Procharger is coming off
 12/31/06, 09:54 AM
#1
Bullitt Member
Thread Starter
Join Date: April 24, 2005
Posts: 306
Likes: 0
Received 0 Likes
on
0 Posts
Procharger is coming off
Well its been almost 2 weeks and I still dont have a running Mustang.
I need my car back this week since I sold the F150 on Friday and I dont see myself overcoming all the install problems before Tuesday.
Im going to leave the intercooler on since its not in the way, and take everything else off for now.
The problem is the piping. Its 3" diameter and I just cant get it to fit. I think part of the problem on the SC discharge side is my GT swaybar. Its a tight fit anyway and I think the larger diameter of the bar is causing interfearence. I cant get the piping to connect without it hitting the crank pully.
There are 45 and 90 degree rubber couplers that join the pipes, my plan is to buy new couplers that are 1 to 2 inchs longer, remove the sway bay, hook up the piping, then reinstall the sway bar.
Im really disappointed, Ive worked on the plumbing for 3 days and dont have a single piece of it installed. Its the holidays and everyone is on vacation or is on reduced hours so I havent been able to get any tech help.
So at this point Im not sure what to do about the install, I have to have my car running by Tuesday and thats not going to happen with the Procharger installed.
This sucks.
 12/31/06, 10:19 AM
#2
Bullitt Member

Join Date: July 29, 2006
Posts: 342
Likes: 0
Received 0 Likes
on
0 Posts
hate to hear about the troubles, backing up and regrouping sometimes helps, do some research on some of the forums before you start again, seems like some others had to cut some piping or something on theirs as well
12/31/06, 10:21 AM
#3
Legacy TMS Member
That really sucks. Sorry to hear about your troubles. I would be interested in how it turns out. I am contemplating the Procharger over other S/C options and I have the GT swaybar also. I hope it all turns out OK for you. Keep us posted.
12/31/06, 01:43 PM
#9
Banned

Join Date: September 19, 2005
Posts: 1,897
Likes: 0
Received 0 Likes
on
0 Posts
Determination!
BurntPony, I know this has been a very rough road for you.. However, never allow defeat to become a viable option..
You will conquer the Procharger install, and reap the 300+RWHP rewards from it..
Defeat is not an option for 4.0 owners.. We bought 4.0's for the challenge, and will remain loyal to our original intent..
Defeat is not an option..
Pull yourself by your bootstraps, and post some pictures of the problems so we can see what your referring to.. Post all areas of concern and hostility, so that we may overcome the adversity which is running rampant in your garage.. LOL!!
Defeat is not a viable option for you BurntPony!!
12/31/06, 02:15 PM
#10
Bullitt Member

Join Date: February 3, 2006
Location: Colorado Springs
Posts: 254
Likes: 0
Received 0 Likes
on
0 Posts
What's going on over here... someone needs ProCharger help? 
Check your PM for my phone number. Call if you still need help. Thanks for pointing this out to me, MSP...
Check your PM for my phone number. Call if you still need help. Thanks for pointing this out to me, MSP...
12/31/06, 02:23 PM
#11
Bullitt Member
Join Date: February 3, 2006
Location: Colorado Springs
Posts: 254
Likes: 0
Received 0 Likes
on
0 Posts
OK, just got done reading your post. I had the same problem. I had to back off and regroup as well.
What you need to do is install all the tubing after the surge valve until right before it curves up into the engine compartment. Leave out the piece that starts the curve upwards.
Next, connect everything from the outlet of the blower down. When you connect each piece, put them on with just enough room for the clamp to attach. My problem was that I was putting each piece of piping on a full inch or two over. It was not allowing enough slack to attach the pieces below.
Once you have the piece from the blower hanging all the way down to the bottom of the car, then you can get underneath and connect the two pieces underneath. Once you get everything connected, then you can go back, loosen each clamp, and pull it a little tighter if you want.
Something else you may or may not have done.... did you know you can take off the little clamps on the shell of the blower and rotate it wherever you need to. That can also help you get the piping where you need it....
12/31/06, 02:52 PM
#12
Bullitt Member
Thread Starter
Join Date: April 24, 2005
Posts: 306
Likes: 0
Received 0 Likes
on
0 Posts
Do you mean split the blower case in two and rotate the front part?
My blower outlet points roughly toward 9:00, if I could rotate it down to 7:00ish that would solve one of the problems.
Im going to put the car on ramps and remove the swaybar next go around, probley next weekend. I have a job interview Tuesday and I have to have the car running. I have removed just the procharger and plate, but left everything else. So its only about 30 minutes to get back where Im at next time.
Flapjack I will call later today.
Thanks all.
12/31/06, 03:23 PM
#13
Bullitt Member
Join Date: July 29, 2006
Posts: 342
Likes: 0
Received 0 Likes
on
0 Posts
flapjack to the rescue, help the poor guy out flap, he needs it, almost ready to throw in the towel
@burnt pony, some picts of the problems would help, also the stock tune you have should at least allow you to drive, maybe not peak numbers
@burnt pony, some picts of the problems would help, also the stock tune you have should at least allow you to drive, maybe not peak numbers
12/31/06, 04:19 PM
#14
Mach 1 Member
Join Date: October 14, 2006
Location: Tucson, Arizona
Posts: 716
Likes: 0
Received 0 Likes
on
0 Posts
Although I have zero experience with ProCharger on Mustangs, I've owned a couple of them on my IROC-Z....
Do you mean split the blower case in two and rotate the front part? My blower outlet points roughly toward 9:00, if I could rotate it down to 7:00ish that would solve one of the problems.
Yes!! The air inlet half can be rotated in relation to the housing. Just loosen the perimeter bolts (do not remove) and the halves will rotate....
ProCharger really needs to include this "tidbid" in their instructions. Personally, I didn't know this either on my first install and my air discharge pointed directly at my inner fenderwell. Not knowing I could clock it, I took to my inner fender with a big hammer......
12/31/06, 08:15 PM
#15
Bullitt Member
Thread Starter
Join Date: April 24, 2005
Posts: 306
Likes: 0
Received 0 Likes
on
0 Posts
I am now offiically the biggest poser on the board. Bone stock 05 Mustang deluxe with a GT bodykit and a big ole honk-n intercooler sticking out of the lower grill.
12/31/06, 10:44 PM
#16
Bullitt Member
Thread Starter
Join Date: April 24, 2005
Posts: 306
Likes: 0
Received 0 Likes
on
0 Posts
Willie, are you talking about the allen head bolts on the backside of the air inlet? I have tabs similar to the kind under valve cover bolts so I dont see how to reclock the air inlet unless I remove the bolts. It looks like the tabs will have to stay in thier relative position.
Heres a pic of the backside. Its hard to see but there are tabs under the allen head bolts.
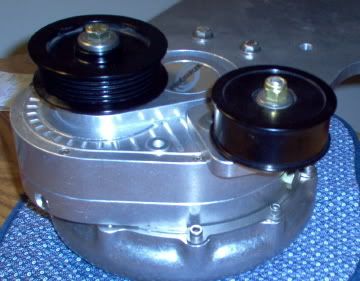
Heres a pic of the backside. Its hard to see but there are tabs under the allen head bolts.
1/1/07, 07:13 AM
#17
Mach 1 Member
Join Date: October 14, 2006
Location: Tucson, Arizona
Posts: 716
Likes: 0
Received 0 Likes
on
0 Posts
Your head unit is the same as my old F1, except you have a tensioner bolted to yours. I'm assuming it's a P1SC or D1SC....
Yes, the Allen head bolts. You may need to remove and relocate one or two including the tabs, depending on where the elongated "egg shape" ends up, blocking the threaded holes. You can see in your pic below one of the holes I'm talking about. Once the bolts are loosened, the back end (shown in the yellow oval) will rotate freely.
If you need more help, PM me and I'll send you my phone number.
Willie
1/1/07, 09:59 AM
#19
Mach 1 Member
Join Date: October 14, 2006
Location: Tucson, Arizona
Posts: 716
Likes: 0
Received 0 Likes
on
0 Posts
That is correct. Loosening the bolts allows the "air" half to rotate. Once you loosen the bolts, you'll see how easy this is to do. The internal gearing / fluid are completely contained on the other half, the "business" end if you will.
Willie
Willie
1/10/07, 10:10 PM
#20
Bullitt Member
Join Date: February 3, 2006
Location: Colorado Springs
Posts: 254
Likes: 0
Received 0 Likes
on
0 Posts
Any update, BP? I never got a call from you... so I assume you're making some progress.
Willie is right. ATI really should include that information in their install guide. I ended up calling only to find out what we're telling you now. I also mentioned they needed to include this information. Fortunately, I know someone there who is in a position to get some changes made. I've been working with him to clarify the PCV valve instructions (which I think may be backwards). I'll bring this up while I'm at it.
Willie is right. ATI really should include that information in their install guide. I ended up calling only to find out what we're telling you now. I also mentioned they needed to include this information. Fortunately, I know someone there who is in a position to get some changes made. I've been working with him to clarify the PCV valve instructions (which I think may be backwards). I'll bring this up while I'm at it.