Raptor shift light - PMP billet mount install (w/pics)
 7/16/07, 11:35 AM
#1
Thread Starter

Raptor shift light - PMP billet mount install (w/pics)
I completed the installation of the Raptor Performance shift light and the PMP (Piedmont Modular Performance) custom polished billet mount within the 12V power plug in the center dash.
Both the Raptor and PMP billet mount are of excellent build quality. Adjustability and ease of installation of both of these made this install a snap. I can personally recommend these two accessories to anyone thinking of getting a shift light and who wants it mounted in a unique place. The Raptor light can be purchased directly from them or PMP, but the billet mount is only available from PMP.
About the only difficult part of the install was removing the OEM 12V receptacle from the center dash. The 2 black plastic tabs securing it in place literally had to be broken off to release the receptacle from the dash. Since I wasn�€™t planning on re-using it, breaking off the tabs worked for me.
My installation was a bit unique where as I was also installing an Alpine DVD head unit and the Speed of Sound switch plate. However, I will make notes on where to splice into if installing the shift light only. If you wish to wire the shift light directly to the PCM, consult Raptor's website for detailed information on plug and pin locations.
Remove the Negative battery cable.
Follow the steps in the following link to gain access to the lower center console (all the way to the A-Pillar trim removal).
Top console and center dash removal
EDIT: 03-14-08
SEE POST 61 ON THE MGW SHIFTER INSTALL FOR SPECIAL INSTRUCTIONS FOR THOSE WITH THE AMBIENT LIGHTING OPTION.
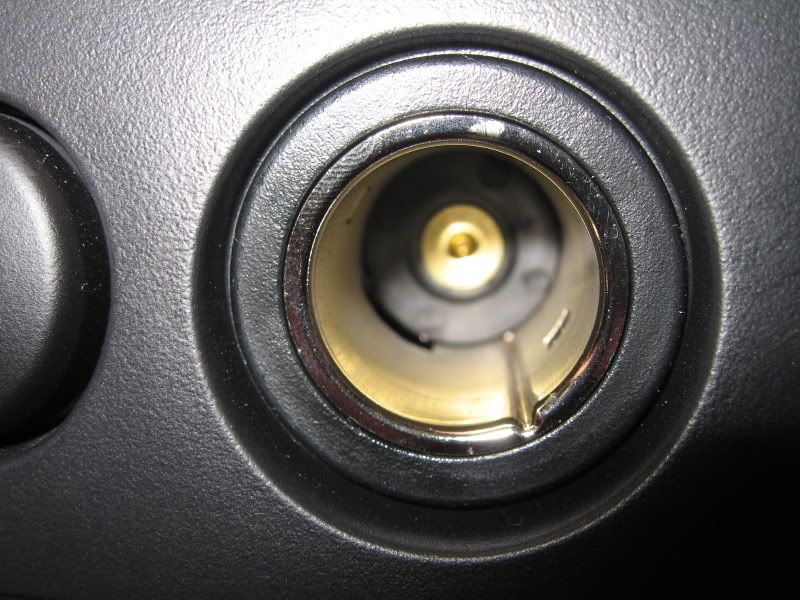
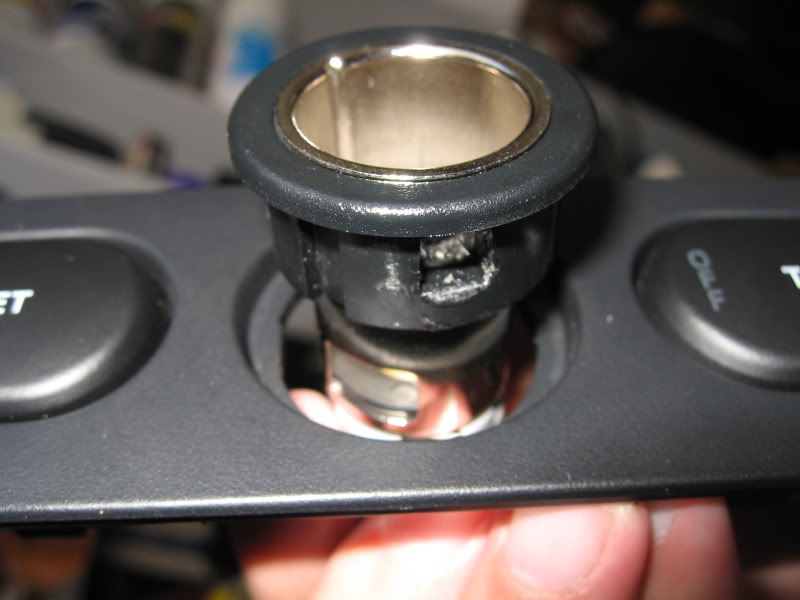
OEM 12V receptacle
Backside of receptacle
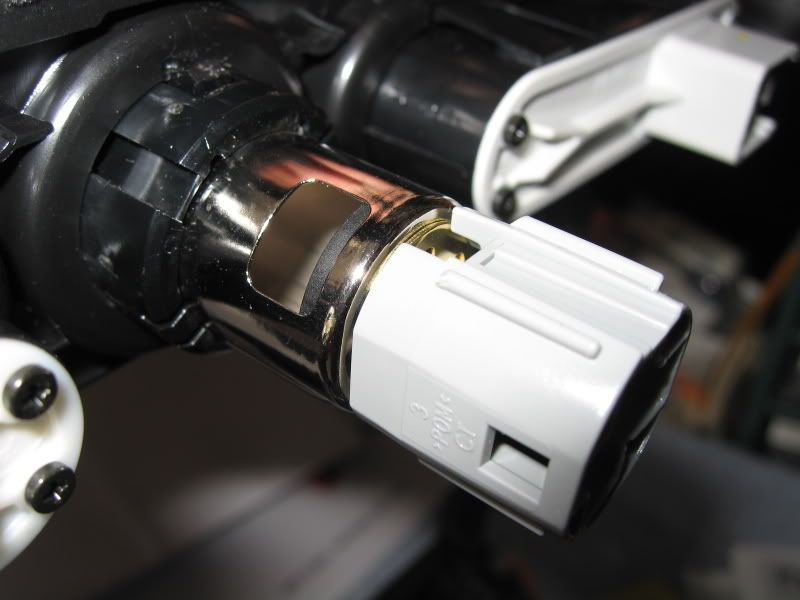
Note: The plastic tab that had to be broken off using a flat blade screwdriver. There are 2 tabs total, one on top, and one on bottom.
The Raptor has only 3 wires; pick-up (green), positive (red) and negative (black). It comes bundled in a nice conduit and can be kept that way if you wish to run all 3 wires to the PCM. For me, I had to cut open the conduit to run the +/- wires to my switch and the pick-up wire to the coil pack. You can use a straight razor blade, but be careful not to cut into the any of the wires.
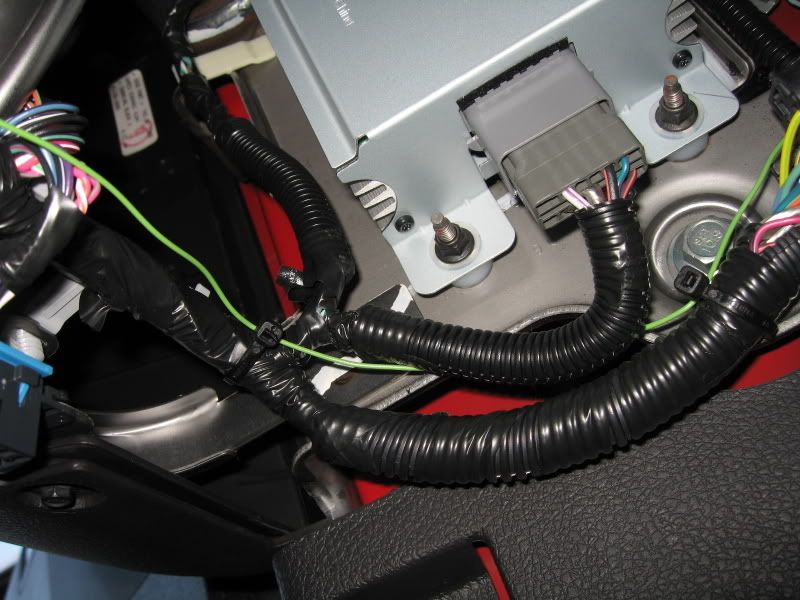
If you wish to only run the pick-up wire through the firewall, you'll need to locate a suitable switched 12V source and ground within the area of the center dash. A good source would be the large plug that plugs into the rear of the Shaker head unit. A simple wire splice or t-tap will do just fine.
Note: The power source for the 12V power plug is constant power, so it will not be a suitable source to power the light (however the ground will work fine).
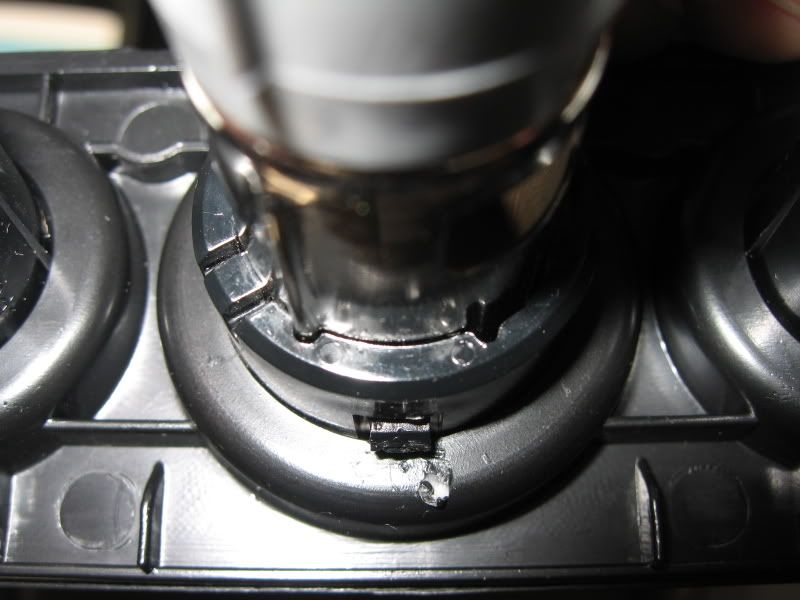
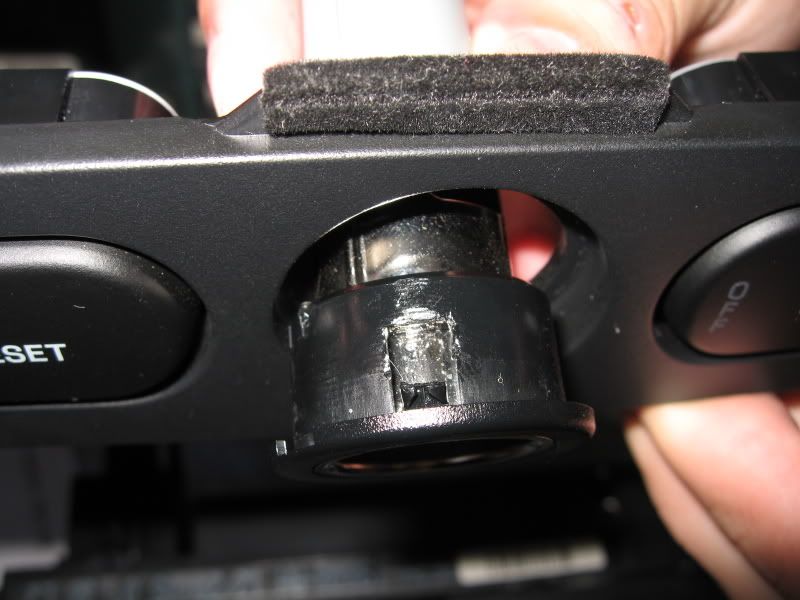
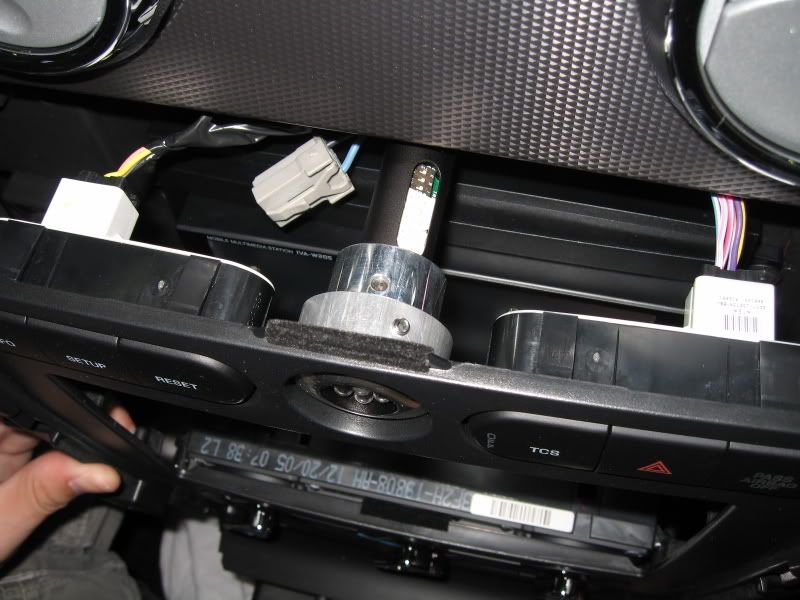
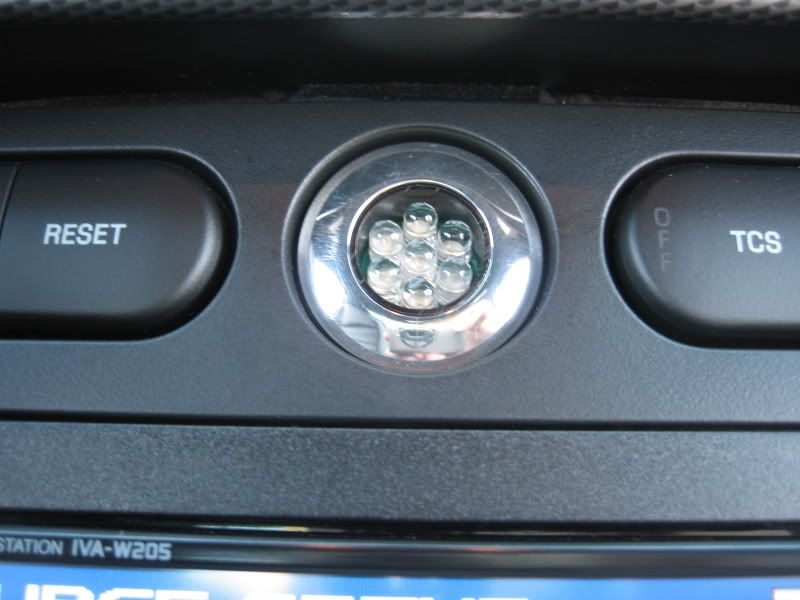
Raptor being positioned into the PMP mount.
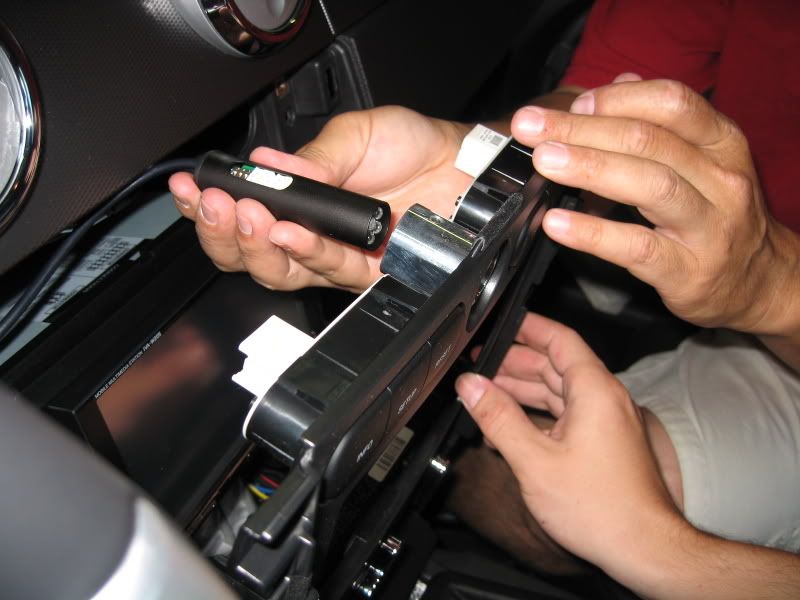
There are 2 set screws on the mount that secure the Raptor to the bezel mount and an outer ring with one set screw that secures the bezel to the dash.
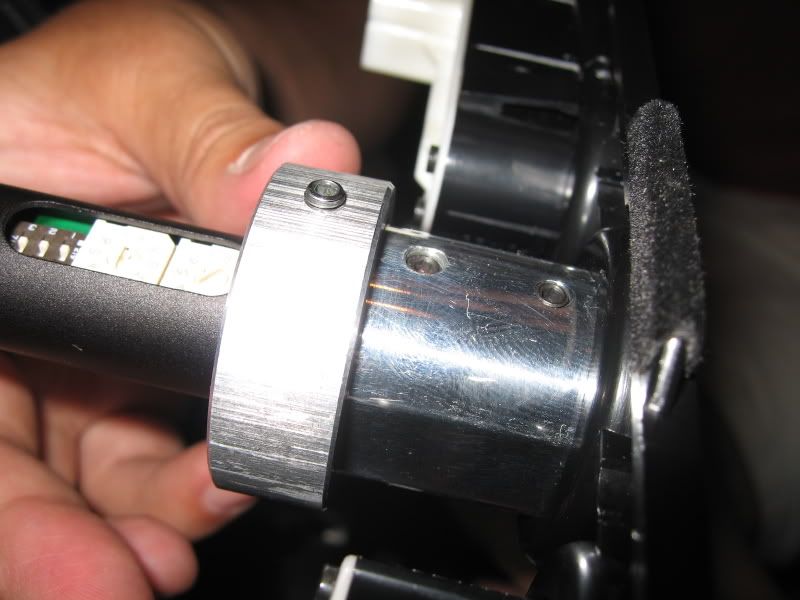
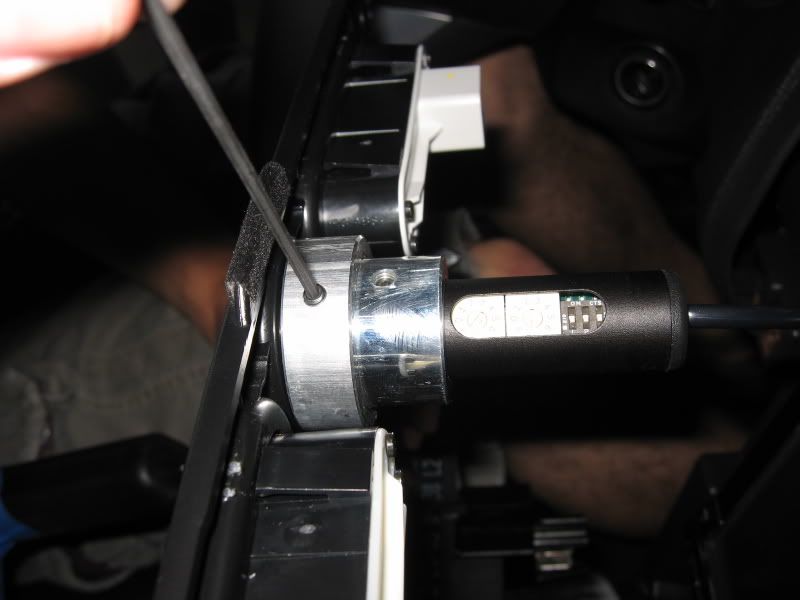
If you haven't already done so, now is a good time to set what RPM you want the light to come on. There are 2 dials and a set of 3 dip switches that are accessible from the opening in the case. The outer dial (away from the dip switches) sets you RPM x1000, the center dial (closest to the dip switches) sets the RPM x100, both are clearly marked with a triangle indicator pointer with a positive click when turned.
For our Mustangs, set all 3 of the dip switches down (1 cylinder mode).
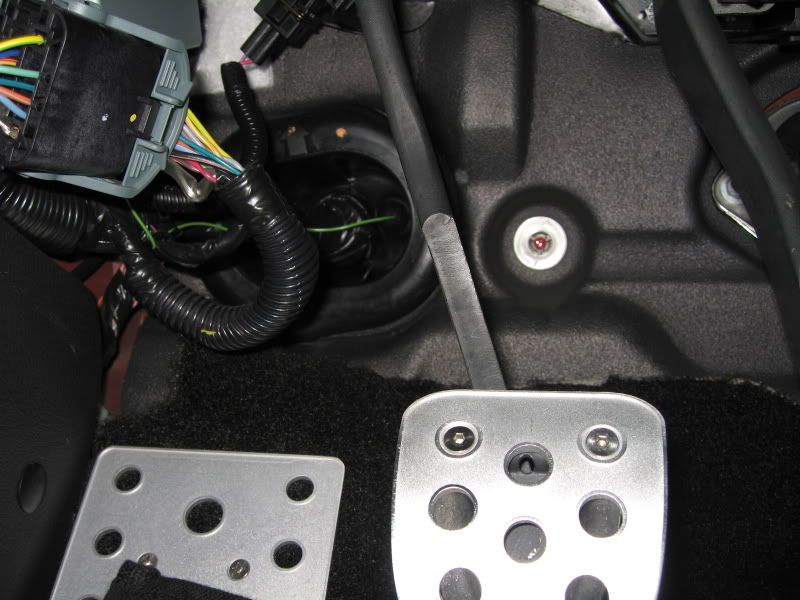
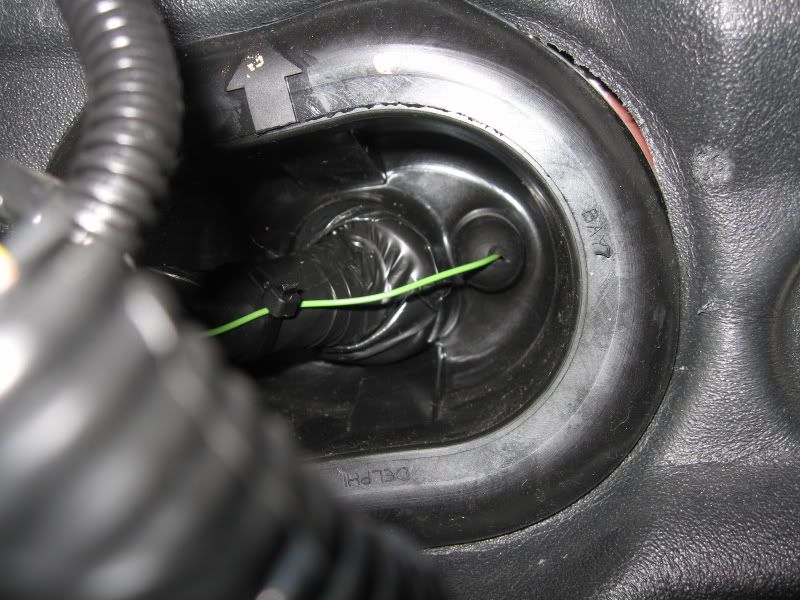
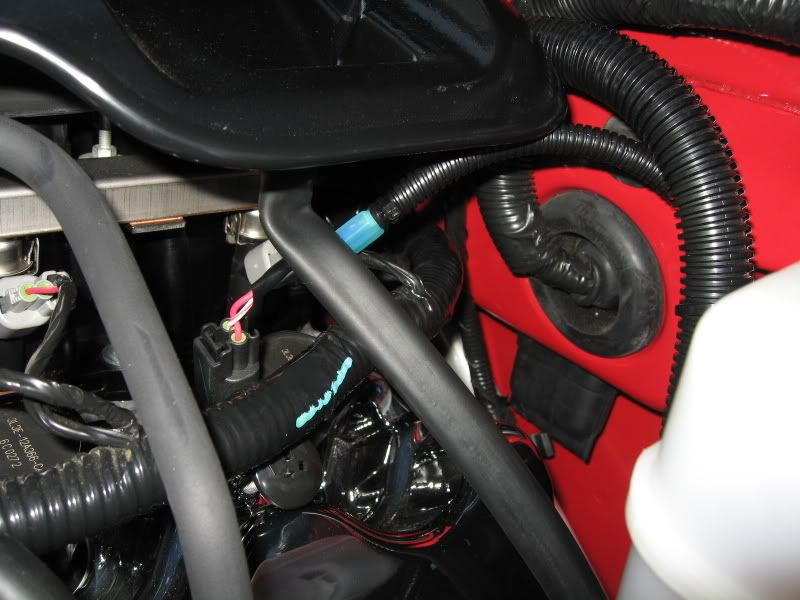
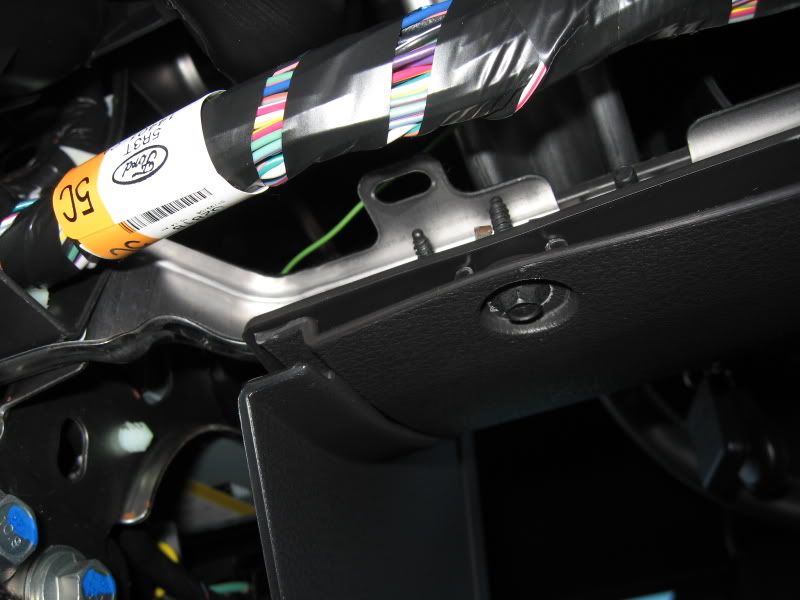
To route the green pick-up wire, free up enough length and feed it through the unused nipple part of the firewall plug located just above and out of the clutch pedal. I first penetrated the plug using a awl, then put the end of the wire across a small flat blade screwdriver and pushed it through. Don't worry about the seal being too large, it'll close up around the wire.
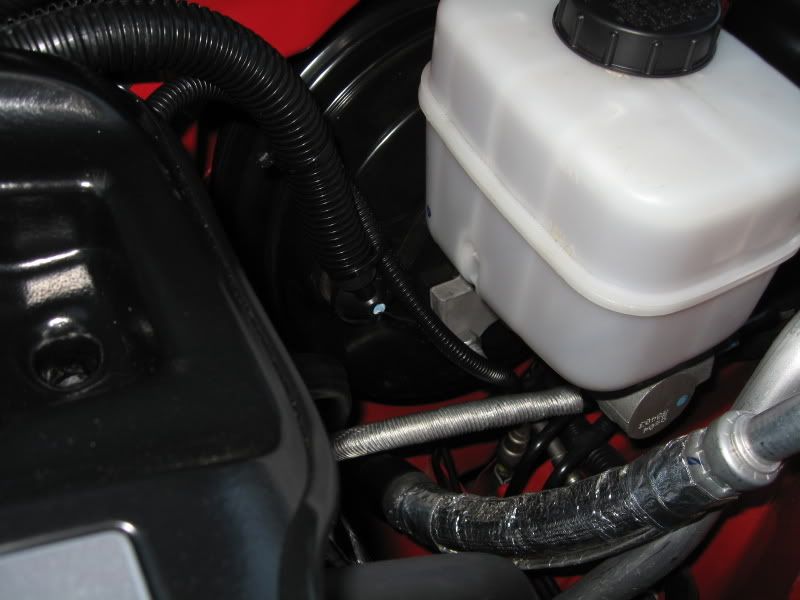
Now the tricky part, the exit point is behind the wheel well liner, under the master cylinder/brake booster. There's an opening in the body panel where you can access the wire. What I did was feed a good amount of wire through the firewall plug until it became visible from the body opening. With the aid of some mechanical fingers (retrieval tool), I was able to pull the wire up.
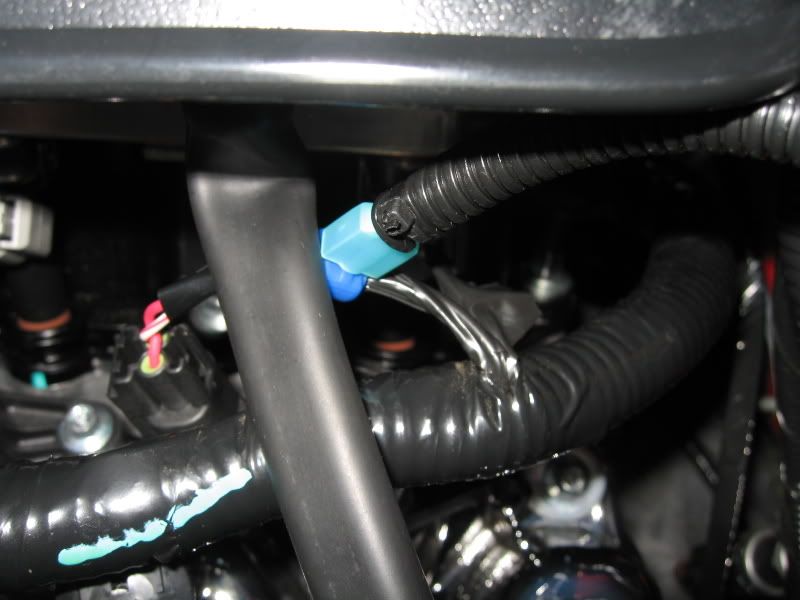
I ran some convoluted tubing over the green pick-up wire and zip tied it to the larger tubing up to the #8 cylinder coil pack (drivers side, closest to firewall).
Using a t-tap, I spliced into the WHITE W/RED STRIPE wire of the coil pack.
Back inside the car, carefully route and zip tie the pick-up wire out of the way.
If you wish to test out the shift light before buttoning up the console assembly, reconnect the Negative battery post, then set your shift light to a low RPM like 3000 (unless you feel like redlining it in the garage ), start the engine, the Raptor should go through a light test sequence, then rev up the engine to test.
If everything is fine, reset to the desired RPM and re-install all the dash and trim pieces in reverse order.
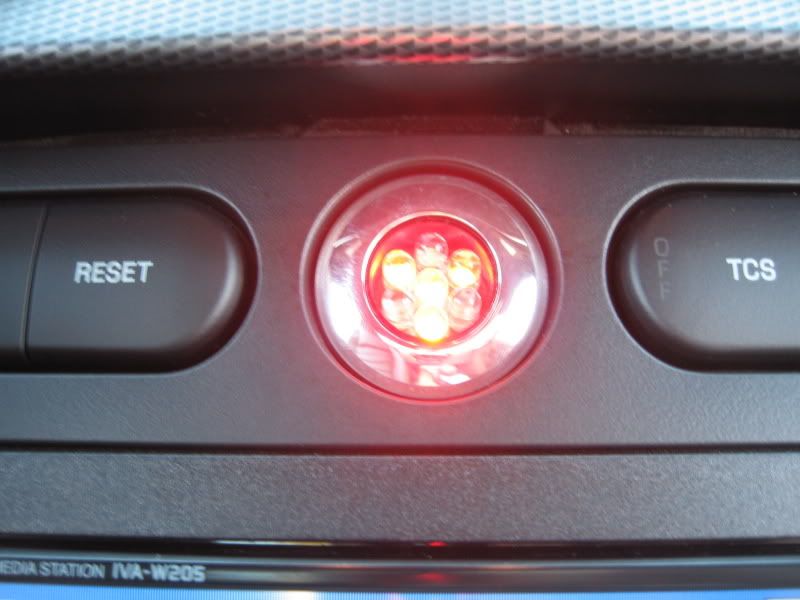
Installation complete!
Both the Raptor and PMP billet mount are of excellent build quality. Adjustability and ease of installation of both of these made this install a snap. I can personally recommend these two accessories to anyone thinking of getting a shift light and who wants it mounted in a unique place. The Raptor light can be purchased directly from them or PMP, but the billet mount is only available from PMP.
About the only difficult part of the install was removing the OEM 12V receptacle from the center dash. The 2 black plastic tabs securing it in place literally had to be broken off to release the receptacle from the dash. Since I wasn�€™t planning on re-using it, breaking off the tabs worked for me.
My installation was a bit unique where as I was also installing an Alpine DVD head unit and the Speed of Sound switch plate. However, I will make notes on where to splice into if installing the shift light only. If you wish to wire the shift light directly to the PCM, consult Raptor's website for detailed information on plug and pin locations.
Remove the Negative battery cable.
Follow the steps in the following link to gain access to the lower center console (all the way to the A-Pillar trim removal).
Top console and center dash removal
EDIT: 03-14-08
SEE POST 61 ON THE MGW SHIFTER INSTALL FOR SPECIAL INSTRUCTIONS FOR THOSE WITH THE AMBIENT LIGHTING OPTION.
OEM 12V receptacle
Backside of receptacle
Note: The plastic tab that had to be broken off using a flat blade screwdriver. There are 2 tabs total, one on top, and one on bottom.
The Raptor has only 3 wires; pick-up (green), positive (red) and negative (black). It comes bundled in a nice conduit and can be kept that way if you wish to run all 3 wires to the PCM. For me, I had to cut open the conduit to run the +/- wires to my switch and the pick-up wire to the coil pack. You can use a straight razor blade, but be careful not to cut into the any of the wires.
If you wish to only run the pick-up wire through the firewall, you'll need to locate a suitable switched 12V source and ground within the area of the center dash. A good source would be the large plug that plugs into the rear of the Shaker head unit. A simple wire splice or t-tap will do just fine.
Note: The power source for the 12V power plug is constant power, so it will not be a suitable source to power the light (however the ground will work fine).
Raptor being positioned into the PMP mount.
There are 2 set screws on the mount that secure the Raptor to the bezel mount and an outer ring with one set screw that secures the bezel to the dash.
If you haven't already done so, now is a good time to set what RPM you want the light to come on. There are 2 dials and a set of 3 dip switches that are accessible from the opening in the case. The outer dial (away from the dip switches) sets you RPM x1000, the center dial (closest to the dip switches) sets the RPM x100, both are clearly marked with a triangle indicator pointer with a positive click when turned.
For our Mustangs, set all 3 of the dip switches down (1 cylinder mode).
To route the green pick-up wire, free up enough length and feed it through the unused nipple part of the firewall plug located just above and out of the clutch pedal. I first penetrated the plug using a awl, then put the end of the wire across a small flat blade screwdriver and pushed it through. Don't worry about the seal being too large, it'll close up around the wire.
Now the tricky part, the exit point is behind the wheel well liner, under the master cylinder/brake booster. There's an opening in the body panel where you can access the wire. What I did was feed a good amount of wire through the firewall plug until it became visible from the body opening. With the aid of some mechanical fingers (retrieval tool), I was able to pull the wire up.
I ran some convoluted tubing over the green pick-up wire and zip tied it to the larger tubing up to the #8 cylinder coil pack (drivers side, closest to firewall).
Using a t-tap, I spliced into the WHITE W/RED STRIPE wire of the coil pack.
Back inside the car, carefully route and zip tie the pick-up wire out of the way.
If you wish to test out the shift light before buttoning up the console assembly, reconnect the Negative battery post, then set your shift light to a low RPM like 3000 (unless you feel like redlining it in the garage
), start the engine, the Raptor should go through a light test sequence, then rev up the engine to test.If everything is fine, reset to the desired RPM and re-install all the dash and trim pieces in reverse order.
Installation complete!
Last edited by TacoBill; 3/14/08 at 02:50 PM. Reason: Console removal instructions added for those with Ambient Lighting option.
 7/16/07, 04:45 PM
#4
Legacy TMS Member
Join Date: January 9, 2005
Location: New Carlisle, Ohio (20 miles north of Dayton)
Posts: 6,982
Likes: 0
Received 6 Likes
on
6 Posts
Hey Bill,
Glad your back from vacation to give us some more of your excellent installs with pics. We missed you this pass 10 days or so. I also thought about this mod but then I remembered I have an auto and don't need to be prompted to shift. But... I do like the flashy lights.
  Can it be hooked up to an auto trans.
  P.S. WTF???? is that neat screen below the shift light?????? I definitely missed that install.
Scott
Glad your back from vacation to give us some more of your excellent installs with pics. We missed you this pass 10 days or so. I also thought about this mod but then I remembered I have an auto and don't need to be prompted to shift.
But... I do like the flashy lights. Can it be hooked up to an auto trans. P.S. WTF???? is that neat screen below the shift light?????? I definitely missed that install. Scott
7/16/07, 06:52 PM
#6
Legacy TMS Member
Not to answer for Bill, but YES the Raptors are bright, bright, bright. I usually leave the red cap on mine, even in the day time. Its funny because with the blower and 4.10s, mine is on so often that its given me a sun tan. 
 7/16/07, 10:16 PM
#8
Thread Starter
Thanks guys! 
Like Tom mentioned, the Raptor light is pretty bright. I haven't switched it on during the night yet, but I bet it'll be blinding!
One of the reasons why I installed the Raptor to a switch, so I can essentially black it out at will.
Sure the Raptor can be hooked up to an Auto! Lots of folks shift their Auto sticks manually. Even if you left it on 'D', it'd still be neat seeing it flash as the tranny shifts up.
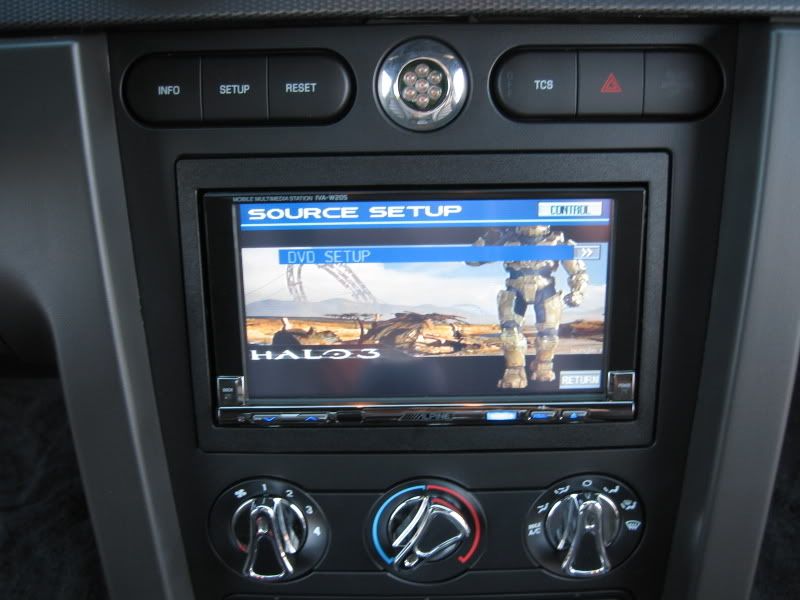
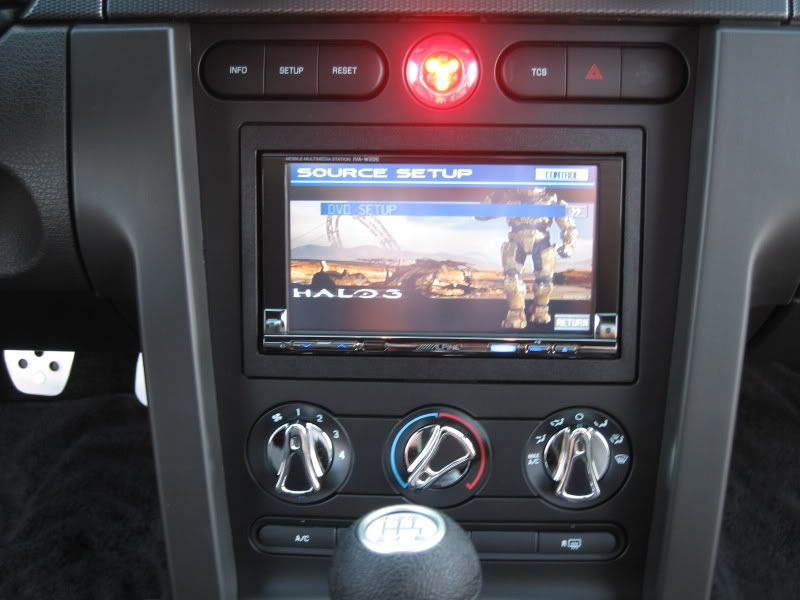
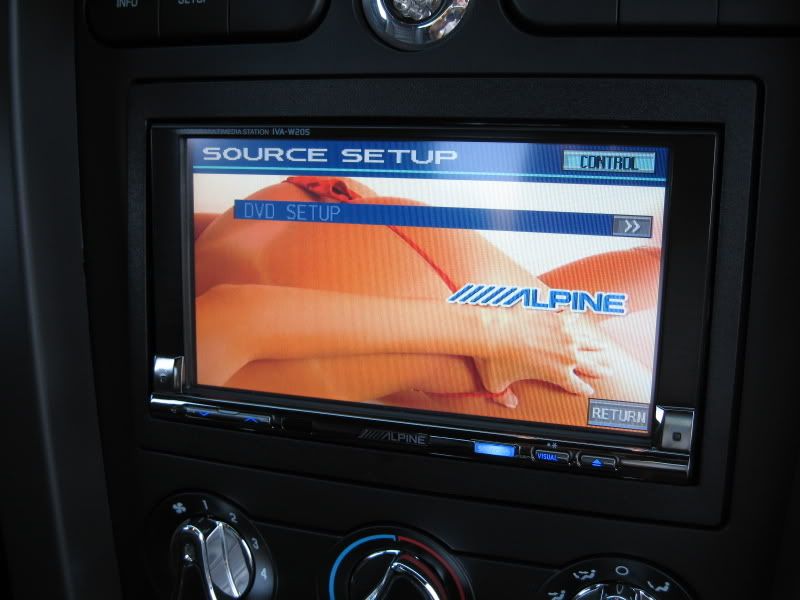
Oh, are you talking about my new Alpine DVD/NAV head unit?
Yeah, I sneaked this one in during the install, along with a rear camera and switch panel.
Here's another peak at the Alpine (can I post this? )
)
Like Tom mentioned, the Raptor light is pretty bright. I haven't switched it on during the night yet, but I bet it'll be blinding!
One of the reasons why I installed the Raptor to a switch, so I can essentially black it out at will.
Oh, are you talking about my new Alpine DVD/NAV head unit?
Yeah, I sneaked this one in during the install, along with a rear camera and switch panel.
Here's another peak at the Alpine (can I post this?
)
7/17/07, 05:40 AM
#9
Legacy TMS Member
I bet she got those tan lines from her Raptor light..... like most females, she's be driving with her head up her butt again.
I'm sorry, I really did try but I just couldn't resist.....
I'm sorry, I really did try but I just couldn't resist.....
 7/17/07, 07:11 AM
#12
Thread Starter
Tell him TacoBill sent ya!
 7/17/07, 11:24 AM
#14
Bullitt Member
Join Date: November 16, 2006
Location: Knoxville, TN
Posts: 434
Likes: 0
Received 0 Likes
on
0 Posts
Glad to see that I am not the only one who has the Raptor & bezel installed. Like Bill said, a breeze to install and it really does help when you are at the track.
7/17/07, 02:09 PM
#15
Hey Bill,
Glad your back from vacation to give us some more of your excellent installs with pics. We missed you this pass 10 days or so. I also thought about this mod but then I remembered I have an auto and don't need to be prompted to shift. But... I do like the flashy lights. Can it be hooked up to an auto trans. P.S. WTF???? is that neat screen below the shift light?????? I definitely missed that install.
Scott
Glad your back from vacation to give us some more of your excellent installs with pics. We missed you this pass 10 days or so. I also thought about this mod but then I remembered I have an auto and don't need to be prompted to shift.
But... I do like the flashy lights. Can it be hooked up to an auto trans. P.S. WTF???? is that neat screen below the shift light?????? I definitely missed that install. Scott
One of the biggest sources of inconsistency for me is my starting line launch RPM. I currently do it by "feel", becuase I can't watch the Christmas tree and tach at the same time. But that's far from consistent. Let's say I want to launch at 2000 rpm. A shift light would be great for telling me when I was at 2000... but it wouldn't stop me from going too high, like 2300 or 2400 for example. Ideally, a two stage light would be perfect... on at 2000, off at 2100. I could keep my powerbrake right where I wanted it.
I just found out from Kevin @ PMP a couple weeks ago, that Raptor will be offering a two stage shift light in the near future to. Kevin said, "I don't want to divulge any secrets but Raptor does have something in the works. Once they become available we will let you all know. It's nice being 10 minutes from them."
I'm definitely waiting for this one to come out...
 I just hope it's a lot cheaper than the Level 2 DPSS from AutoMeter, http://www.autometer.com/dpss/index.html, which goes for about $170.
7/17/07, 05:23 PM
I just hope it's a lot cheaper than the Level 2 DPSS from AutoMeter, http://www.autometer.com/dpss/index.html, which goes for about $170.
7/17/07, 05:23 PM
#16
Legacy TMS Member
Join Date: January 9, 2005
Location: New Carlisle, Ohio (20 miles north of Dayton)
Posts: 6,982
Likes: 0
Received 6 Likes
on
6 Posts
Scott... Here's food for thought for the auto trans guys who drag race a lot (like me, for example).
One of the biggest sources of inconsistency for me is my starting line launch RPM. I currently do it by "feel", becuase I can't watch the Christmas tree and tach at the same time. But that's far from consistent. Let's say I want to launch at 2000 rpm. A shift light would be great for telling me when I was at 2000... but it wouldn't stop me from going too high, like 2300 or 2400 for example. Ideally, a two stage light would be perfect... on at 2000, off at 2100. I could keep my powerbrake right where I wanted it.
I just found out from Kevin @ PMP a couple weeks ago, that Raptor will be offering a two stage shift light in the near future to. Kevin said, "I don't want to divulge any secrets but Raptor does have something in the works. Once they become available we will let you all know. It's nice being 10 minutes from them."
I'm definitely waiting for this one to come out... I just hope it's a lot cheaper than the Level 2 DPSS from AutoMeter, http://www.autometer.com/dpss/index.html, which goes for about $170.
One of the biggest sources of inconsistency for me is my starting line launch RPM. I currently do it by "feel", becuase I can't watch the Christmas tree and tach at the same time. But that's far from consistent. Let's say I want to launch at 2000 rpm. A shift light would be great for telling me when I was at 2000... but it wouldn't stop me from going too high, like 2300 or 2400 for example. Ideally, a two stage light would be perfect... on at 2000, off at 2100. I could keep my powerbrake right where I wanted it.
I just found out from Kevin @ PMP a couple weeks ago, that Raptor will be offering a two stage shift light in the near future to. Kevin said, "I don't want to divulge any secrets but Raptor does have something in the works. Once they become available we will let you all know. It's nice being 10 minutes from them."
I'm definitely waiting for this one to come out...
I just hope it's a lot cheaper than the Level 2 DPSS from AutoMeter, http://www.autometer.com/dpss/index.html, which goes for about $170.You know when I posted if the Raptor could be used with the auto trans I was kinda teasing... but after your post and thinking about it... it just might be a great mod...especially for a weekend worrier like you!!!
Scott
7/17/07, 05:39 PM
#17

 Maybe that's what I wanted to say.
 7/18/07, 03:41 PM
#19
