
nexus water temp gauge problem
 5/30/06, 09:15 PM
#1
Legacy TMS Member
Thread Starter
Join Date: November 10, 2004
Posts: 2,483
Likes: 0
Received 0 Likes
on
0 Posts
nexus water temp gauge problem
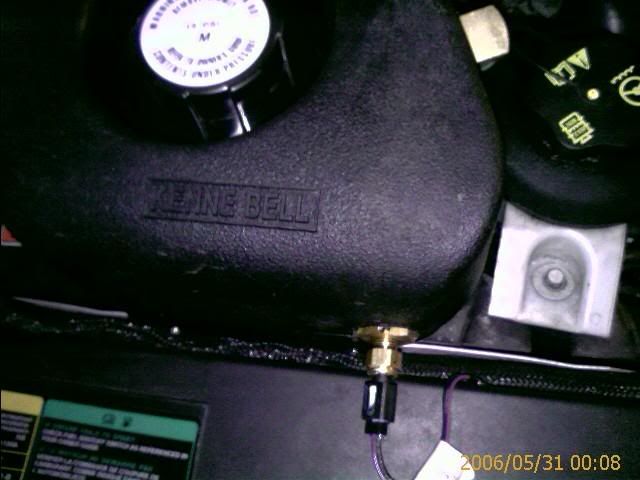
Im looking for help installnig my Nexus water temp gauge. I want to place it in the Kenne Bell Intercooler Reservoir so i can monitor the intercoolers coolant temp.
there were 2 holes that looked preset up for the sender. one was high and one was low. i chose the low one right after the return feed of hot coolant from the intercooler. the hole was threaded already and had a smaller indentation in the middle. i figured it was for the sensor. I used a drill and drilled out the smaller indentation, installed the sneder and sensor and tested it for leaks. it all worked as normal.
i rehooked up the reservoir to the car and added the coolant back in. the wire harness was nowhere near long enough so i cut it and extended the wires to the proper location to hook up the harness. i used those blue clamp connectors (i have no idea what they are called) where the 2 wires go inside and you use a pair of plyers to squeeze the metal clip down and splice the wires together. i made sure that the wires were hooked up properly and proceeded to hook up the wire harness to the sensor module in the car.
The water temp gauge comes on but never reads any temperature changes. the boost gauge works fine. what could be the issue? im open to suggestions. Thanks in advance
 5/30/06, 10:03 PM
#2
Cobra Member
Join Date: May 17, 2004
Posts: 1,476
Likes: 0
Received 0 Likes
on
0 Posts
I'm not a 100% sure but if I remember right the instructions for the Nexus gauges make it a point not to cut/splice those wires...That may be your problem. A solder splice may also solve the problem...
5/30/06, 10:13 PM
#4
Cobra Member
Join Date: May 17, 2004
Posts: 1,476
Likes: 0
Received 0 Likes
on
0 Posts
Yeah, I haven't ran anything that far out yet...I need to get myself a water temp. gauge. I hope a little solder fixes you up.
Did you tap into the passenger side fuse box for a switched 12v source? If so how?
Did you tap into the passenger side fuse box for a switched 12v source? If so how?
5/30/06, 10:14 PM
#5
Legacy TMS Member
Thread Starter
Join Date: November 10, 2004
Posts: 2,483
Likes: 0
Received 0 Likes
on
0 Posts


I made sure the purple wire met the purple and the black met the black wires as well. i know it was dumb to use red to extend both wires but i had to do with what i had at the moment. i still plan on putting it all in wire loom when it works and im done and tying it all of to existing wire looms.
5/30/06, 10:23 PM
#7
Cobra Member
Join Date: May 17, 2004
Posts: 1,476
Likes: 0
Received 0 Likes
on
0 Posts
I bought a gaping tool from Vortech. You have to call them to buy it as it's not on their website. I gaped my plug's down to .035's.
Did you use the 12v switched open fuse port in the passenger side panel? If so, how did you do it? I am looking for a better way to do mine...
Pick up some heatshrink and solder and see if that cures your problem...
Did you use the 12v switched open fuse port in the passenger side panel? If so, how did you do it? I am looking for a better way to do mine...
Pick up some heatshrink and solder and see if that cures your problem...
5/31/06, 07:34 AM
#8
Member

Join Date: April 15, 2006
Posts: 12
Likes: 0
Received 0 Likes
on
0 Posts
Here's the plug gapping tool. Ordered online and it arrived in a couple days. Works perfect.
http://www.vortechsuperchargers.com/..._Code=TL0286-1
http://www.vortechsuperchargers.com/..._Code=TL0286-1
5/31/06, 09:56 AM
#9
Originally Posted by Vegasjay
Did you use the 12v switched open fuse port in the passenger side panel? If so, how did you do it? I am looking for a better way to do mine...
 5/31/06, 07:03 PM
#10
Legacy TMS Member
Thread Starter
Join Date: November 10, 2004
Posts: 2,483
Likes: 0
Received 0 Likes
on
0 Posts
ok i figured it out myself. there was no issue. the intercooler antifreeze never got over 105F. so it never really registered. i figured it out today after the car was parked out in the sun with hood up. i started the car and it was at 120F. upon driving the car or about 2 minutes it immediately went down to unreadable again. pretty good intercooler/heat exchanger imo
5/31/06, 07:36 PM
#11
Cobra Member
Join Date: May 17, 2004
Posts: 1,476
Likes: 0
Received 0 Likes
on
0 Posts
Originally Posted by don_w
When I installed mine, I used the fuse panel in the passenger side kick panel, and here's what I found. There are three open slots where you can use an "Add-a-Circuit" thingy. In the pic below, slots "A" and "C" are switched, and slot "B" is constant 12V power. I used the three slots to handle the gauges, line locks and electric cutouts.
5/31/06, 07:37 PM
#12
Cobra Member
Join Date: May 17, 2004
Posts: 1,476
Likes: 0
Received 0 Likes
on
0 Posts
Originally Posted by 94tbird
ok i figured it out myself. there was no issue. the intercooler antifreeze never got over 105F. so it never really registered. i figured it out today after the car was parked out in the sun with hood up. i started the car and it was at 120F. upon driving the car or about 2 minutes it immediately went down to unreadable again. pretty good intercooler/heat exchanger imo
5/31/06, 08:20 PM
#13
Originally Posted by Vegasjay
Thanks Don, I have never used an "add a circuit"... I assume it plugs into the fuse port and allows one to plug a connector in thus tapping into the power supply safely...Can you pick one up at radioshack or are they available at Autozone/Checker's etc?


Thread
Thread Starter
Forum
Replies
Last Post
Rando
2010-2014 Mustang
8
8/25/21 11:12 AM