When you click on links to various merchants on this site and make a purchase, this can result in this site earning a commission. Affiliate programs and affiliations include, but are not limited to, the eBay Partner Network.
I completed my Automatic Shifter Build experiment and it works perfectly.
Rather than going with the seemingly only other option of the TCI Rachet Shifter, I fabricated my own Ball Shifter because I don't like the look of the big "T" style Shifters.
I working used a White Madness Ball Shifter for a 2010-2014. I bored it out to fit the 2005-2009 Shifter Post.
It looks more like a Manual Ball Shifter, but works as the normal Automatic Shifter.
I connected the Overdrive Button separately to
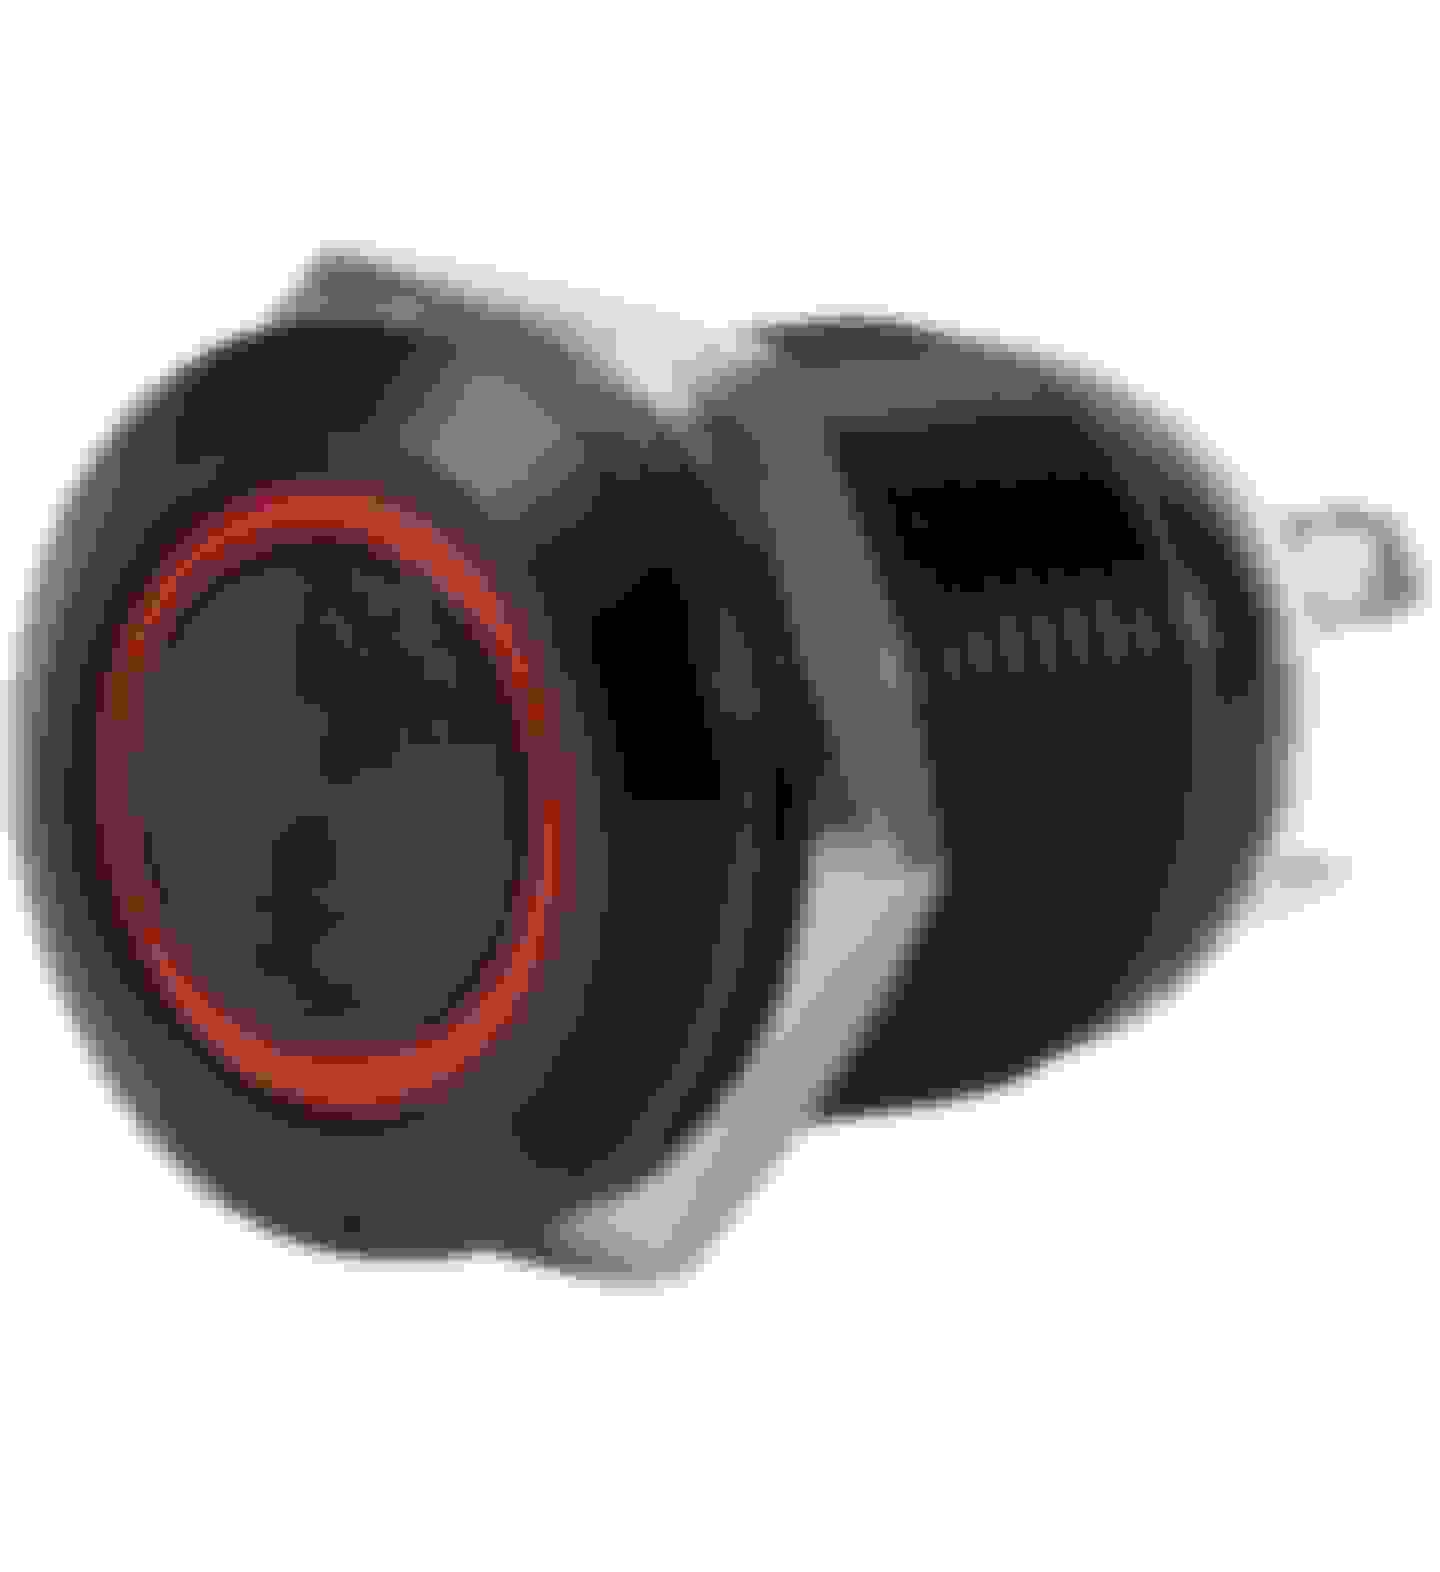
12mm DC Power Button 5V LED, Waterproof Latching Push Button Switch On/Off 23V (Red 2V).
I drilled a hole and dropped it into the Button Switch in console to the right of the shifter.
I set it for the LED to be on when overdrive is off.
Hey there, new member here. I've been looking for ways to come up with this same solution for my 2006 automatic. Do you have any pics of the install process? The shifter shaft is such a large plastic square - I didn't realize there was enough room in the White Madness Garage **** to bore it out for that. Thanks!
My shifter doesn't have the plastic block at the bottom of the shifter, but the shifter **** will still fit on the upper part of the shifter. It will just sit an inch higher.
When you say the block, do you mean the cover with the PRND321? I figured it would work best with that removed. I did get a trim ring and boot from a 5-speed car, so I figured what's the point of leaving that PRNDL cover on. I was more concerned about the thickness of the plastic stump, once the T-handle/cover is removed... I wasn't sure (from pictures) that the WM shifter had enough aluminum to be able to bore it out enough. I ordered it, so I'll see it first-hand. I stumbled onto this idea because I picked up a really clean console from a 2009 Bullitt, mainly because it still had all the factory ambient lighting components... they left the boot and **** on it and I thought, wait a minute - this could almost work. Finally searched "home made shifter handle for 05-09 Mustang" and stumbled onto your post.
SUPERCHARGED RED ROCKET ------------------Master-Moderator
Joined: May 11, 2006
Posts: 10,668
Likes: 2,532
From: Carnegie, PA
Originally Posted by aborick
Hey all.
I completed my Automatic Shifter Build experiment and it works perfectly.
Rather than going with the seemingly only other option of the TCI Rachet Shifter, I fabricated my own Ball Shifter because I don't like the look of the big "T" style Shifters.
I working used a White Madness Ball Shifter for a 2010-2014. I bored it out to fit the 2005-2009 Shifter Post.
It looks more like a Manual Ball Shifter, but works as the normal Automatic Shifter.
I connected the Overdrive Button separately to
12mm DC Power Button 5V LED, Waterproof Latching Push Button Switch On/Off 23V (Red 2V).
I drilled a hole and dropped it into the Button Switch in console to the right of the shifter.
I set it for the LED to be on when overdrive is off.
Let me know your thoughts.
That is definitely one fine fabrication, as I have never seen an automatic gear shifter look so identical to a manual before... In fact, I would have never guessed your car had an automatic trans if you had not mentioned this in your post submission... In the meantime, job well done... Also, thanks for sharing and congrats...
You were an inspiration, aborick. Installed a 2010 shifter with White Madness ball in my 2006 automatic. Swapped in a console from a 2009 Bullitt with ambient lighting while I had the old console out, because why not.
Thanks for that, KC - I think something like that could be a slick solution. I had considered making a custom plate for inside the bezel, as that�s just a Bullitt boot and bezel flipped 180 degrees, so the boot slack is on the side that needs it - it is still very tight, though. Maybe a combination of some kind of aluminum plate with a small indicator mounted in it? I see more internet research in my future�
I Thought About a Mechanical Solution as Well. Simply a Pointer in a Slot With Some Nice Lettered Font Next to it. Whatever You Come Up With It Would Be great To See Some How To Pics For The Viewing Audience! Some Good Research Would Be Looking at Factory Floor Shifts Over the Years and See How The Factory Had it Set Up. What Would Be Way Cool is Somehow Adapting The Guts Out of An Earlier Mustang Bezel. Just a Thought! Just Spitballing To Get You Thinking!
Another Good Place to Look For Idea's Would Be at a Street Rod Show As a Lot of Those Cars Had Transplanted Shifters & The Like!
SUPERCHARGED RED ROCKET ------------------Master-Moderator
Joined: May 11, 2006
Posts: 10,668
Likes: 2,532
From: Carnegie, PA
Originally Posted by jallen670
You were an inspiration, aborick. Installed a 2010 shifter with White Madness ball in my 2006 automatic. Swapped in a console from a 2009 Bullitt with ambient lighting while I had the old console out, because why not.
You did such an amazing job with the 2010 shifter and white madness ball... If anything, it could fool those who are unfamiliar into thinking you have a manual trans shifter over an auto trans shifter... It would probably even fool me every so often whenever attempting to access the clutch petal which would obviously be missing...LOL. In the meantime, I would also follow Kevin's advice below by fabricating either an electronic gear selector or fabricate a custom plate with gear indicator as you mentioned would also look very unique and cool, to say the very least... Meanwhile, thank you for keeping us all updated and congrats.
Originally Posted by 05stangkc
Very Cool!
Looks Great!
KC
Have You Considered an Electronic Gear Indicator??
Thanks for that, KC - I think something like that could be a slick solution. I had considered making a custom plate for inside the bezel, as that’s just a Bullitt boot and bezel flipped 180 degrees, so the boot slack is on the side that needs it - it is still very tight, though. Maybe a combination of some kind of aluminum plate with a small indicator mounted in it? I see more internet research in my future…
I also think fabricating a custom plate for inside the bezel would be a very solution as well...
Last edited by m05fastbackGT; May 14, 2024 at 01:39 PM.
I stand corrected on something I posted early in this thread. Rick’s 2005’s shifter is likely original and not swapped out by the previous owner. I now understand why he noted boring out the White Madness shifter to fit the larger diameter post. I dissected my 2006 shifter and found it does not match the pic I re-posted of the square plastic stump. It would appear early S197s likely had a different design where the plastic block was part of the T-handle (Pic 1). Mine is an early 2006 (mfg 8/05), so there had to be a revision sometime after that. This earlier design, it’s worth noting, is a 2-piece design, where the linkage bracket is stamped steel and is screwed onto the plastic body of the shifter (Pic 2). On mine, this screw had backed out several threads, which probably explains the sloppiness I was feeling. I was attributing this to the mostly plastic design, but that’s probably not the case, as the 2010 has even more plastic, though with its one-piece design, the linkage bracket is part of the main housing. Anyway, for Rick, or anyone who still has this original design on their car, it’d be worth checking that screw if your shifter action is feeling spongy (Pic 3).
FYI, That is The Early Style and You Could Swap The Black Handle For The Silver One on The Early Cars. Be Advised The Later Ones Don't Like To Go Back Together if You Pop The **** Off. There are a Couple of Threads in Here Where This Has Happened!
The Earlier Style Was More Durable Except For The Accordian Slide Insert Getting Jammed Up!
You were an inspiration, aborick. Installed a 2010 shifter with White Madness ball in my 2006 automatic. Swapped in a console from a 2009 Bullitt with ambient lighting while I had the old console out, because why not.
I stand corrected on something I posted early in this thread. Rick�s 2005�s shifter is likely original and not swapped out by the previous owner. I now understand why he noted boring out the White Madness shifter to fit the larger diameter post. I dissected my 2006 shifter and found it does not match the pic I re-posted of the square plastic stump. It would appear early S197s likely had a different design where the plastic block was part of the T-handle (Pic 1). Mine is an early 2006 (mfg 8/05), so there had to be a revision sometime after that. This earlier design, it�s worth noting, is a 2-piece design, where the linkage bracket is stamped steel and is screwed onto the plastic body of the shifter (Pic 2). On mine, this screw had backed out several threads, which probably explains the sloppiness I was feeling. I was attributing this to the mostly plastic design, but that�s probably not the case, as the 2010 has even more plastic, though with its one-piece design, the linkage bracket is part of the main housing. Anyway, for Rick, or anyone who still has this original design on their car, it�d be worth checking that screw if your shifter action is feeling spongy (Pic 3).
Pic 1:
Pic 2:
Pic 3:
Thanks for the update.
I checked the bolt and added a little locktite just in case.