
Did some cheap homemade dress up stuff!

Thread Starter
Bullitt Member
Joined: December 30, 2007
Posts: 494
Likes: 0
From: Lemont
Did some cheap homemade dress up stuff!
So I saw those things you put on the underside of your trunk lid online for like 180 bux! 

I said I can make that for less, turned out for about $35.


and then on the other end at the same time I painted that little ribbed strip thing in the center of the saleen SC lid and changed my couplers to red one since I was having a problem with them holding anyhow.
Yeah I went nuts on the newspaper, but hey it's free.


I said I can make that for less, turned out for about $35.
and then on the other end at the same time I painted that little ribbed strip thing in the center of the saleen SC lid and changed my couplers to red one since I was having a problem with them holding anyhow.
Yeah I went nuts on the newspaper, but hey it's free.

GT Member
Joined: March 7, 2008
Posts: 142
Likes: 2
From: Lake Worth, South Florida
looks good, I always like the cheap home made mods, I didn't want to pay $180.00 either for a tool
caddie for the trunk, and the underside of the deck lid looked like it was missing something, so for under $25.00 this is what I did.

caddie for the trunk, and the underside of the deck lid looked like it was missing something, so for under $25.00 this is what I did.


Cobra Member
Joined: March 15, 2008
Posts: 1,177
Likes: 1
I love this! Any pics of the process/advice?


Thread Starter
Bullitt Member
Joined: December 30, 2007
Posts: 494
Likes: 0
From: Lemont
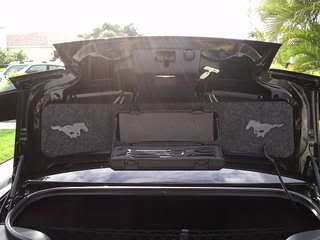
Ok for those interested here is the file for the outline and a little write up.
http://www.starfiregraphics.net/Trunklid.pdf
I used Dibond to make the core, since we had some scrap at work. (http://www.dibond.com.au/html/s02_ar...&nav_top_id=69) but you could use anything thin (1/8" is how thick my core is).
Then I went to O'Reillys auto parts (Advance has it too) and picked up rolled carpethttp://www.oreillyauto.com/site/c/se...keyword=carpet it comes in tan, blue, black, and gray. I used black since my car is black and white, the gray might be a better match for what's in the trunk though.
Also picked up General Trim Adhesive by 3M http://www.oreillyauto.com/site/c/de...0474&ppt=C0171
It comes in a black can. Just followed the instructions and glued the carpet to the core then trimmed around about 1" from the edge and use the same adhesive to wrap and stick the edge over the back of the core.
Next I moved the wires that run for the light, latch and 3d brake light by removing the clips circled in yellow and ran the wire like shown in green. Then I drilled a hole on the left side where the blue circle is, this matches up to the farthest right hole from which you just removed the clips from.

Then it's just a matter of finding a fastener to hold the panel up with the two holes. I ended up using some sheet metal screws but I would like to replace them with the black plastic retainers that hold your hood liner in place, but they need to be longer since the dibond doesn't flex much.
For the letters I routed them at work on our CNC router out of 1/8" white plexiglass and attached them to the lid using good'ol velcro, if you wiggle and push them in they will stick really well to that carpet, plus then I was able to cover my screws but still have access if I need to.
BTW for the holes I just put some screws in the trunk lid and put a little peanut butter on them and pressed my core piece on them to find where to drill, worked perfect.
http://www.starfiregraphics.net/Trunklid.pdf
I used Dibond to make the core, since we had some scrap at work. (http://www.dibond.com.au/html/s02_ar...&nav_top_id=69) but you could use anything thin (1/8" is how thick my core is).
Then I went to O'Reillys auto parts (Advance has it too) and picked up rolled carpethttp://www.oreillyauto.com/site/c/se...keyword=carpet it comes in tan, blue, black, and gray. I used black since my car is black and white, the gray might be a better match for what's in the trunk though.
Also picked up General Trim Adhesive by 3M http://www.oreillyauto.com/site/c/de...0474&ppt=C0171
It comes in a black can. Just followed the instructions and glued the carpet to the core then trimmed around about 1" from the edge and use the same adhesive to wrap and stick the edge over the back of the core.
Next I moved the wires that run for the light, latch and 3d brake light by removing the clips circled in yellow and ran the wire like shown in green. Then I drilled a hole on the left side where the blue circle is, this matches up to the farthest right hole from which you just removed the clips from.
Then it's just a matter of finding a fastener to hold the panel up with the two holes. I ended up using some sheet metal screws but I would like to replace them with the black plastic retainers that hold your hood liner in place, but they need to be longer since the dibond doesn't flex much.
For the letters I routed them at work on our CNC router out of 1/8" white plexiglass and attached them to the lid using good'ol velcro, if you wiggle and push them in they will stick really well to that carpet, plus then I was able to cover my screws but still have access if I need to.
BTW for the holes I just put some screws in the trunk lid and put a little peanut butter on them and pressed my core piece on them to find where to drill, worked perfect.

Thread
Thread Starter
Forum
Replies
Last Post
Evolution Performance
Northeast
1
Aug 5, 2016 12:46 PM
austin101385
'10-14 Shelby Mustangs
3
Oct 2, 2015 01:00 PM