
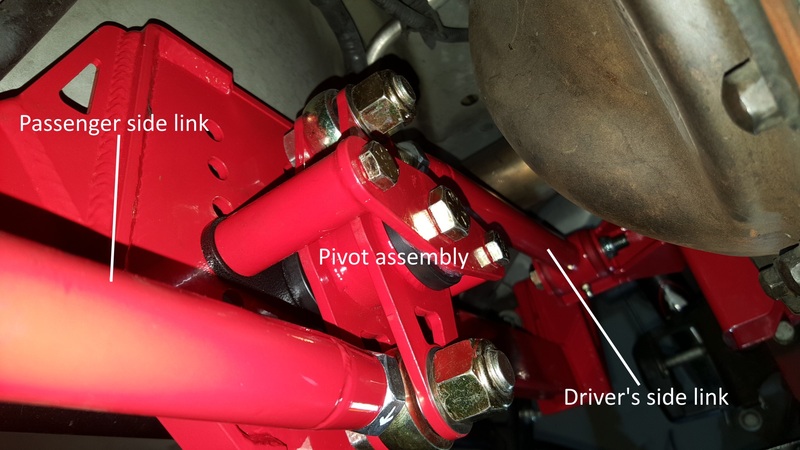
BMR Watts link installed.
 11/10/15 | 10:52 AM
#1
Thread Starter
Bullitt Member
Joined: October 7, 2007
Posts: 274
Likes: 4
From: San Jose, CA
BMR Watts link installed.
Some of you may already know that BMR came out with their Watts link not too long ago. I've always wanted a Watts link and when BMR announced they were developing one with an attractive price point I decided to wait for it. I ordered one through Late Model Restoration and installed it over the weekend. The install took longer than expected. They say it should take 3-4 hrs but there were a few issues that made it take much longer for me. Probably about 12 hrs split between Saturday and Sunday with a lot of breaks and a couple of runs to the hardware store. The instructions kinda suck. It doesn't tell you where every washer goes but I figured it out. It doesn't mention any torque specs for a lot of the bolts (e.g., axle clamp bolts). It only says to "tighten" them. Only a few bolts had torque specs.
Now for the issues...
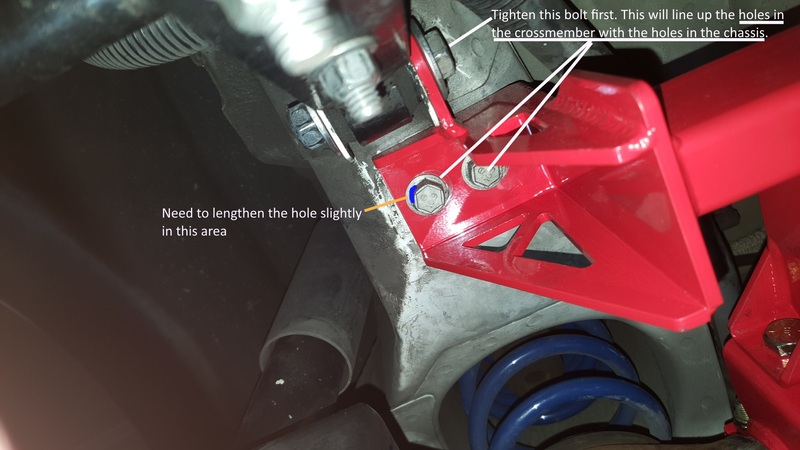
I had to lengthen the outboard hole in the driver's side crossmember mount because I couldn't get the bolt started. The guy in this Youtube video had the same issue. Skip to 7:37.
I took a dremel to the crossmember hole in the area under the blue line to allow insertion of bolt. You only need to grind a little off. Just enough to get the bolt started.
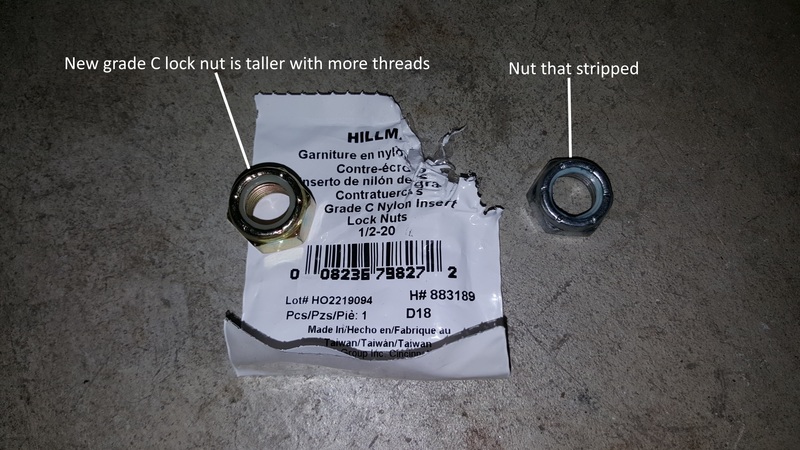
The other issue was the cheap lock nut they give you for the axle mounts (piece that bolts to the axle clamps) that requires 80 ft/lbs of torque. I didn't even reach the torque spec when the lock nut suddenly turned freely. Bad. Real bad. Cheap nut got stripped. Word of advice. Go to your hardware store BEFORE the install and pick up 2 pcs of grade C (8), 1/2-20 lock nuts. You can send me a Hallmark card to thank me later. The other side was also nearly stripped. Didn't notice until I removed it later to adjust the axle centering. More later.
Get yourself new lock nuts like the one on the left. New lock nut is taller with more threads and of course stronger at grade C, i.e. 8.
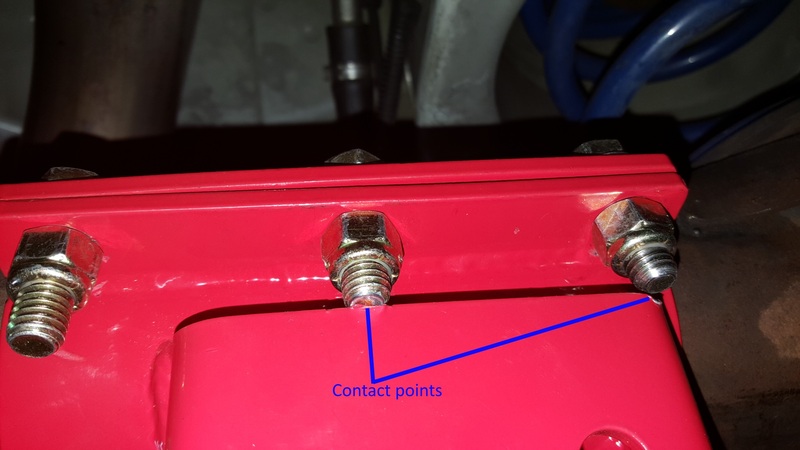
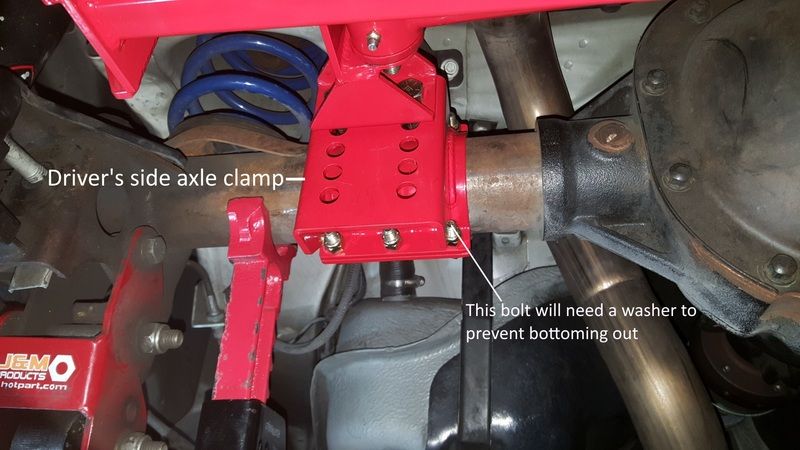
Another issue...Some of the bolts in the axle clamps are a bit too long and makes contact at end of bolt travel. I had to use lock washers to prevent it.
Passenger side:
Driver's side:
That's it for the issues.
Now some miscellaneous pics.
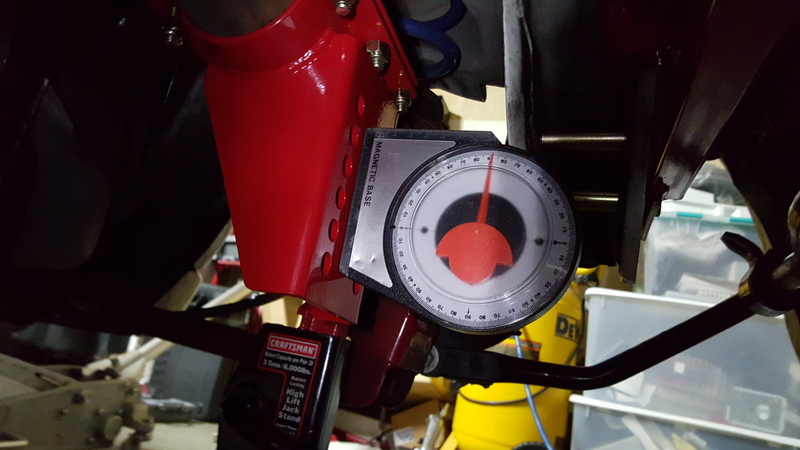
I used an angle finder and set the links as close to zero degrees as possible.
Setting angle of axle clamps to match center of crossmember. Should be close to 90�. My crossmember angle was 91� so I set the axle clamps to 91�. Make sure axle is loaded to simulate ride height. I had mine on jack stands.
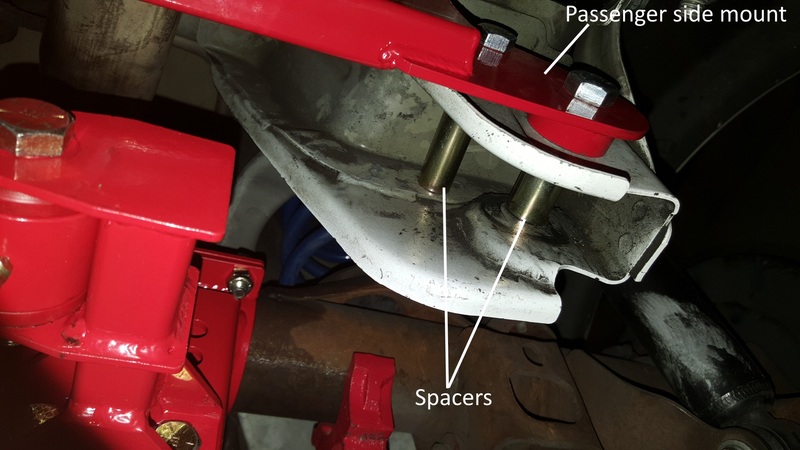
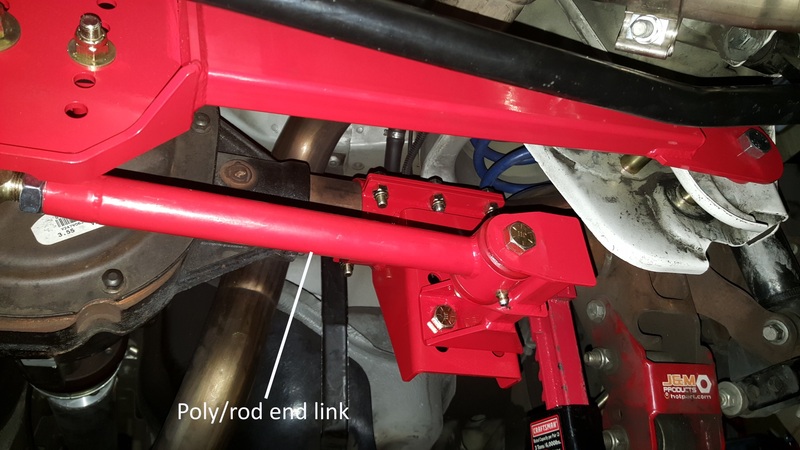
I mentioned earlier about the discovery of the other axle mount nut being nearly stripped. This was during one of the most time consuming parts of the install which is the centering of the axle. Instructions do not tell you how. I had to figure it out myself. This was a ***** with a capital B. I didn't notice the poly/rod end links weren't adjustable on the car when I made the purchase. If I had known, I would've purchased model WL006 which is rod ends on both sides and double adjustable. This would save a lot of time.
At first I tried removing one of the end links at the axle mount (poly end) and shorten or lengthen them depending on which way I want the axle to go. This caused a problem where I can't reinsert the bolt because the hole in the poly bushing no longer lines up with the axle mount hole. Argh! I finally decided to try, with hesitation, to remove the pivot assembly in the center and leave the other end link connected. In this case, I had removed the driver's side end link at the axle mount and the pivot assembly and left the passenger side untouched. I shortened the driver's side link 3/16". I then lengthened the passenger side 3/16" by turning the pivot assembly which in turn spins the rod end. I then finish by reinstalling the driver's side link first which is easy because the poly bushing hole now matches up with the axle mount since the pivot is dangling in the middle. Lastly, I position the pivot assembly into place and tighten everything down. I had to do this process three times. Each time having to take the car off jack stands to measure how much each tire sticks out. Like I said, ***** with a capital B. lol
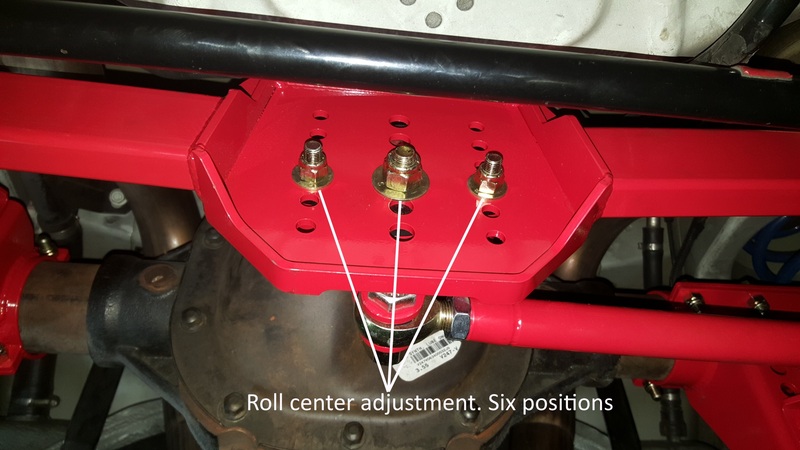
Remove the three roll center adjustment bolts to remove pivot assembly.
This is probably BMR's first production run and they'll probably have some of the issues ironed out eventually. They're not major issues. Just mainly some cheap nuts, bolts that are a bit too long and that hole I had to dremel out.
All in all it was worth it. The rear feels less twitchy on rough roads. It feels more planted and smooth. This is probably my second favorite mod next to the Whipple. I should've done it a long time ago.
Now for the issues...
I had to lengthen the outboard hole in the driver's side crossmember mount because I couldn't get the bolt started. The guy in this Youtube video had the same issue. Skip to 7:37.
I took a dremel to the crossmember hole in the area under the blue line to allow insertion of bolt. You only need to grind a little off. Just enough to get the bolt started.

The other issue was the cheap lock nut they give you for the axle mounts (piece that bolts to the axle clamps) that requires 80 ft/lbs of torque. I didn't even reach the torque spec when the lock nut suddenly turned freely. Bad. Real bad. Cheap nut got stripped. Word of advice. Go to your hardware store BEFORE the install and pick up 2 pcs of grade C (8), 1/2-20 lock nuts. You can send me a Hallmark card to thank me later.
The other side was also nearly stripped. Didn't notice until I removed it later to adjust the axle centering. More later. Get yourself new lock nuts like the one on the left. New lock nut is taller with more threads and of course stronger at grade C, i.e. 8.

Another issue...Some of the bolts in the axle clamps are a bit too long and makes contact at end of bolt travel. I had to use lock washers to prevent it.
Passenger side:

Driver's side:

That's it for the issues.
Now some miscellaneous pics.
I used an angle finder and set the links as close to zero degrees as possible.


Setting angle of axle clamps to match center of crossmember. Should be close to 90�. My crossmember angle was 91� so I set the axle clamps to 91�. Make sure axle is loaded to simulate ride height. I had mine on jack stands.

I mentioned earlier about the discovery of the other axle mount nut being nearly stripped. This was during one of the most time consuming parts of the install which is the centering of the axle. Instructions do not tell you how. I had to figure it out myself. This was a ***** with a capital B. I didn't notice the poly/rod end links weren't adjustable on the car when I made the purchase. If I had known, I would've purchased model WL006 which is rod ends on both sides and double adjustable. This would save a lot of time.
At first I tried removing one of the end links at the axle mount (poly end) and shorten or lengthen them depending on which way I want the axle to go. This caused a problem where I can't reinsert the bolt because the hole in the poly bushing no longer lines up with the axle mount hole. Argh! I finally decided to try, with hesitation, to remove the pivot assembly in the center and leave the other end link connected. In this case, I had removed the driver's side end link at the axle mount and the pivot assembly and left the passenger side untouched. I shortened the driver's side link 3/16". I then lengthened the passenger side 3/16" by turning the pivot assembly which in turn spins the rod end. I then finish by reinstalling the driver's side link first which is easy because the poly bushing hole now matches up with the axle mount since the pivot is dangling in the middle. Lastly, I position the pivot assembly into place and tighten everything down. I had to do this process three times. Each time having to take the car off jack stands to measure how much each tire sticks out. Like I said, ***** with a capital B. lol
Remove the three roll center adjustment bolts to remove pivot assembly.


This is probably BMR's first production run and they'll probably have some of the issues ironed out eventually. They're not major issues. Just mainly some cheap nuts, bolts that are a bit too long and that hole I had to dremel out.
All in all it was worth it. The rear feels less twitchy on rough roads. It feels more planted and smooth. This is probably my second favorite mod next to the Whipple. I should've done it a long time ago.
Last edited by 2007CalSpec; 11/10/15 at 02:53 PM.