timing and vacuums
 2/27/13, 08:02 PM
#1
GT Member
Thread Starter
Join Date: January 22, 2013
Location: NE Ohio
Posts: 189
Likes: 0
Received 0 Likes
on
0 Posts
timing and vacuums
so here is my problem.
i did my trick flow intake manifold swap and now my car is out of time.
i have the 10 degree and 14 degree btdc marked on my harmonic balancer and my rotor button is pointed at my number 1 spark plug.
i know its not pointed directly at it in the picture. i just put it like that so you could see it
the problem is that when i try to start it it will fire but wont stay running or idle
Last edited by Batmobilebrock57; 2/27/13 at 08:41 PM.
 2/27/13, 08:06 PM
#2
GT Member
Thread Starter
Join Date: January 22, 2013
Location: NE Ohio
Posts: 189
Likes: 0
Received 0 Likes
on
0 Posts
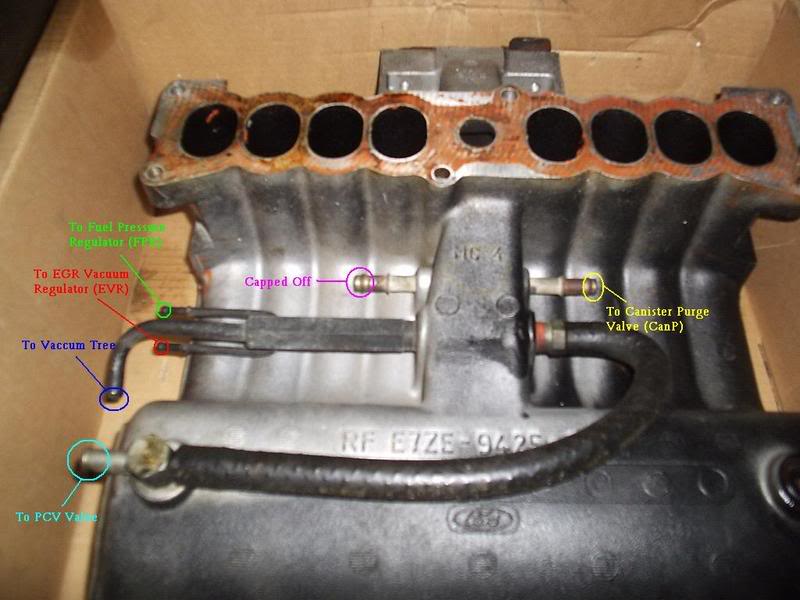
next are my vacuum lines from the upper plenum.
the first picture is the 3 mains coming out of the firewall side of the upper plenum.
the on with a red vacuum line is going to the fuel pressure regulator i believe.
then the one in the middle above the big one is going to the blue round thing in picture 3 and from there it goes to 4 and 5.
picture 6 goes from the egr? to picture 7.
8 and 9 are two that arent connected to anything.
the last picture is the one i think is supposed to go the the charcoal pit? it was plugged on my stock intake
.
Last edited by Batmobilebrock57; 2/27/13 at 08:18 PM.
2/27/13, 08:15 PM
#3
GT Member
Thread Starter
Join Date: January 22, 2013
Location: NE Ohio
Posts: 189
Likes: 0
Received 0 Likes
on
0 Posts
this picture is of the vacuum line coming from the underside of the plenum its a lone line beside the 3 others i blocked it off just to see if it changed anything
3/4/13, 01:46 AM
#5
Cobra R Member
1. First things first. You'll need a few things: a timing light, a distributor wrench or a ratchet and socket that will fit the distributor hold down bolt, and a little know how.
2. The first thing you'll have to do is disconnect the spout connector. Make sure the car is off when you do this. On 87-93 cars its at the end of a wire that is hanging near the distributor. The reason you disconnect the spout connector is so the computer doesn't automatically change the timing when you move the distributor, which will let you set the base timing. Oh and whatever you do....Don't lose the spout connector.
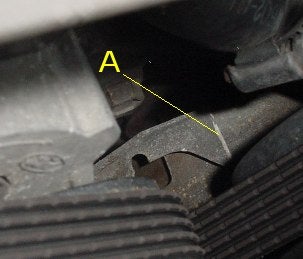
3. Next you'll have to connect the timing light. With most lights you have to connect the positive and negative clips onto the positive and negative terminals on the battery. Then you clip the inductive lead of the timing light onto the number one (1) spark plug wire. If you don't happen to know which one that is on a Mustang, then I'll tell you. If you are standing in front of the car looking at the engine its the first spark plug wire on the left side of the engine. See the diagram below.
Firing order
4. The next thing you will need to do is start the car. Before you do so there are a few things to look out for. First make sure there aren't any wires hanging near the belts, pulleys or fan You'll also want to check to make sure you can see the actual timing marks on the harmonic balancer. Some times is easier to get some whiteout and crawl under the car and mark where you'd like the timing to be set at, such as 14 degrees.
5. Before you start the car, loosen the distributor hold down bolt(D). Don't take it all of the way out, just loosen it a little. If you take it all of the way out the distributor gear may skip timing when you start the car up, which isn't a good thing.
Now start the car, and point the timing light at the timing marks(A) and pull the trigger (if it has one). You should see the light flashing on and off, and you should be able to see the timing marks, or the one mark that you made with the whiteout. Be careful, don't let the timing light, or even worse your hands get caught in the belts or hit with the fan.
Timing bracket
6. While holding the base of the distributor (not the top near the plug wires) turn it very slowly until you get the timing where you want. Then tighten the distributor hold down bolt and re-check the timing to make sure the distributor didn't move. Don't forget to re-connect the spout connector too.
7. There you go! You're all set!!! There are a few things you should know. Ford set the timing at 10 degrees from the factory so you could use low octane fuel. If you bump up your timing then you'll need to use a higher octane fuel, usually 91 octane. Although I've seen and heard of people running 18 degrees of timing without having trouble its really not recommended. When you set your timing too high your engine will ping, which will cause bad things to happen like blown pistons.
Try setting your timing at 13 and take a ride. If it doesn't ping then you can try setting it higher, but once it starts to ping turn it back down a degree or two. Basically what we are saying is be careful and, if you don't under stand any of this have someone who does help you.
2. The first thing you'll have to do is disconnect the spout connector. Make sure the car is off when you do this. On 87-93 cars its at the end of a wire that is hanging near the distributor. The reason you disconnect the spout connector is so the computer doesn't automatically change the timing when you move the distributor, which will let you set the base timing. Oh and whatever you do....Don't lose the spout connector.
3. Next you'll have to connect the timing light. With most lights you have to connect the positive and negative clips onto the positive and negative terminals on the battery. Then you clip the inductive lead of the timing light onto the number one (1) spark plug wire. If you don't happen to know which one that is on a Mustang, then I'll tell you. If you are standing in front of the car looking at the engine its the first spark plug wire on the left side of the engine. See the diagram below.
Firing order
4. The next thing you will need to do is start the car. Before you do so there are a few things to look out for. First make sure there aren't any wires hanging near the belts, pulleys or fan You'll also want to check to make sure you can see the actual timing marks on the harmonic balancer. Some times is easier to get some whiteout and crawl under the car and mark where you'd like the timing to be set at, such as 14 degrees.
5. Before you start the car, loosen the distributor hold down bolt(D). Don't take it all of the way out, just loosen it a little. If you take it all of the way out the distributor gear may skip timing when you start the car up, which isn't a good thing.
Now start the car, and point the timing light at the timing marks(A) and pull the trigger (if it has one). You should see the light flashing on and off, and you should be able to see the timing marks, or the one mark that you made with the whiteout. Be careful, don't let the timing light, or even worse your hands get caught in the belts or hit with the fan.
Timing bracket
6. While holding the base of the distributor (not the top near the plug wires) turn it very slowly until you get the timing where you want. Then tighten the distributor hold down bolt and re-check the timing to make sure the distributor didn't move. Don't forget to re-connect the spout connector too.
7. There you go! You're all set!!! There are a few things you should know. Ford set the timing at 10 degrees from the factory so you could use low octane fuel. If you bump up your timing then you'll need to use a higher octane fuel, usually 91 octane. Although I've seen and heard of people running 18 degrees of timing without having trouble its really not recommended. When you set your timing too high your engine will ping, which will cause bad things to happen like blown pistons.
Try setting your timing at 13 and take a ride. If it doesn't ping then you can try setting it higher, but once it starts to ping turn it back down a degree or two. Basically what we are saying is be careful and, if you don't under stand any of this have someone who does help you.
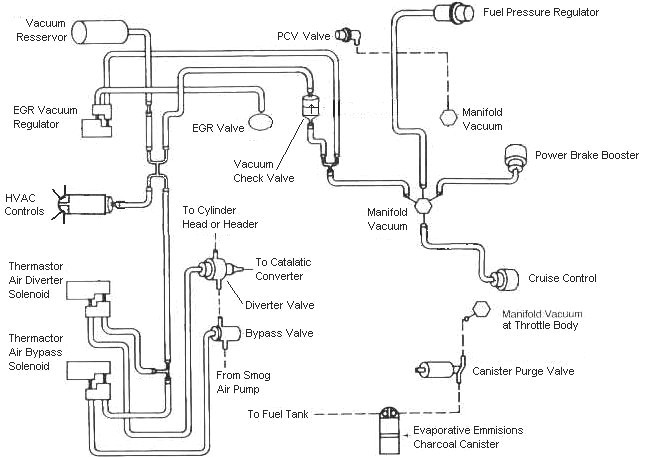
Vacuum Diagram
Last edited by bluethunderhorse; 3/4/13 at 02:03 AM.
3/4/13, 04:50 AM
#6
GT Member
Thread Starter
Join Date: January 22, 2013
Location: NE Ohio
Posts: 189
Likes: 0
Received 0 Likes
on
0 Posts
3/4/13, 05:04 AM
#7
Cobra R Member
1st thing first pull the distributor out, pull the plug from #1. Have someone bump the engine over while you have your finger over the spark plug hole. When the piston comes up on top dead center with both valves closed, it will blow your finger off of the hole. Check your timing marks to double check. then you can drop your distributor in and point the rotor button where ever you want it. now start installing your plug wires starting with #1 go clockwise around the distributor cap in this order 1-8-4-5-6-2-7-3. Try to start it then use your timing light to dial it in
3/4/13, 08:28 AM
#8
GT Member
Thread Starter
Join Date: January 22, 2013
Location: NE Ohio
Posts: 189
Likes: 0
Received 0 Likes
on
0 Posts
My firing order is already right. I only pulled the distributor not the cap. I left the cap as it was. My car ran great before so i know the firing order is correct. I know how to get it tdc but it still won't fire and stay running
3/4/13, 12:26 PM
#9
Legacy TMS Member
What is being said, is that your distributor may be set on the wrong stroke. The piston will rise to the top of the cylinder on each stroke. (intake/exhaust.) To make sure you have your distributor clocked properly, follow the suggestions as posted. If you feel uneasy about using the starter to rotate the engine assembly, use a 1/2" breaker bar with a socket attached to the crank and turn by hand.
3/5/13, 05:16 AM
#11
Cobra R Member
Join Date: December 11, 2011
Location: Mass
Posts: 1,839
Likes: 0
Received 0 Likes
on
0 Posts
IIRC he never removed the dizzy during the intake swap. You need to go over you steps. It is easy to miss something or leave something unplugged.
Intake vacuum ( note the capped off port is you had a map sensor not used for bap )
Double check all your connections. If you did pull your dizzy then like stated you need to restab it.
Intake vacuum ( note the capped off port is you had a map sensor not used for bap )
Double check all your connections. If you did pull your dizzy then like stated you need to restab it.
3/5/13, 06:53 AM
#12
GT Member
Thread Starter
Join Date: January 22, 2013
Location: NE Ohio
Posts: 189
Likes: 0
Received 0 Likes
on
0 Posts
What is being said, is that your distributor may be set on the wrong stroke. The piston will rise to the top of the cylinder on each stroke. (intake/exhaust.) To make sure you have your distributor clocked properly, follow the suggestions as posted. If you feel uneasy about using the starter to rotate the engine assembly, use a 1/2" breaker bar with a socket attached to the crank and turn by hand.
3/5/13, 06:59 AM
#13
GT Member
Thread Starter
Join Date: January 22, 2013
Location: NE Ohio
Posts: 189
Likes: 0
Received 0 Likes
on
0 Posts
IIRC he never removed the dizzy during the intake swap. You need to go over you steps. It is easy to miss something or leave something unplugged.
Intake vacuum ( note the capped off port is you had a map sensor not used for bap )
Double check all your connections. If you did pull your dizzy then like stated you need to restab it.
Intake vacuum ( note the capped off port is you had a map sensor not used for bap )
Double check all your connections. If you did pull your dizzy then like stated you need to restab it.
3/5/13, 07:20 AM
#14
Cobra R Member
Join Date: December 11, 2011
Location: Mass
Posts: 1,839
Likes: 0
Received 0 Likes
on
0 Posts
I didn't relize you pulled teh dizzy. looking at your pics I thought you left it in ( some have done an intake this way ).
the dizzy is in wrong, don't go by the cap. Take a step back and start over, it isn't going to hurt anything.
Get the #1 cylinder up on compression. pull the plug and turn the motor over by hand via the crank with the your thumb over the hole, like stated you will know when it come up on the compression stroke. The balancer should be near the "0" mark. move it to the "0" mark and drop in the distributor. The pointer should be pointed right at the #1 plug terminal on teh cap, you may need to start the dizzy counter clockwise has you drop it in but once the gear meshes it will drop into place.
start it up. 10* is base.
Canister purger valve is next to the charcoal canister mounted on the pass. side frame rail down by the radiator below the air box, it may have been deleted.
I'm just going down the line like the others. also if the pic you are posting of your dizzy is to show us the position you have it in and think is correct I can tell by looking at the pic it isn't. If restabbing the dizzy doesn't work then we move on.
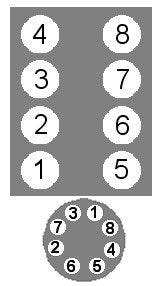
Correct position. rotor button on #1

Last edited by skunk21; 3/5/13 at 07:33 AM. Reason: added pic
3/5/13, 07:34 AM
#16
Cobra R Member
Join Date: December 11, 2011
Location: Mass
Posts: 1,839
Likes: 0
Received 0 Likes
on
0 Posts
3/6/13, 05:07 AM
#17
GT Member
Thread Starter
Join Date: January 22, 2013
Location: NE Ohio
Posts: 189
Likes: 0
Received 0 Likes
on
0 Posts
They are correct. Restab your dizzy your off. I looked at your distributor pic harder and can see it. your pointed at #7.
I didn't relize you pulled teh dizzy. looking at your pics I thought you left it in ( some have done an intake this way ).
the dizzy is in wrong, don't go by the cap. Take a step back and start over, it isn't going to hurt anything.
Get the #1 cylinder up on compression. pull the plug and turn the motor over by hand via the crank with the your thumb over the hole, like stated you will know when it come up on the compression stroke. The balancer should be near the "0" mark. move it to the "0" mark and drop in the distributor. The pointer should be pointed right at the #1 plug terminal on teh cap, you may need to start the dizzy counter clockwise has you drop it in but once the gear meshes it will drop into place.
start it up. 10* is base.
Canister purger valve is next to the charcoal canister mounted on the pass. side frame rail down by the radiator below the air box, it may have been deleted.
I'm just going down the line like the others. also if the pic you are posting of your dizzy is to show us the position you have it in and think is correct I can tell by looking at the pic it isn't. If restabbing the dizzy doesn't work then we move on.
Correct position. rotor button on #1
3/6/13, 05:12 AM
#18
GT Member
Thread Starter
Join Date: January 22, 2013
Location: NE Ohio
Posts: 189
Likes: 0
Received 0 Likes
on
0 Posts
I pulled the dizzy cause one of upper plenum bolts wouldn't go in cause of the dizzy.
Thanks ill give that a try tonight.
I should pull the spout connector before i start it up correct?
Thanks ill give that a try tonight.
I should pull the spout connector before i start it up correct?
3/6/13, 10:32 AM
#19
Cobra R Member
Join Date: December 11, 2011
Location: Mass
Posts: 1,839
Likes: 0
Received 0 Likes
on
0 Posts
3/6/13, 07:22 PM
#20
GT Member
Thread Starter
Join Date: January 22, 2013
Location: NE Ohio
Posts: 189
Likes: 0
Received 0 Likes
on
0 Posts
Tried it. Loud backfire. And before you say you're 180 degrees out. I turned my harmonic balancer one full turn and re-adjusted the rotor button, tried it one tooth advanced and one tooth retarded. Getting nowhere fast with this car.