My 1990 Notch Project
 2/19/12, 02:03 PM
#1
V6 Member
Thread Starter

Join Date: February 19, 2012
Location: Temple, TX
Posts: 73
Likes: 0
Received 0 Likes
on
0 Posts
My 1990 Notch Project
The car is a 1990 LX 5.0 with a 5spd. It actually is a canadian model so everything is in kilometers.
The car is a true 5.0 coupe also. It has 135,000 miles on it and was obviously babied most of it's life. When I got the car the only thing that had been done to it was a set of flowmaster 3 chamber mufflers and a set of FRPP shorty headers. Since I've had the car, I've put a short belt on, installed a offroad H-pipe,and a set of 2 Chamber flows. I've also installed a FRPP aluminum driveshaft, along with a Pro 5.0 short throwshifter. Not soon after that I picked up a complete 8.8 rear end with 3.55 gears installed in it. Well being the caroriginally had 2.73's, they had to go. So in when the 3.55's and oh my god what a difference. It totally woke the car up. I know some of you are going to ask why the hell does a LX coupe have a Gt front end on it. Well the previous owner aparently had a fender bender, and this is what was put on. I like it and like the fact that i Have fog lights for when it's crappy outside.
So the bad. I blew the clutch up. So after some quick reactions. I was back on the road. Now the paint. Well the Texas sun has not been nice to this car. It has massive amounts of clear coat that is peeling. So that leaves me to painting the car here before to long.


Some goodies:
Picked these up from Justin:


8.8 with 3.55 FRPP gears:


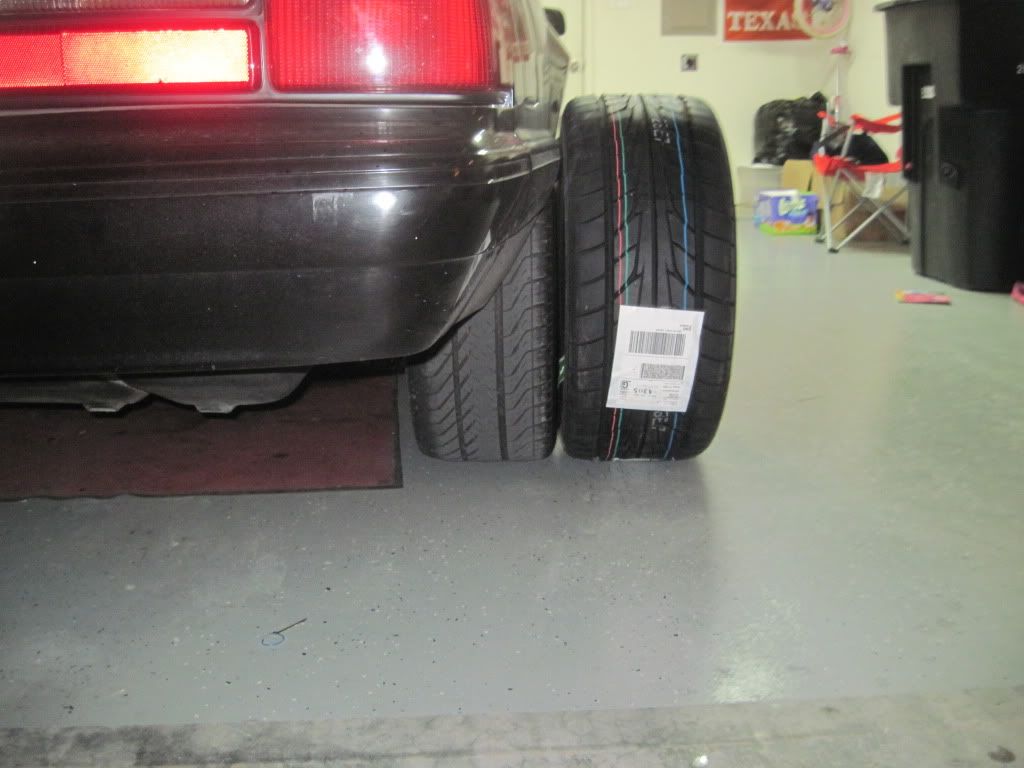
Picked these up, gonna get em cleaned up and roll on them for a little bit,
till I get a set of 5 lug cobra's...well actually 2 sets...

The car is a true 5.0 coupe also. It has 135,000 miles on it and was obviously babied most of it's life. When I got the car the only thing that had been done to it was a set of flowmaster 3 chamber mufflers and a set of FRPP shorty headers. Since I've had the car, I've put a short belt on, installed a offroad H-pipe,and a set of 2 Chamber flows. I've also installed a FRPP aluminum driveshaft, along with a Pro 5.0 short throwshifter. Not soon after that I picked up a complete 8.8 rear end with 3.55 gears installed in it. Well being the caroriginally had 2.73's, they had to go. So in when the 3.55's and oh my god what a difference. It totally woke the car up. I know some of you are going to ask why the hell does a LX coupe have a Gt front end on it. Well the previous owner aparently had a fender bender, and this is what was put on. I like it and like the fact that i Have fog lights for when it's crappy outside.
So the bad. I blew the clutch up. So after some quick reactions. I was back on the road. Now the paint. Well the Texas sun has not been nice to this car. It has massive amounts of clear coat that is peeling. So that leaves me to painting the car here before to long.
Some goodies:
Picked these up from Justin:
8.8 with 3.55 FRPP gears:
Picked these up, gonna get em cleaned up and roll on them for a little bit,
till I get a set of 5 lug cobra's...well actually 2 sets...
 2/19/12, 02:03 PM
#2
V6 Member
Thread Starter
Join Date: February 19, 2012
Location: Temple, TX
Posts: 73
Likes: 0
Received 0 Likes
on
0 Posts
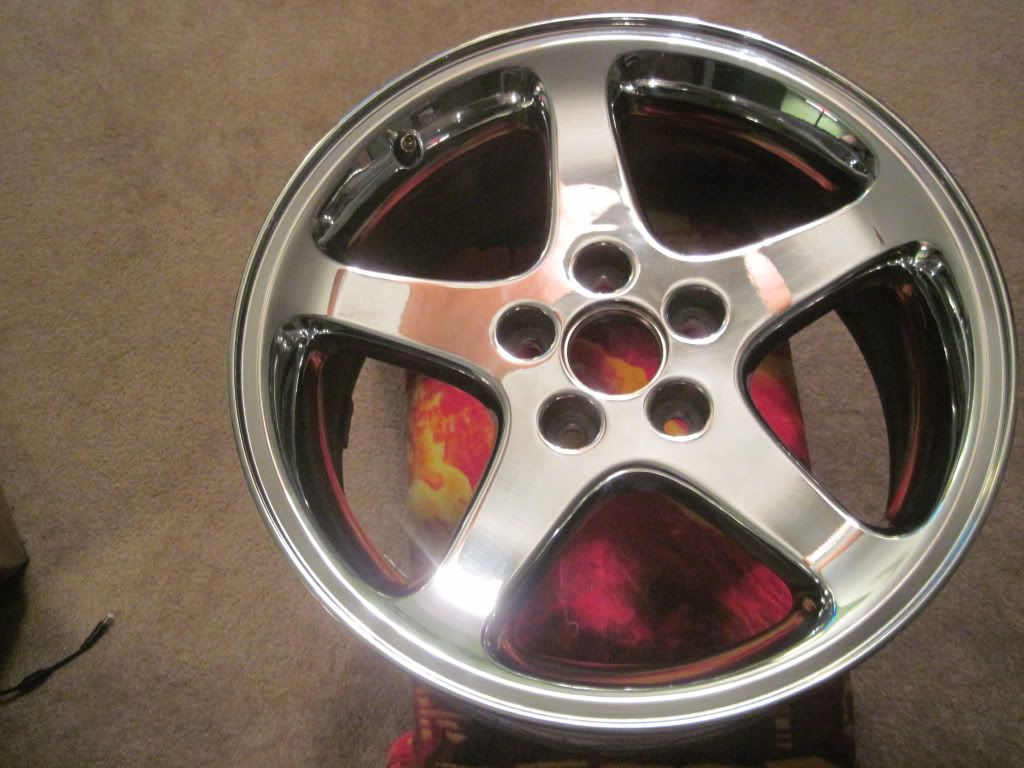
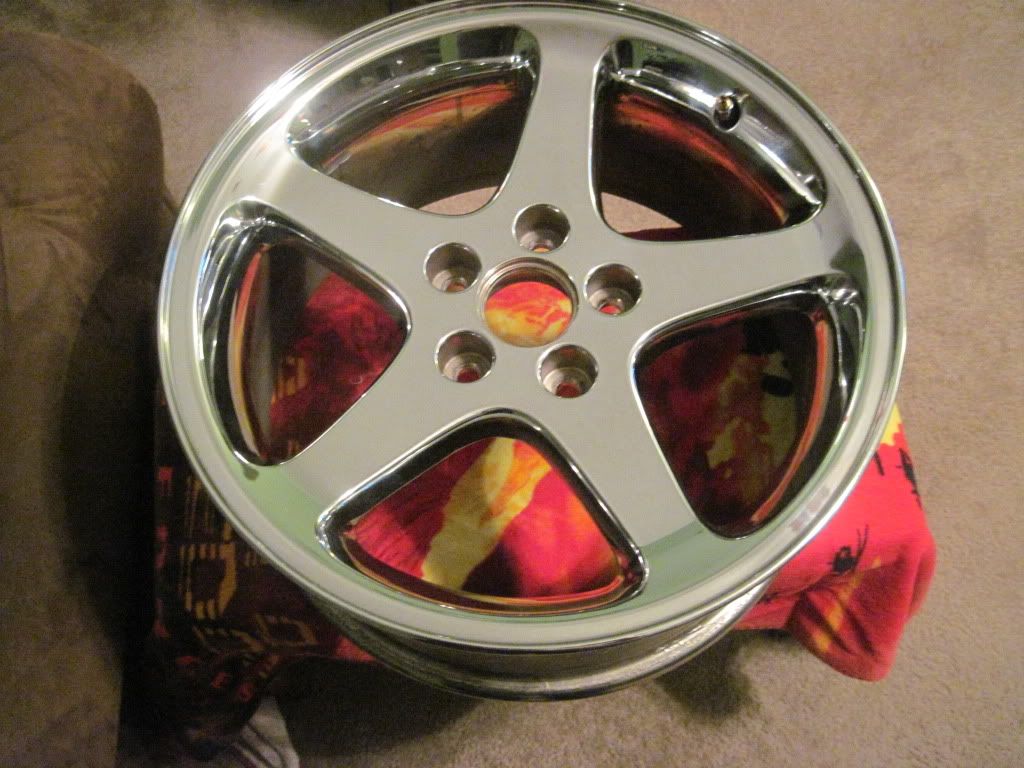
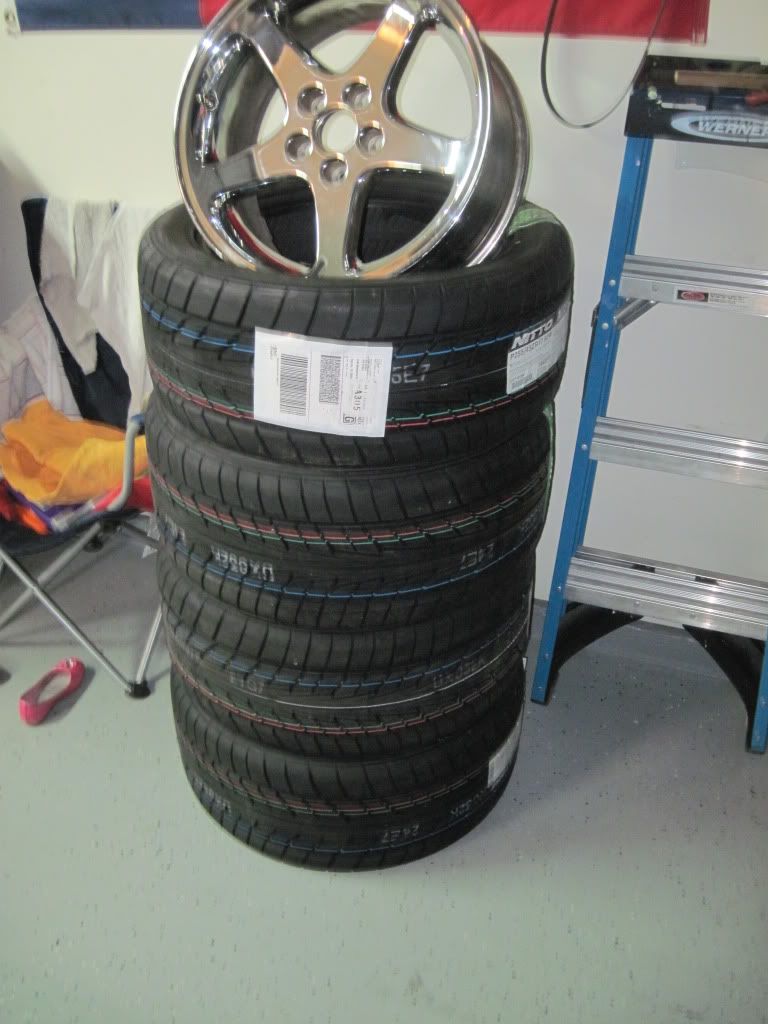
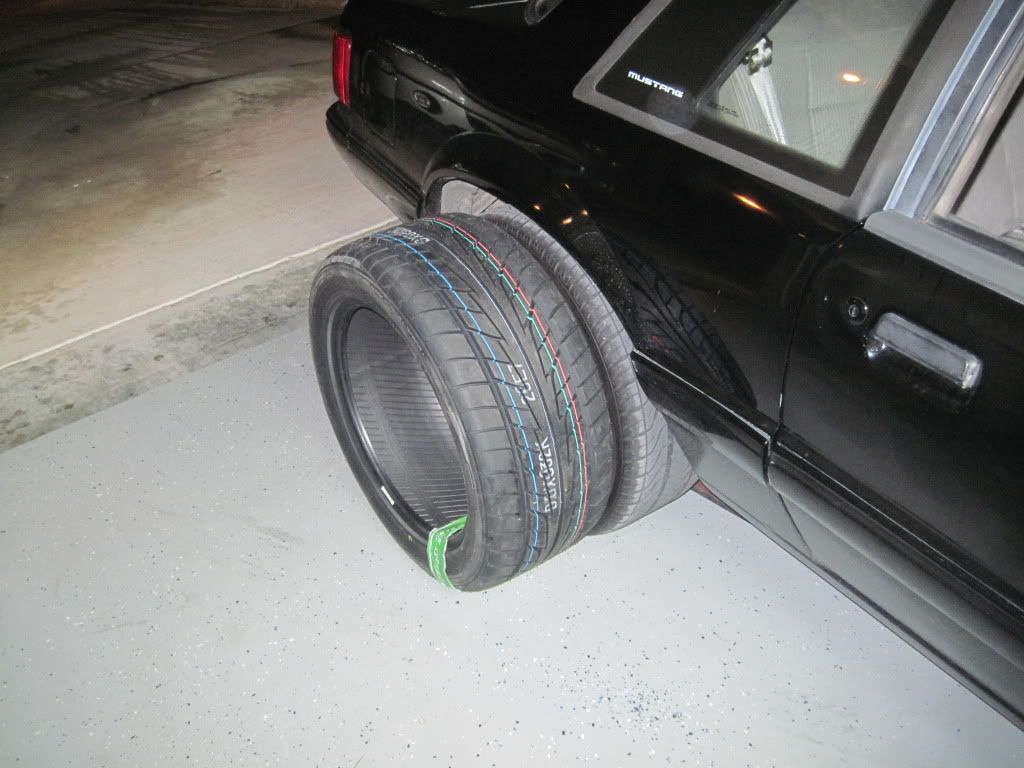
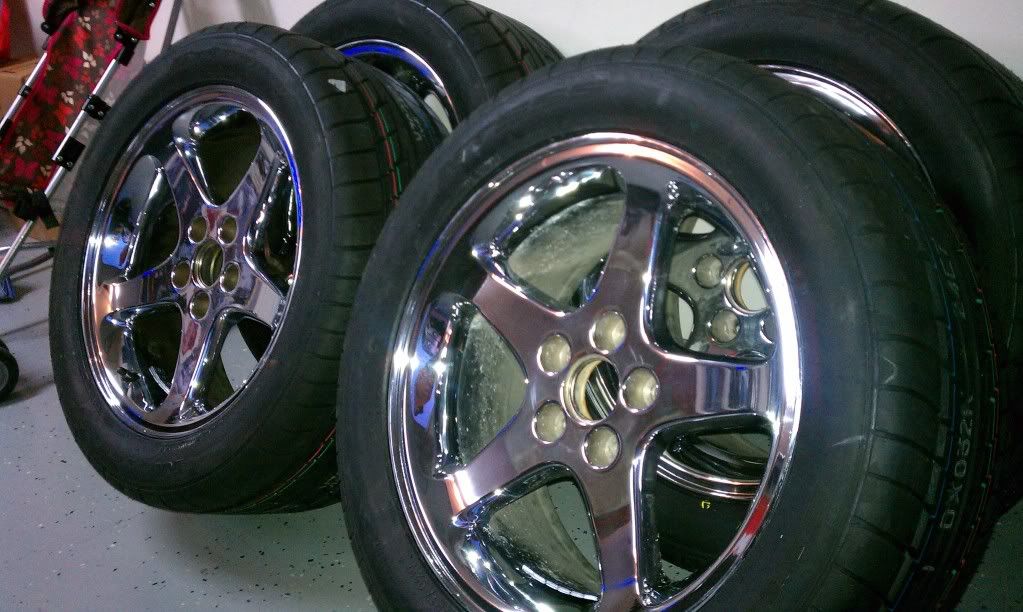
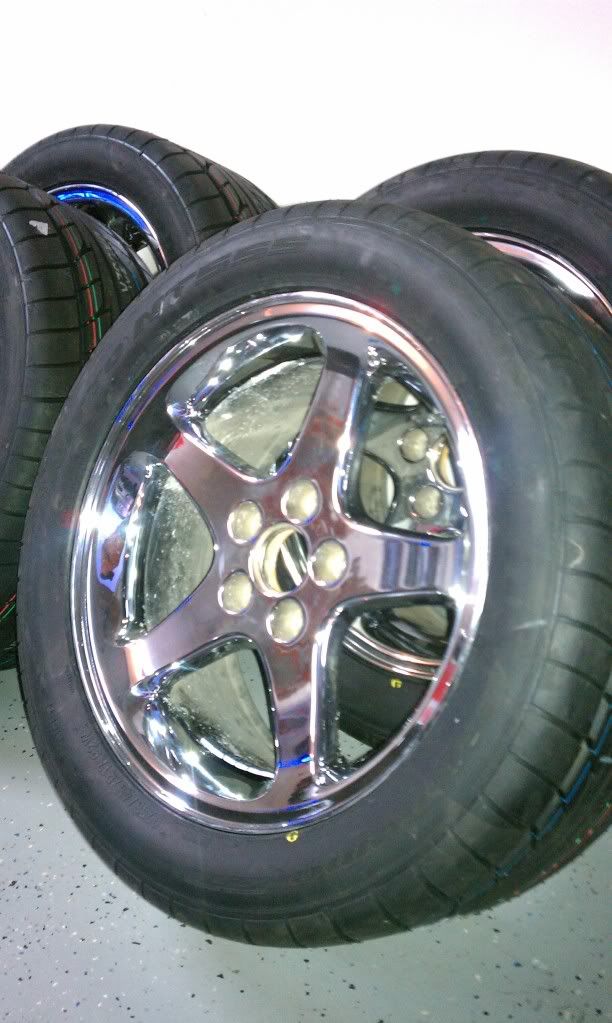
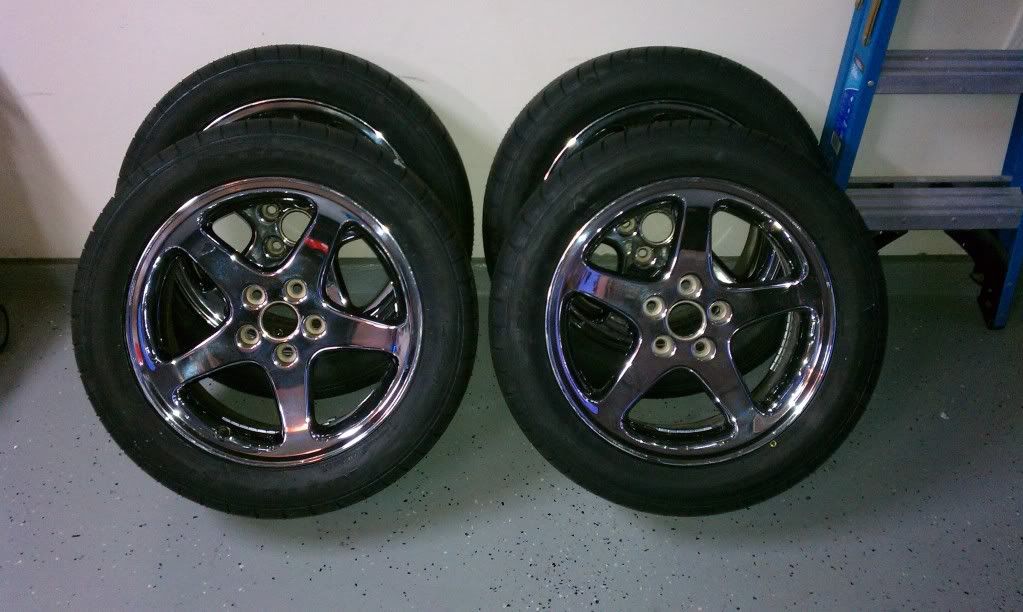
Got the big and lils on the coupe. Picked these up from SVO, spent HOURS and HOURS polishing these. Still have a long way to go, but they at least are sealed up for now. This wheel and tire combo totally changed the look, feel of the car. Really happy with them. Thanks JEFF!
Here's what they looked like...PRE-POLISH


I apologize in advance for the dirty car....there was no way in hell I'm washing it in 30 degree weather with a 15 mph wind.
Here's what they looked like...PRE-POLISH
I apologize in advance for the dirty car....there was no way in hell I'm washing it in 30 degree weather with a 15 mph wind.


 2/19/12, 02:04 PM
#4
V6 Member
Thread Starter
Join Date: February 19, 2012
Location: Temple, TX
Posts: 73
Likes: 0
Received 0 Likes
on
0 Posts
Got some more goodies today.....wife helped...LOL

Found a little monkey taking up residency:


Little bit mo meat
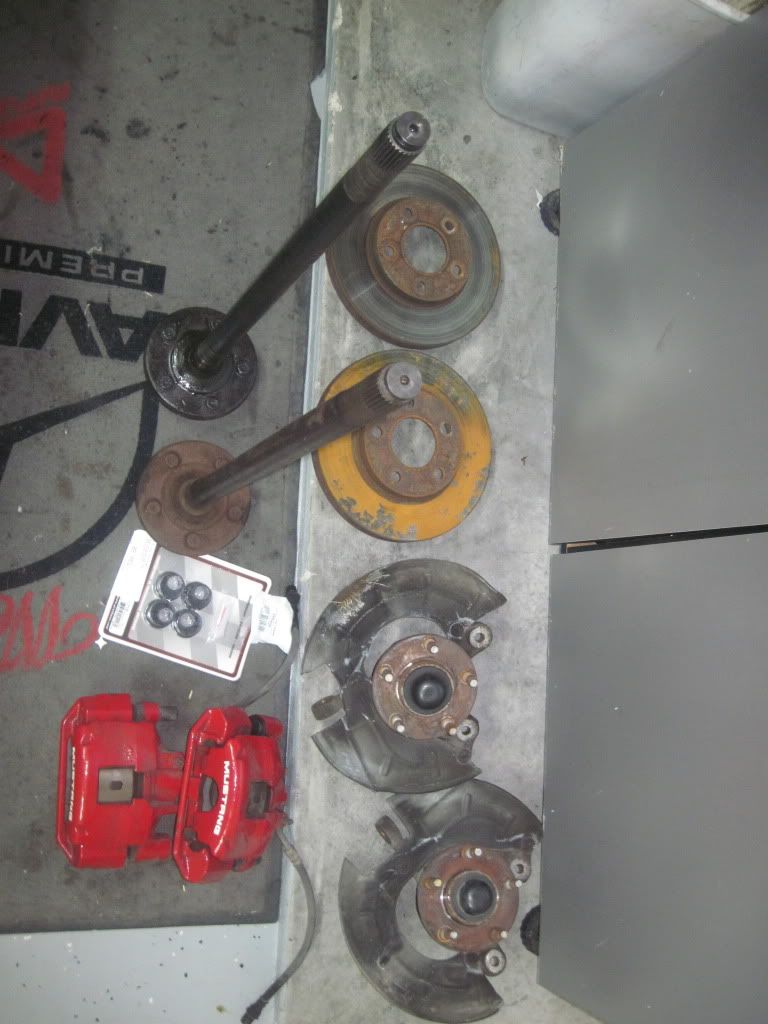
Got almost all the parts I need for my 5lug conversion:
Found a little monkey taking up residency:
Little bit mo meat
Got almost all the parts I need for my 5lug conversion:
2/19/12, 02:06 PM
#5
V6 Member
Thread Starter
Join Date: February 19, 2012
Location: Temple, TX
Posts: 73
Likes: 0
Received 0 Likes
on
0 Posts
Well I'm just a little bit closer.....here's something for ya'll to chew on.....wheel setup will be going on this weekend :P
Pics will be posted as soon as I get more :P
Pics will be posted as soon as I get more :P
 2/19/12, 02:06 PM
#7
V6 Member
Thread Starter
Join Date: February 19, 2012
Location: Temple, TX
Posts: 73
Likes: 0
Received 0 Likes
on
0 Posts
Well got the wife to take pictures of the coupe after the 5 lug swap. She's not happy with the pictures at all, so we're going to try again tomorrow. Anyway here's the ones she took.
Camera= Canon Rebel XTI


Car is going to paint shortly...and eibach's are in it's VERY near future...4x4 option was made more obvious after the wheels swap...
Camera= Canon Rebel XTI
Car is going to paint shortly...and eibach's are in it's VERY near future...4x4 option was made more obvious after the wheels swap...
2/19/12, 02:07 PM
#8
V6 Member
Thread Starter
Join Date: February 19, 2012
Location: Temple, TX
Posts: 73
Likes: 0
Received 0 Likes
on
0 Posts
Well this mod if finally done. Didn't take too many pictures. I read thread after thread about this mod. Some people said do it this way, other's said this way. This is how I did mine. Pretty straight foreward if you ask me.
Dirty Engine Bay

As some of you have read you MIGHT have to notch out your alternator bracket. I had to on mine. Took a die grinder and dremel to grind mine down a bit. I borrow the pictures from another thread so you can see what you need to do:
BEFORE

AFTER

The top bolt hole on the fox is threaded (3/8) if I remember correctly. With the 3g alternator, you can either put in a helicoil, or you can do what most people do and go get a 2in 3/8 bolt,lock washer and nut to bolt up the top of the alternator. The bottom mount retains the factory bolt

New 4gauge power wire going from the alternator to the start solenoid. Some threads were different than other's here. Some said put a waffle fuse, or a fusible link on your new hot wire going to the solenoid. Some said close to the alternator, some said close to the start solenoid. I chose to put it close to the alternator. Well after some looking around (2hrs) No-one around here had a fusible link. So I ended up putting a 140 Amp Circuit breaker in. 4gauge in, 4 gauge out. This way if something goes wrong and I blow a fuse I'm not paying $5 a fuse.
New 4 gauge wire:

Circuit Breaker:

Spliced Stator wire:

Belt Clearence:

That's pretty much it. Only other problem that I ran into was the pulley that was on my stock Fox 75 amp alternator was not the same size that was on my 3g alternator.My belt that I had wasn't big enough. So I ended up just changing out the belt.
This mod is leading up to this:
Taurus Fan

Picked up thisNew Shifter ****, with a "modified shift handle" also.

Dirty Engine Bay
As some of you have read you MIGHT have to notch out your alternator bracket. I had to on mine. Took a die grinder and dremel to grind mine down a bit. I borrow the pictures from another thread so you can see what you need to do:
BEFORE
AFTER
The top bolt hole on the fox is threaded (3/8) if I remember correctly. With the 3g alternator, you can either put in a helicoil, or you can do what most people do and go get a 2in 3/8 bolt,lock washer and nut to bolt up the top of the alternator. The bottom mount retains the factory bolt
New 4gauge power wire going from the alternator to the start solenoid. Some threads were different than other's here. Some said put a waffle fuse, or a fusible link on your new hot wire going to the solenoid. Some said close to the alternator, some said close to the start solenoid. I chose to put it close to the alternator. Well after some looking around (2hrs) No-one around here had a fusible link. So I ended up putting a 140 Amp Circuit breaker in. 4gauge in, 4 gauge out. This way if something goes wrong and I blow a fuse I'm not paying $5 a fuse.
New 4 gauge wire:
Circuit Breaker:
Spliced Stator wire:
Belt Clearence:
That's pretty much it. Only other problem that I ran into was the pulley that was on my stock Fox 75 amp alternator was not the same size that was on my 3g alternator.My belt that I had wasn't big enough. So I ended up just changing out the belt.
This mod is leading up to this:
Taurus Fan
Picked up thisNew Shifter ****, with a "modified shift handle" also.
2/19/12, 02:07 PM
#9
V6 Member
Thread Starter
Join Date: February 19, 2012
Location: Temple, TX
Posts: 73
Likes: 0
Received 0 Likes
on
0 Posts
Ok so after reading a RETARDED amount of threads all over the interwebs, I figured I'd tackle this mod.
Installation of a Early 90's model 2 speed Taurus electric fan on my 90 Notchback.
Parts:
Taurus Fan:

Hayden Fan Controller:

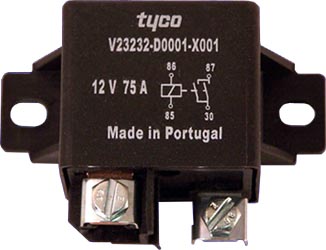
75 Amp Relay :
40 Amp female fuse:
Radiator zip ties:

10ft of 8 gauge wire
10ft of 12 gauge wire
Butt splices
Ring Terminals
Zip Ties
Electrical tape
Ok so I picked up my taurus fan for 28 bucks at our local wrench a part. The weekend before I picked up my 3g alternator for 28 bucks also.
Anyway, Here is my horrible wiring diagram, with my chicken scratch writing. Before I did anything, I wrote this down.

Had a few spots where I just couldn't figure out. The write ups that are on the net vary so much, that you don't know who is right/wrong blah blah blah. So after a call and
long chat with a professional who doesn't do this for a living, finally got things ironed out. So first I did the wiring for the fan itself.

Installed my 40 amp fuse:


Installed my 75 amp Relay:

Grounded the relay:


Now that that's all installed, time to rip out the old stuff. Pulled out the mechanical fan/clutch/shroud and overflow bottle. Reinstalled the 4 water pump bolts back
into the pulley.
Like every other write up, most talked about using weather stripping. I went the same route. 3/8 x 1/2 roll of weather stripping. I'm going to redo
mine. I think that I can do something better. But this will get me by for right now. The bottom of the fan fit's nicely into the bottom (factory) shroud
clips. But leaves you scratching your head for securing the top. Some write up's had you flip the fan upside down, and trim this piece off and
grind here. I didn't want to do that. So I mounted it the way it was stock. Went to the parts store and got some radiator pull through zip ties for the top
install. Talk about a pain in the ***. I would strongly recommend that you pull your radiator support arms (that hold the radiator in place) off so you can
lean the radiator and fan assembly forward so you can tighten up the retainers. So I installed the fan:


The picture above also show's where I mounted my controller. Figured I'd keep it there, that way I could adjust it if need be. Didn't really
have any other place to put it. All in all it worked out pretty good.
Fan installed:

For the overflow bottle, I still need to work on that. But for the time being I have two of the radiator pull through ties holding it on to the radiator. Hopefully
I'll make something out of sheet metal that will support it on the bottom.
The controller install was pretty self explanatory, I chose to only use the high speed side on the taurus fan. Flow's just fine and keep's my car @ 190 degree's with the
a/c on max and it's 105 outside. Pay attention to color wire's and look really hard at the factory wiring and where you going to tap into. I ended up wiring the fan the wrong
way and it was blowing air into the radiator instead of pulling. I missed the iddy biddy red strip on the wire. I tried to shrink wrap all my connections, some of them I just didn't
have the right size, so I made due with what I had. One note, as far as how to wire up the controller's 12v constant hot, and 12v "KEY ON" I didn't want my fan to run after I have
shut the car off. Things happen and mechanical/electrical parts can crap out. So I wired my controller's 12v constant hot and 12v "KEY ON" hot together to a 12v "KEY ON" source.
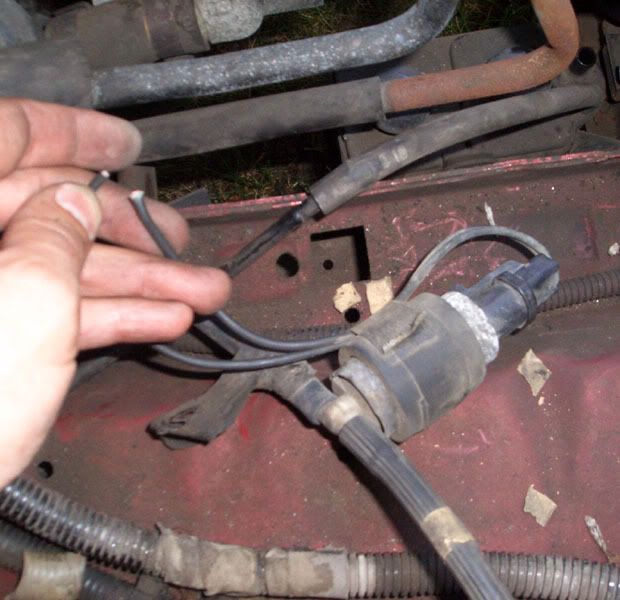
Which ended up being the PURGE SOLENOID connector. Both wire's are black so your going to have to figure out which wire is hot and which is ground.
Picture of purge solenoid (borrowed from another forum) which is located on the passenger side below the airbox, and inboard of the frame rail. you can't miss it.
The rest is a piece of cake. hope this helps, like I said there are SOOOOOO many write up's out there, and it can get kinda overwhelming on which one to do.
Any questions/suggestions lemme know. This is a rough install. I want to dress the wiring up better, seal the shroud on the radiator better....so by no means is
this completely done, but then again when is our mustang projects EVER done! ;D
Installation of a Early 90's model 2 speed Taurus electric fan on my 90 Notchback.
Parts:
Taurus Fan:
Hayden Fan Controller:
75 Amp Relay :
40 Amp female fuse:
Radiator zip ties:
10ft of 8 gauge wire
10ft of 12 gauge wire
Butt splices
Ring Terminals
Zip Ties
Electrical tape
Ok so I picked up my taurus fan for 28 bucks at our local wrench a part. The weekend before I picked up my 3g alternator for 28 bucks also.
Anyway, Here is my horrible wiring diagram, with my chicken scratch writing. Before I did anything, I wrote this down.
Had a few spots where I just couldn't figure out. The write ups that are on the net vary so much, that you don't know who is right/wrong blah blah blah. So after a call and
long chat with a professional who doesn't do this for a living, finally got things ironed out. So first I did the wiring for the fan itself.
Installed my 40 amp fuse:
Installed my 75 amp Relay:
Grounded the relay:
Now that that's all installed, time to rip out the old stuff. Pulled out the mechanical fan/clutch/shroud and overflow bottle. Reinstalled the 4 water pump bolts back
into the pulley.
Like every other write up, most talked about using weather stripping. I went the same route. 3/8 x 1/2 roll of weather stripping. I'm going to redo
mine. I think that I can do something better. But this will get me by for right now. The bottom of the fan fit's nicely into the bottom (factory) shroud
clips. But leaves you scratching your head for securing the top. Some write up's had you flip the fan upside down, and trim this piece off and
grind here. I didn't want to do that. So I mounted it the way it was stock. Went to the parts store and got some radiator pull through zip ties for the top
install. Talk about a pain in the ***. I would strongly recommend that you pull your radiator support arms (that hold the radiator in place) off so you can
lean the radiator and fan assembly forward so you can tighten up the retainers. So I installed the fan:
The picture above also show's where I mounted my controller. Figured I'd keep it there, that way I could adjust it if need be. Didn't really
have any other place to put it. All in all it worked out pretty good.
Fan installed:
For the overflow bottle, I still need to work on that. But for the time being I have two of the radiator pull through ties holding it on to the radiator. Hopefully
I'll make something out of sheet metal that will support it on the bottom.
The controller install was pretty self explanatory, I chose to only use the high speed side on the taurus fan. Flow's just fine and keep's my car @ 190 degree's with the
a/c on max and it's 105 outside. Pay attention to color wire's and look really hard at the factory wiring and where you going to tap into. I ended up wiring the fan the wrong
way and it was blowing air into the radiator instead of pulling. I missed the iddy biddy red strip on the wire. I tried to shrink wrap all my connections, some of them I just didn't
have the right size, so I made due with what I had. One note, as far as how to wire up the controller's 12v constant hot, and 12v "KEY ON" I didn't want my fan to run after I have
shut the car off. Things happen and mechanical/electrical parts can crap out. So I wired my controller's 12v constant hot and 12v "KEY ON" hot together to a 12v "KEY ON" source.
Which ended up being the PURGE SOLENOID connector. Both wire's are black so your going to have to figure out which wire is hot and which is ground.
Picture of purge solenoid (borrowed from another forum) which is located on the passenger side below the airbox, and inboard of the frame rail. you can't miss it.
The rest is a piece of cake. hope this helps, like I said there are SOOOOOO many write up's out there, and it can get kinda overwhelming on which one to do.
Any questions/suggestions lemme know. This is a rough install. I want to dress the wiring up better, seal the shroud on the radiator better....so by no means is
this completely done, but then again when is our mustang projects EVER done! ;D
2/19/12, 02:08 PM
#10
V6 Member
Thread Starter
Join Date: February 19, 2012
Location: Temple, TX
Posts: 73
Likes: 0
Received 0 Likes
on
0 Posts
Little update
Thanks to some good buddies, (ProjectResto+SSPwanbe) they picked up a 70 mm 93 Cobra MAF for me. Best part was it was only 15$!
Swapped in my 55mm MAF meter, It's working out really good
I'm using my buds pics, same housing, so you get the idea. Compared to the stock one visually. My god...what a choke point.

Here's a pic of the original:


Throttle response improvement was really prominent. Not bad if you ask me.
Thanks to some good buddies, (ProjectResto+SSPwanbe) they picked up a 70 mm 93 Cobra MAF for me. Best part was it was only 15$!
Swapped in my 55mm MAF meter, It's working out really good
I'm using my buds pics, same housing, so you get the idea. Compared to the stock one visually. My god...what a choke point.
Here's a pic of the original:
Throttle response improvement was really prominent. Not bad if you ask me.
2/19/12, 02:09 PM
#11
V6 Member
Thread Starter
Join Date: February 19, 2012
Location: Temple, TX
Posts: 73
Likes: 0
Received 0 Likes
on
0 Posts
Well put the car on MV's dyno and was greatly surprised!
230 hp and 292 ft lbs of torque

[/video]
[/video]
230 hp and 292 ft lbs of torque
Last edited by oatburner99; 2/19/12 at 02:10 PM.
2/19/12, 02:11 PM
#12
V6 Member
Thread Starter
Join Date: February 19, 2012
Location: Temple, TX
Posts: 73
Likes: 0
Received 0 Likes
on
0 Posts
Alright no more 4 wheeling for the notch. Picked up a set of Saleen Racecraft springs, and me and my buddy Justin put them on this morning. Went on with no problems. Only worry that I had was that I have a REALLY REALLY steep driveway, and I was worried about scraping while trying to get the car in the garage. But I squeaked by. Overall the springs feel awesome. The car handles like it's on rails (in combination with the subframes) but the ride isn't bone jaring or beat you to death. Very happy with the outcome. Only thing I've got to work out a little more is roll the fender lips. Still rubs on the tire, in the front and the back. Easy enough fix. Excuse the cell phone pics, the sun was STUPID bright early this morning which caused the glare. Here's some pics:
Springs:

Before the spring install (at Reborn's house)


Stock vs Saleen's

Out with the old:

All done:

All installed got glare? :


Springs:
Before the spring install (at Reborn's house)
Stock vs Saleen's
Out with the old:
All done:
All installed got glare? :
2/19/12, 02:11 PM
#13
V6 Member
Thread Starter
Join Date: February 19, 2012
Location: Temple, TX
Posts: 73
Likes: 0
Received 0 Likes
on
0 Posts
So here's a little update (sorry been working alot and have no life)
Just a quick picture of the car lowered again, better than the sucky phone pictures.


Main news, I picked up 1 other polished cobra wheel (already had 1 spare) so I can mount some Drag radials on them, and not tear up my nitto's when I go to the track. Maybe this will get me to the track more often too lol...

Picked these up as well, although now that I have my other cobra wheel, these will be up for sale shortly:


car needs some love, I picked up the door to body weatherstripping kits from LRS last weekend, need to get those changed out, before it starts raining. Thats about it....I'll post up more when I get it
Just a quick picture of the car lowered again, better than the sucky phone pictures.
Main news, I picked up 1 other polished cobra wheel (already had 1 spare) so I can mount some Drag radials on them, and not tear up my nitto's when I go to the track. Maybe this will get me to the track more often too lol...
Picked these up as well, although now that I have my other cobra wheel, these will be up for sale shortly:
car needs some love, I picked up the door to body weatherstripping kits from LRS last weekend, need to get those changed out, before it starts raining. Thats about it....I'll post up more when I get it
2/19/12, 02:12 PM
#14
V6 Member
Thread Starter
Join Date: February 19, 2012
Location: Temple, TX
Posts: 73
Likes: 0
Received 0 Likes
on
0 Posts
Little update,
So I started to notice that the car was running a little bit warmer than normal. Found out my water pump was seeping out of the weep hole. In my garage the floor has an epoxy coating on it, which makes leaks really noticeable. That is if you don't have carpet down underneath your car (like I did) and didn't notice it leaking.
Well it got to the point where I would fill it up in the morning before work, drive to work (8miles) drive home and the radiator would be almost empty.
So I picked up a new Ford Racing water pump, new thermostat, new gasket's and ARP's waterpump bolt/stud kit from LRS. Luckily for me (with the help of a knowledgeable friend, not one bolt busted off. Had 2 that were really questionable. Like as your trying to loosen the bolt, it kind of has that "dead" feeling to it, and you start thinking "oh ****, please don't break....please don't break." Well the praying worked, no broken bolts. Found that it was the original water pump that came on the car. 21 years old. Not bad Anyway it finally let go between the shims and the timing cover gasket. Here's a couple of pics:
Just a lil leak:


Out with the old, prepped and ready for the new one:

FAIL:

USED plain and simple (147,000 mile water pump)

Old and new:

Buddies water pump bolt:


All Done!

ARP studs/Bolts and new bypass hoses

Coming up next is this:


So I started to notice that the car was running a little bit warmer than normal. Found out my water pump was seeping out of the weep hole. In my garage the floor has an epoxy coating on it, which makes leaks really noticeable. That is if you don't have carpet down underneath your car (like I did) and didn't notice it leaking.
Well it got to the point where I would fill it up in the morning before work, drive to work (8miles) drive home and the radiator would be almost empty.
So I picked up a new Ford Racing water pump, new thermostat, new gasket's and ARP's waterpump bolt/stud kit from LRS. Luckily for me (with the help of a knowledgeable friend, not one bolt busted off. Had 2 that were really questionable. Like as your trying to loosen the bolt, it kind of has that "dead" feeling to it, and you start thinking "oh ****, please don't break....please don't break." Well the praying worked, no broken bolts. Found that it was the original water pump that came on the car. 21 years old. Not bad
Anyway it finally let go between the shims and the timing cover gasket. Here's a couple of pics:Just a lil leak:
Out with the old, prepped and ready for the new one:
FAIL:
USED plain and simple (147,000 mile water pump)
Old and new:
Buddies water pump bolt:
All Done!
ARP studs/Bolts and new bypass hoses
Coming up next is this:
2/19/12, 02:13 PM
#15
V6 Member
Thread Starter
Join Date: February 19, 2012
Location: Temple, TX
Posts: 73
Likes: 0
Received 0 Likes
on
0 Posts
Noticed this:
BBK longtubes 2.5 on the ball and socket are actually 2.25.

Then the ports on the flange have big welds inside. Plan is to smooth them out:

Tools of destruction, diamond cut rotary bits

BBK longtubes 2.5 on the ball and socket are actually 2.25.
Then the ports on the flange have big welds inside. Plan is to smooth them out:
Tools of destruction, diamond cut rotary bits
2/19/12, 02:14 PM
#16
V6 Member
Thread Starter
Join Date: February 19, 2012
Location: Temple, TX
Posts: 73
Likes: 0
Received 0 Likes
on
0 Posts
So finally got a little bit of work done. I've been procrastinating for some reason. So I finally got off my butt and got some work done.
Spent today working on my Explorer Gt40 upper intake. This thing looked like it was set on fire and beat with a wet chain. So I gave it a little love today:
Got started with the paint stripper:


All cleaned up ready for primer:


1st Copy of Primer:

2nd Coat:

3rd Coat:

Final Coat:

Lower fins prepped:


Plan is to Paint it black, clear it over and polish up the intake plate. Letting the primer dry and then on to the black
Spent today working on my Explorer Gt40 upper intake. This thing looked like it was set on fire and beat with a wet chain. So I gave it a little love today:
Got started with the paint stripper:
All cleaned up ready for primer:
1st Copy of Primer:
2nd Coat:
3rd Coat:
Final Coat:
Lower fins prepped:
Plan is to Paint it black, clear it over and polish up the intake plate. Letting the primer dry and then on to the black
2/19/12, 02:14 PM
#17
V6 Member
Thread Starter
Join Date: February 19, 2012
Location: Temple, TX
Posts: 73
Likes: 0
Received 0 Likes
on
0 Posts
Well it's just in primer, but here's the first coat:

and I FINALLY found one of these...my god you'd think these things were made of gold or something:

and these new center caps were given to me by a good friend, cause she's just that cool!


and I FINALLY found one of these...my god you'd think these things were made of gold or something:
and these new center caps were given to me by a good friend, cause she's just that cool!


