
Rocker Panel Stripe install


Rocker Panel Stripe install
Special thanks to OKCMustangGT for letting us all benefit from his rocker stripe install. 
I purchased my Vinyl GT300 Rocker Panel Stripe Decals from Baltimore Street Mods www.baltimorestreetmods.com and am very pleased with the design and quality of the decals.
TOOLS & EQUIPMENT USED:
Straightedge (4’) - X-acto Knife - Ruler/Yardstick (Wooden) - Grease Pencil - ¾” Masking Tape
Vinyl Squeegee - Vinyl Adhesive Solution - Soft Brush - Pin (To pop air bubbles) - Level
SURFACE PREPARATION
The first thing you need to do is make sure the area is prepped, clean and free of any grease, dirt or debris. I would recommend using water with some dish soap added. This combination is very hard on wax and polish but will not harm your paint or clear coat. The reason I recommend this is I have heard horror stories of people trying to install vinyl after they have waxed/polished their cars and the decals just blow off. (ZAINO is especially notorious for this) I have heard people using denatured alcohol as well, but I didn’t. After the area is washed make sure it is dry and free of any dirt particles or strings from towels, etc.
INITIAL DECAL PREPARATION
My decals came in one long strip with both decals on it. I recommend placing the decals on a clean flat surface (we used a workbench that had been dusted) and then placing a straightedge in the center of the two decals and using an X-acto knife to cut the decals in two separate strips, being careful not to cut either actual decal just the backing paper.
ALIGNMENT PREPARATION
The flat distance where the decal goes is 5” between the lip of the door indention and the bottom of the flat area. This makes for easy math as the decals are 3”, which leaves a distance of 1” above and below the decal. Take a ruler and measure 1” down from the top of the door indention lip. With a grease pencil make a mark as far toward the front wheel well as possible and as far toward the rear wheel well as possible. The rear mark can’t go all the way to the wheel well due to the upward curvature of the door indention. Use a level and straight edge to transfer the mark to the edge of the rear wheel well.

MASKING THE DECALS
Now it is time to mock-up the decals and set them into the correct positions. This is where it is VERY helpful to have a second set of hands. Hold the lettering end (FORWARD END) of the decal and line it up with the grease pencil mark using the top of the DECAL line, NOT THE BACKING STRIP. Have your helper do the same with the REAR END of the decal. Make sure you leave enough decal to wrap around both wheel wells and tuck into the lips there. Once you are satisfied with the alignment, place several pieces of masking tape along the length of the decal to hold it in place. Notice a piece of tape is also holding the edge to the rear tire to aide in the process.

Recheck the entire length of the decal to make sure a 1” gap is maintained between the lip edge and the top line of the actual decal, NOT THE BACKING STRIP. Once you are again satisfied with the alignment it is time to secure the decal so it won’t move. Take a roll of ¾” masking tape and at the top of the decal run a strip the entire length making sure that about 2/3 of the tape is on the decal and 1/3 on the car. Place another strip the entire length of the decal this time making sure about 1/3 of the tape is on the previous strip of tape and 2/3 on the car. Also at this time place a 2”-3” strip of tape at the beginning and ending slots of the door.
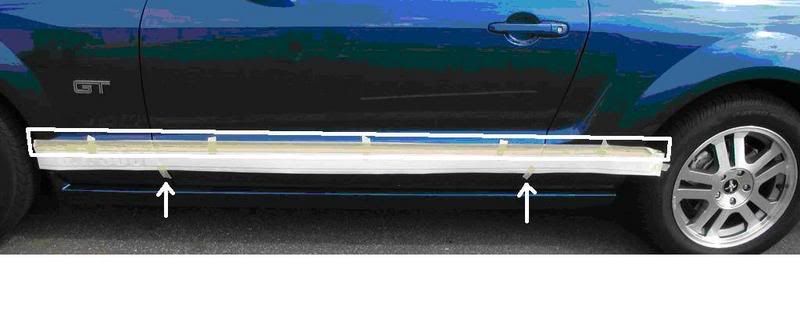
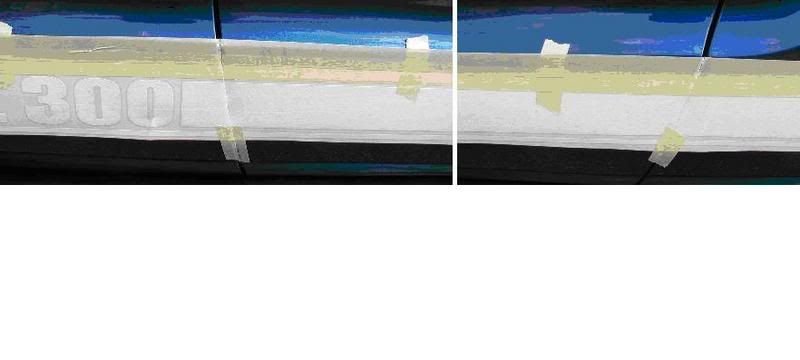
Take your finger and press along the decal where the door slots are, the place where you put the 2”-3” strip of masking tape. This creates a slight groove in the decal and marks the edges of the car so you know where to cut and where not to. Cut? Yes that’s right, cutting is the next step, but it is not very much and not very difficult, you just need a somewhat steady hand. Take the X-acto knife and carefully cut the decal down the center of the groove you just created. This will allow you to wrap the excess around the door and frame edges.
APPLYING THE SOLUTION AND DECALS
Ok, we now have the decals in place, taped down and cut where the door is. It’s now time to start actually applying the decals to the car. First, lift the decal up from the bottom and gently remove the backing strip. Hold the decal up and lightly sprits the backside of the decal as well as the area where the decal will lay against the car, with a vinyl adhesive solution. This can be found at auto body shops or in my case a vinyl sign shop. Most instructions will tell you to spray a lot of solution so you can move the decal into place, but since we have already taken the steps to secure the decals this is not necessary. That being said, use very little of this solution, otherwise it takes forever to dry and you will get aggravated trying to remove all the excess moisture from under the decal.
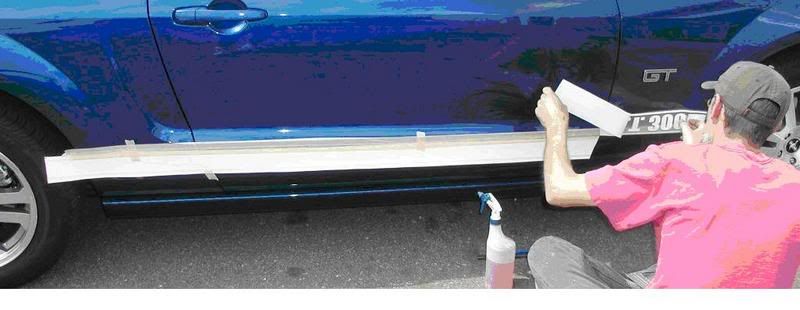
Lay the decal back down against the car and remove any excess moisture using a squeegee, like the one in the picture below. You do not need to press hard, be patient and gently squeegee the water away until the entire decal is lying flat against the car with as few air bubbles as possible. We used a downward motion to remove most bubbles but occasionally used a side to side motion. Now you wait a few minutes for the decal to dry a little before you remove the top protective film. In our experience, by the time we had worked the air bubbles out of the next section the previous section was ready to remove the protective film.
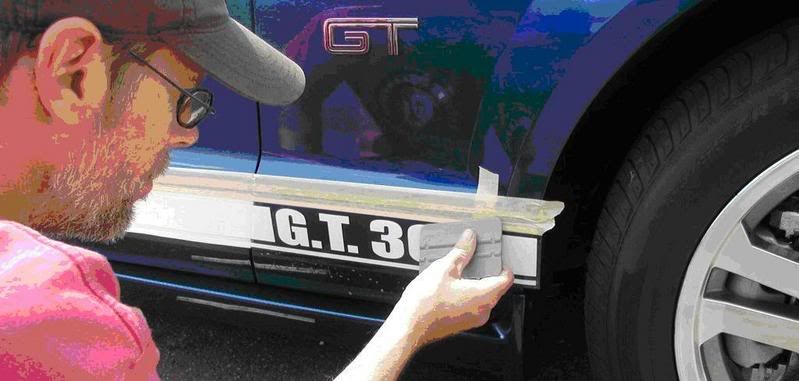
Grasp one of the loose ends and gently begin to peel the film away from the decal. Pull at a 0-5º angle being very gentle and patient. Once the film is removed use your finger, the meaty part not the nail, and work out any remaining bubbles. At times this can be very frustrating as not all of the bubbles will want to cooperate. You will probably not be able to work out all of the air bubbles and they will have to be popped with a needle to release the trapped moisture. (Be Careful doing this so you don’t scratch, poke your paint)
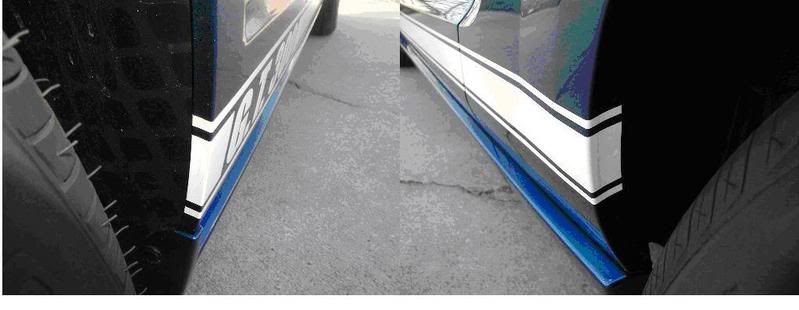
Wrap the edges of the decal as far as you can around the door edges, opening the door helps greatly on some areas. On the wheel wells wrap the edge around and tuck it back behind the lip that is created by the folded sheet metal.
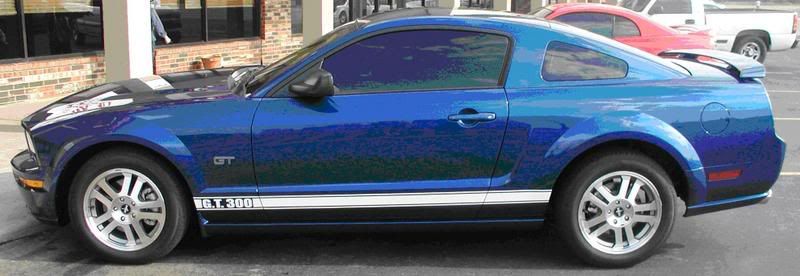
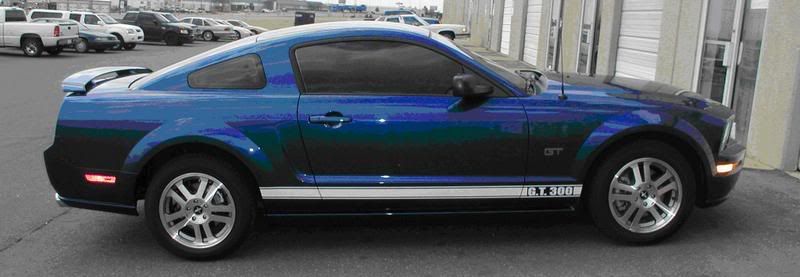
Repeat the entire process for the other side of the car, and when done it should look something like this.
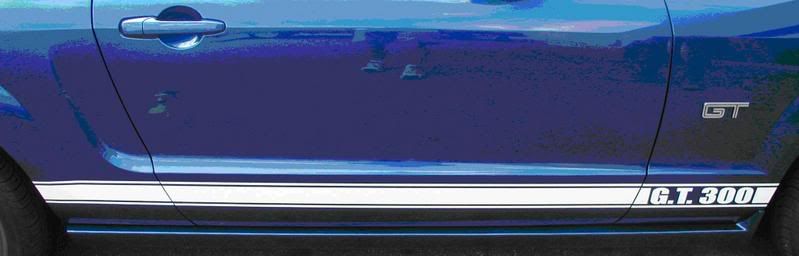
I purchased my Vinyl GT300 Rocker Panel Stripe Decals from Baltimore Street Mods www.baltimorestreetmods.com and am very pleased with the design and quality of the decals.
TOOLS & EQUIPMENT USED:
Straightedge (4’) - X-acto Knife - Ruler/Yardstick (Wooden) - Grease Pencil - ¾” Masking Tape
Vinyl Squeegee - Vinyl Adhesive Solution - Soft Brush - Pin (To pop air bubbles) - Level
SURFACE PREPARATION
The first thing you need to do is make sure the area is prepped, clean and free of any grease, dirt or debris. I would recommend using water with some dish soap added. This combination is very hard on wax and polish but will not harm your paint or clear coat. The reason I recommend this is I have heard horror stories of people trying to install vinyl after they have waxed/polished their cars and the decals just blow off. (ZAINO is especially notorious for this) I have heard people using denatured alcohol as well, but I didn’t. After the area is washed make sure it is dry and free of any dirt particles or strings from towels, etc.
INITIAL DECAL PREPARATION
My decals came in one long strip with both decals on it. I recommend placing the decals on a clean flat surface (we used a workbench that had been dusted) and then placing a straightedge in the center of the two decals and using an X-acto knife to cut the decals in two separate strips, being careful not to cut either actual decal just the backing paper.
ALIGNMENT PREPARATION
The flat distance where the decal goes is 5” between the lip of the door indention and the bottom of the flat area. This makes for easy math as the decals are 3”, which leaves a distance of 1” above and below the decal. Take a ruler and measure 1” down from the top of the door indention lip. With a grease pencil make a mark as far toward the front wheel well as possible and as far toward the rear wheel well as possible. The rear mark can’t go all the way to the wheel well due to the upward curvature of the door indention. Use a level and straight edge to transfer the mark to the edge of the rear wheel well.
MASKING THE DECALS
Now it is time to mock-up the decals and set them into the correct positions. This is where it is VERY helpful to have a second set of hands. Hold the lettering end (FORWARD END) of the decal and line it up with the grease pencil mark using the top of the DECAL line, NOT THE BACKING STRIP. Have your helper do the same with the REAR END of the decal. Make sure you leave enough decal to wrap around both wheel wells and tuck into the lips there. Once you are satisfied with the alignment, place several pieces of masking tape along the length of the decal to hold it in place. Notice a piece of tape is also holding the edge to the rear tire to aide in the process.
Recheck the entire length of the decal to make sure a 1” gap is maintained between the lip edge and the top line of the actual decal, NOT THE BACKING STRIP. Once you are again satisfied with the alignment it is time to secure the decal so it won’t move. Take a roll of ¾” masking tape and at the top of the decal run a strip the entire length making sure that about 2/3 of the tape is on the decal and 1/3 on the car. Place another strip the entire length of the decal this time making sure about 1/3 of the tape is on the previous strip of tape and 2/3 on the car. Also at this time place a 2”-3” strip of tape at the beginning and ending slots of the door.
Take your finger and press along the decal where the door slots are, the place where you put the 2”-3” strip of masking tape. This creates a slight groove in the decal and marks the edges of the car so you know where to cut and where not to. Cut? Yes that’s right, cutting is the next step, but it is not very much and not very difficult, you just need a somewhat steady hand. Take the X-acto knife and carefully cut the decal down the center of the groove you just created. This will allow you to wrap the excess around the door and frame edges.
APPLYING THE SOLUTION AND DECALS
Ok, we now have the decals in place, taped down and cut where the door is. It’s now time to start actually applying the decals to the car. First, lift the decal up from the bottom and gently remove the backing strip. Hold the decal up and lightly sprits the backside of the decal as well as the area where the decal will lay against the car, with a vinyl adhesive solution. This can be found at auto body shops or in my case a vinyl sign shop. Most instructions will tell you to spray a lot of solution so you can move the decal into place, but since we have already taken the steps to secure the decals this is not necessary. That being said, use very little of this solution, otherwise it takes forever to dry and you will get aggravated trying to remove all the excess moisture from under the decal.
Lay the decal back down against the car and remove any excess moisture using a squeegee, like the one in the picture below. You do not need to press hard, be patient and gently squeegee the water away until the entire decal is lying flat against the car with as few air bubbles as possible. We used a downward motion to remove most bubbles but occasionally used a side to side motion. Now you wait a few minutes for the decal to dry a little before you remove the top protective film. In our experience, by the time we had worked the air bubbles out of the next section the previous section was ready to remove the protective film.
Grasp one of the loose ends and gently begin to peel the film away from the decal. Pull at a 0-5º angle being very gentle and patient. Once the film is removed use your finger, the meaty part not the nail, and work out any remaining bubbles. At times this can be very frustrating as not all of the bubbles will want to cooperate. You will probably not be able to work out all of the air bubbles and they will have to be popped with a needle to release the trapped moisture. (Be Careful doing this so you don’t scratch, poke your paint)
Wrap the edges of the decal as far as you can around the door edges, opening the door helps greatly on some areas. On the wheel wells wrap the edge around and tuck it back behind the lip that is created by the folded sheet metal.
Repeat the entire process for the other side of the car, and when done it should look something like this.
 was so excited to read the write up I jumped right past that part! In that case you both get


Thread
Thread Starter
Forum
Replies
Last Post
Mr. Sparkle
2015 - 2023 MUSTANG
4
Sep 11, 2015 02:57 PM