
GT500 Diffuser and splash guards installed!

Thread Starter
V6 Member
Joined: November 8, 2010
Posts: 83
Likes: 0
From: Austin TX
GT500 Diffuser and splash guards installed!
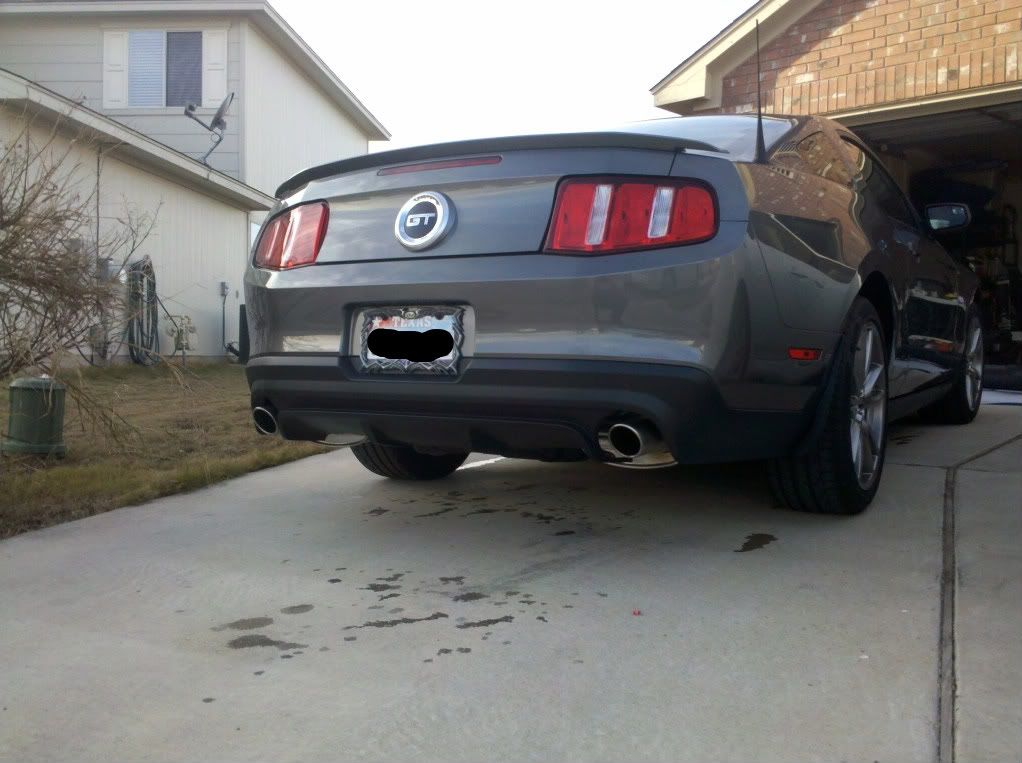
Finally found the time to do the install! Couldn't be happier. It gives the car a more aggressive rear which I believe the stang should have, but without standing out like a sore thumb. The perfect mod, one that can pass off as stock and fool most people, yet the trained eye will pick up on it.
Stock:

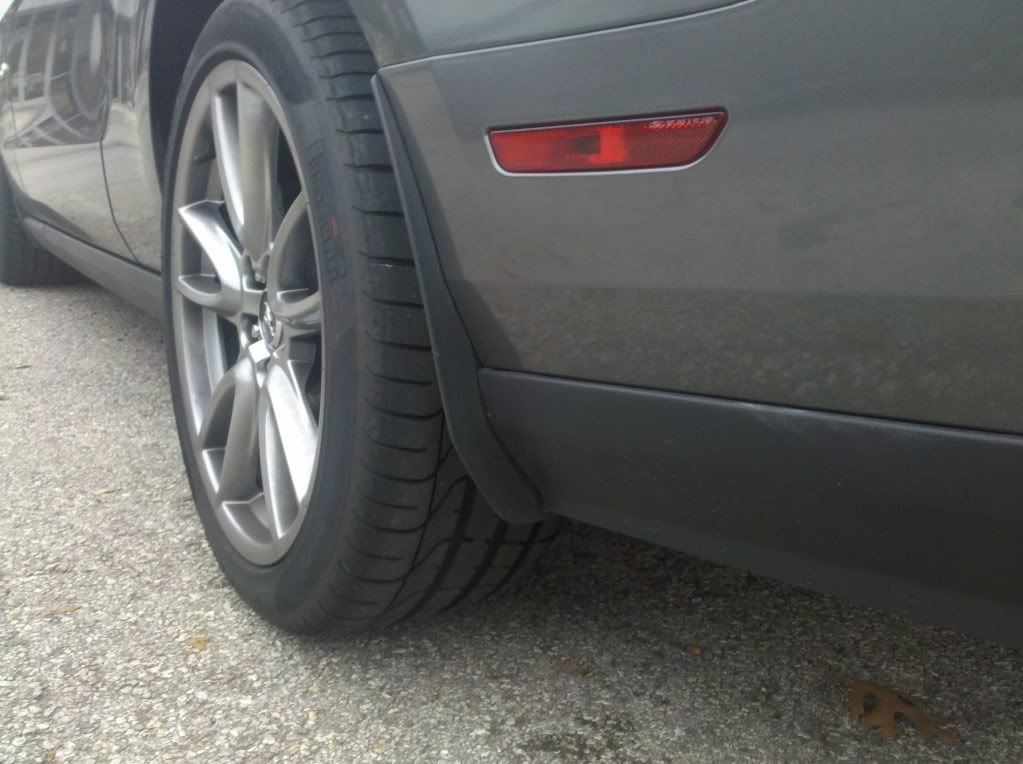
GT500 Diffuser/Splash Guards:

Install was fairly simple, Overboost's thread had some helpful information it that helped me, so THANKS to Overboost.
Here is the post he made that anybody looking to do this swap should read.
Stock:
GT500 Diffuser/Splash Guards:
Install was fairly simple, Overboost's thread had some helpful information it that helped me, so THANKS to Overboost.
Here is the post he made that anybody looking to do this swap should read.
Some things to note:
- I did end up taking the rear wheels off. This made the three screws easier to get to on each side, and with it up on jack stands, doing the clip removal underneath (2 on each side, two in the center, and two on the "straps" on the back) much easier to get to.
- Roush tells you to take the taillights off. I did, but didn't see much benefit in that.
- Also, there are two larger push pins up in the back center portion of the diffuser that need to be addressed. I didn't see this mentioned in the instructions, but they are just inside the mufflers, and have a large push pin holding them in place. If you see the diffuser off the car, it's very obvious.
- The biggest pain I had was separating the diffuser from the bumper. Most of the clips slid out, but the ones right at the license plate area were a real PITA to remove. Some careful persuasion got them out. Snapping it back together takes a clever touch to get it in place.
- Overall, it took me 2 hours to do it by myself. I took my time since this is the first time I've torn into the car. I ended up breaking the white W-clips from the factory diffuser, but they are cheap to replace.

Team Mustang Source
Joined: January 15, 2005
Posts: 1,424
Likes: 0
From: So. FL
Looks great, and you no longer have the big blue monster laying on the floor of your garage. 
I have the same job to do as soon as my wife's new 2011 grabber blue MCA arrives. Below are the parts waiting.

I have the same job to do as soon as my wife's new 2011 grabber blue MCA arrives. Below are the parts waiting.
Last edited by SoFlaBoss; Jan 10, 2011 at 02:12 PM.
Thread Starter
V6 Member
Joined: November 8, 2010
Posts: 83
Likes: 0
From: Austin TX
And as far as removing the tail lights, I would say you might still want to remove them just so you don't risk scratching the very top part trying to slide them out from under them.
Also, if you have a 2nd set of hands available, def recommended. It wasn't difficult removing/reinstalling the bumper, but a 2nd set of hands will be insurance that you don't drop it, or scratch it.
Thread Starter
V6 Member
Joined: November 8, 2010
Posts: 83
Likes: 0
From: Austin TX
Are those the GT500 mufflers? What's in the bag with the 3m tape? decklid trim maybe?
Team Mustang Source
Joined: January 15, 2005
Posts: 1,424
Likes: 0
From: So. FL
The mufflers are Magnaflow Street Axlebacks (part# 15595), and the bag of parts with the 3M tape are the non-painted black plastic pieces of the pedestal spoiler, that go with the painted portion sitting on the bed.
Thread Starter
V6 Member
Joined: November 8, 2010
Posts: 83
Likes: 0
From: Austin TX
Thanks. I thought maybe it was those long floppy supports just inside each muffler opening that were omitted by the Roush instructions? Anyhow, I'll need to lookup those instructions for my install.
The mufflers are Magnaflow Street Axlebacks (part# 15595), and the bag of parts with the 3M tape are the non-painted black plastic pieces of the pedestal spoiler, that go with the painted portion sitting on the bed.
The mufflers are Magnaflow Street Axlebacks (part# 15595), and the bag of parts with the 3M tape are the non-painted black plastic pieces of the pedestal spoiler, that go with the painted portion sitting on the bed.
Team Mustang Source
Joined: January 15, 2005
Posts: 1,424
Likes: 0
From: So. FL
Mach 1 Member
Joined: December 8, 2010
Posts: 731
Likes: 2
From: Naples, Fl
Looks great! How much those cost? My friend did that to his 07 for when he put dual 44s. The gt500 bumper just makes it look amazing
Last edited by SoFlo Mustang; Jan 11, 2011 at 05:28 AM.
V6 Member
Joined: October 17, 2010
Posts: 74
Likes: 0
From: TX
Joined: November 25, 2009
Posts: 1,519
Likes: 0
From: Metro Detroit
I really need to get the splash gaurds for my car, they look so good


Team Mustang Source
Joined: January 15, 2005
Posts: 1,424
Likes: 0
From: So. FL
I have them on my 08 Shelby GT with the OE 8.5" wide wheels and they look good. Even had them on my 05 GT with the GT/CS rear bumper and OE 8" wide wheels and they looked good. They were excellent (from a functional standpoint) at the dragstrip to when using M/T ET Streets on stock 17" bullet wheels that were 8" wide.
GTR Member
Joined: September 28, 2009
Posts: 6,284
Likes: 1
Perhaps the mod team can merge this thread with the one I created some time ago.
https://themustangsource.com/f802/ho...nstall-487757/
https://themustangsource.com/f802/ho...nstall-487757/