
2010 V6 Dual Exhaust Conversion Install

Thread Starter
Bullitt Member
Joined: March 17, 2010
Posts: 383
Likes: 0
From: Farmington Hills, MI
2010 V6 Dual Exhaust Conversion Install
This weekend I completed the conversion to duals on my '10 V6. I didn't buy it as an entire kit like some websites have (link), I pieced it all together with a bunch of hand-me down parts from friends (thanks Overboost) and a few parts I needed to buy.
Needed for the conversion:
Pypes Cut & Clamp X-pipe (link)
Stock Driver's side mid-pipe exhaust tube
Passenger side mid-pipe exhaust tube & clamp can be re-used
Stock mid-pipe clamp
Set of 2010 GT Axle-back mufflers
(2) Driver's side rear muffler hangers
Lower rear fascia valence from a 2010+ GT
Here is all the exhaust parts all laid out and ready for the install:

The Pypes Cut & Clamp X-Pipe

Having never dealt with Pypes before, I was a little skeptical about their quality and how well it will fit. I was VERY impressed with the quality of this component. The bends were done done via mandrel, and the welds were perfect TIG welds. Best of all, once I cut the stock Y-pipe this slipped right into place without having to fight with it. Look at the high-quality welds:

Overall the install went very well. This really does require 2 people to make it go easier and faster. The most difficult part of the entire install is swapping over the lower fascia valence. There are a few bolts and a lot of clips holding the fascia onto the body. Just take your time and it comes off pretty easily. Once off, the valence can be switched over. The connections for the driver's side muffler hangers need to be tapped using a M8x1.25 tap into the existing un-threaded weldnuts. Once everything is loosely bolted up, make sure to have your helper align the tips into the valence and tighten the system up starting from the front of the car, working your way back.
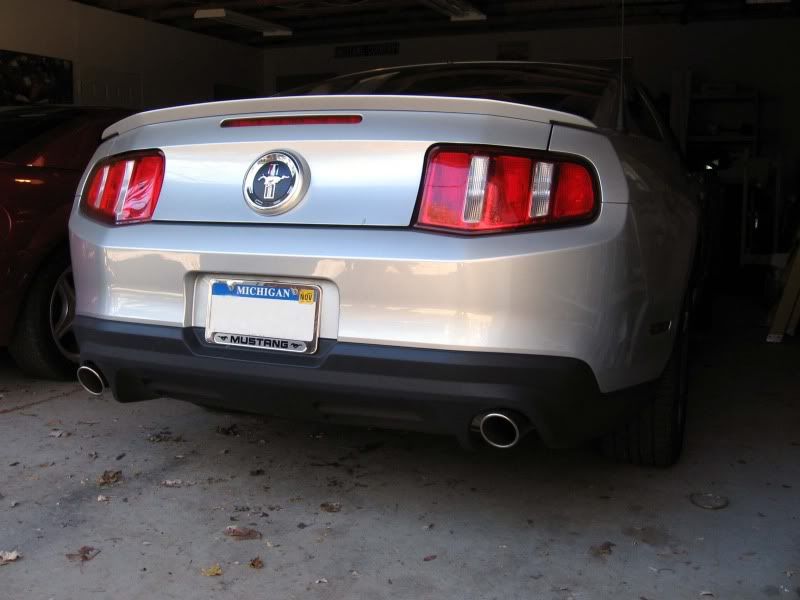
Overall, I am really happy with the results. The car has the look I was going for, and it retains OEM quality. The sound was actually a bit quieter than I was expecting. It has a real smooth sound that is a little louder, but better than stock. There was actually some power freed up in the upper RPM's. It pulls a little better above 4k now. For anyone with a 2010 V6 car, I would recommend this mod.
Needed for the conversion:
Pypes Cut & Clamp X-pipe (link)
Stock Driver's side mid-pipe exhaust tube
Passenger side mid-pipe exhaust tube & clamp can be re-used
Stock mid-pipe clamp
Set of 2010 GT Axle-back mufflers
(2) Driver's side rear muffler hangers
Lower rear fascia valence from a 2010+ GT
Here is all the exhaust parts all laid out and ready for the install:
The Pypes Cut & Clamp X-Pipe
Having never dealt with Pypes before, I was a little skeptical about their quality and how well it will fit. I was VERY impressed with the quality of this component. The bends were done done via mandrel, and the welds were perfect TIG welds. Best of all, once I cut the stock Y-pipe this slipped right into place without having to fight with it. Look at the high-quality welds:
Overall the install went very well. This really does require 2 people to make it go easier and faster. The most difficult part of the entire install is swapping over the lower fascia valence. There are a few bolts and a lot of clips holding the fascia onto the body. Just take your time and it comes off pretty easily. Once off, the valence can be switched over. The connections for the driver's side muffler hangers need to be tapped using a M8x1.25 tap into the existing un-threaded weldnuts. Once everything is loosely bolted up, make sure to have your helper align the tips into the valence and tighten the system up starting from the front of the car, working your way back.
Overall, I am really happy with the results. The car has the look I was going for, and it retains OEM quality. The sound was actually a bit quieter than I was expecting. It has a real smooth sound that is a little louder, but better than stock. There was actually some power freed up in the upper RPM's. It pulls a little better above 4k now. For anyone with a 2010 V6 car, I would recommend this mod.

Legacy TMS Member
Joined: May 19, 2010
Posts: 1,927
Likes: 567
From: Clinton TN

Member
Joined: January 25, 2011
Posts: 6
Likes: 0
From: Orlando
GTR Member
Joined: February 18, 2010
Posts: 4,990
Likes: 1
From: S.E. Texas
Member
Joined: January 25, 2011
Posts: 6
Likes: 0
From: Orlando
Thank you for the help. This probably won't be happening right away. It's slowly coming together and I'm trying to save up to get the Fr500s mufflers which aren't cheap. So besides being precise the install wasn't difficult?
Legacy TMS Member
Joined: May 19, 2010
Posts: 1,927
Likes: 567
From: Clinton TN
Not at all, a lot easier than fighting with the 4 inch exhaust on the Mack at work.
Thread Starter
Bullitt Member
Joined: March 17, 2010
Posts: 383
Likes: 0
From: Farmington Hills, MI
This was a very easy install as long as you are comfortable with using basic hand tools. There are a couple parts you will need other than the driver's side exhaust pipe though. You will also need both of the muffler hangers for the driver's side, and about (8) M8 bolts. You will also have to tap the factory bolt locations with an M8 tap so the bolts will thread in. Other than that, it is really easy.
Legacy TMS Member
Joined: May 19, 2010
Posts: 1,927
Likes: 567
From: Clinton TN
This was a very easy install as long as you are comfortable with using basic hand tools. There are a couple parts you will need other than the driver's side exhaust pipe though. You will also need both of the muffler hangers for the driver's side, and about (8) M8 bolts. You will also have to tap the factory bolt locations with an M8 tap so the bolts will thread in. Other than that, it is really easy.

Team Mustang Source
Joined: January 15, 2005
Posts: 1,424
Likes: 0
From: So. FL

When I added dual exhaust to my wife's (now my son's) 2006 V6, I got GT take-offs, including the extra hangers, bolts and band-clamp, at the same time I ordered the other parts to make it look like a GT. The driver's side mid-pipe I had laying around from my 05 GT after I installed a catback on it. And rather than the above Pypes X-pipe, I used a MAC Pro Chamber piece, that required cutting the y-pipe just like when adding the above Pypes X-pipe piece. Like you said measure twice and cut once! Cutting the y-pipe was easy, but tiring, using one of those chain type pipe cutters, by hand.
Josh - You're more than capable of doing the job yourself, after you get all the parts together. You'll need to raise the car some, so you'll need to borrow or buy a floorjack and stands, and simple tools, if you don't already have them. If you are the least bit uncomfortable working under a car, then by all means have a professional do it. Otherwise, just take your time and be safe.
Install the new rear fascia first, which alone will take you a good 3 or 4 hours.

Thread
Thread Starter
Forum
Replies
Last Post

