
Project Retrofit
 3/10/15, 08:12 AM
#1
Cobra R Member
Thread Starter
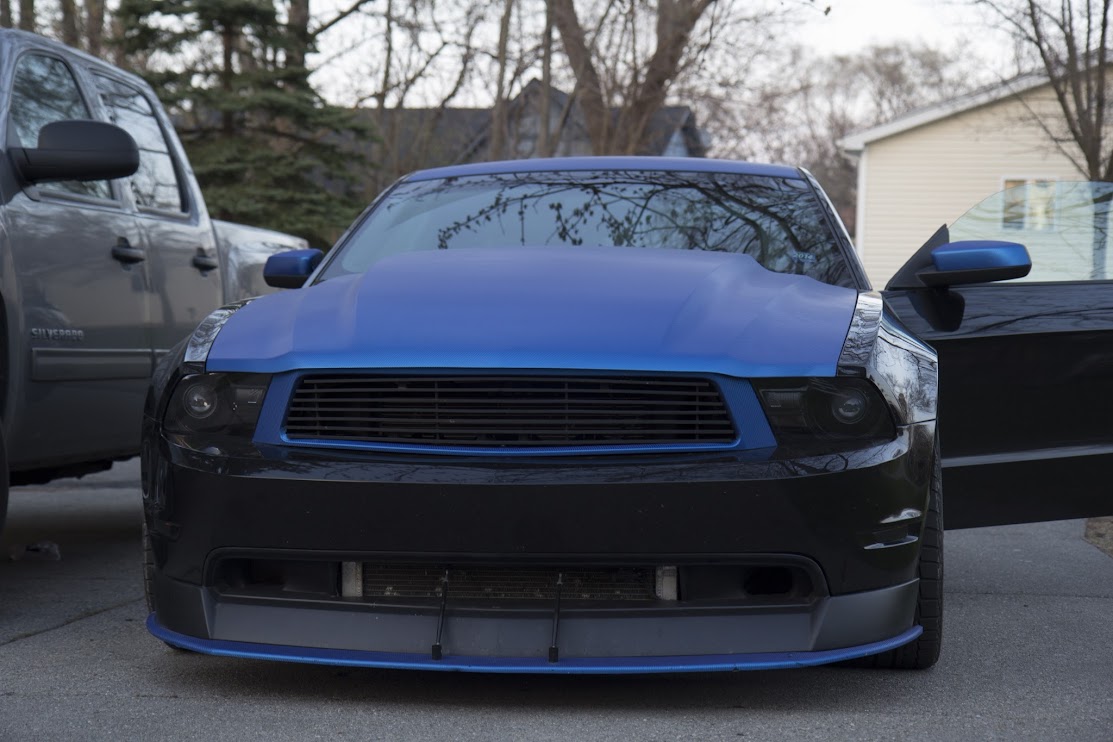
Project Retrofit - Finished
You can find the build after the finished product. Alright so finished everything today... only snag is one of the demon eyes wouldn't come on, and i tested both so either something is wired wrong orrr i some how fried it which would suck because now its stuck in the housing. Ill tinker with that another day.
Either way, got the housings sealed and installed and ITS ALL DONE and i think it looks AWESOMEEEEE..
here is what the stocks looked like before the Project.
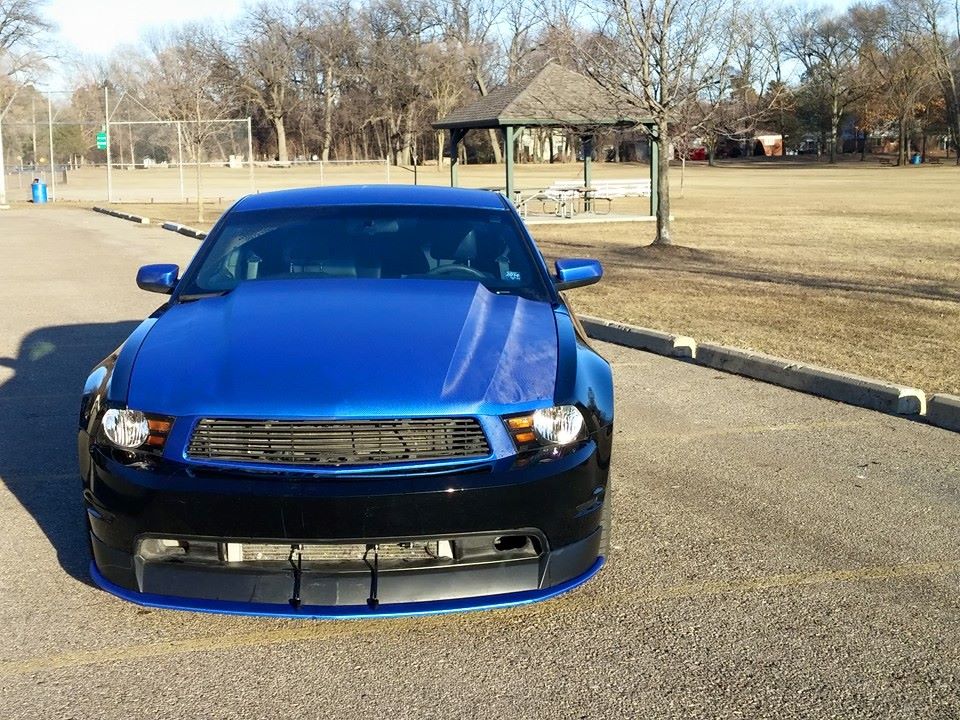
and now
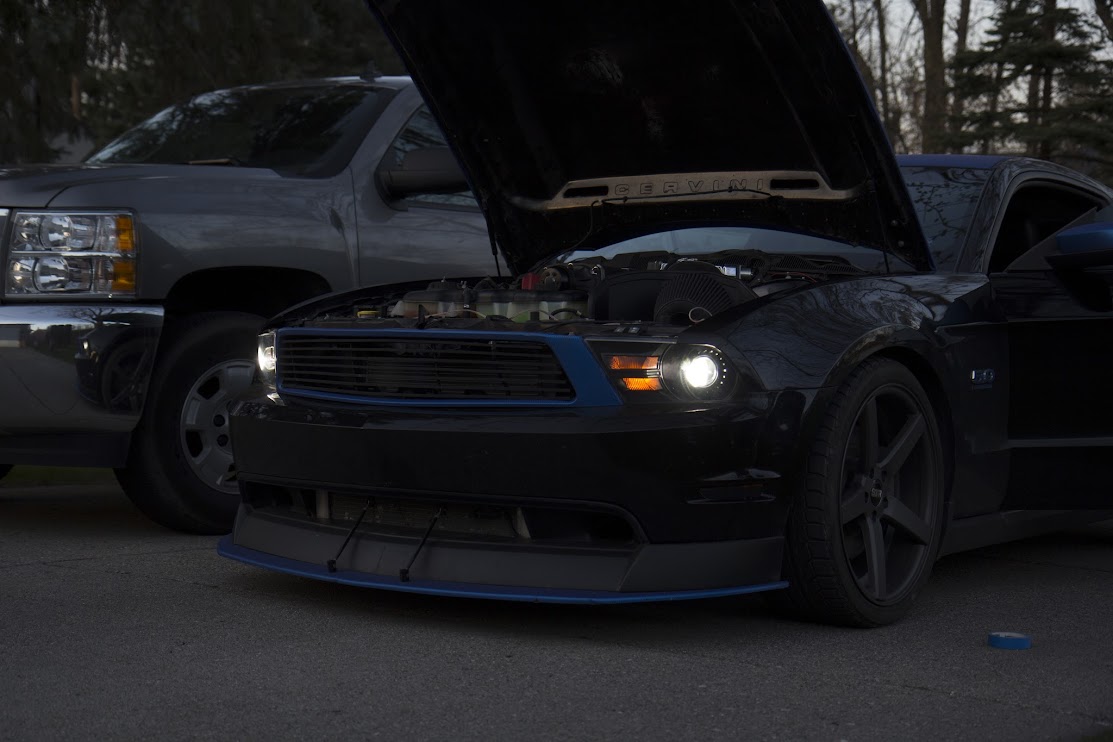
Hidden halo which is on is own switch.

lights on
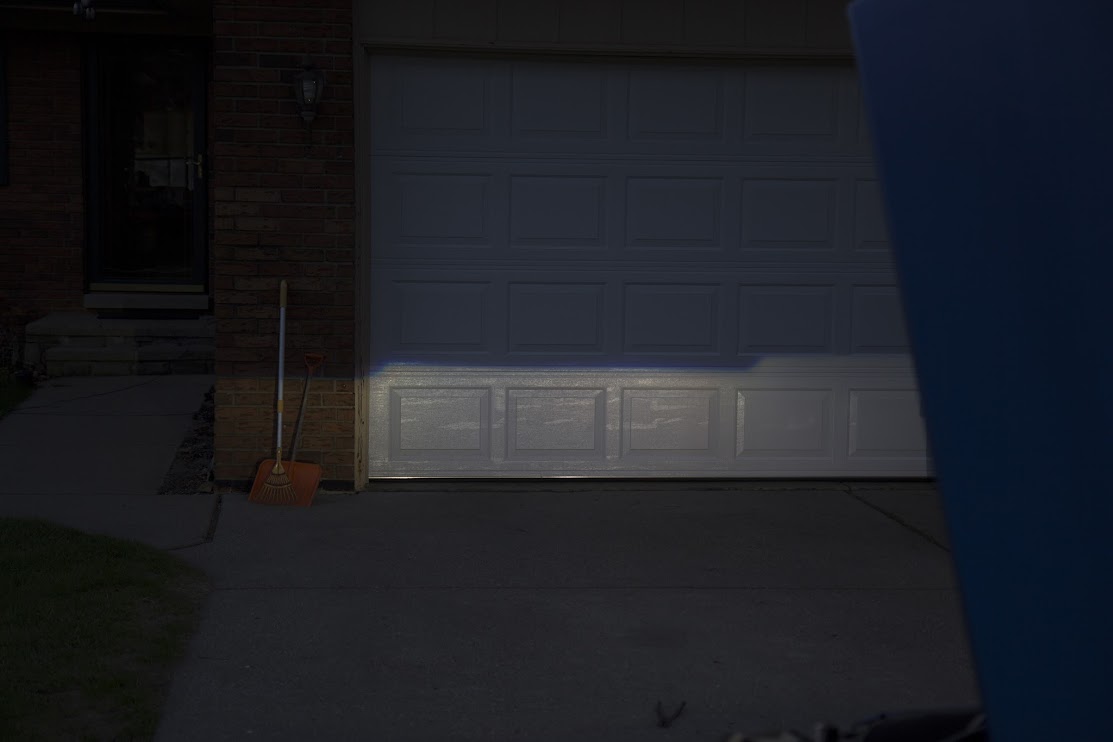
beam pattern
So one of the things I was planning to do this spring was get some new headlights, and replace the old halogen ones i have with some HIDs. At first i thought raxiom but decided to possibly do one of those custom deals like through HIDguy, now i know some people have had bad experiences with him so.... i decided to take on the challenge myself.
I succesfully wrapped my hood, installed a supercharger... might as well try to tackle this myself. The HID retrofit kit will be ordered through the retrofit source.
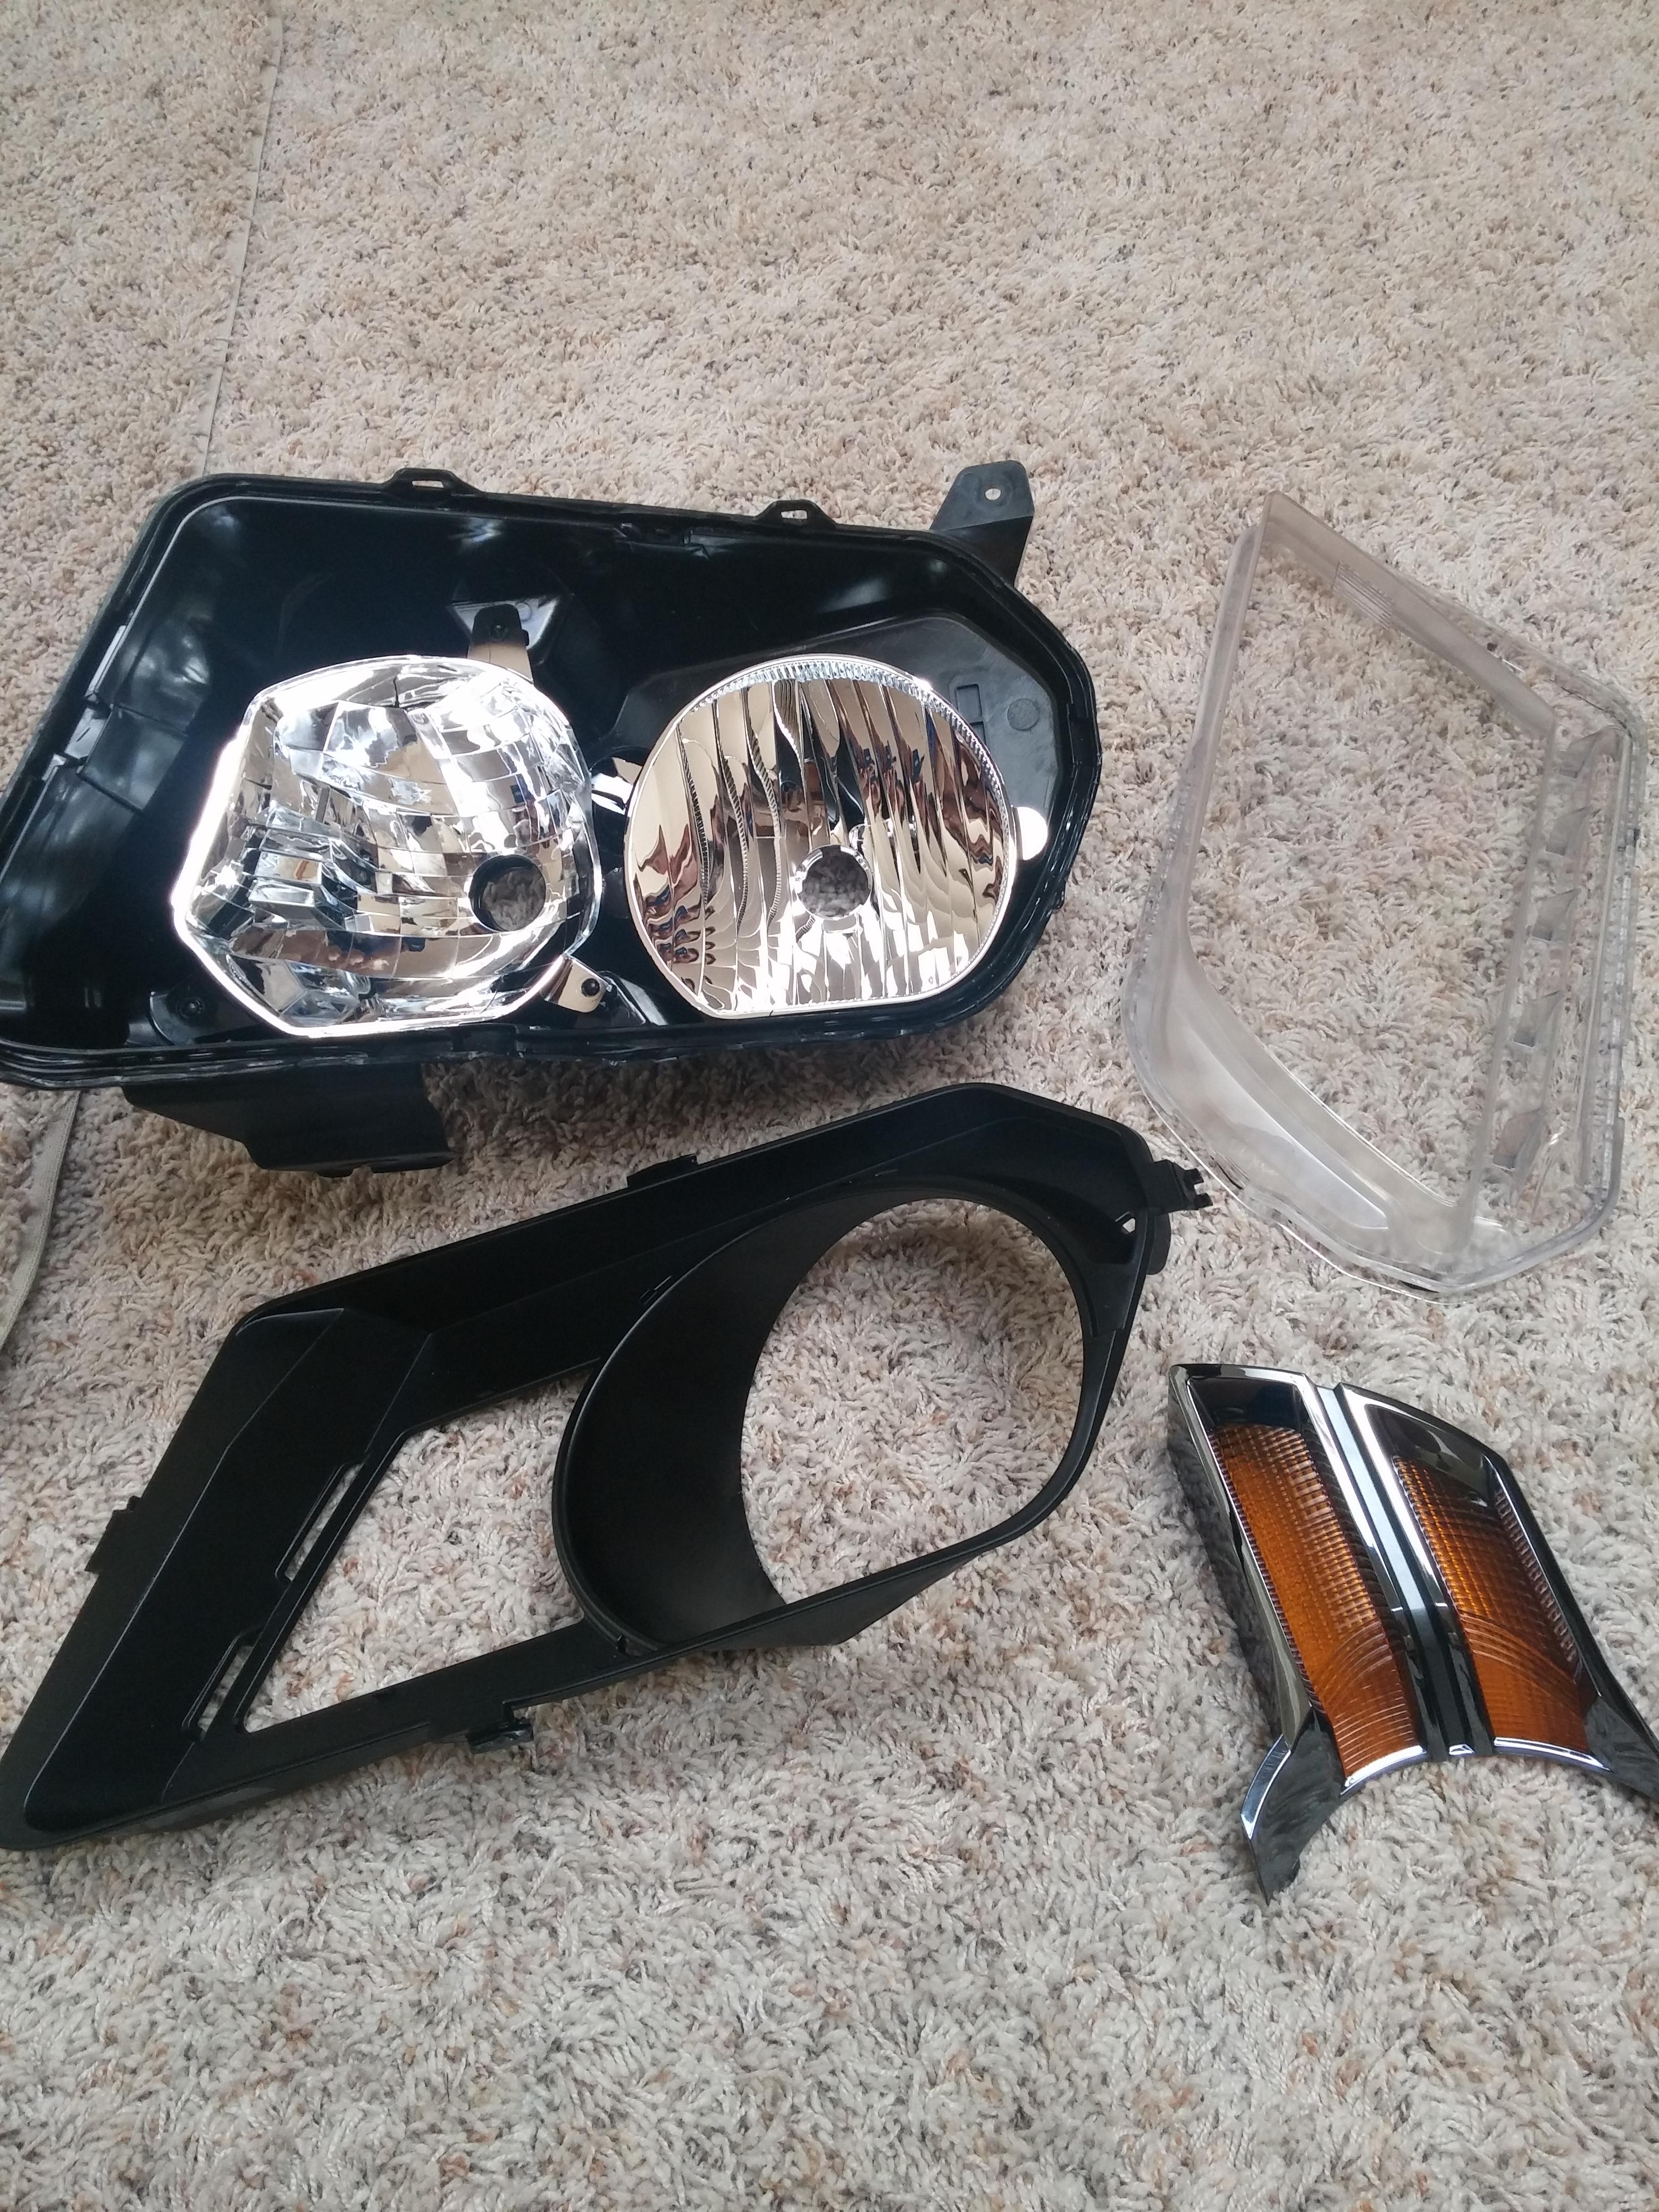
I also bought 2 used halogen headlights off ebay to work on so i don't have to use my current ones in case this all goes to crap.
So for now i will just be working with the ebay oem headlights. I want to ensure i can get the housing taken apart before i put money into the retrofit kit.
I will be posting pictures of the progress once i get them.
-----update 1-------
So i decided to finally tackle the head lights. I bought myself my own heat gun because i wanted to see if i could use that to pull the housings apart before i used a dremel on it.
and well it worked out great. Used a heat gun on the seams just enough to where the plastic was a bit mailable. Didn't take that much time to do both of them. It'll take a bit of time to clean out the recesses of the left over "glue" but the hard part is really done. So ill be ordering the retrofit kit soon.
Sadly i cracked a tab on one of them, so hopefully i can glue it back on to make it somewhat useable.
I will be painting the reflector and trim piece black.
Either way, got the housings sealed and installed and ITS ALL DONE and i think it looks AWESOMEEEEE..
here is what the stocks looked like before the Project.
and now
Hidden halo which is on is own switch.
lights on
beam pattern
So one of the things I was planning to do this spring was get some new headlights, and replace the old halogen ones i have with some HIDs. At first i thought raxiom but decided to possibly do one of those custom deals like through HIDguy, now i know some people have had bad experiences with him so.... i decided to take on the challenge myself.
I succesfully wrapped my hood, installed a supercharger... might as well try to tackle this myself. The HID retrofit kit will be ordered through the retrofit source.
I also bought 2 used halogen headlights off ebay to work on so i don't have to use my current ones in case this all goes to crap.
So for now i will just be working with the ebay oem headlights. I want to ensure i can get the housing taken apart before i put money into the retrofit kit.
I will be posting pictures of the progress once i get them.
-----update 1-------
So i decided to finally tackle the head lights. I bought myself my own heat gun because i wanted to see if i could use that to pull the housings apart before i used a dremel on it.
and well it worked out great. Used a heat gun on the seams just enough to where the plastic was a bit mailable. Didn't take that much time to do both of them. It'll take a bit of time to clean out the recesses of the left over "glue" but the hard part is really done. So ill be ordering the retrofit kit soon.
Sadly i cracked a tab on one of them, so hopefully i can glue it back on to make it somewhat useable.
I will be painting the reflector and trim piece black.
Last edited by rmurer; 4/26/15 at 06:46 PM.

 3/10/15, 10:34 AM
#3
Cobra R Member
Thread Starter
3/10/15, 01:01 PM
#4
Cobra Member
I actually like the look of the 2012 mustang better than my 2014.. the only thing I like about mine is that its got HID's and LED lighting. Once you achieve this and go HID's, you'll have the best of both worlds in my books.
3/10/15, 11:03 PM
#5
GT Member
There are some threads on HID Planet about retrofiting HID Projectors on different year Mustangs, but I don't remember if any were 2010-2012.
HID Projector headlights were an option on the 2010-2012 Mustang.
HID Projector headlights were an option on the 2010-2012 Mustang.
Last edited by VIP1; 3/10/15 at 11:08 PM.
3/11/15, 11:34 AM
#6
Cobra Member
Interesting.... I see A LOT of 2012 around.... haven't seen anyone take advantage of that option!
3/11/15, 02:54 PM
#7
GT Member
My 2011 V6 has them (see my Images for a pic)
If you ordered the Security Package (full alarm) it came with them. A lot of Convertibles will probably have them, I'm guessing for the reason that compared to the coupe, it is less secure.
If you ordered the Security Package (full alarm) it came with them. A lot of Convertibles will probably have them, I'm guessing for the reason that compared to the coupe, it is less secure.
Last edited by Noilly Pratt; 3/11/15 at 03:20 PM.
3/30/15, 11:03 AM
#9
GT Member
Join Date: February 11, 2012
Location: San Antonio Texas
Posts: 159
Likes: 0
Received 0 Likes
on
0 Posts
I baked the housings in my oven at 225 for about 20 minutes the first time, then 15 minutes 3 or 4 more times as needed to break the "permaseal" I also used a heat gun as well. I would recommend buying a damaged housing from ebay to practice. That is what I did before doing the original fixtures.
3/30/15, 12:10 PM
#10
Cobra R Member
Thread Starter
sorry for late reply.
I baked the housings in my oven at 225 for about 20 minutes the first time, then 15 minutes 3 or 4 more times as needed to break the "permaseal" I also used a heat gun as well. I would recommend buying a damaged housing from ebay to practice. That is what I did before doing the original fixtures.
I baked the housings in my oven at 225 for about 20 minutes the first time, then 15 minutes 3 or 4 more times as needed to break the "permaseal" I also used a heat gun as well. I would recommend buying a damaged housing from ebay to practice. That is what I did before doing the original fixtures.
I used strickly just a heat gun also i bought 2 housings off ebay to play with.
4/2/15, 07:48 AM
#11
Cobra R Member
Thread Starter
Ok recieved all the goodies from theretrofitsource yesterday. Didn't get THAT much accomplished. because i was trying to figure out how everything was going to fit into the headlight.
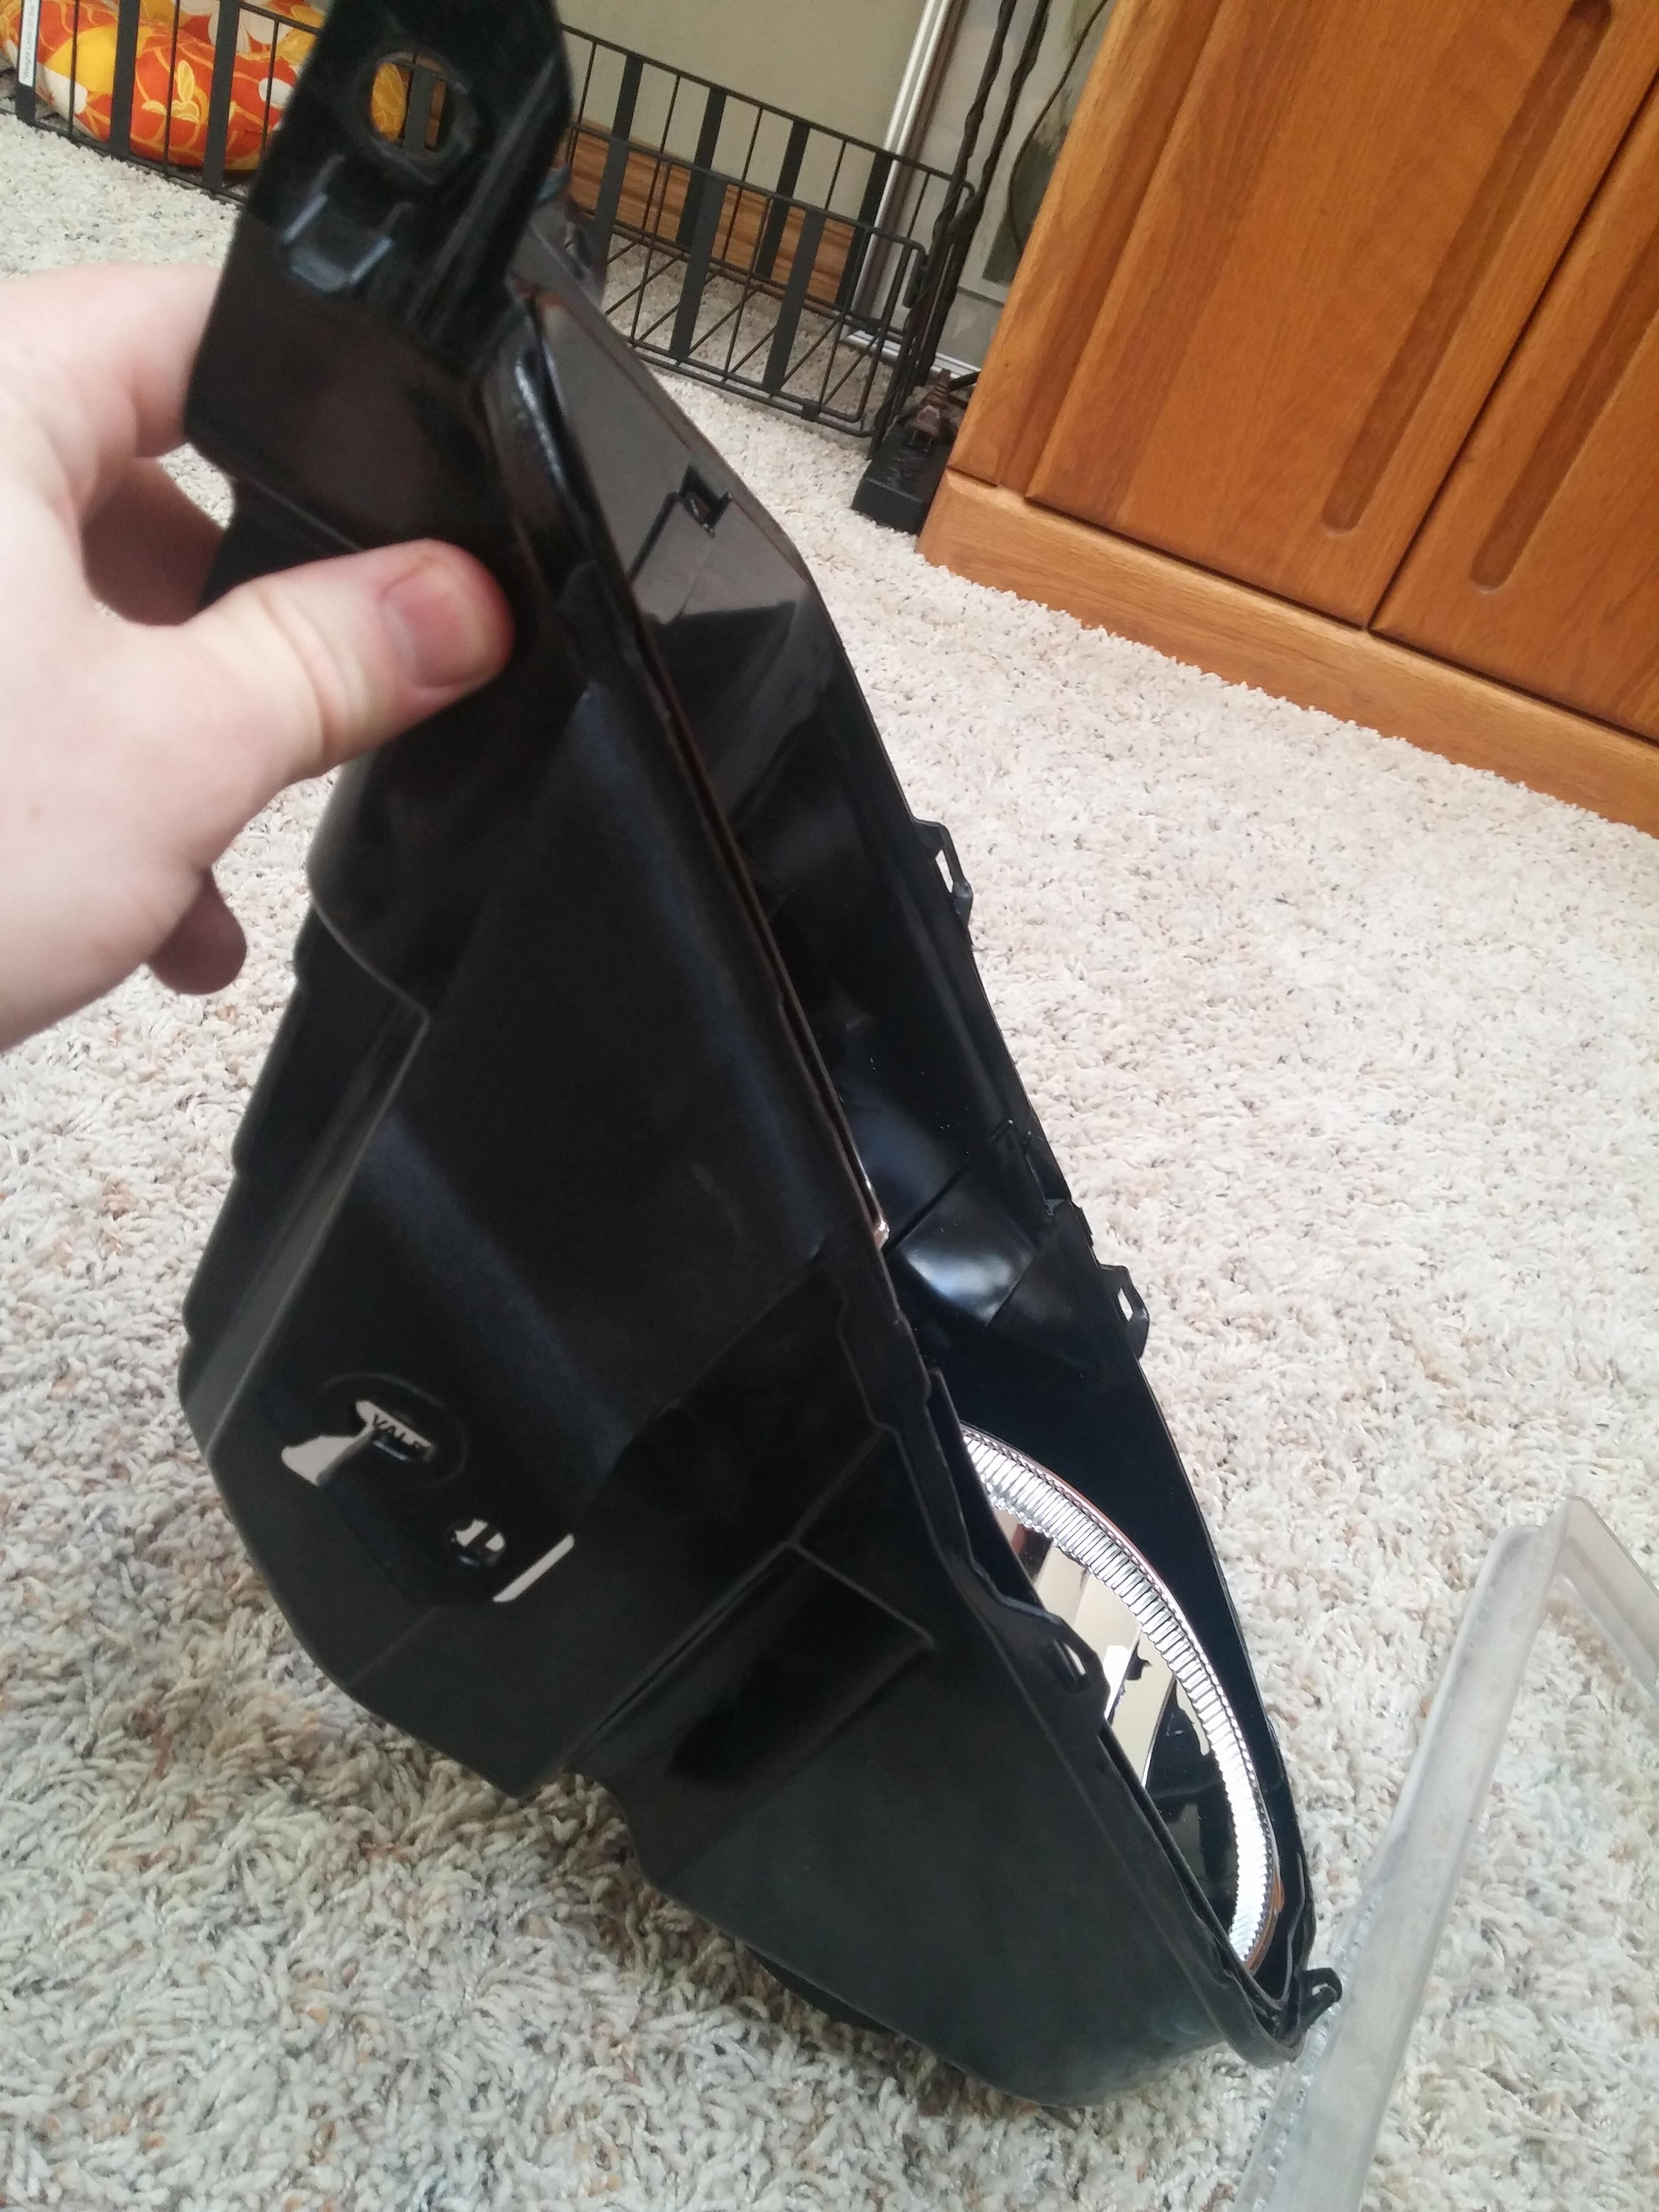
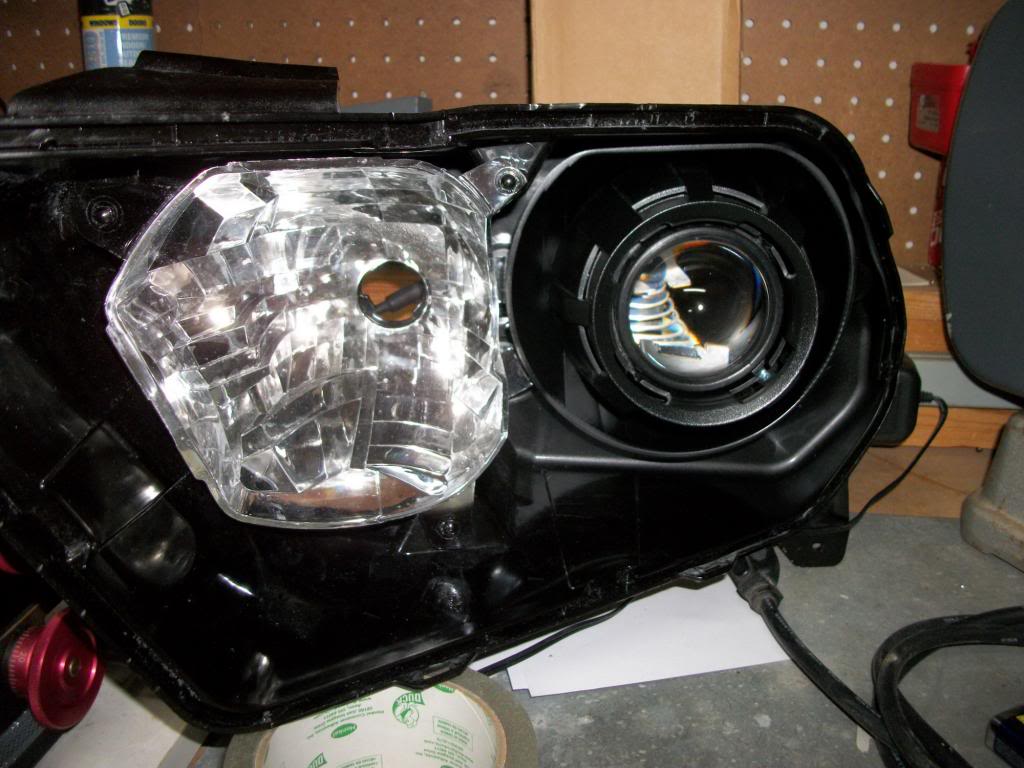
One step that really isn't in any sort of instructions is you have to grind down the rear of the reflector where the old bulbs would mount, see picture. In order to do that, the best idea is to remove the reflector from the housing which is a bit of a pain.
Here you see the rear of the housing, basically you have to trim all that stuff to the edge of the actual reflector, i used a dremel with a cut off wheel which made quick work of it. I will take more pics today of what it looks cut down.
I assume you should be able to somehow cut that without taking the reflector out but i did to make it easier.
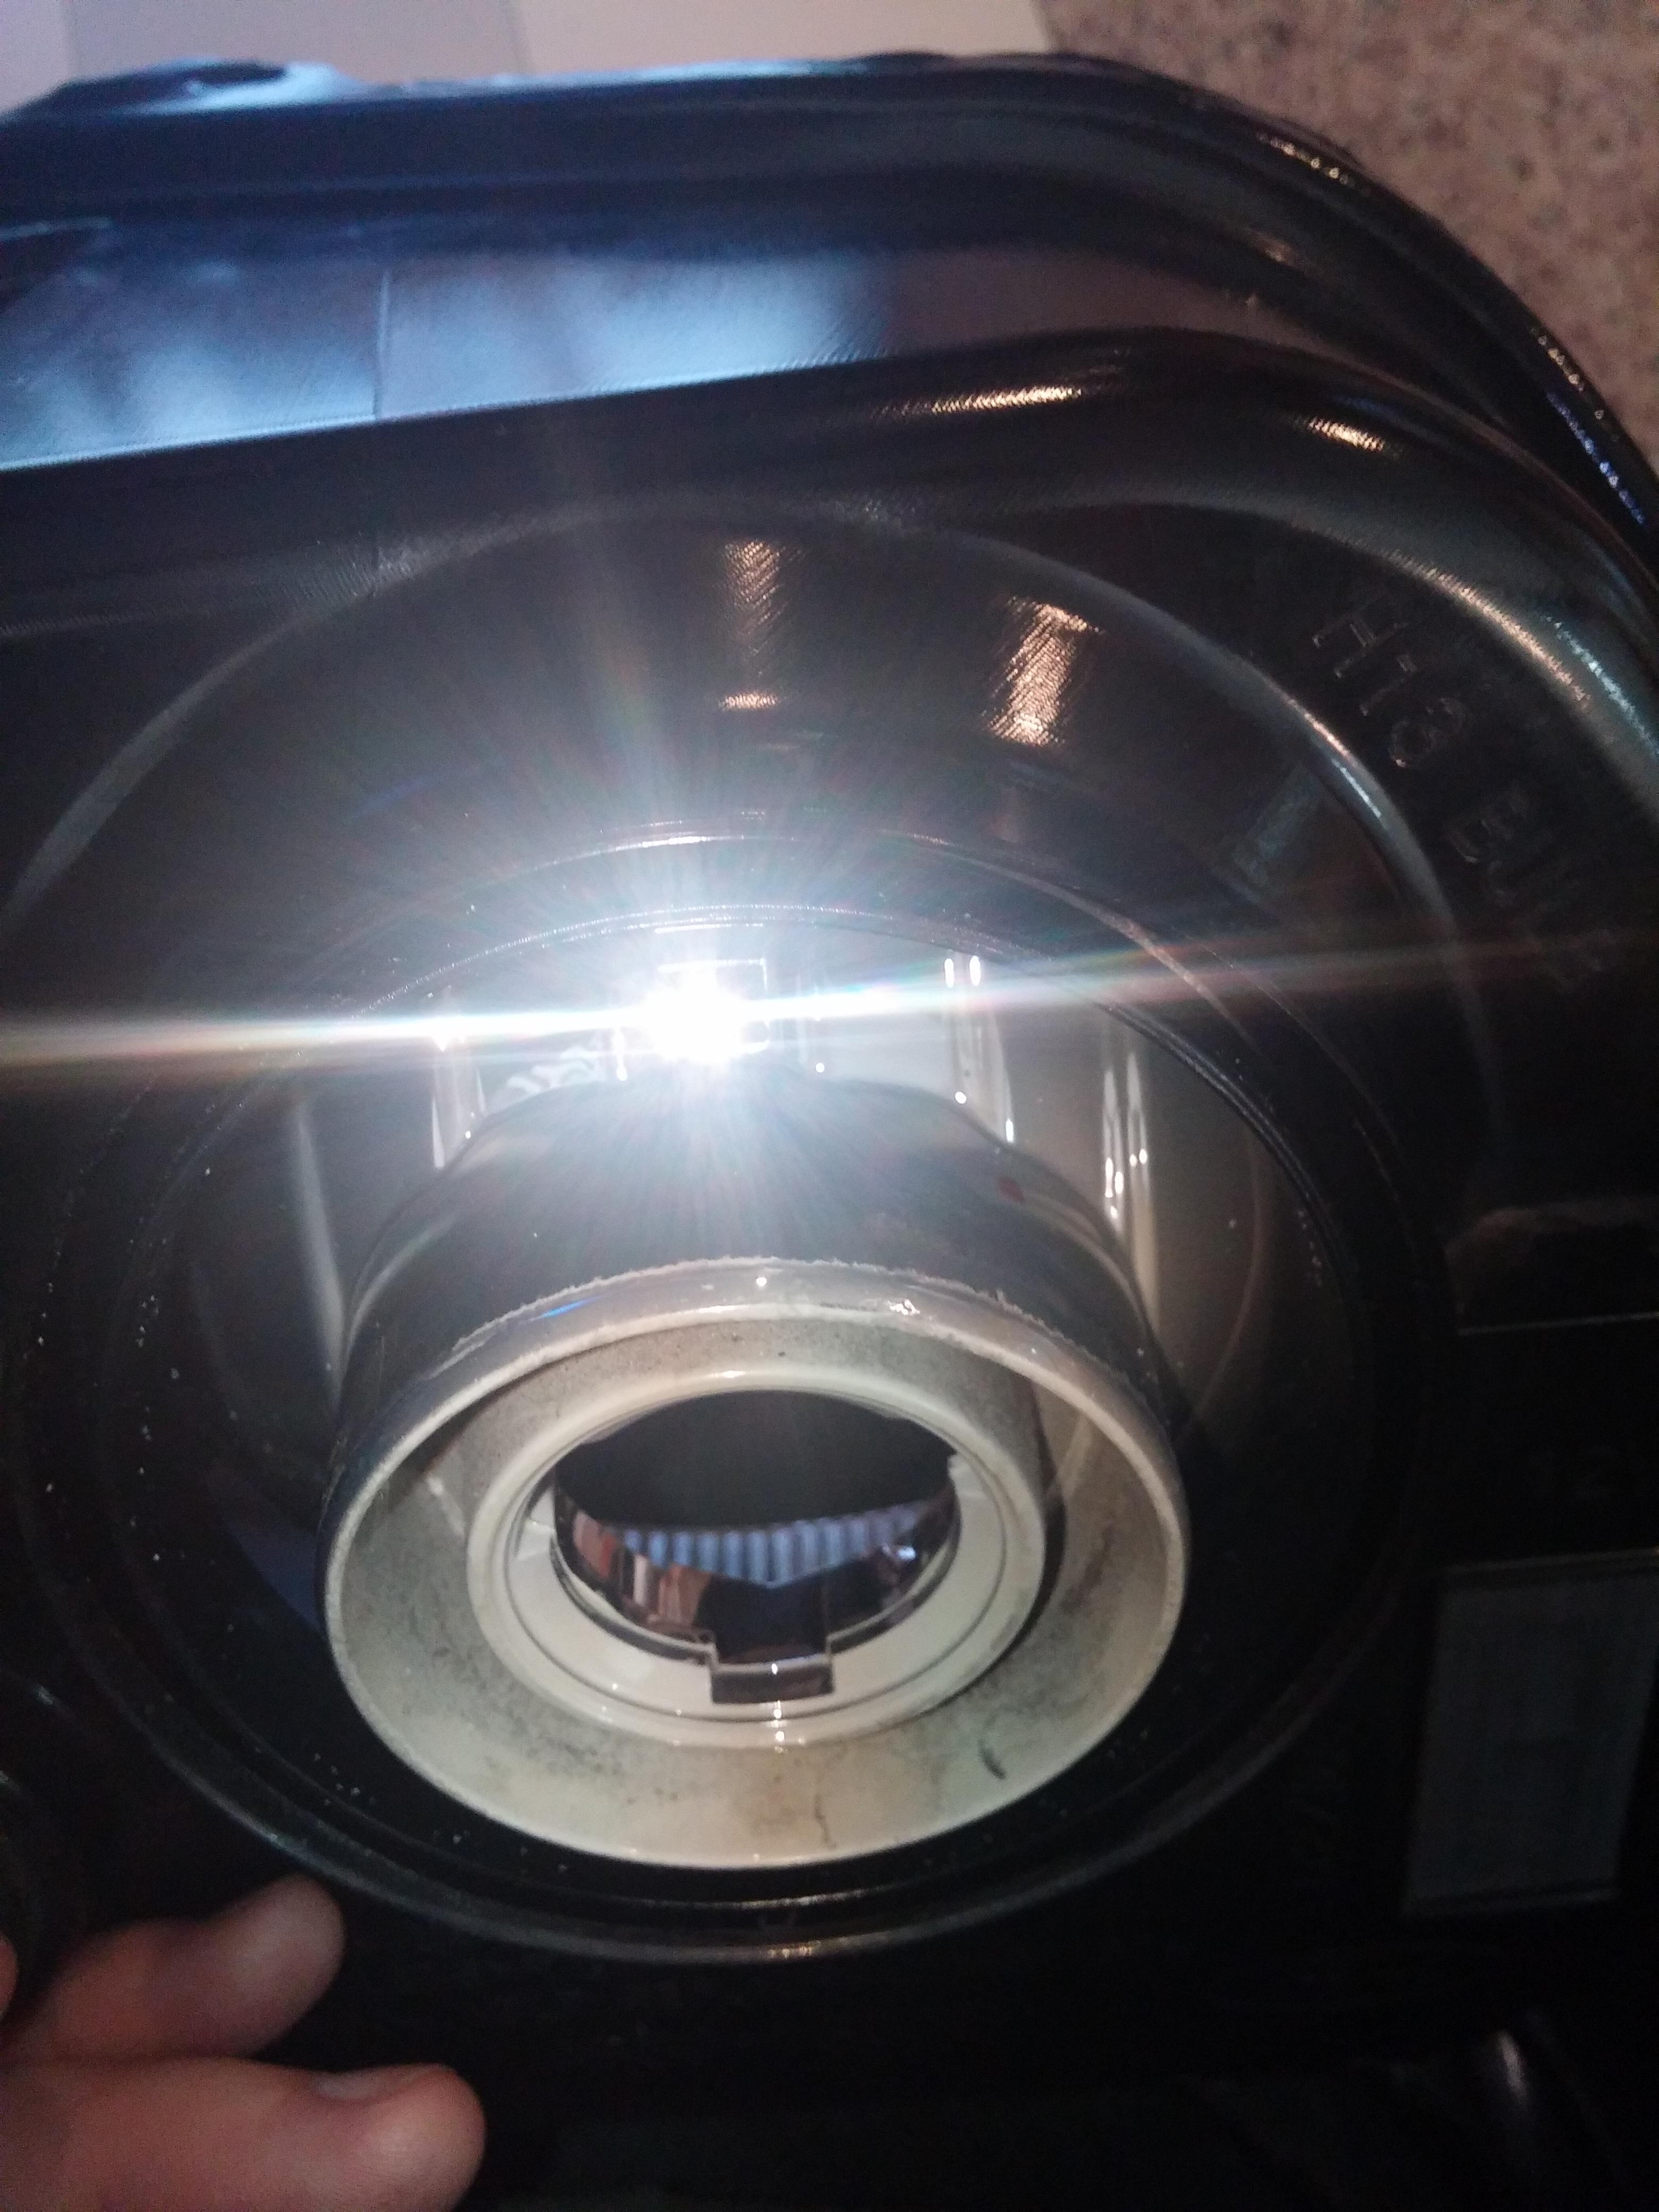
There are three mounting points for the reflector. one is the adjuster, which your first step to do should be to back the adjuster out, clock wise. Then you should be able to remove the adjust from the headlight. All it takes is a bit of clockwise movement and it should rotate out.
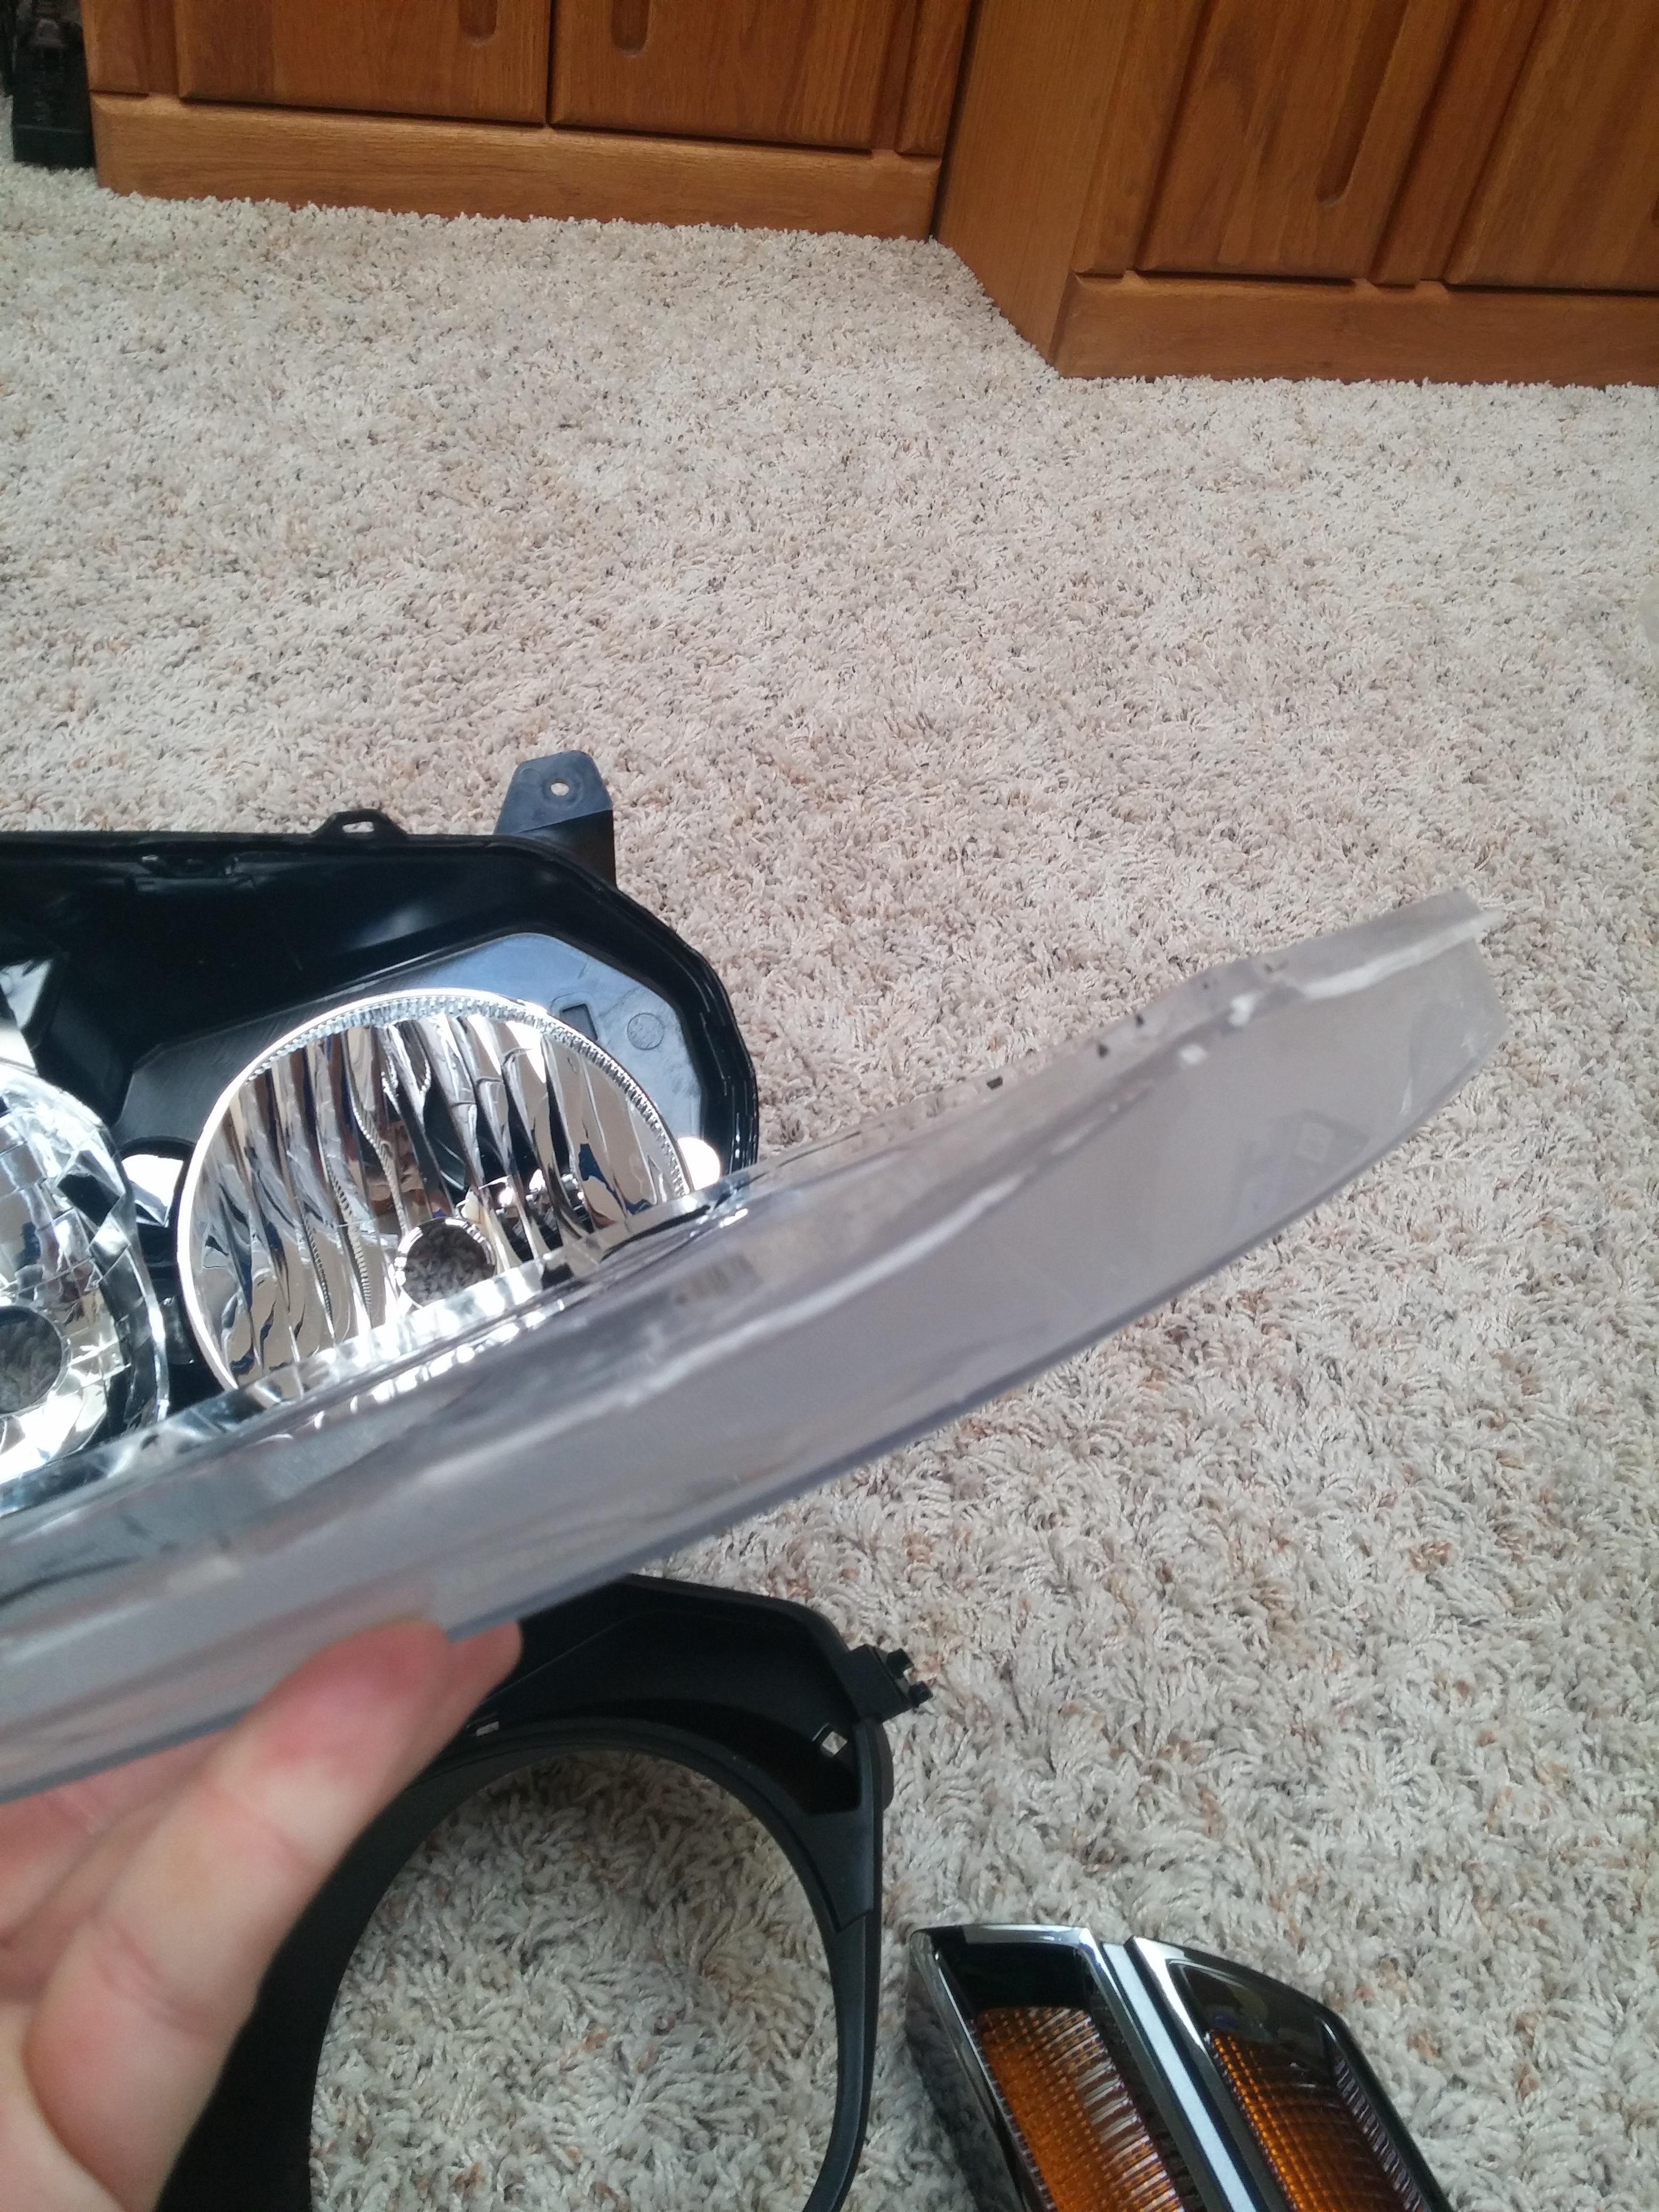
the reflector is held to these mounting points with a plastic...uh well i dunno how to describe it but here's a picture.
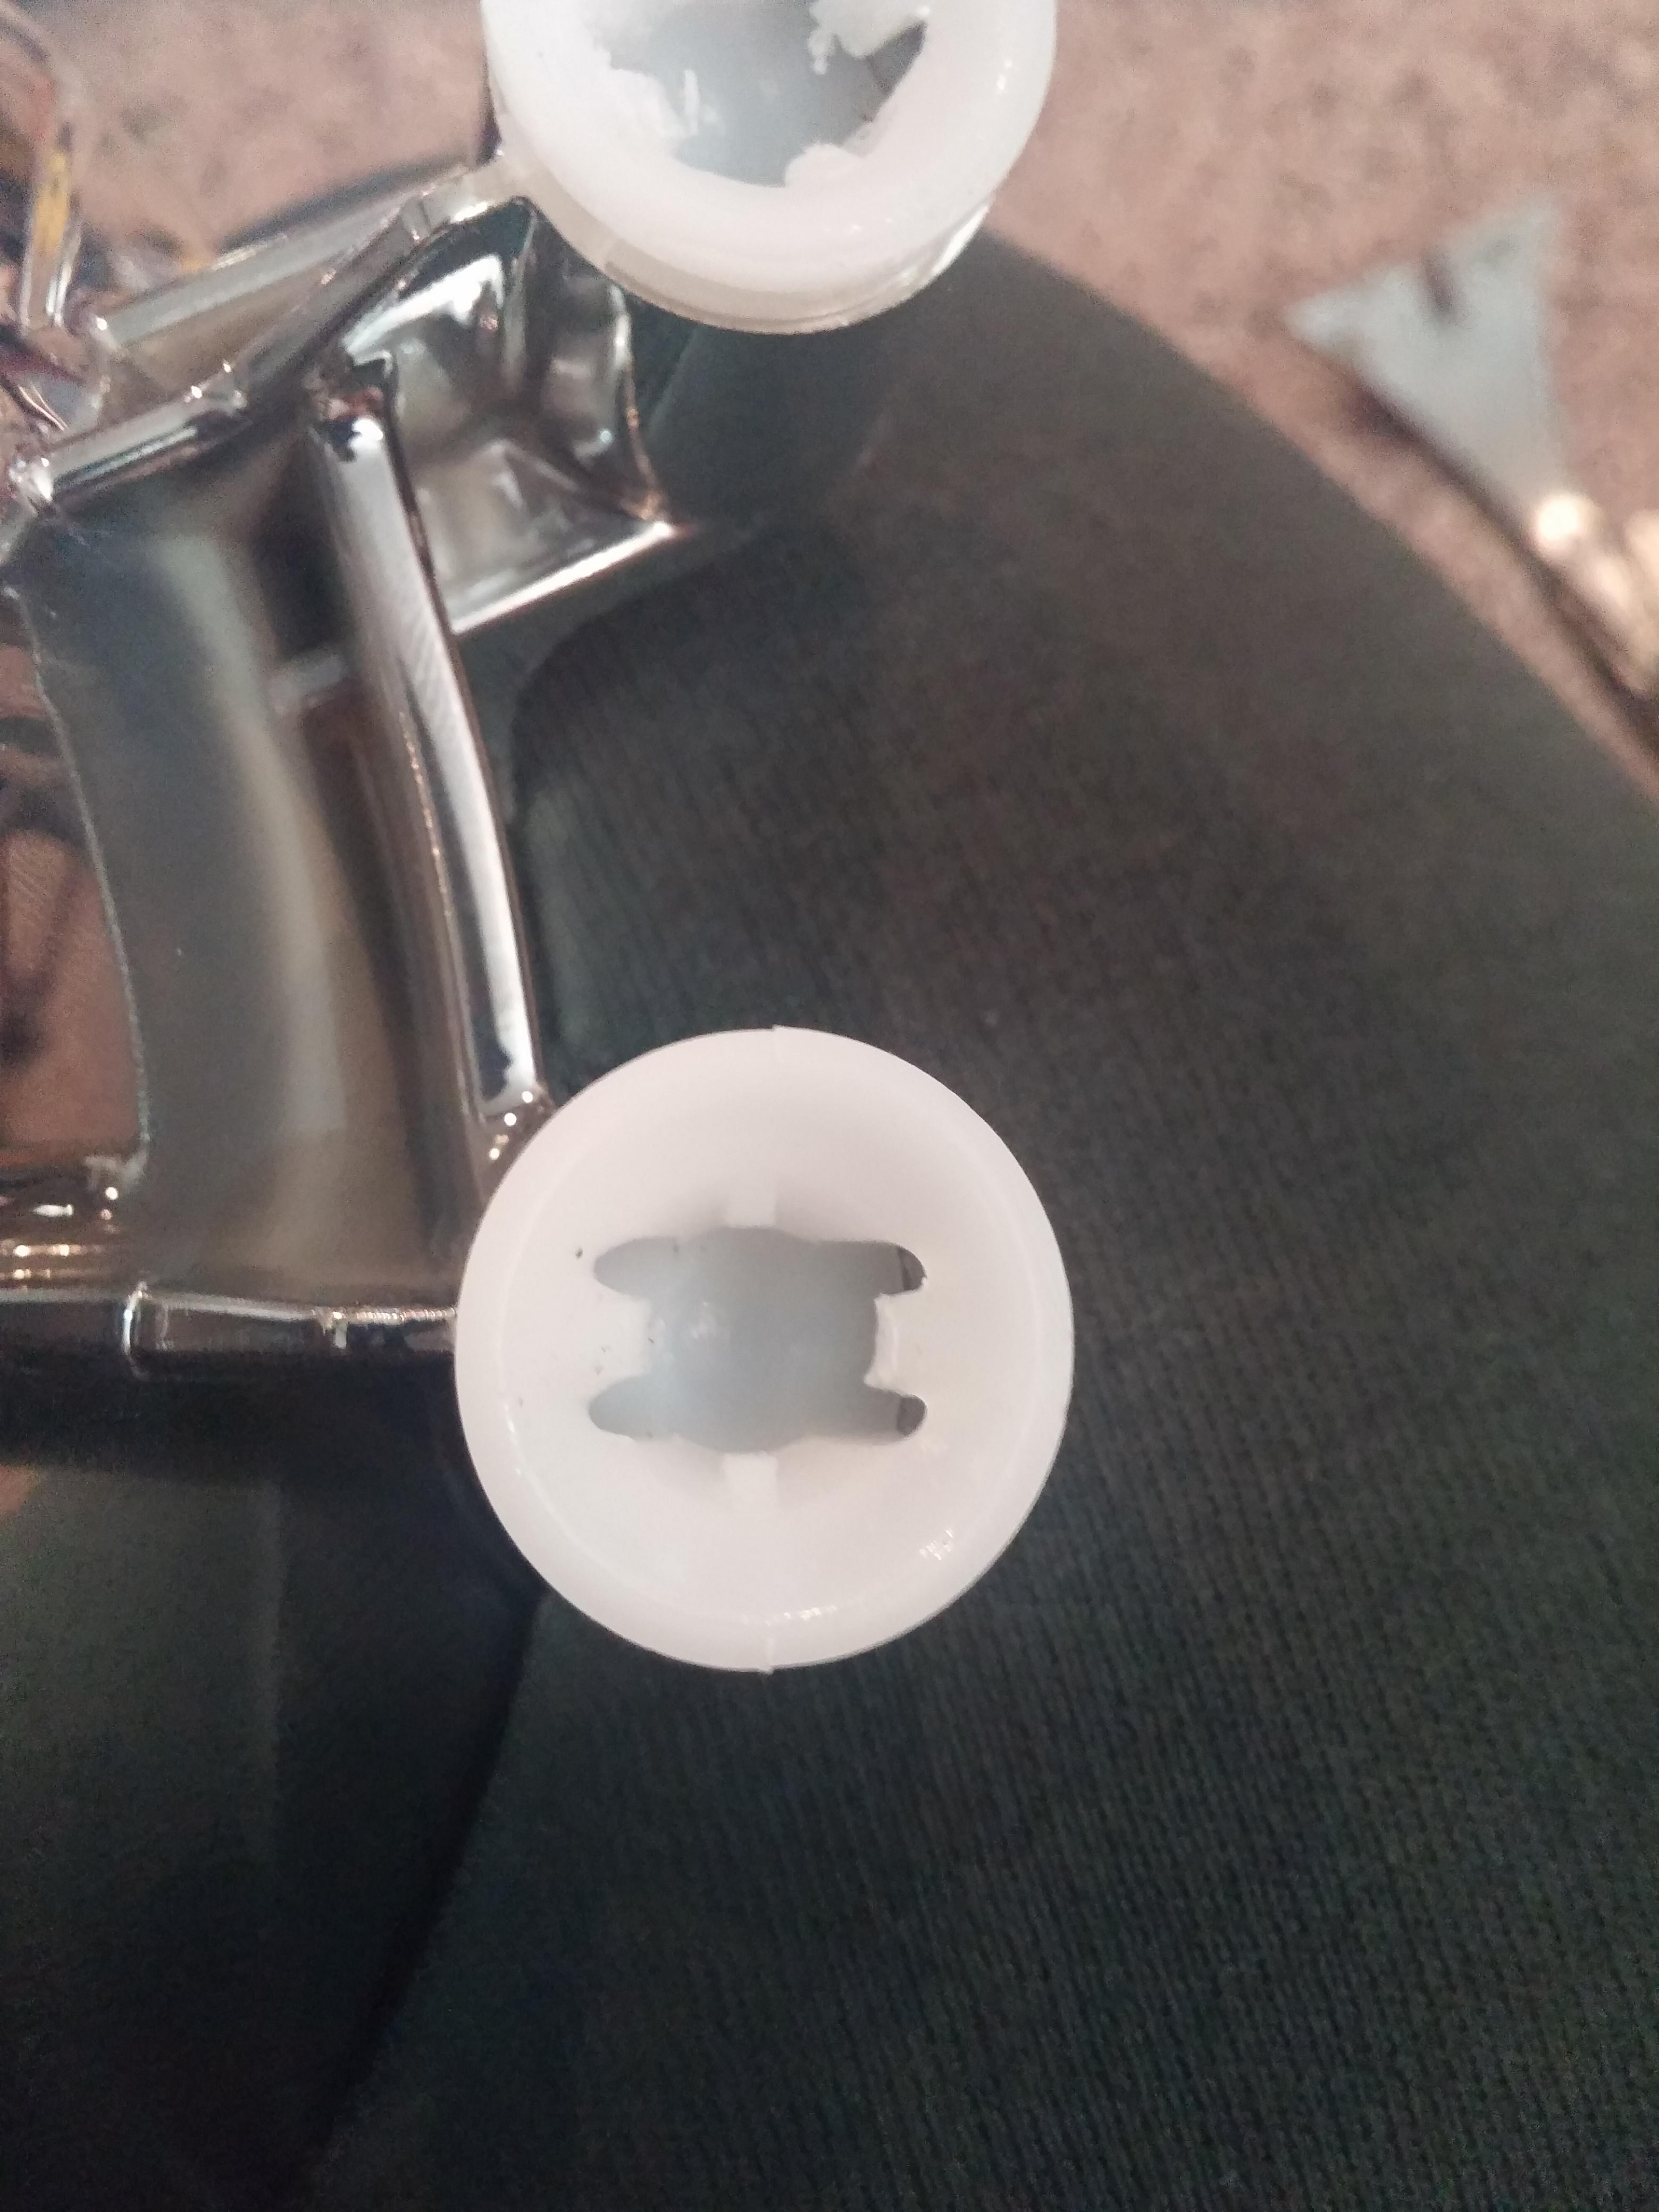
you can see the two nubs in the middle of that washer thing. those have to be depressed outward because they seat around a nub that is attatched to the housing. See picture.
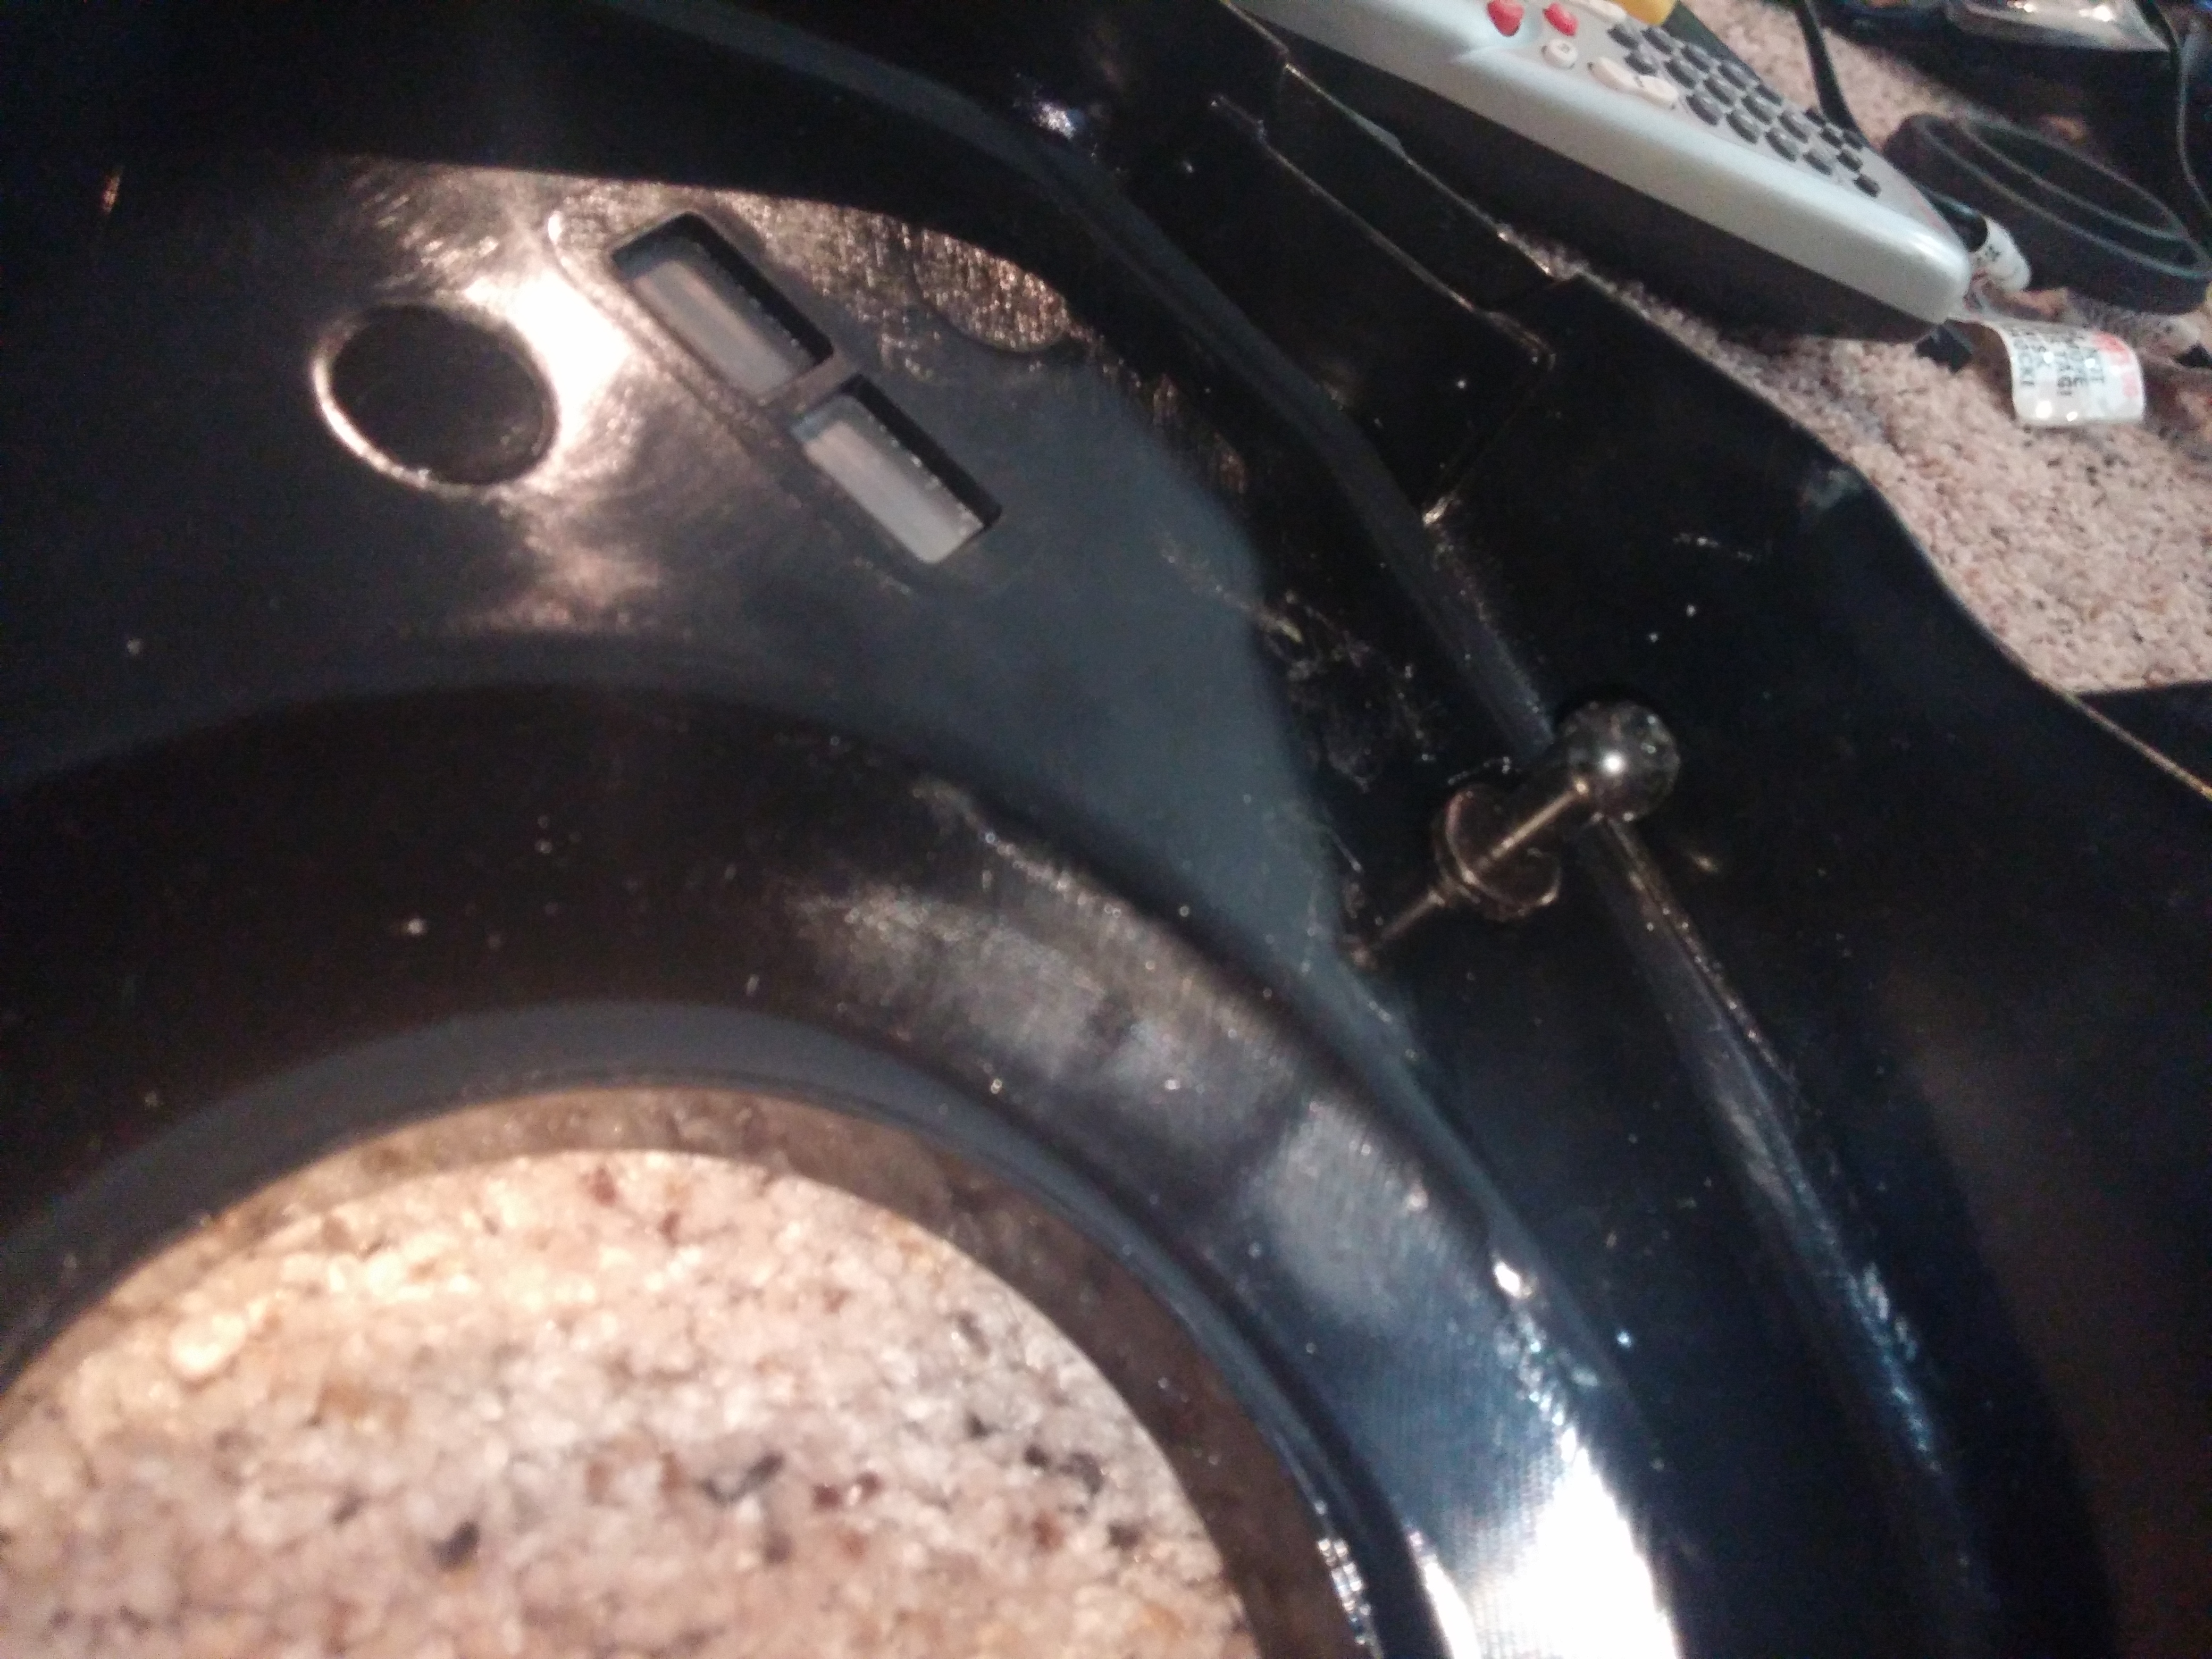
This is what was a pain because the way its designed its almost impossible to depress them outward to get them off the nub. What i did was start with the outer most one, the one thats by itself. You get the most room to work, you have to basically wedge a small flat head in the side and try to pry the tab out. Once i did that i got it off. then went on to the adjuster one which is easy to see the tab and remove. Then the last which is almost hidden out of view but you should be able to find an angle to get a flat head underneath and depress the tab.
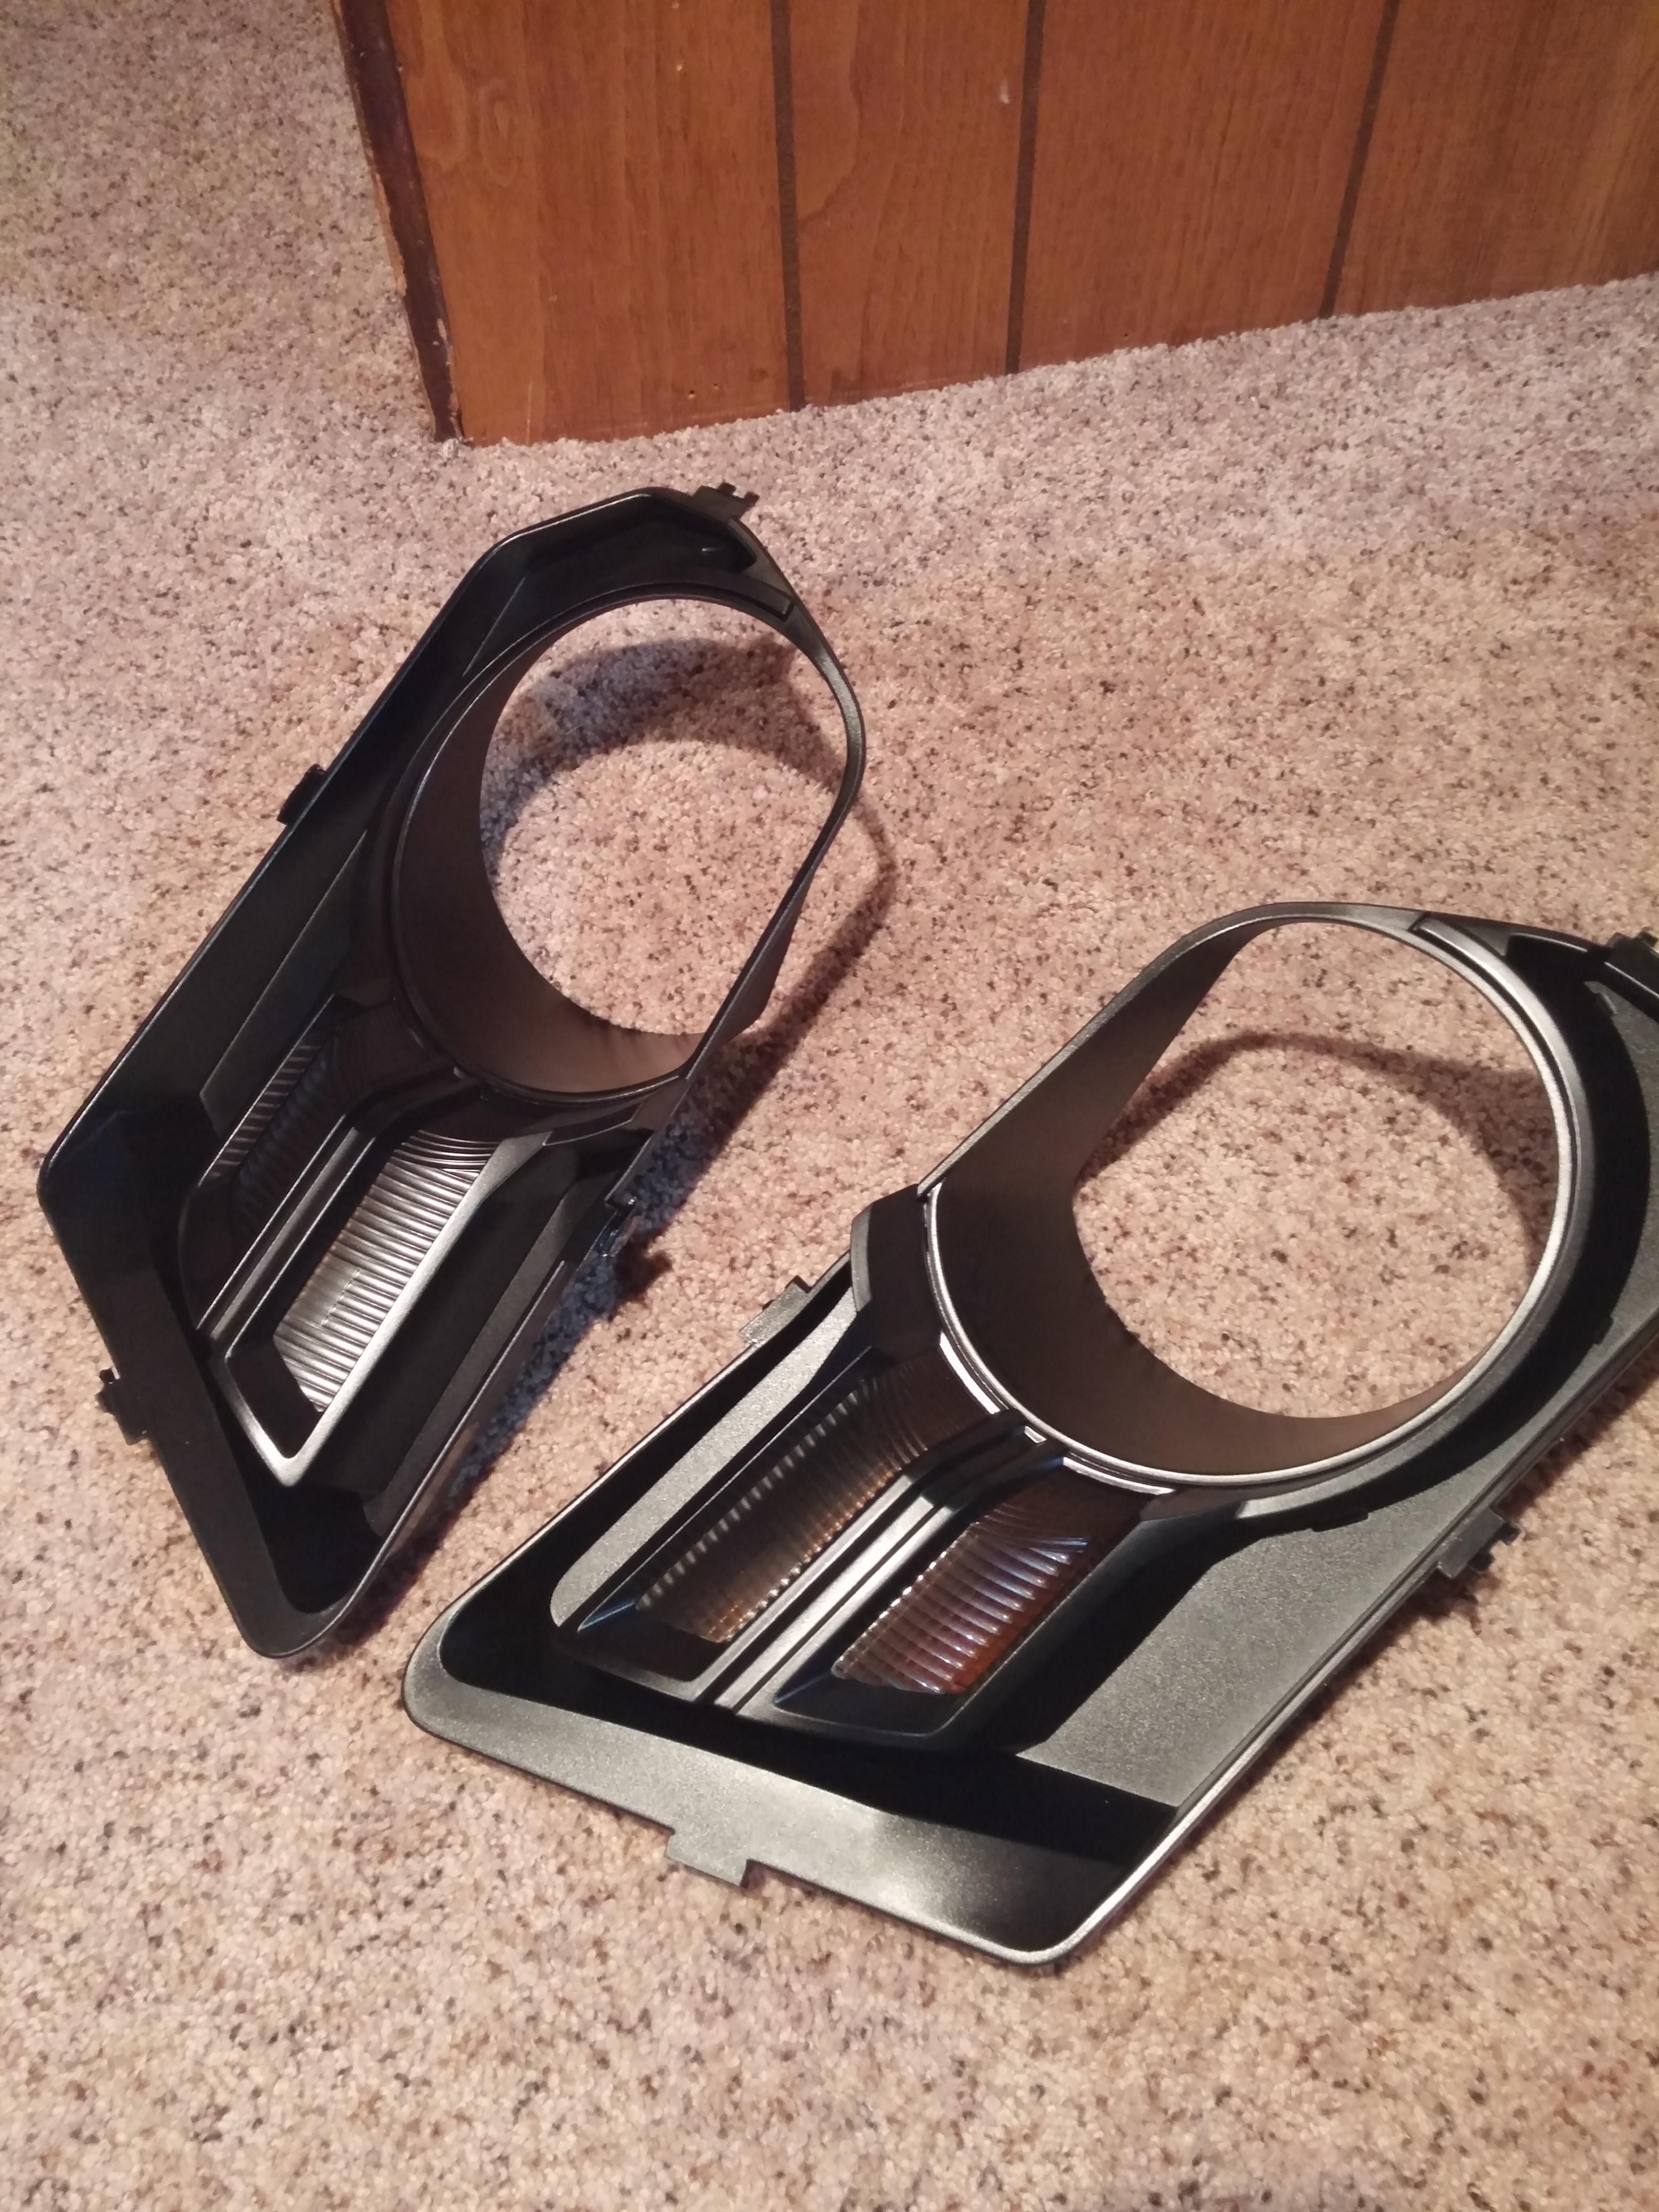
One i got the reflectors off i was able to grind down the back then i painted them. After that i stopped working on it to let the paint sit. Going to be working on it more today but probably slow progress, i want to take my time so i don't mess it up.
Here is the outside trim. I painted them with a high temp black. I also gave the amber covers a quick dusting to "tint" them a bit.
One step that really isn't in any sort of instructions is you have to grind down the rear of the reflector where the old bulbs would mount, see picture. In order to do that, the best idea is to remove the reflector from the housing which is a bit of a pain.
Here you see the rear of the housing, basically you have to trim all that stuff to the edge of the actual reflector, i used a dremel with a cut off wheel which made quick work of it. I will take more pics today of what it looks cut down.
I assume you should be able to somehow cut that without taking the reflector out but i did to make it easier.
There are three mounting points for the reflector. one is the adjuster, which your first step to do should be to back the adjuster out, clock wise. Then you should be able to remove the adjust from the headlight. All it takes is a bit of clockwise movement and it should rotate out.
the reflector is held to these mounting points with a plastic...uh well i dunno how to describe it but here's a picture.
you can see the two nubs in the middle of that washer thing. those have to be depressed outward because they seat around a nub that is attatched to the housing. See picture.
This is what was a pain because the way its designed its almost impossible to depress them outward to get them off the nub. What i did was start with the outer most one, the one thats by itself. You get the most room to work, you have to basically wedge a small flat head in the side and try to pry the tab out. Once i did that i got it off. then went on to the adjuster one which is easy to see the tab and remove. Then the last which is almost hidden out of view but you should be able to find an angle to get a flat head underneath and depress the tab.
One i got the reflectors off i was able to grind down the back then i painted them. After that i stopped working on it to let the paint sit. Going to be working on it more today but probably slow progress, i want to take my time so i don't mess it up.
Here is the outside trim. I painted them with a high temp black. I also gave the amber covers a quick dusting to "tint" them a bit.
4/2/15, 08:56 AM
#13
Cobra R Member
Thread Starter
Did make a slight mistake when ordering, i ordered the wrong sized halos, so fabrication might take a stop until i get the new ones ordered or figure out if the ones i have will still work properly.
4/6/15, 06:37 PM
#15
Cobra R Member
Thread Starter
update time.
got my new bigger halos in that will fit the shroud. The E46 R shrouds need drilling to get the look that i have but its easy. Then mounted the halo's inside the shroud with some wire nice and snug.
Mounted the blue demon eyes as well, with both the halo's and demon eyes going the halo over powers it and you can barely see them, they just arn't super bright guess thats what i get for buying them from ebay haha. But without the halo it would be a nice night time feature when parked so i might throw one of them on a switch.
Also drilled a whole through the blacked out reflector to feed the wires through out the back. Have to wait for a new rubber "nub" for the back of the housing to keep the moister out.
I like the look so far, these are going to be great i think.
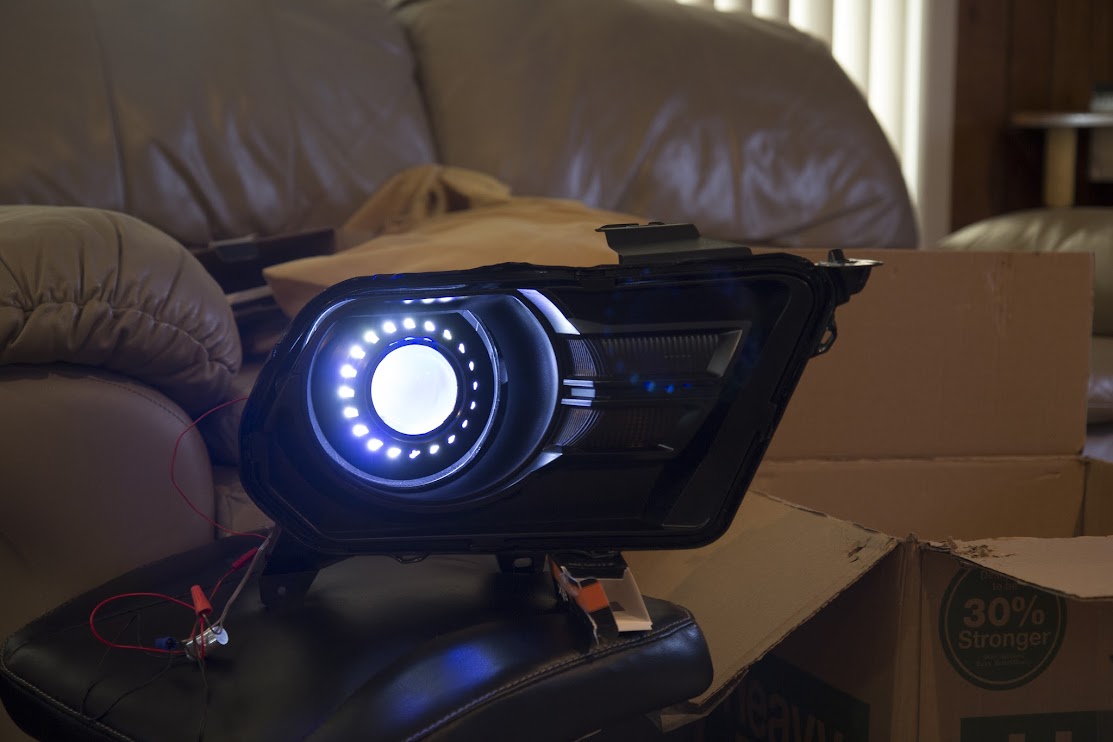
4/6/15, 07:34 PM
#17
Cobra R Member
Thread Starter
 haha
4/21/15, 07:15 AM
haha
4/21/15, 07:15 AM
#18
Cobra R Member
Thread Starter
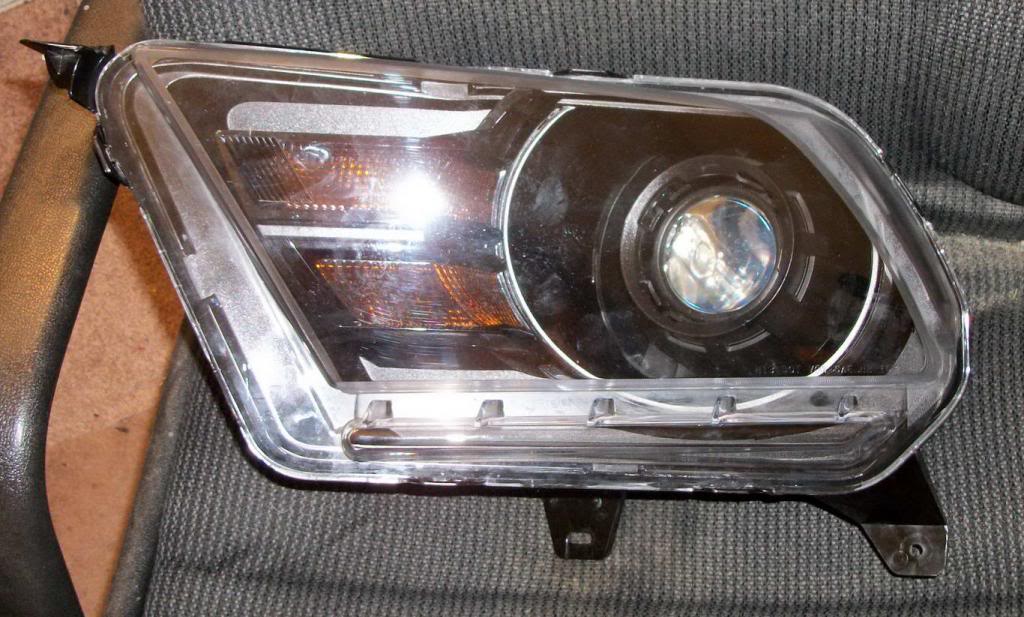
alright mini update. Its been a while, i got hit with a sinus infection that just knocked me out for a week an a half and i just felt like resting after getting home from work. But back on the mend.
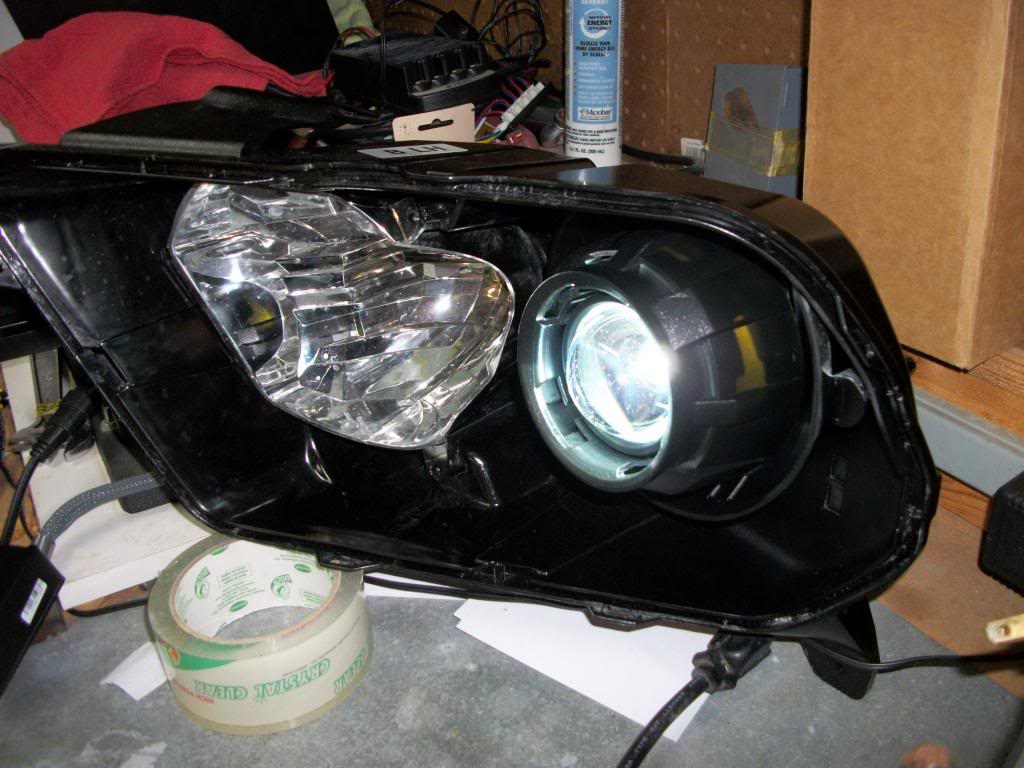
So yesterday i wanted to atleast see how things wired together, and i must say the wiring harness from theretrofitsource made it super easy, no splicy at all. Just plugs right into the factory harness. Fired it up first try.
I know the light is on the wrong side it was just for testing purposes.
Today i plan on pulling the old headlights, putting in the new ones and making sure that everything lines up somewhat before i seal the housing.
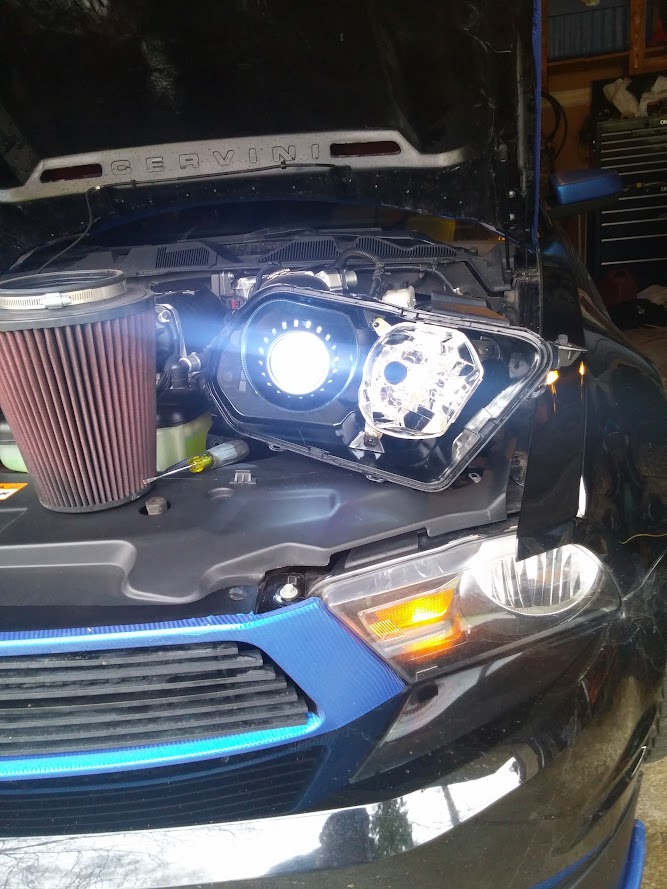
4/21/15, 11:42 AM
#19
Cobra Member
alright mini update. Its been a while, i got hit with a sinus infection that just knocked me out for a week an a half and i just felt like resting after getting home from work. But back on the mend.
So yesterday i wanted to atleast see how things wired together, and i must say the wiring harness from theretrofitsource made it super easy, no splicy at all. Just plugs right into the factory harness. Fired it up first try.
I know the light is on the wrong side it was just for testing purposes.
Today i plan on pulling the old headlights, putting in the new ones and making sure that everything lines up somewhat before i seal the housing.
the light is on the wrong side LOL

Looks good!
4/22/15, 07:25 AM
#20
I Have No Life
Russ, looks good my friend.
I'm so glad you didn't go cheap with Raxiom and AM junk. I would have given you he11 for that.
Keep us posted buddy. Will look great.
p.s. Retrofit Source is awesome...I got my Osram CBI's from them.
I'm so glad you didn't go cheap with Raxiom and AM junk. I would have given you he11 for that.
Keep us posted buddy. Will look great.
p.s. Retrofit Source is awesome...I got my Osram CBI's from them.