
My Shaker Project

I Have No Life
Joined: September 24, 2011
Posts: 10,141
Likes: 172
I tend to agree with is. Clean look is best.
2014 SGM Roush Stage 2 --------- Moderator------
Joined: July 7, 2013
Posts: 3,176
Likes: 1,340
From: Idaho
Looking good. Here are a few photos for inspiration. Since I am on my iPad you will get multiple posts... There are lots of options out there. Kind of wonder what it would look like with your SGM & silver stripes. Just don't paint the shaker. Saw pictures of silver and white versions, they look bad, really bad, black is best.
Not a shaker, and not your color, but light stripes do look good with dark shaker. Would have to allow for hood vents that are not here.
Not a shaker, and not your color, but light stripes do look good with dark shaker. Would have to allow for hood vents that are not here.
Thread Starter
Mach 1 Member
Joined: March 18, 2013
Posts: 537
Likes: 13
From: Lincoln, NE
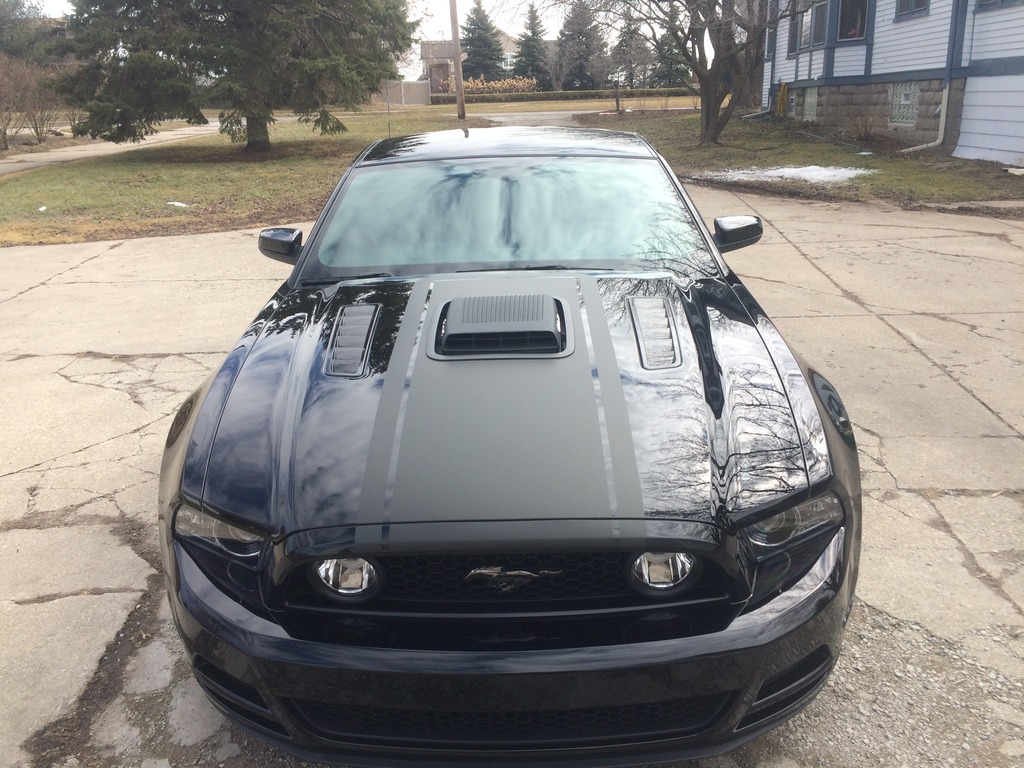
Ok All... Sorry I have not done a update recently. Have been busy with work and kids. So the car is complete. For now. I could not make a decision on badges for the Shaker. So for now I am going without. I also could not decide on stripes of any kind so again for now without. Those can be added later. I have struggled with stripes on this car because of the Glass Roof. I cannot decide if I would like them or not since there would be the large break at the Roof. I also considered going the Boss type stripes of a 12-13. But I want to keep my 5.0 Badges so I need to think on that. To me the Coyote is a 5.0 and the Road Runner is the 302. Since I do not have the Road Runner motor I am apposed to 302 badging on my car. Just how it works in my head. Would appreciate opinions. And photos of a car with 5.0 Badges with Boss stripes if anyone has this. Thanks to Shaneyusa for the references on the old hood stripes. I will use that as a reference if I go that route. Here is a photo of the painted hood before it was installed.
Thread Starter
Mach 1 Member
Joined: March 18, 2013
Posts: 537
Likes: 13
From: Lincoln, NE
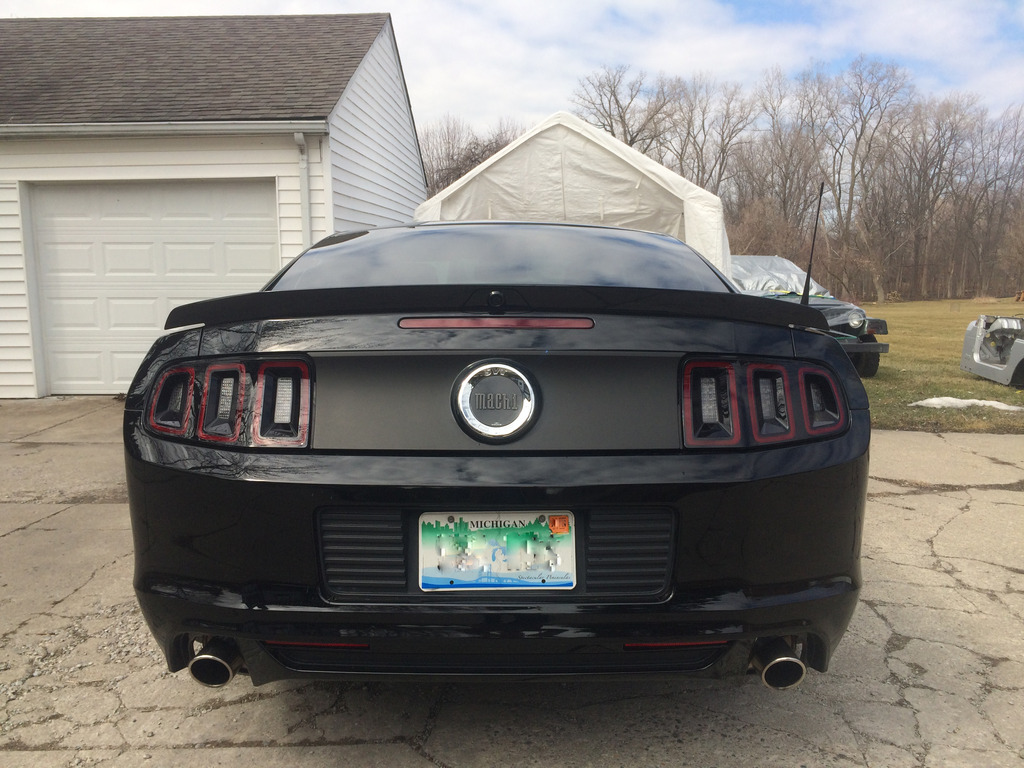
Here are the completed photos. I will get better ones soon. This is all I had time for. I am happy for the most part. I still need to get the top of the Shaker repaired after the car goes into hibernation. Also now there are a couple small nicks in the seal area of the Shaker. They happened when the hood was installed. I need to see if I can make them look acceptable or find a replacement. My only real disappointment is the underside of the hood. They did not clear it like from the factory. Most people will not notice but I do. Also there are a couple small dirt nibs that they can correct once the paint has cured. The original paint match was not good. They put the hood on the car and it was not close. They re shot it and it looks great as far as color match. I need to touch up the bolt heads now also. But I expected that.
Last edited by 14Glassback; Oct 22, 2016 at 12:46 PM.
Mach 1 Member
Joined: April 26, 2012
Posts: 679
Likes: 8
From: Charleston, SC
Here are the completed photos. I will get better ones soon. This is all I had time for. I am happy for the most part. I still need to get the top of the Shaker repaired after the car goes into hibernation. Also now there are a couple small nicks in the seal area of the Shaker. They happened when the hood was installed. I need to see if I can make them look acceptable or find a replacement. My only real disappointment is the underside of the hood. They did not clear it like from the factory. Most people will not notice but I do. Also there are a couple small dirt nibs that they can correct once the paint has cured. The original paint match was not good. They put the hood on the car and it was not close. They re shot it and it looks great as far as color match. I need to touch up the bolt heads now also. But I expected that.
http://www.americanmuscle.com/matte-...ecal-9904.html
Last edited by SpeedCostsMoney; Oct 26, 2016 at 11:04 AM.
Thread Starter
Mach 1 Member
Joined: March 18, 2013
Posts: 537
Likes: 13
From: Lincoln, NE
So I have barely gotten to drive the car since I got the Shaker done. But I have been contemplating stripes a lot. And surprisingly I am already considering breaking my rule about the Boss Stripes. I already searched this. But all I could was a thread that turned into 3 pages of fighting. My question. Has anyone put factory 13 Boss 302 Stripes on a GT? My concern is how is the fender stripe fit in relation to the 5.0 badge? They did not make a Sterling Gray Boss. I assume because of the reflective nature of the Stripes. Which I actually think could look cool. Almost a Ghost Stripe at times. My concern is that the 5.0 badge would not be centered on the Stripe. Thoughts?

Member
Joined: September 18, 2010
Posts: 27
Likes: 3
From: Sweetwater, TN
Yeah I agree after I did mine. I used the 1970 Mach 1 strip measurement and took it to a local graphics shop and had them delete the engine call out number. Here's a photo of mine done. It cost $300 but I had him flat black the rear deck lid panel out as well and the graphic was perfect. The guy doing the graphic said that my shaker hood is perfectly center and he actually did his measurements from the shaker hood.
I also used this as a guide for the strip.


I also used this as a guide for the strip.

Last edited by Bedrat2; Nov 14, 2016 at 01:21 PM.
Legacy TMS Member
Joined: March 6, 2008
Posts: 6,717
Likes: 109
From: Apple Valley Mn.
Here are the completed photos. I will get better ones soon. This is all I had time for. I am happy for the most part. I still need to get the top of the Shaker repaired after the car goes into hibernation. Also now there are a couple small nicks in the seal area of the Shaker. They happened when the hood was installed. I need to see if I can make them look acceptable or find a replacement. My only real disappointment is the underside of the hood. They did not clear it like from the factory. Most people will not notice but I do. Also there are a couple small dirt nibs that they can correct once the paint has cured. The original paint match was not good. They put the hood on the car and it was not close. They re shot it and it looks great as far as color match. I need to touch up the bolt heads now also. But I expected that.

Thread Starter
Mach 1 Member
Joined: March 18, 2013
Posts: 537
Likes: 13
From: Lincoln, NE
Thanks! I am still undecided on what Stripes to do. I really wanted to figure out a way to do the Factory Boss Stripes. But then I saw how much they are! Kind of shot that one down due to the cost alone! But I will have all winter to make my decision at least.