
Air Raid Intake installed. Install pics, thoughts, impressions...
 6/18/11, 10:48 AM
#1
Bullitt Member
Thread Starter
Join Date: January 19, 2011
Location: Montgomery, AL
Posts: 257
Likes: 0
Received 0 Likes
on
0 Posts
Air Raid Intake installed. Install pics, thoughts, impressions...
also posted on the AFM forum.
Air raid intake showed up a few days ago so I grabbed my camera and snapped pics during the install and like my suspension installed thread, thought I would offer my own input on any tips/tricks and things to be aware of before starting the install.
I can only assume that a lot of this won't apply to other intakes but the removal of the stock intake steps would.
So lets get going!
First, before even opening the hood of the car, I would suggest you get a few things out of the way.
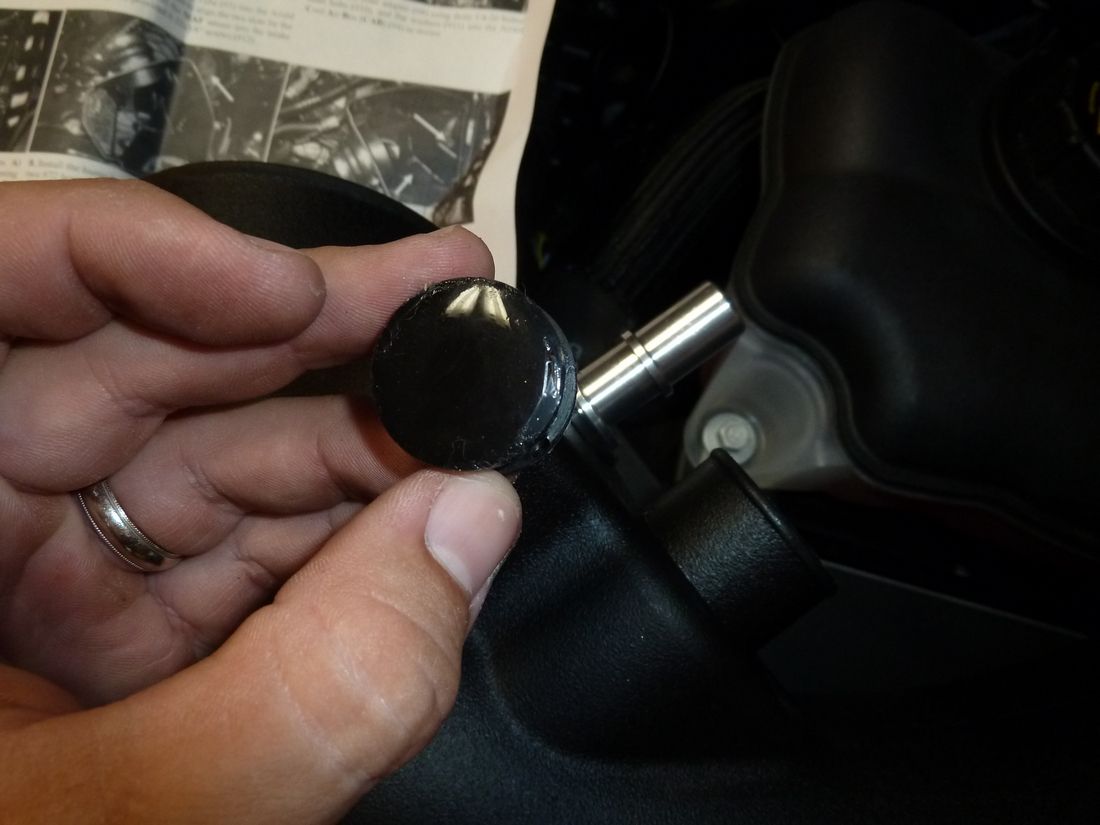
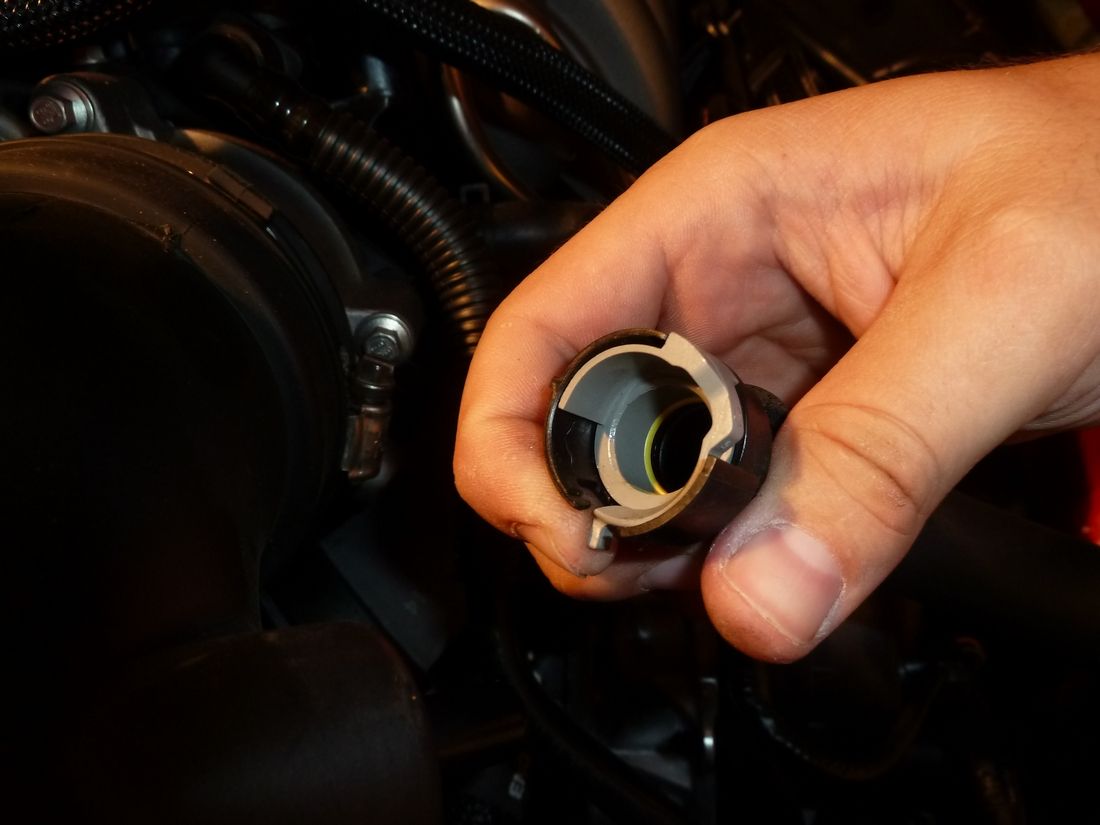
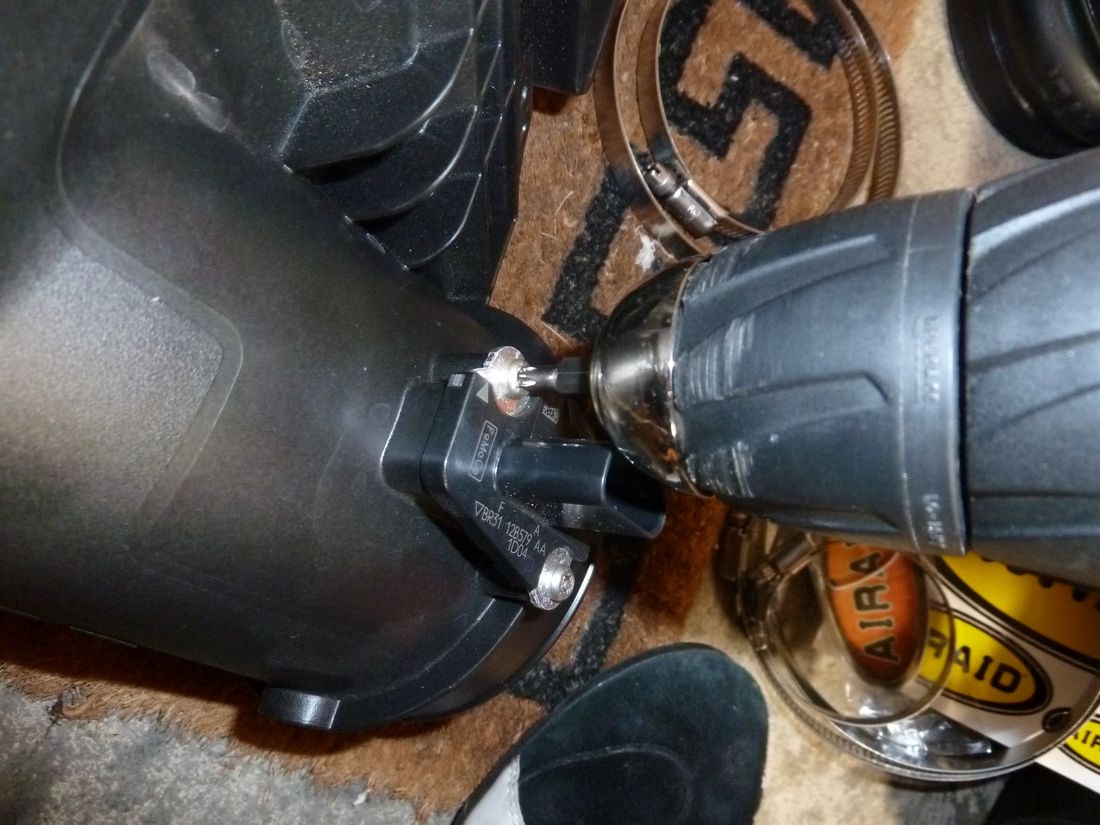
If your car is a manual transmission, there's a blank grommet you have to install into the intake tube. This is hands down one of the most frustrating things I have ever dealt with in my life when it comes to modding a car. It was WAY harder than it should have been and I had to go get my neighbor to help me with it.
The problem is that the grommet size is I guess designed so that once it's in the hole of the air tube, it's incredibly snug and tight. The issue with this is that the rubber compound that the grommet is made of is VERY hard and doesn't flex much at all so it really hard to manipulate it so that it can squeeze through into the hole.
What we ended up doing was holding it with a pair of pliars up to the high wattage shop light long enough that it softened up the rubber allowing it to bend easier. It took a few tries doing this before we figured out the best angle to go into the hole with and how much time we had to try and walk the inner lip of the grommet around the rim of the intake tube's hole to get it in.
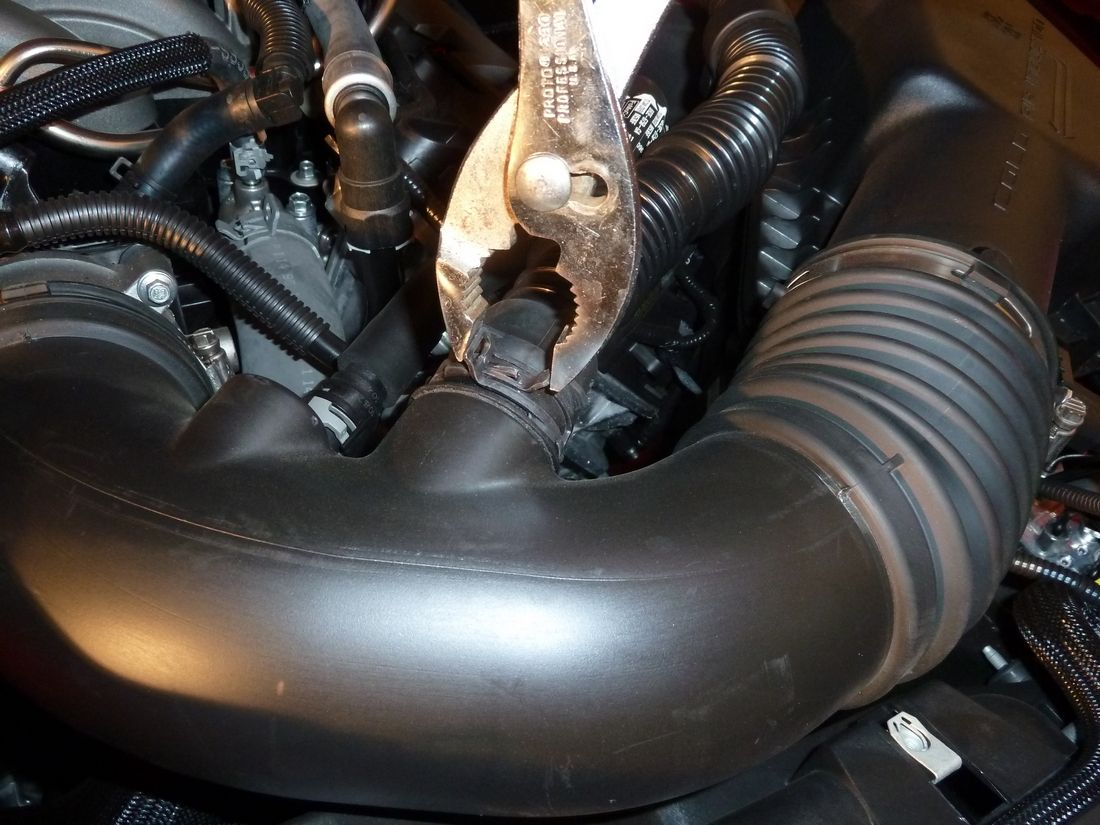
You basically have to go in at about a 75* angle while squeezing the grommet from each side (like you're trying to bend it in half) and then as you're pressing in really hard on the grommet, keep turning it in one direction so the bottom lip of the edge of the grommet slips down into the intake. It's tough but it CAN BE DONE.
Proof
Air Raid... if you are reading this, please please please find a different type of grommet to use for this... something softer at the least. That concrete hard grommet that came with the kit quite literally doubled the amount of time it took to install this kit. :nono: And to be quite honest, it made me wish that I had bought the steeda intake instead. We were on the verge of getting in my other car and driving out to Home Depot with the intake tube to find a replacement grommet that would fit.
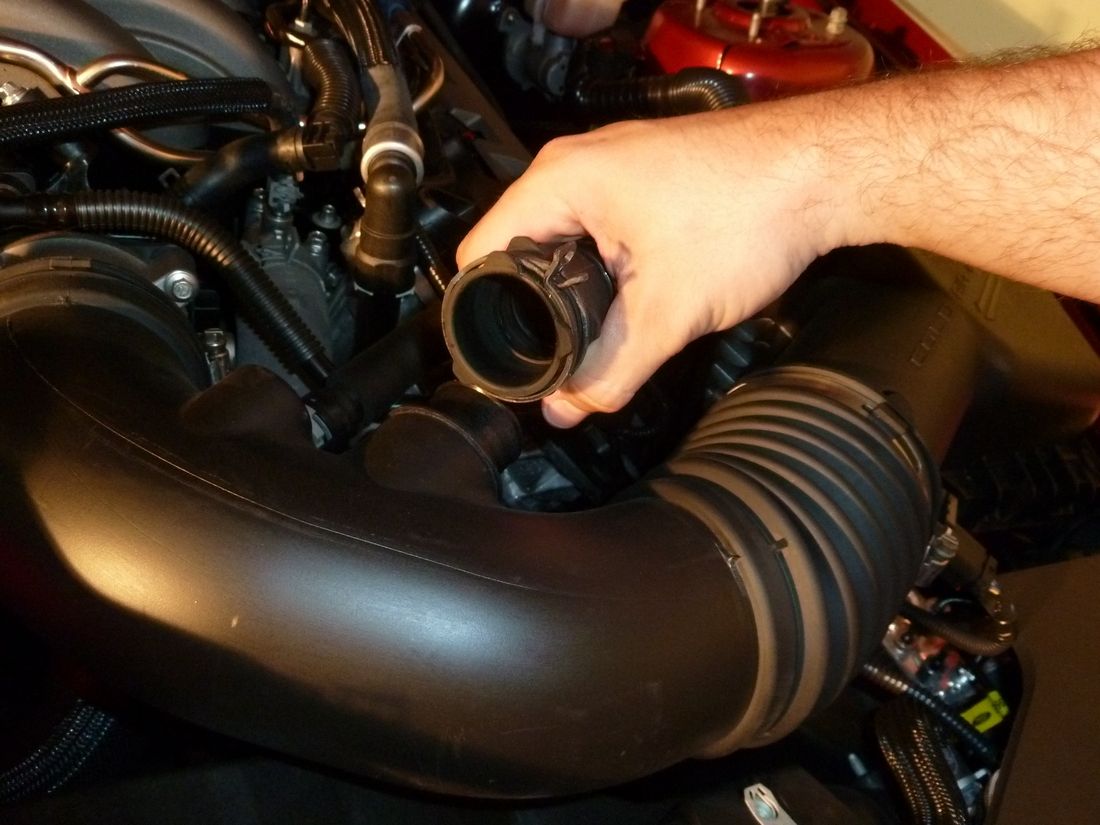
After that's in and if you're planning on removing the stock cabin air tube, go ahead and slip the rubber cap onto the air tube hole on the new intake tube and use the small band clamp to secure it down.
With that bit out of the way, there's one more thing that you should do before you start pulling stuff apart. Put the rubber trim around the top of the air box. The trim that seals off the air box when the hood is shut is a very durable and high quality piece of material that has metal inside the rubber that allows the rubber to hold it's shape and the little U shaped groove in the bottom of the strip has metal prongs embedded in the rubber that allows the strip to "grip" the top edge of the air box.
Reason I say do this before you start is that it's not easy to get this slipped down onto the edge of the air box. It's (again) a very snug fit that requires some patience and elbow grease to press it on all the way. It was roasting hot in my garage and doing this with everything already bolted into the car was a mistake. If I had it to do all over again I would have surely done this in a nice air conditioned house.
So those are my 2 biggest tips for installing this thing. Do those before you start in a nice air conditioned place rather than sweltering in a hot garage.
Anyways, here comes the install pics!
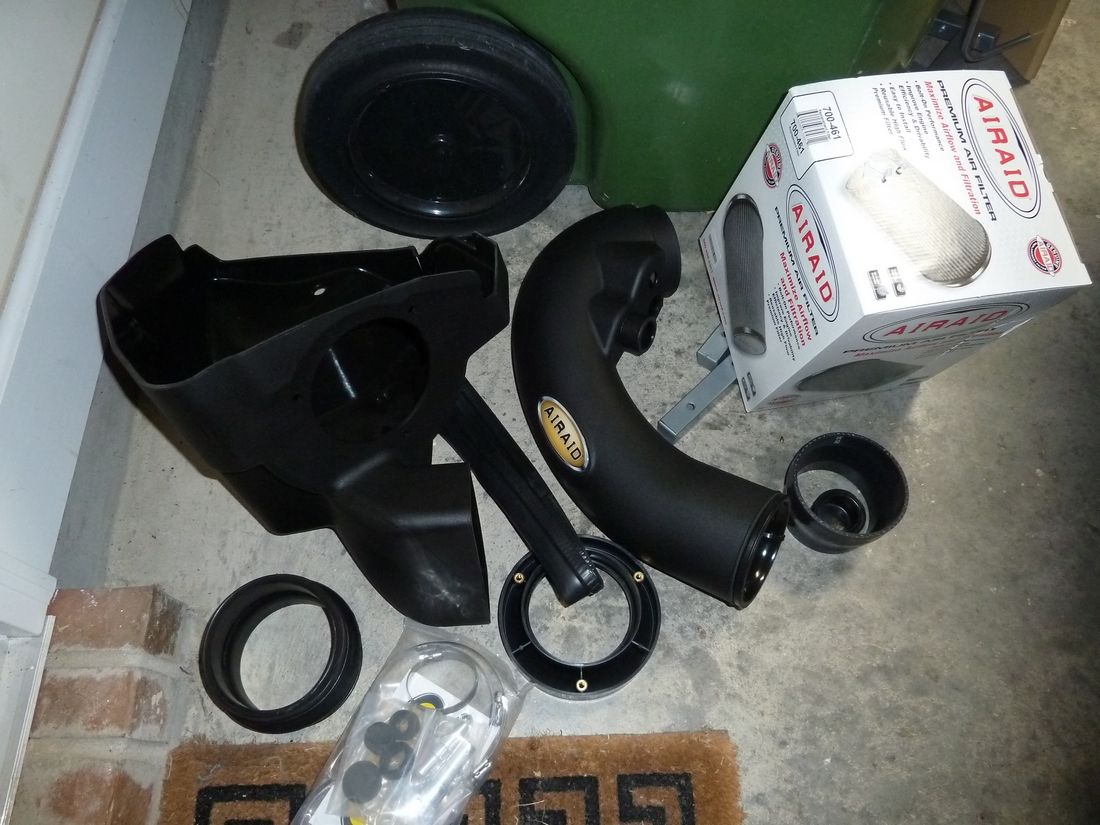
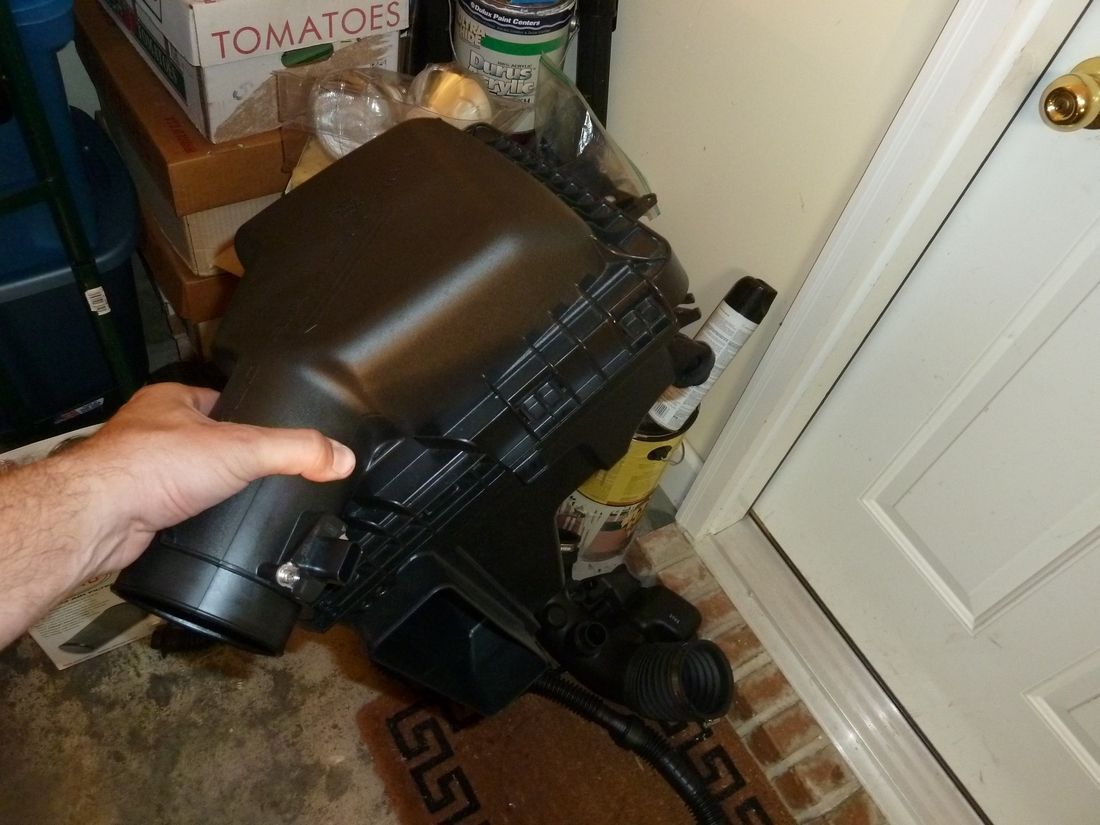
All the pieces
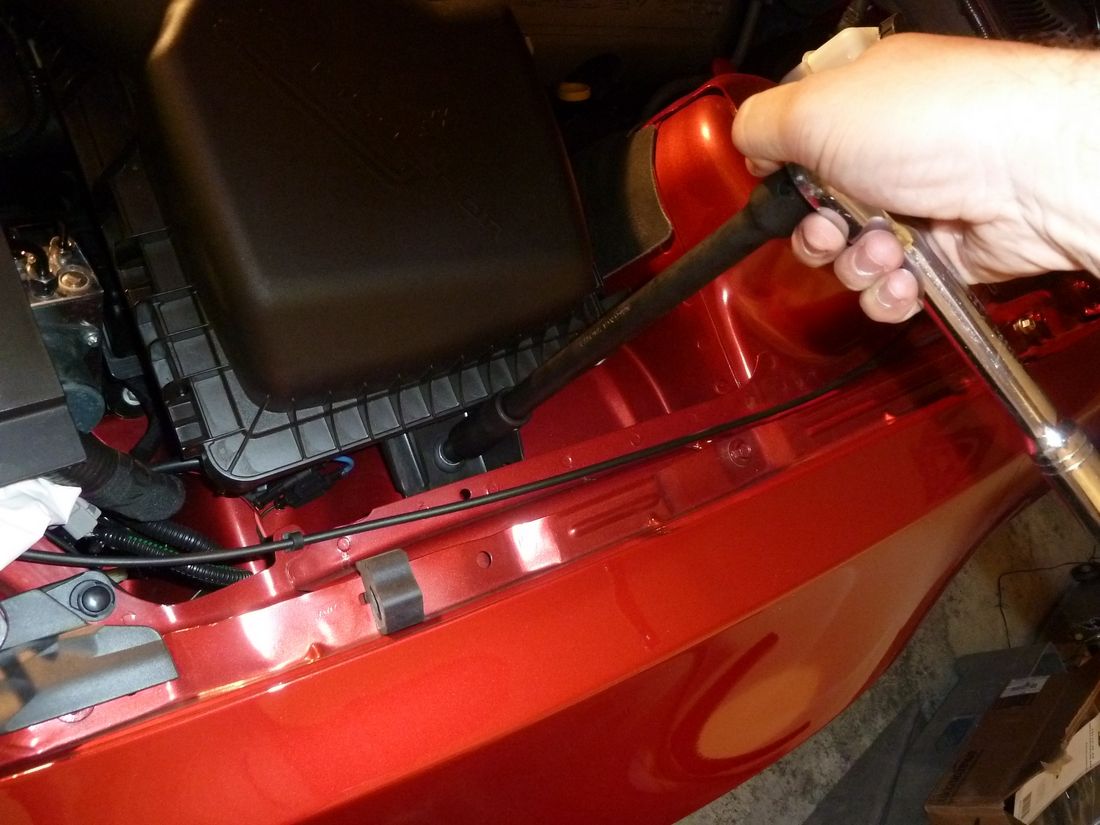
First unbolt the strut brace (if applicable) and engine cover (pops right off)
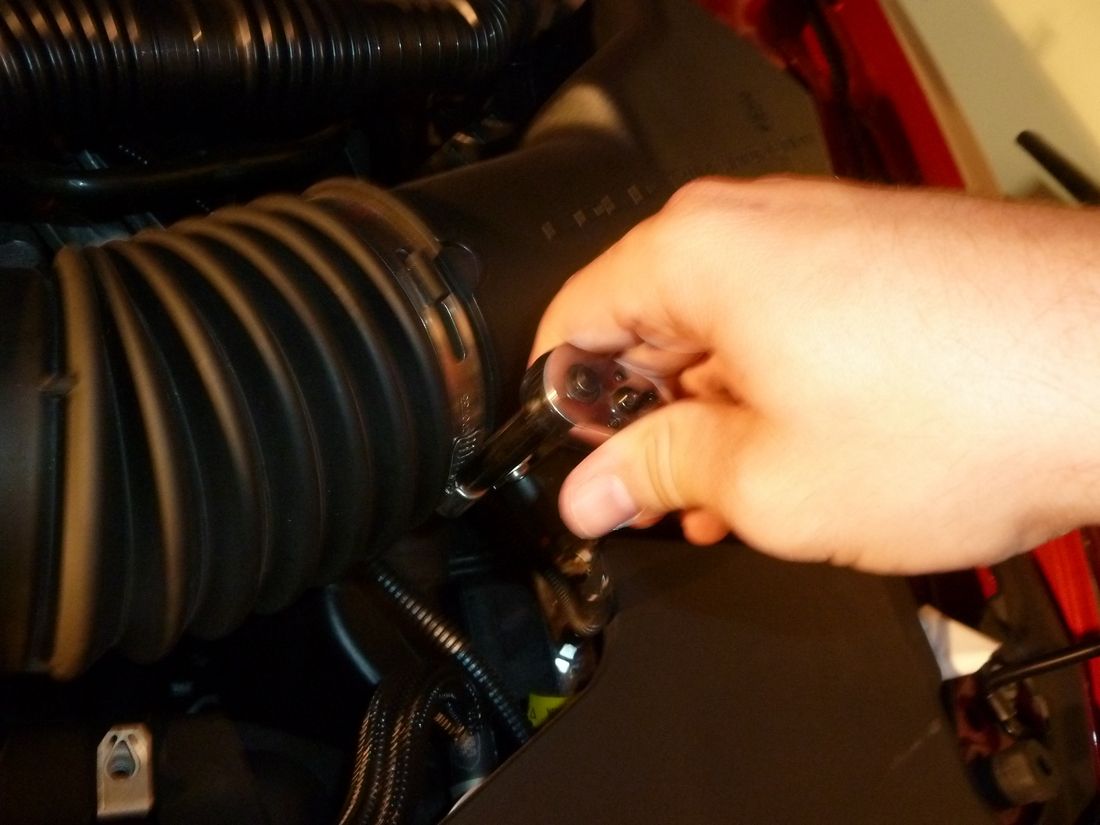
Next, using an 8mm socket, loosen the metal band clamps on the throttle body and air box
Next, with a pair of pliers, squeeze the clamp for the cabin air tube. It will catch a little tab and lock into place open.
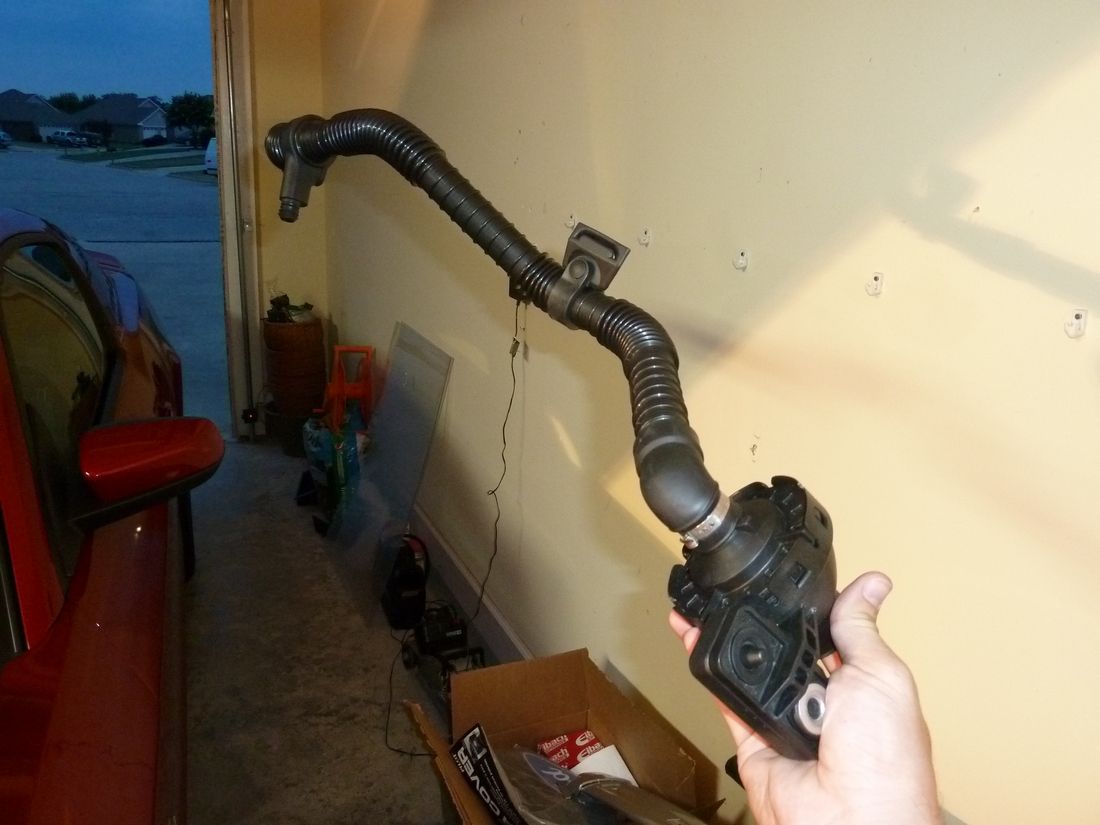
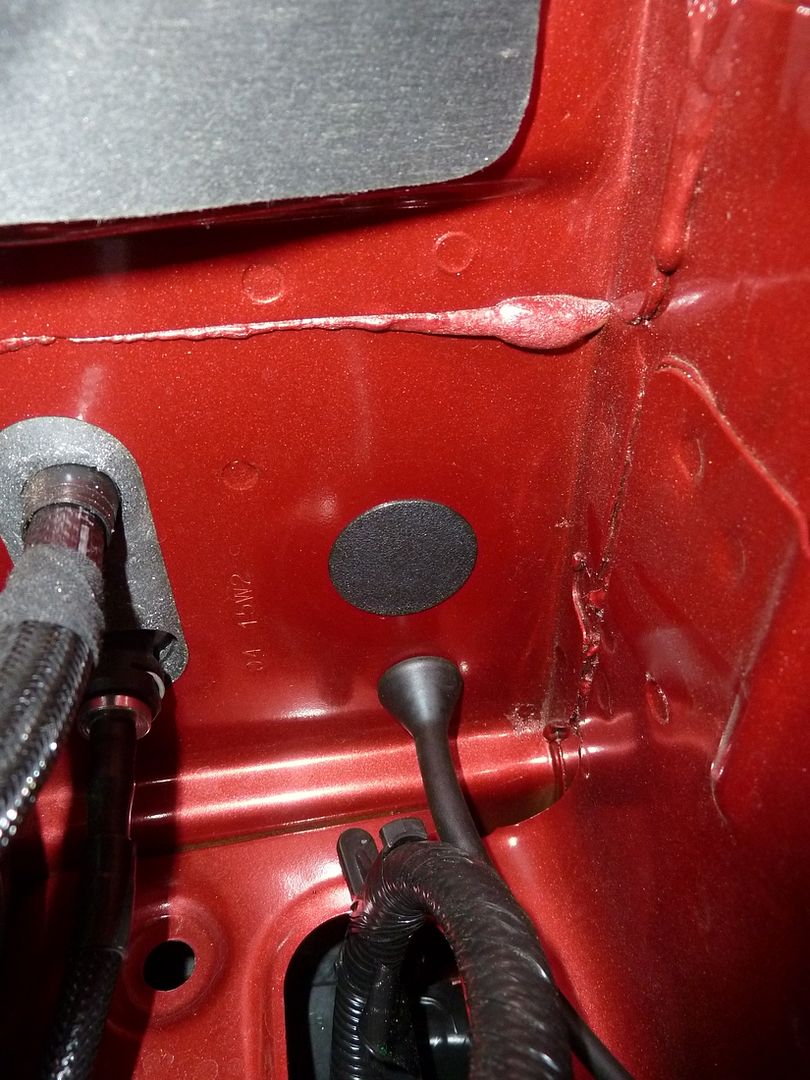
Next (if you plan on removing the air tube) unbolt the little housing from the chassis and simply pull the air tube out of the firewall then pop the plastic firewall plug in (supplied with the intake)
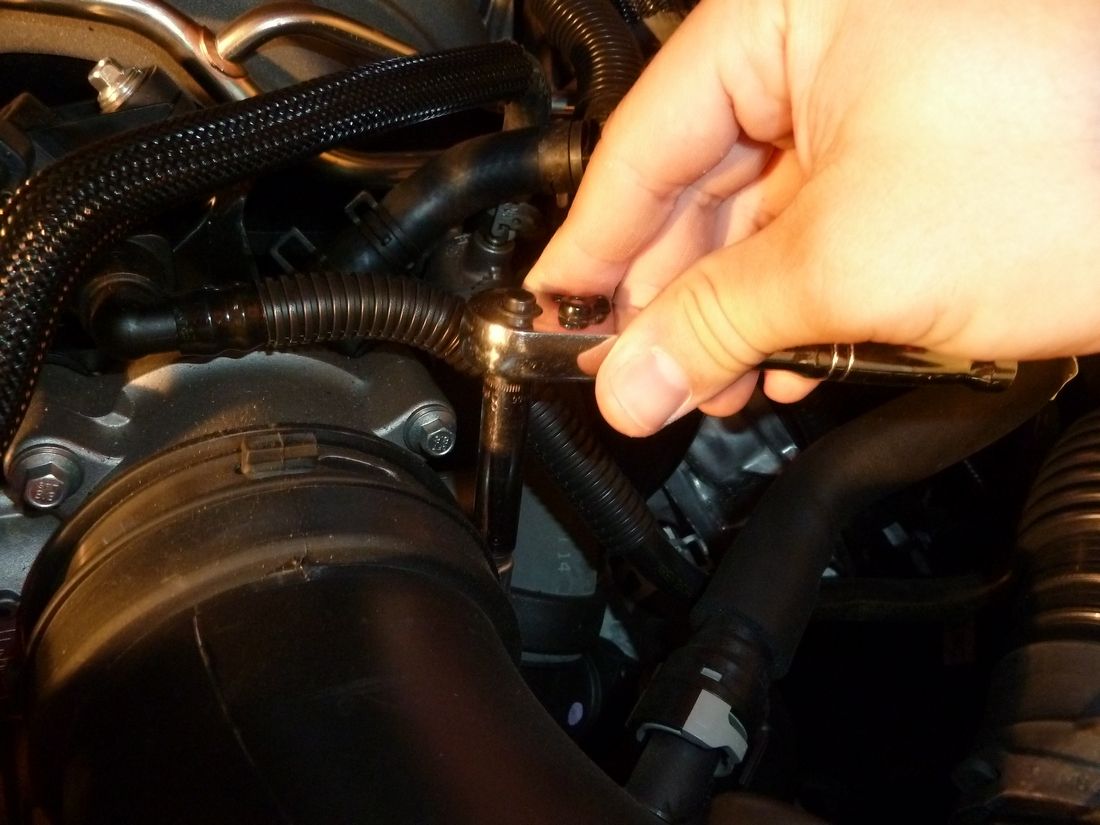
Next, remove the drivers side crank case hose by pressing the light gray lock tab (shown here with my index finger) and pull the hose out.
Next, with a socket extension, remove the bolt holding the air box down (this is the only bolt that secures the air box)
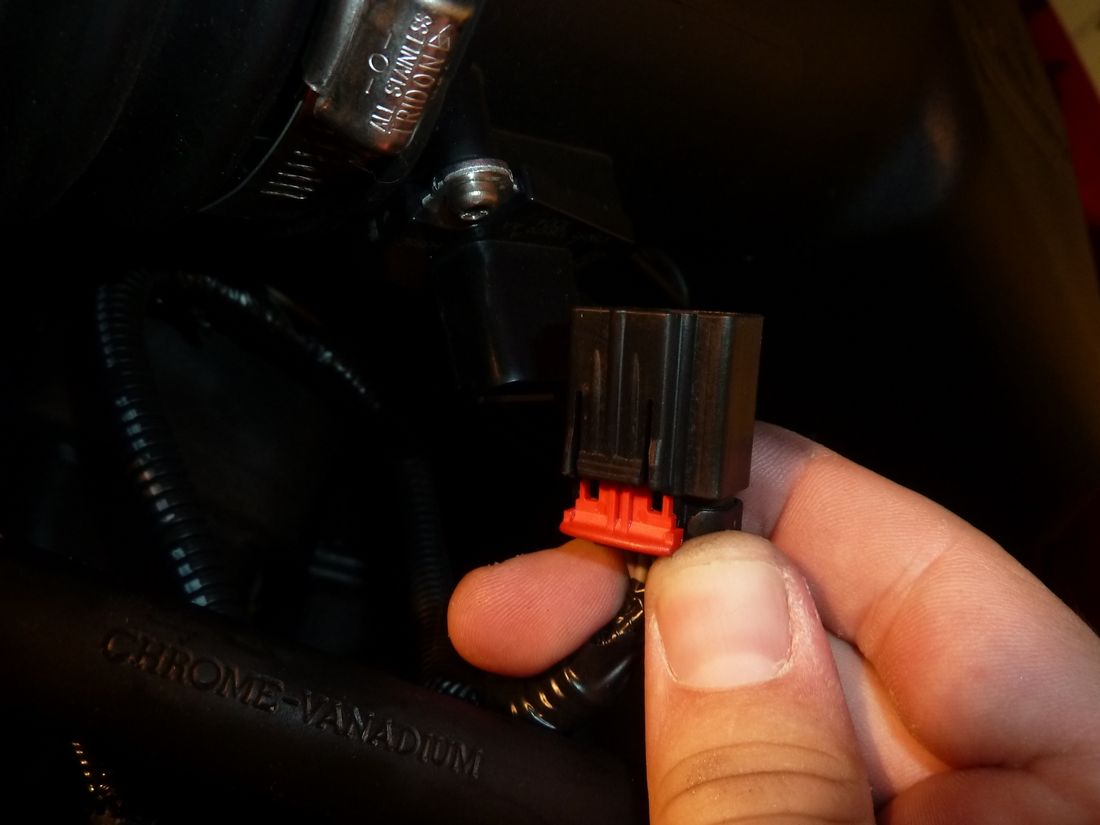
Then gently pop the red tab on the MAF electrical plug back and pull the plug out.
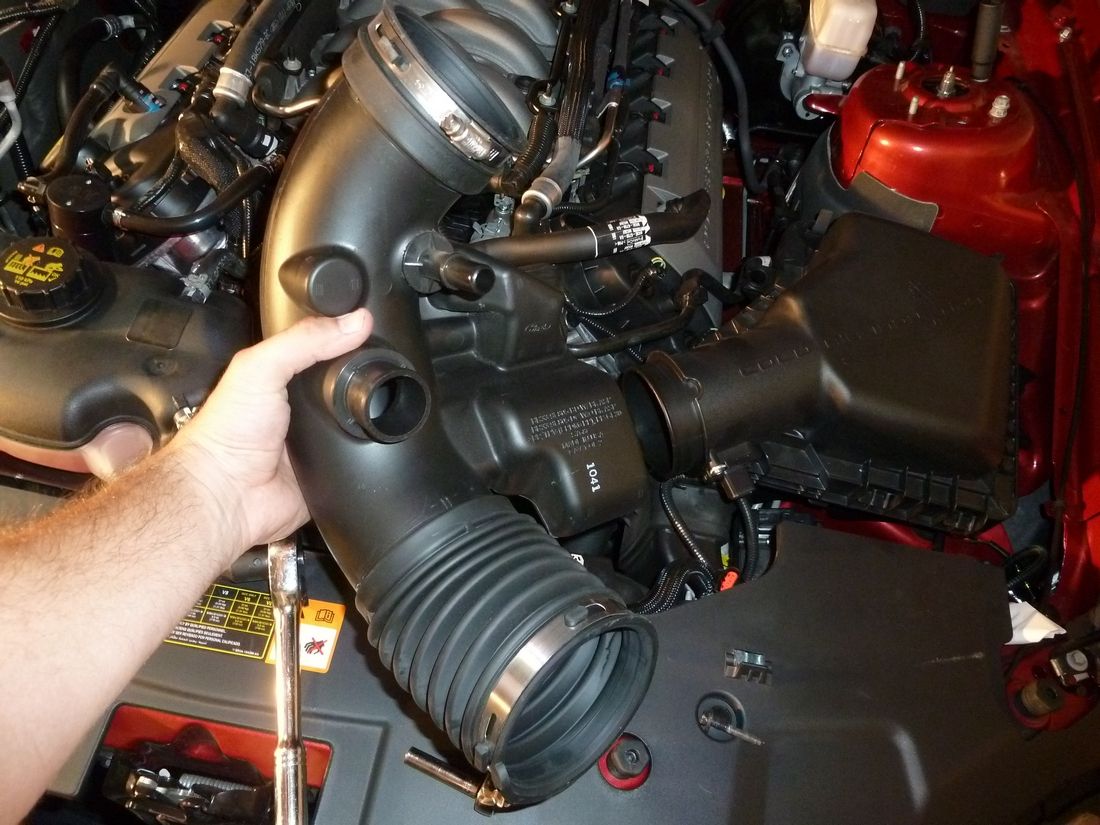
Now pull the stock intake tube out.
Pop these little plastic tabs out of the lower front side of the air box. It's the MAF wiring harness.

And remove the air box
Using the supplied torx bit, remove the two screws securing the MAF sensor to the stock air box.
If you're using a tune with the intake you can skip this but if you're using the stock tune (like me) slip this insert into the intake. This regulates air flow so the MAF can get the car's A/F ratios right.

Next, using the supplied 2 torx screws, mount the MAF sensor into the new intake.
Again, I've got a bone to pick with Air Raid on this. Why did you not include an allen wrench or proper torx bit to do this? The screws in the kit are not the same size torx opening as the stock MAF sensor screws. If you're not going to use the same size screws, please do us a favor and include the appropriate size bit or allen wrench to get the new bolts in. Luckily I had an allen wrench that worked but what if I didn't? SOL I guess? If you can include one bit to get the stock screws out, you can surely afford to include a different bit to get the new screws into the new intake tube... or simply re-use the stock screws.

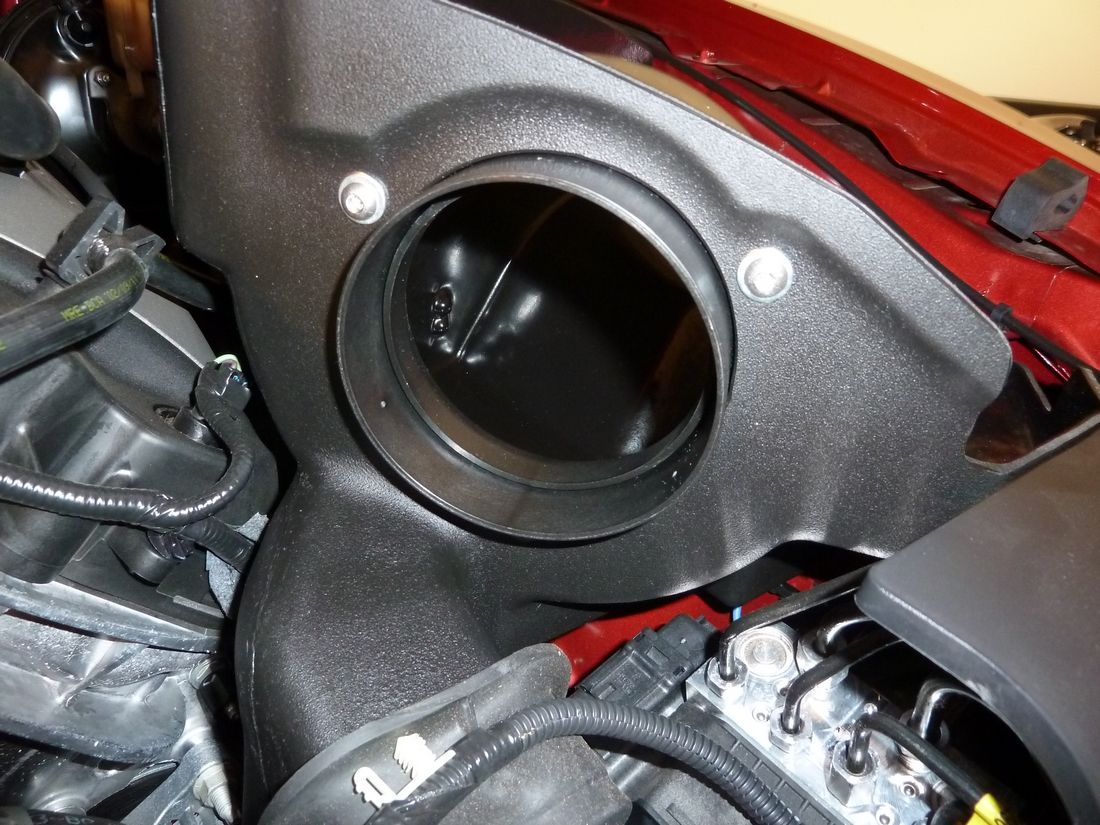
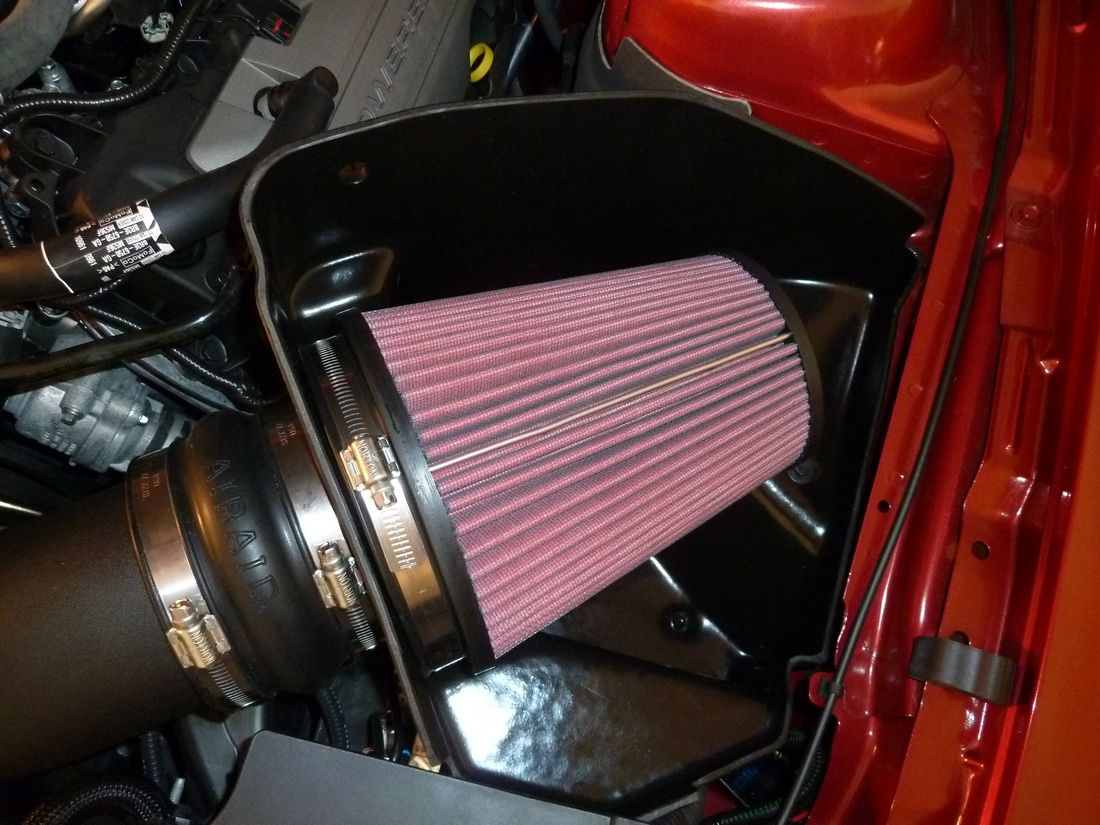
So with the new MAF sensor in, install the large grommet into the intake tube
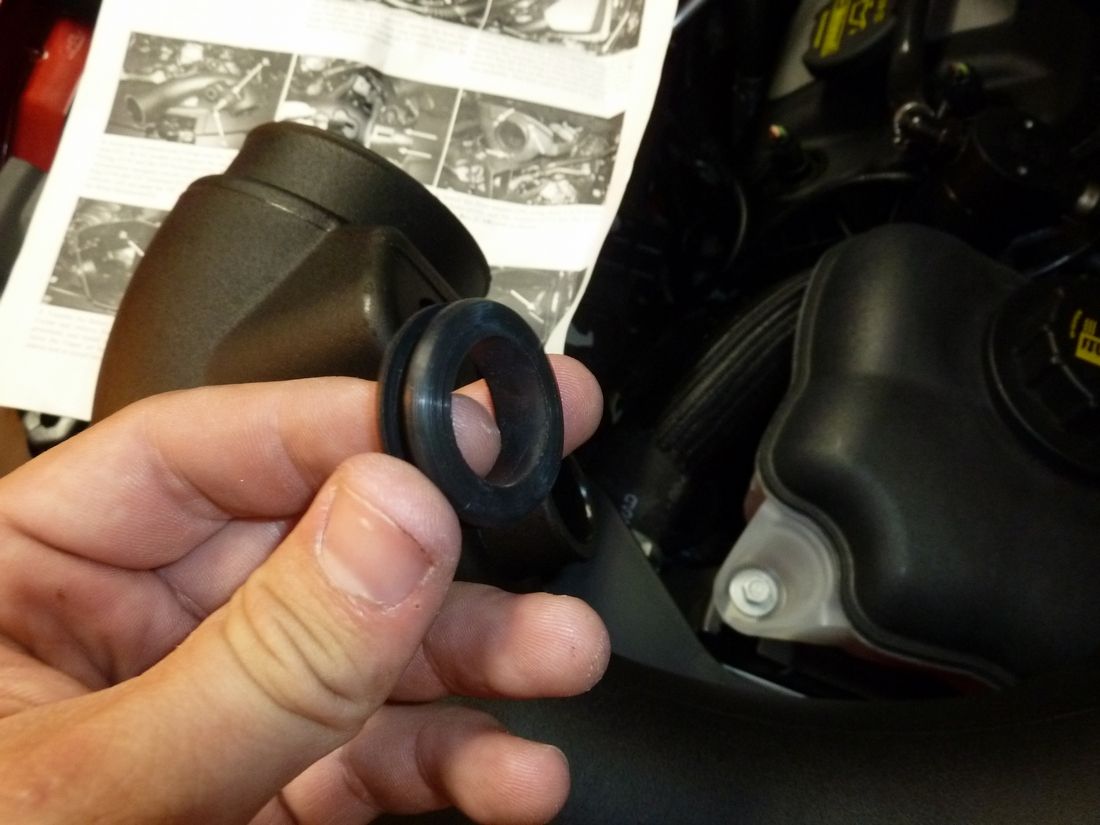
And pop the large metal barb into the grommet.
^ That could also be done inside after you install the blank grommet.
Next, bolt the large circular flange piece to the air box (can also be done inside before install process begins)
Next, remove the two rubber grommets from the bottom of the stock air box and insert them down into the 2 little holes in the chassis
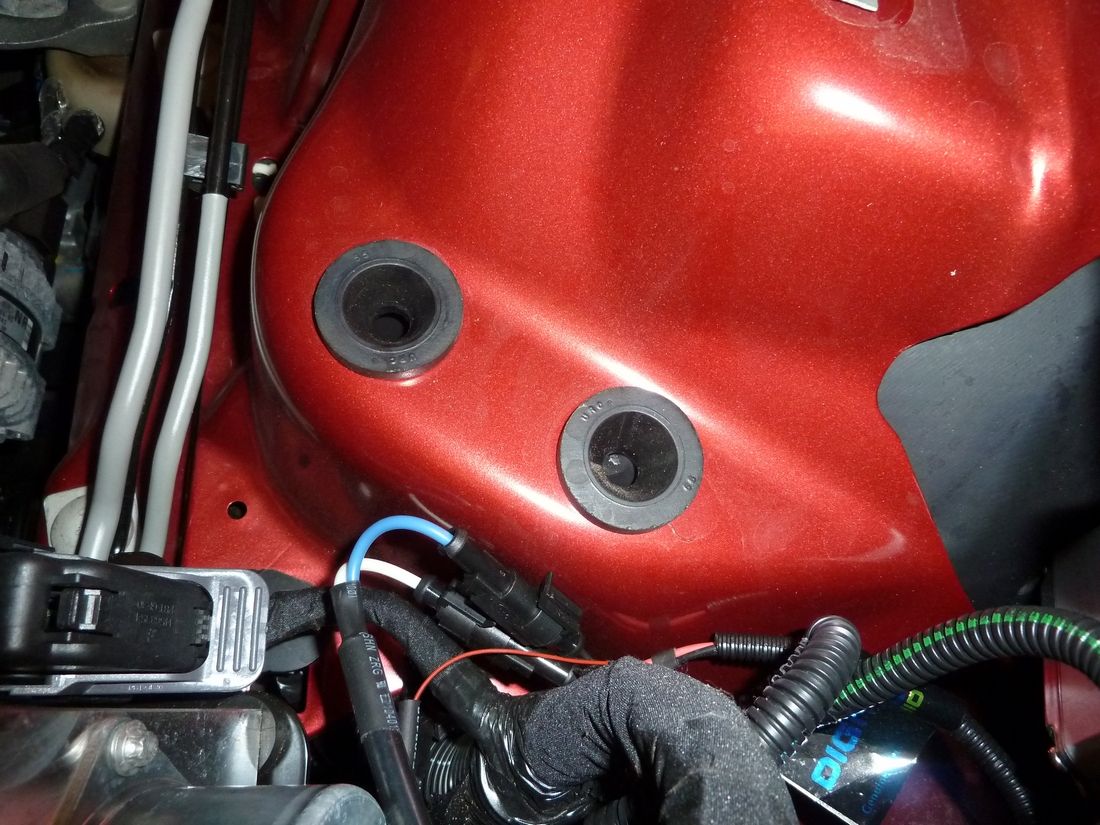
And then slide the new air box down so the little cones on the bottom of the box go into those grommets, the cold air inlet from the front of the car slips over the lip of the air box properly and the bolt hole lines up.
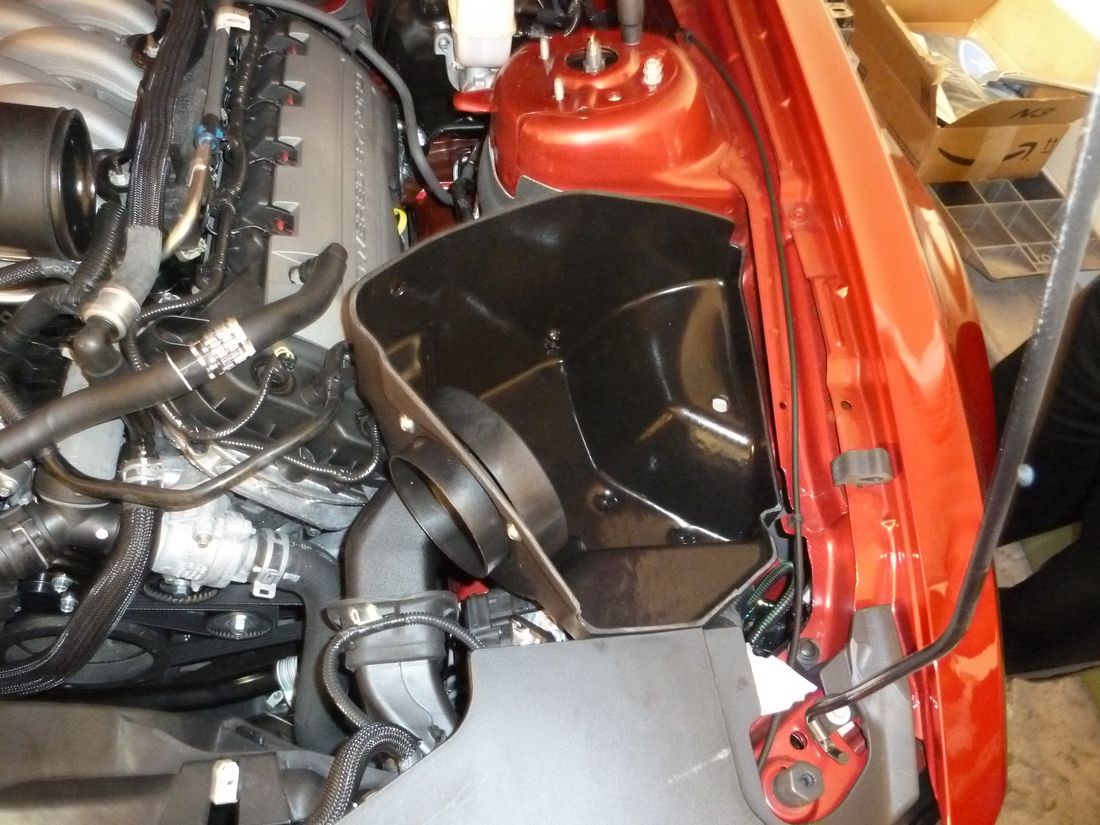
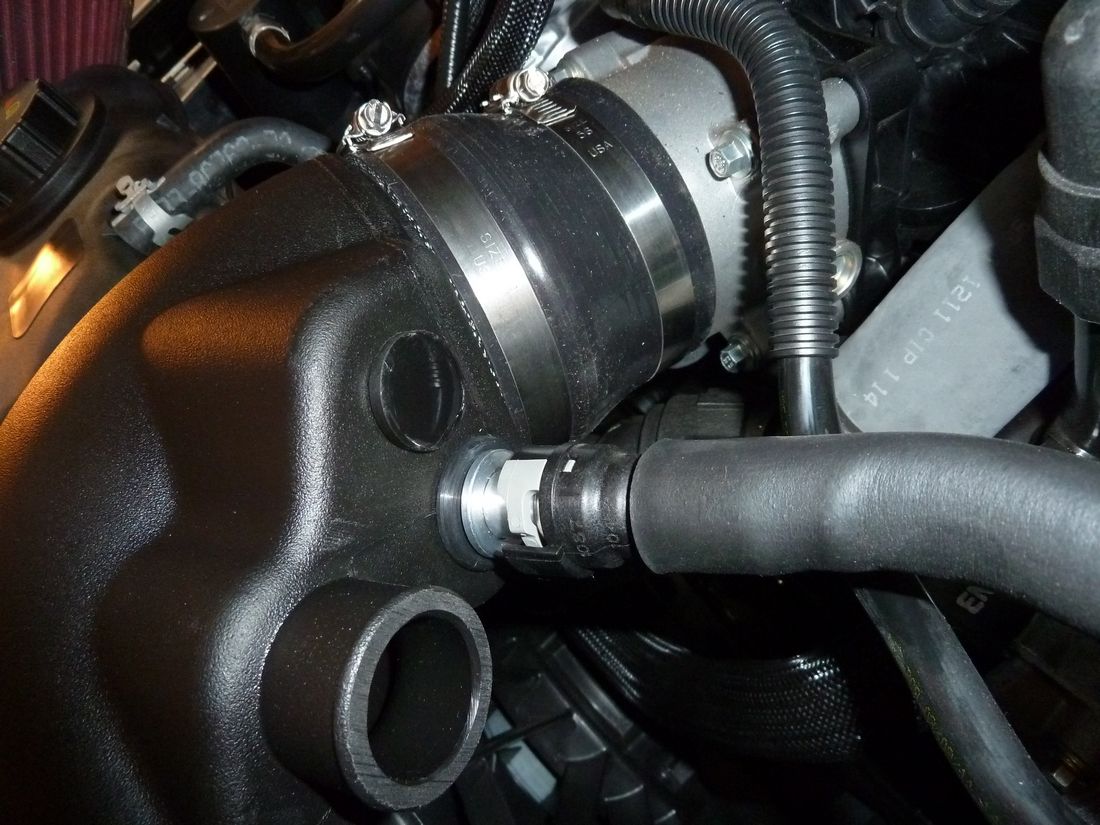
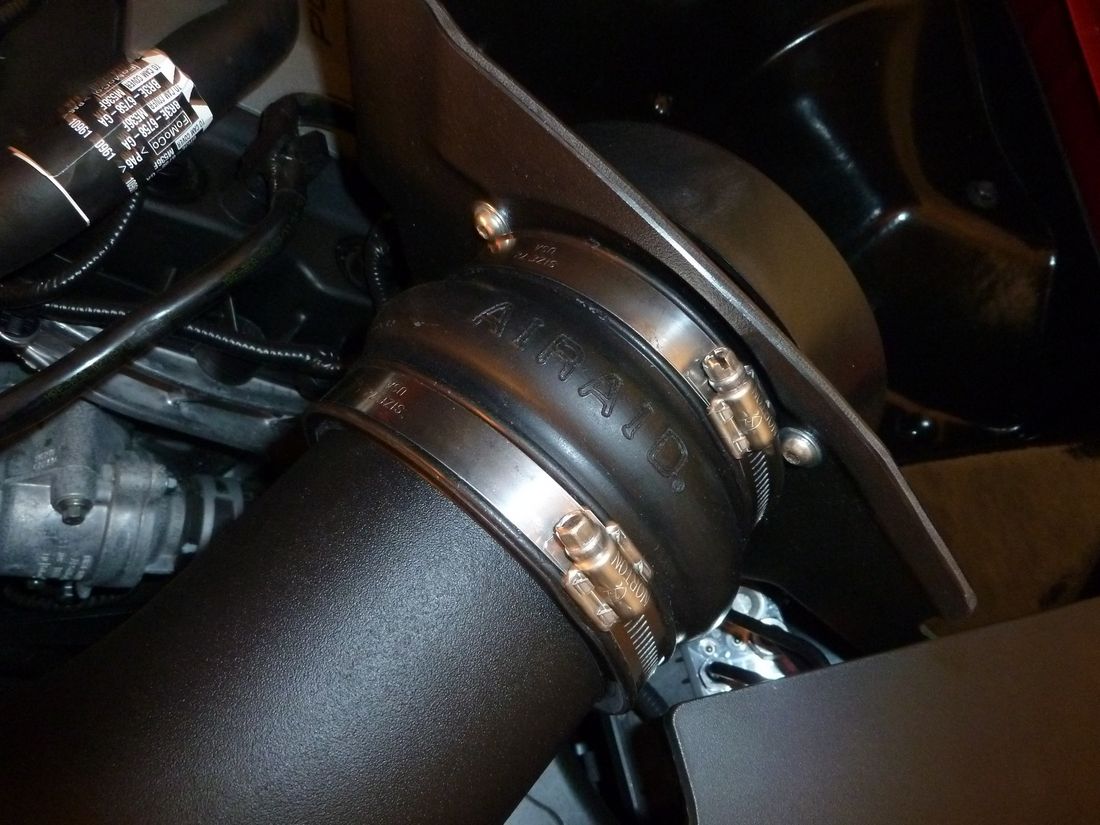
Next, slip one of the large metal band clamps around one side of the hump hose coupler and then slip the coupler onto the flange (the one mounted with 3 screws) coming out of the air box then tighten the band clamp down.
Slip the 2nd large metal band clamp onto the other end of the hump coupler but don't tighten it, in fact, loosen it up as much as you can without it opening up.
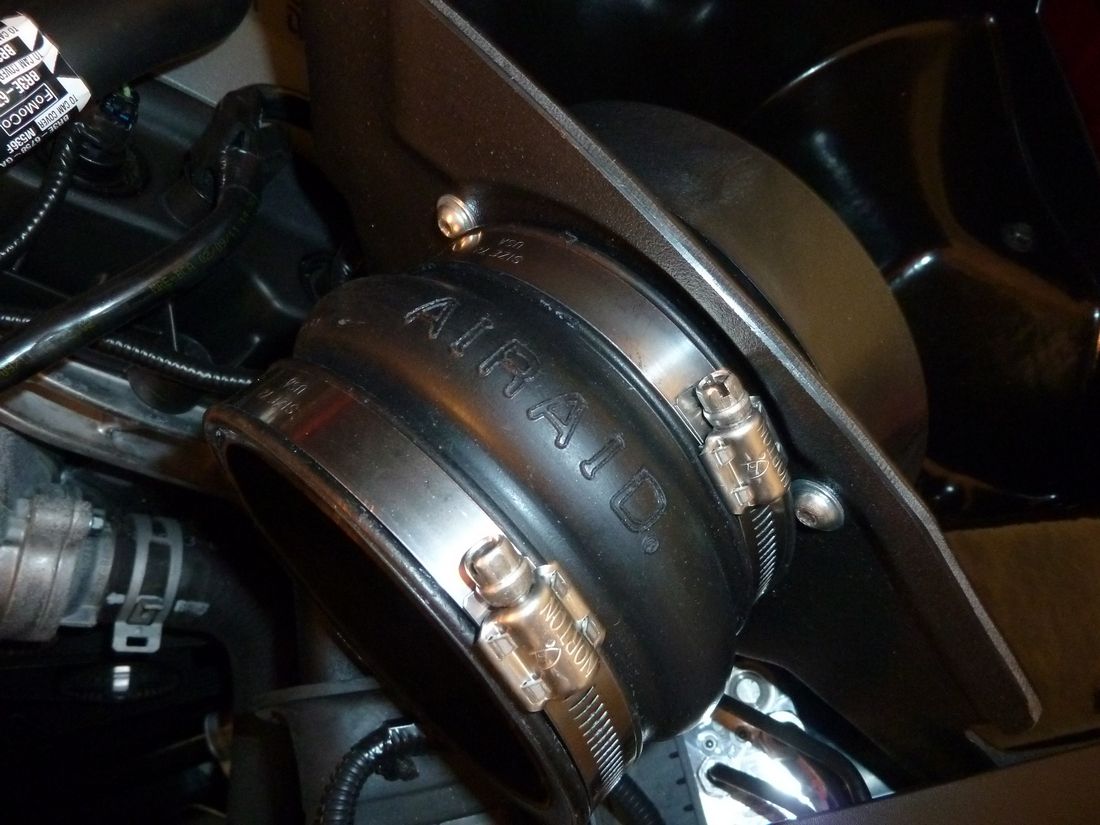
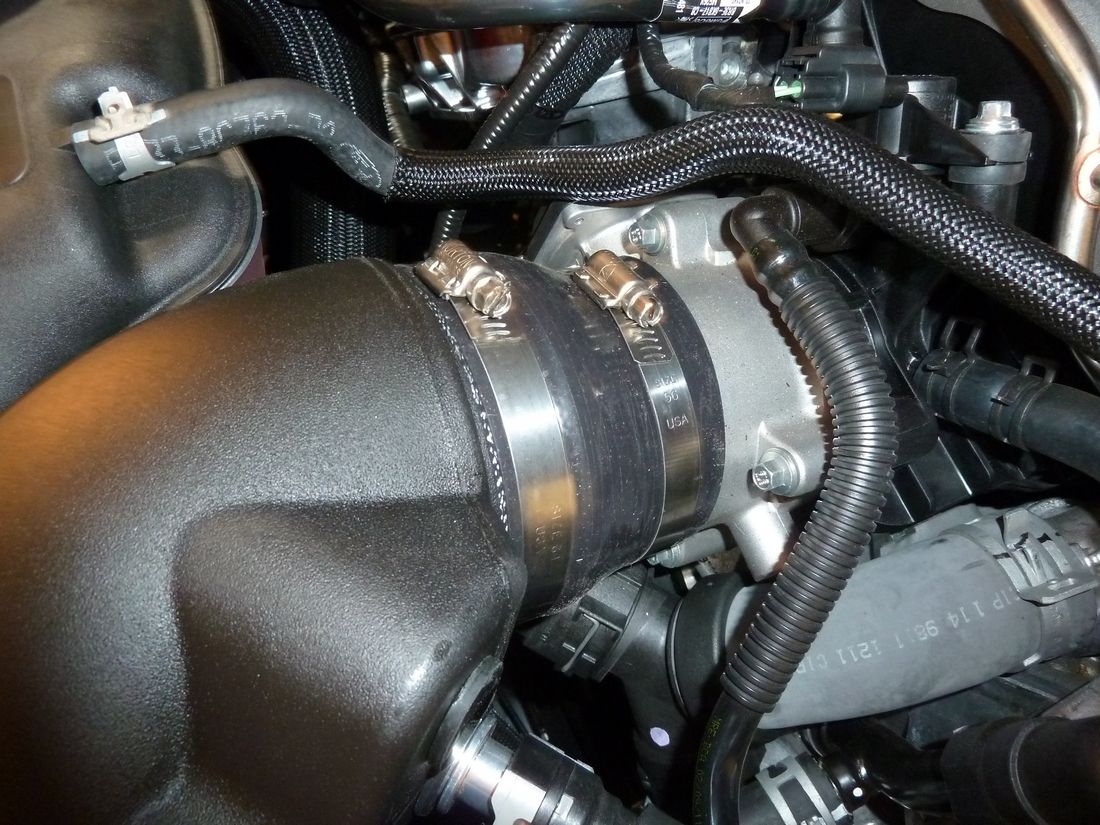
Next, place the medium sized metal band clamp over the small end of the silicone reduction coupler then slip it onto the throttle body and tighten the clamp down.
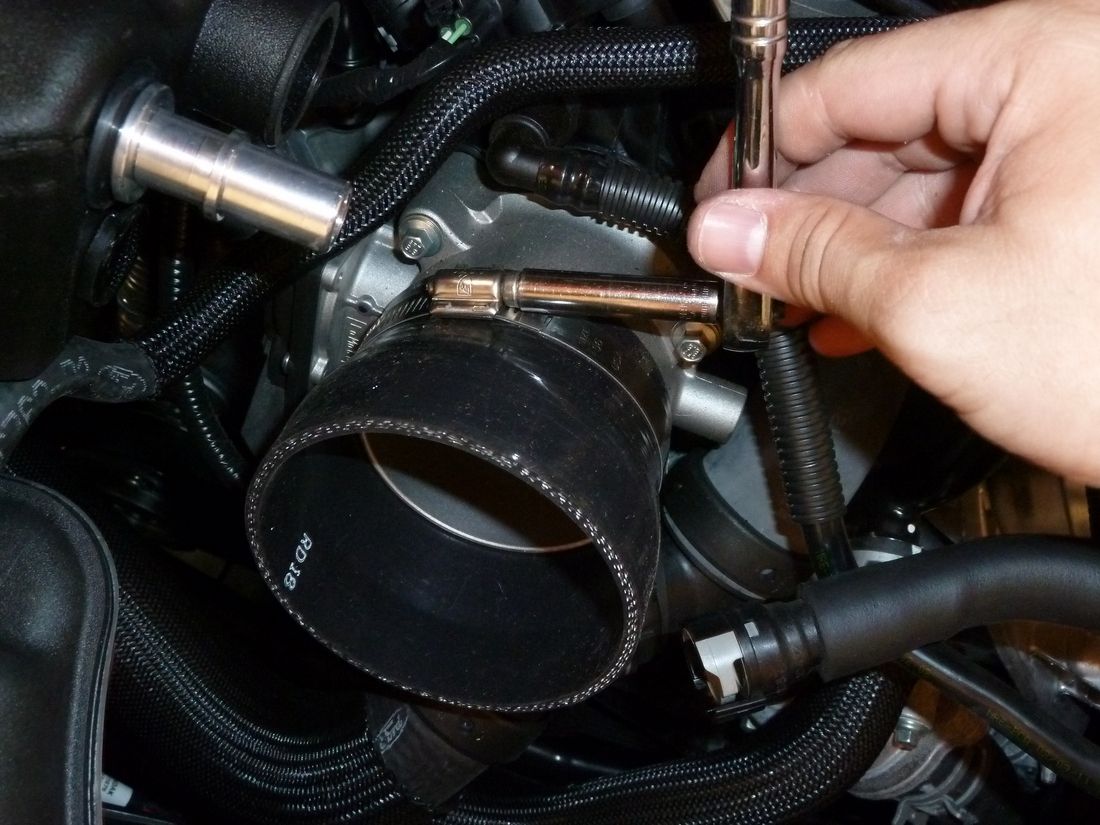
Next, slip the last of the large metal clamps over the coupler and then slip the intake tube into the coupler, rotate the tube down and if necessary, push the air box to the side a bit to slip the other end of the air tube into the hump hose coupler.
Make sure the tube is slipped all the way into the couplers and then tighten the metal band clamps.
*** One thing to be aware of is the orientation of the band clamp screws at the throttle body ***
The reason for this is that if the screws are facing up, the engine cover won't slip down snugly around the throttle body. You need to orient the clamp screws OPPOSITE of how I have them in the pictures. They need to be over on the drivers side facing UP rather than how they are. I had to go back and remove the clamps and re-position them when I realized this.
I don't think that the one on the throttle body is affected by this but I do know that the one holding the large end of the reduction coupler is directly under the little chrome lip of the engine cover.
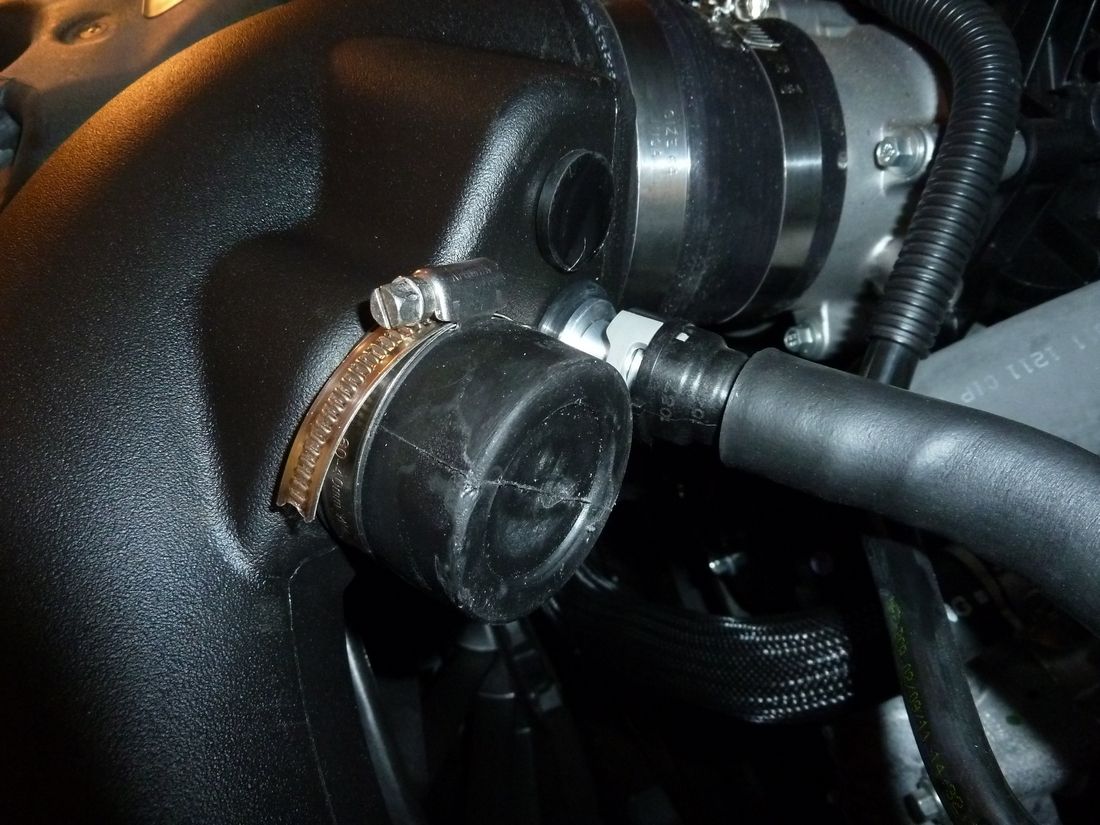
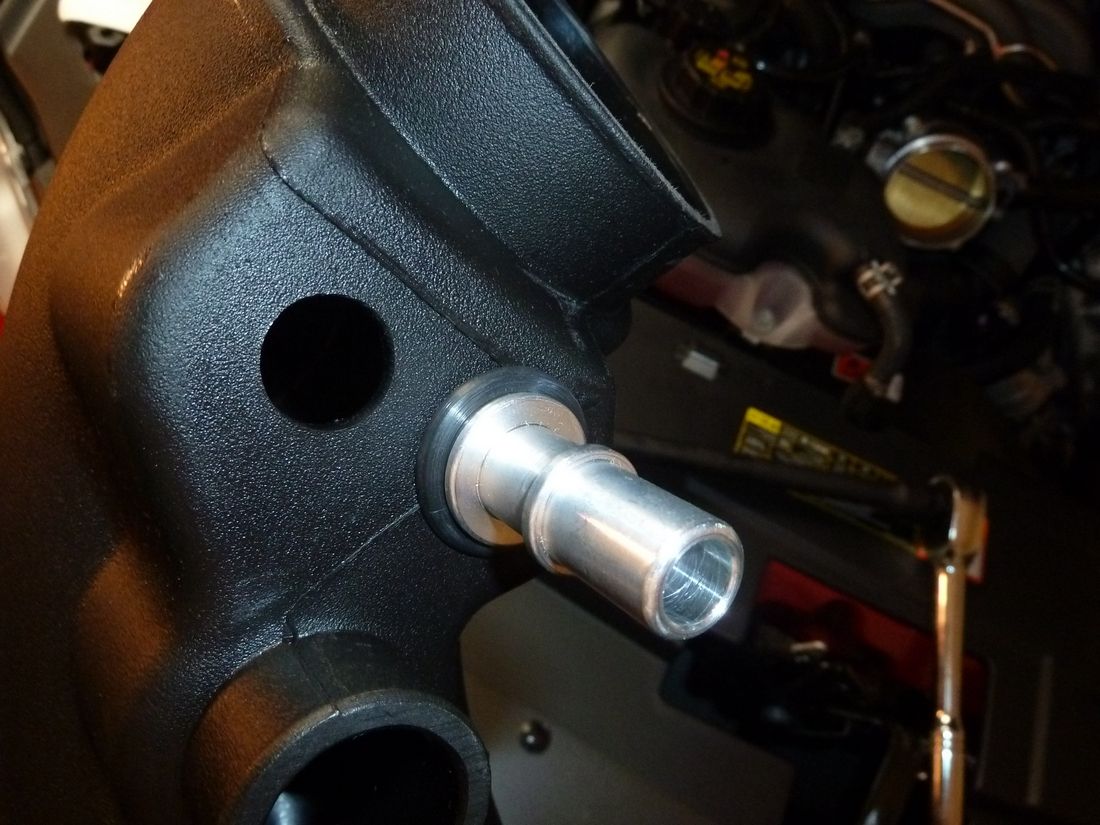
After the intake hose is on, slide the crank case tube clip onto the new flange
Next (and yet again, another gripe) install the stock bolt originally used to mount the air box.
Air Raid, the stock washer attached to the factory nut did not offer much confidence that the box was securely mounted because of how large the diameter of the hole of the airbox was. It was marginally small enough to hold the bolt/washer.
A larger washer would have been nice to have here because even the slightest bit too much torque to this bolt would send it through the hole in the bottom of the air box. A 5 cent washer would have made this a non issues but it was yet another thing that I shouldn't have to worry about when paying this much for an intake.
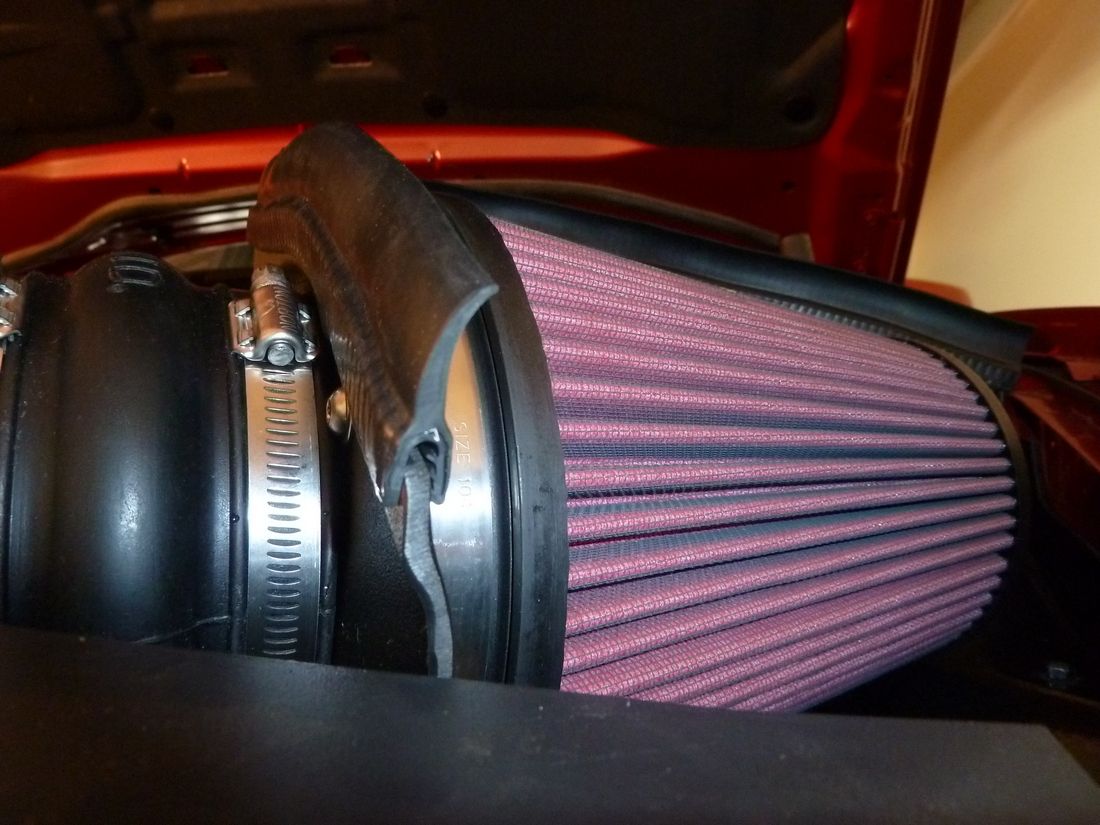
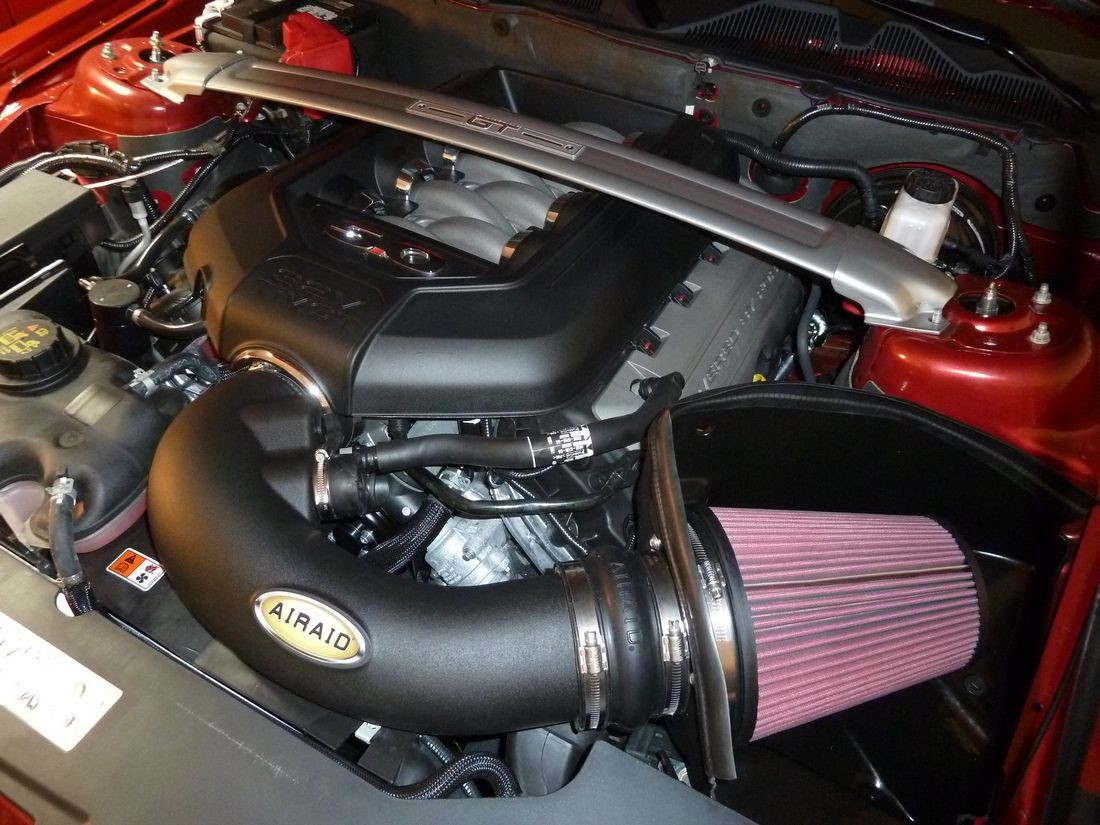
Next, take the cone filter out of the box and mount it to the other side of the flange.
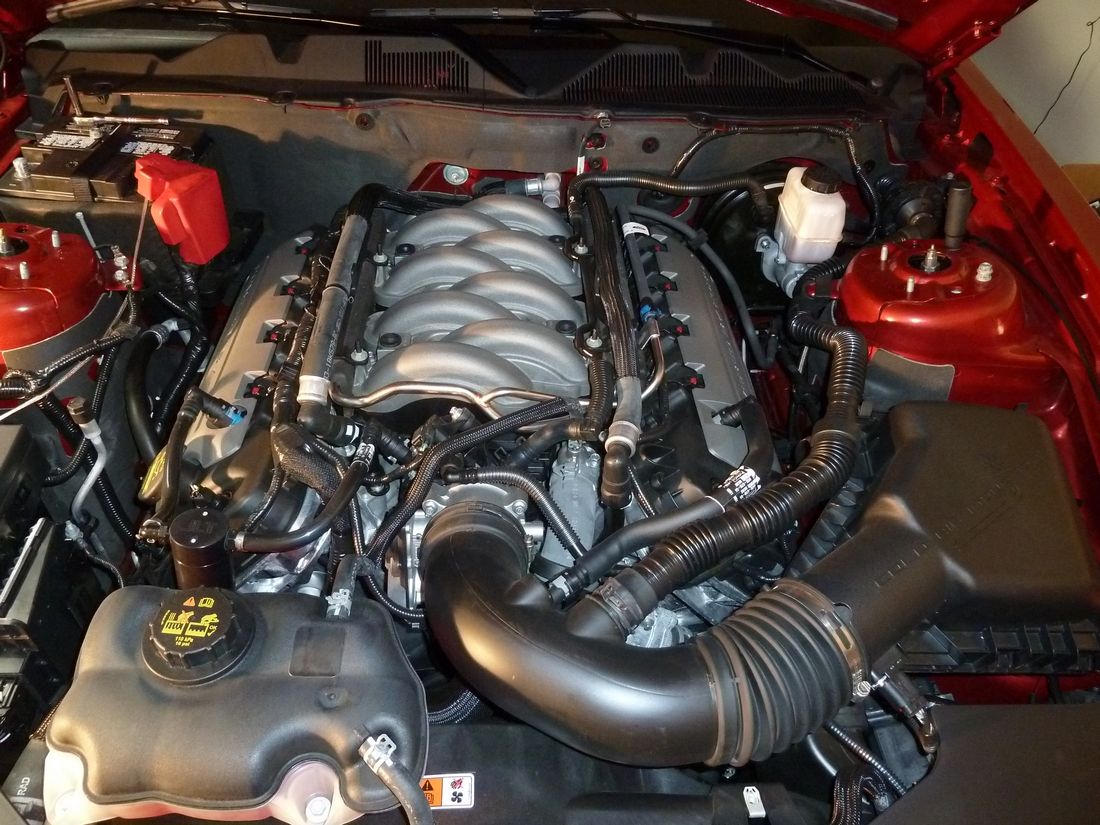
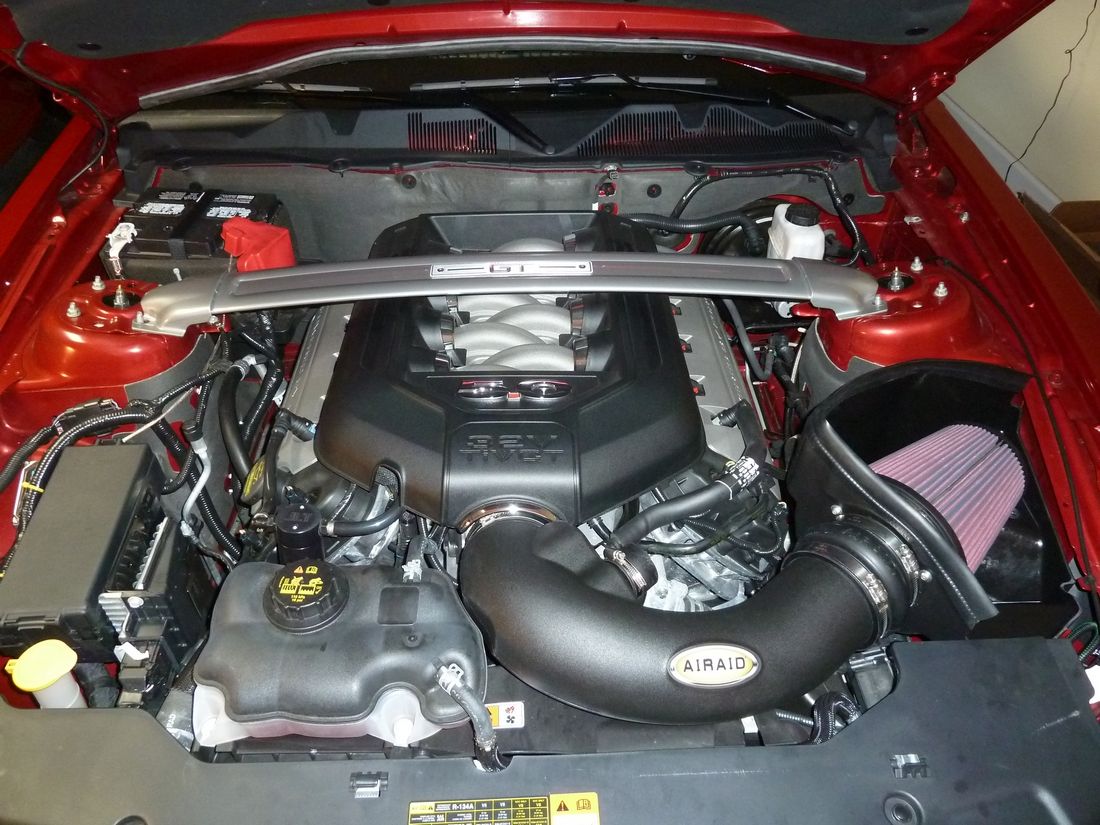
Ensure everything is tight now, pop the engine cover back on then re-install the strut brace and take it for a spin!
** Driving Impressions **
I'm not sure that this is totally intended to make a tremendous difference with the stock tune. It seems like it's primarily to enhance the gains that an ECU tune would offer so in that regard, don't expect huge gains. 15~ish HP is a nice gain but I don't feel a big seat of the pants gain. There is a bit more pull so there IS more power there just not a ton.
I'm going over to a buddy's house today who runs a dyno shop here in town to try and schedule a day I can go out there with the stock air box, pop that back on, make a few pulls and then put the air raid back on and see what sort of gains I got. With the temperatures now in triple digits and even hotter inside the dyno room and high humidity, I'm not expecting stellar results.
Anyways, at the end of the day, I don't regret my choice to go with AirRaid. They have a few things that they need to address in my own opinion but at the end of the day, the quality is there, the fit is perfect and I ended up getting it shipped from UPR for a little over $300.
Air raid, if you're reading this. Please consider using a blanking grommet that's easier to install for the manual transmission guys, include an allen wrench or torx bit to install the MAF sensor screws and a washer to go under the screw holding the air box down.
Get those 3 problems addressed and I will be able to confidently recommend your product to others.
An intake install should not be hard or frustrating and there's nothing worse than getting blind sided by things like that and having a 1 hour project turn take nearly twice as long.
I've read of other guys with different intakes also being sent to hardware stores for parts they weren't expecting to need or have to use so your intake isn't the only one to blame but for over $300, these nickle and dime or dollar parts being needed is unnecessary.
Air raid intake showed up a few days ago so I grabbed my camera and snapped pics during the install and like my suspension installed thread, thought I would offer my own input on any tips/tricks and things to be aware of before starting the install.
I can only assume that a lot of this won't apply to other intakes but the removal of the stock intake steps would.
So lets get going!
First, before even opening the hood of the car, I would suggest you get a few things out of the way.
If your car is a manual transmission, there's a blank grommet you have to install into the intake tube. This is hands down one of the most frustrating things I have ever dealt with in my life when it comes to modding a car. It was WAY harder than it should have been and I had to go get my neighbor to help me with it.
The problem is that the grommet size is I guess designed so that once it's in the hole of the air tube, it's incredibly snug and tight. The issue with this is that the rubber compound that the grommet is made of is VERY hard and doesn't flex much at all so it really hard to manipulate it so that it can squeeze through into the hole.
What we ended up doing was holding it with a pair of pliars up to the high wattage shop light long enough that it softened up the rubber allowing it to bend easier. It took a few tries doing this before we figured out the best angle to go into the hole with and how much time we had to try and walk the inner lip of the grommet around the rim of the intake tube's hole to get it in.
You basically have to go in at about a 75* angle while squeezing the grommet from each side (like you're trying to bend it in half) and then as you're pressing in really hard on the grommet, keep turning it in one direction so the bottom lip of the edge of the grommet slips down into the intake. It's tough but it CAN BE DONE.
Proof
Air Raid... if you are reading this, please please please find a different type of grommet to use for this... something softer at the least. That concrete hard grommet that came with the kit quite literally doubled the amount of time it took to install this kit. :nono: And to be quite honest, it made me wish that I had bought the steeda intake instead. We were on the verge of getting in my other car and driving out to Home Depot with the intake tube to find a replacement grommet that would fit.
After that's in and if you're planning on removing the stock cabin air tube, go ahead and slip the rubber cap onto the air tube hole on the new intake tube and use the small band clamp to secure it down.
With that bit out of the way, there's one more thing that you should do before you start pulling stuff apart. Put the rubber trim around the top of the air box. The trim that seals off the air box when the hood is shut is a very durable and high quality piece of material that has metal inside the rubber that allows the rubber to hold it's shape and the little U shaped groove in the bottom of the strip has metal prongs embedded in the rubber that allows the strip to "grip" the top edge of the air box.
Reason I say do this before you start is that it's not easy to get this slipped down onto the edge of the air box. It's (again) a very snug fit that requires some patience and elbow grease to press it on all the way. It was roasting hot in my garage and doing this with everything already bolted into the car was a mistake. If I had it to do all over again I would have surely done this in a nice air conditioned house.
So those are my 2 biggest tips for installing this thing. Do those before you start in a nice air conditioned place rather than sweltering in a hot garage.
Anyways, here comes the install pics!
All the pieces
First unbolt the strut brace (if applicable) and engine cover (pops right off)
Next, using an 8mm socket, loosen the metal band clamps on the throttle body and air box
Next, with a pair of pliers, squeeze the clamp for the cabin air tube. It will catch a little tab and lock into place open.
Next (if you plan on removing the air tube) unbolt the little housing from the chassis and simply pull the air tube out of the firewall then pop the plastic firewall plug in (supplied with the intake)
Next, remove the drivers side crank case hose by pressing the light gray lock tab (shown here with my index finger) and pull the hose out.
Next, with a socket extension, remove the bolt holding the air box down (this is the only bolt that secures the air box)
Then gently pop the red tab on the MAF electrical plug back and pull the plug out.
Now pull the stock intake tube out.
Pop these little plastic tabs out of the lower front side of the air box. It's the MAF wiring harness.
And remove the air box
Using the supplied torx bit, remove the two screws securing the MAF sensor to the stock air box.
If you're using a tune with the intake you can skip this but if you're using the stock tune (like me) slip this insert into the intake. This regulates air flow so the MAF can get the car's A/F ratios right.
Next, using the supplied 2 torx screws, mount the MAF sensor into the new intake.
Again, I've got a bone to pick with Air Raid on this. Why did you not include an allen wrench or proper torx bit to do this? The screws in the kit are not the same size torx opening as the stock MAF sensor screws. If you're not going to use the same size screws, please do us a favor and include the appropriate size bit or allen wrench to get the new bolts in. Luckily I had an allen wrench that worked but what if I didn't? SOL I guess? If you can include one bit to get the stock screws out, you can surely afford to include a different bit to get the new screws into the new intake tube... or simply re-use the stock screws.
So with the new MAF sensor in, install the large grommet into the intake tube
And pop the large metal barb into the grommet.
^ That could also be done inside after you install the blank grommet.
Next, bolt the large circular flange piece to the air box (can also be done inside before install process begins)
Next, remove the two rubber grommets from the bottom of the stock air box and insert them down into the 2 little holes in the chassis
And then slide the new air box down so the little cones on the bottom of the box go into those grommets, the cold air inlet from the front of the car slips over the lip of the air box properly and the bolt hole lines up.
Next, slip one of the large metal band clamps around one side of the hump hose coupler and then slip the coupler onto the flange (the one mounted with 3 screws) coming out of the air box then tighten the band clamp down.
Slip the 2nd large metal band clamp onto the other end of the hump coupler but don't tighten it, in fact, loosen it up as much as you can without it opening up.
Next, place the medium sized metal band clamp over the small end of the silicone reduction coupler then slip it onto the throttle body and tighten the clamp down.
Next, slip the last of the large metal clamps over the coupler and then slip the intake tube into the coupler, rotate the tube down and if necessary, push the air box to the side a bit to slip the other end of the air tube into the hump hose coupler.
Make sure the tube is slipped all the way into the couplers and then tighten the metal band clamps.
*** One thing to be aware of is the orientation of the band clamp screws at the throttle body ***
The reason for this is that if the screws are facing up, the engine cover won't slip down snugly around the throttle body. You need to orient the clamp screws OPPOSITE of how I have them in the pictures. They need to be over on the drivers side facing UP rather than how they are. I had to go back and remove the clamps and re-position them when I realized this.
I don't think that the one on the throttle body is affected by this but I do know that the one holding the large end of the reduction coupler is directly under the little chrome lip of the engine cover.
After the intake hose is on, slide the crank case tube clip onto the new flange
Next (and yet again, another gripe) install the stock bolt originally used to mount the air box.
Air Raid, the stock washer attached to the factory nut did not offer much confidence that the box was securely mounted because of how large the diameter of the hole of the airbox was. It was marginally small enough to hold the bolt/washer.
A larger washer would have been nice to have here because even the slightest bit too much torque to this bolt would send it through the hole in the bottom of the air box. A 5 cent washer would have made this a non issues but it was yet another thing that I shouldn't have to worry about when paying this much for an intake.
Next, take the cone filter out of the box and mount it to the other side of the flange.
Ensure everything is tight now, pop the engine cover back on then re-install the strut brace and take it for a spin!
** Driving Impressions **
I'm not sure that this is totally intended to make a tremendous difference with the stock tune. It seems like it's primarily to enhance the gains that an ECU tune would offer so in that regard, don't expect huge gains. 15~ish HP is a nice gain but I don't feel a big seat of the pants gain. There is a bit more pull so there IS more power there just not a ton.
I'm going over to a buddy's house today who runs a dyno shop here in town to try and schedule a day I can go out there with the stock air box, pop that back on, make a few pulls and then put the air raid back on and see what sort of gains I got. With the temperatures now in triple digits and even hotter inside the dyno room and high humidity, I'm not expecting stellar results.
Anyways, at the end of the day, I don't regret my choice to go with AirRaid. They have a few things that they need to address in my own opinion but at the end of the day, the quality is there, the fit is perfect and I ended up getting it shipped from UPR for a little over $300.
Air raid, if you're reading this. Please consider using a blanking grommet that's easier to install for the manual transmission guys, include an allen wrench or torx bit to install the MAF sensor screws and a washer to go under the screw holding the air box down.
Get those 3 problems addressed and I will be able to confidently recommend your product to others.
An intake install should not be hard or frustrating and there's nothing worse than getting blind sided by things like that and having a 1 hour project turn take nearly twice as long.
I've read of other guys with different intakes also being sent to hardware stores for parts they weren't expecting to need or have to use so your intake isn't the only one to blame but for over $300, these nickle and dime or dollar parts being needed is unnecessary.
 6/18/11, 12:38 PM
#2
Member

Join Date: May 23, 2011
Location: In.
Posts: 33
Likes: 0
Received 0 Likes
on
0 Posts
Air raid
 Had the same problem with the gasket seal for the box on my 2010 Taurus SHO( in the House) called David at air raid and he said to use a large flat blade screwdiver and spread the flange . Did that with a little WD40 and a small rubber hammer got it to work.Also had to cut some of the wrap on the ATP to make it fit back into the intake tube. For the price should have been better eng.
6/18/11, 03:43 PM
Had the same problem with the gasket seal for the box on my 2010 Taurus SHO( in the House) called David at air raid and he said to use a large flat blade screwdiver and spread the flange . Did that with a little WD40 and a small rubber hammer got it to work.Also had to cut some of the wrap on the ATP to make it fit back into the intake tube. For the price should have been better eng.
6/18/11, 03:43 PM
#5
Bullitt Member
Great post! My experience went exactly as yours, where the blank grommet was BY FAR the hardest and most time consuming part of the install.
Myself and my wife tried various methods (twisting it, forcing it, needlenose pliers, etc). Didn't think about heating it up like you did.
Myself and my wife tried various methods (twisting it, forcing it, needlenose pliers, etc). Didn't think about heating it up like you did.
6/18/11, 06:52 PM
#6
Bullitt Member
Join Date: November 14, 2010
Location: Infront of my PC
Posts: 257
Likes: 0
Received 0 Likes
on
0 Posts
Great write up and pictures. When I installed mine I found that you didn't have to remove the strut brace there was more than enough room by just pooping off the cover and sliding it back a few inches under the brace.
As for the gromet, yes a real pain but I used a trick from my motorcycle experiences with similar things. Get a small pot and boil some water. Drop in the gromet for about 5 minutes in the boiling water and it softens it up nicely. You have to be quick and IT WILL BE HOT but it slipped straight in with the aid of a flat nose screw driver.
I love it and run a basic street tune from BAMA which flattened out the power curve etc and got rid of the skip shift. Smooth throttle and actually gained a few MPG's along the way.
6/18/11, 09:25 PM
#7
Mach 1 Member
Join Date: March 20, 2011
Location: Bremen, Indiana
Posts: 869
Likes: 0
Received 0 Likes
on
0 Posts
Nice write up.
A couple of things,
I bought the steeda and it is a nicer looking set-up but... they both seem to have their pros and cons. The steeda came with hose clamps that were way to big to attach the pcv and the other line to the intake. Seems silly that they wouldn't include the next size down instead of having a ton of extra clamp material hanging off the end..??
I also found out you don't need to remove the strut brace but I did remove two nuts and then just loosened the other two so I could lift one side off the strut tower and remove the engine cover. I didn't think at the time of removal that I wouldn't need to remove the cover at all.. good to know.


Thread
Thread Starter
Forum
Replies
Last Post
tj@steeda
Ecoboost
1
7/25/15 06:32 PM