
Upgraded interior to “Roush Touring Coupe” upholstery

Thread Starter
Member
Joined: May 18, 2011
Posts: 30
Likes: 1
Upgraded interior to “Roush Touring Coupe” upholstery
First off, I’m kind of new to the forums, so I apologize if a post similar to mine below has already been made.
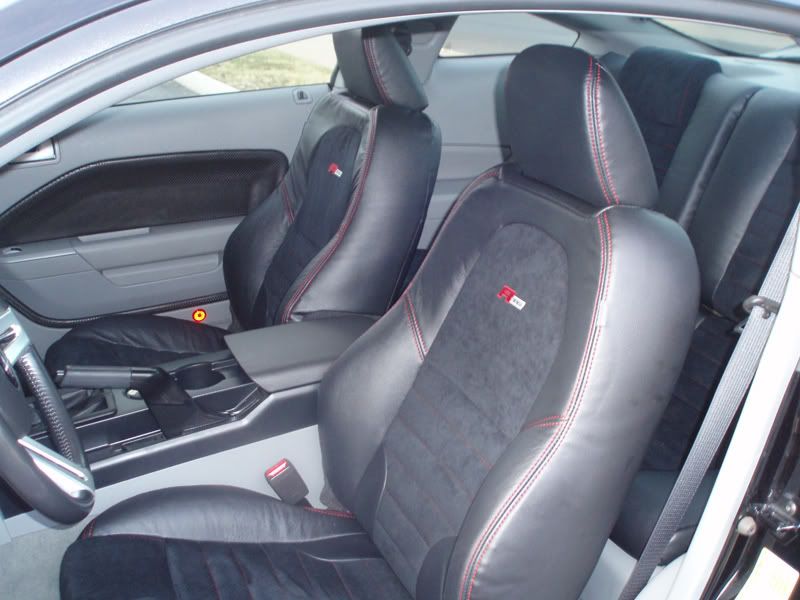
I have a black ’06 GT with the dove grey interior, and the IUP. I really wanted black interior, but as I was buying a used car I couldn’t be that selective. And over time my grey interior was growing on me, but I came across these seat covers on Roush eBay store at an unbelievable price so I couldn’t pass it up. These are black leather with a black suede insert and red stitching, and I was questioning how they would look in a car with grey interior.
This is my stock grey interior, you can see the wear on the drivers seat, the rear seats were perfect though.


All seats removed!

You can see here that I had to paint the grey plastic pieces black, they just didn't look right with the seats. But the Roush Performance floor mats I already had went with them just fine.


I plan on getting a new shift boot and console lid cover in black leather with red stitching to match.
Got the console lid cover and shift boot installed!
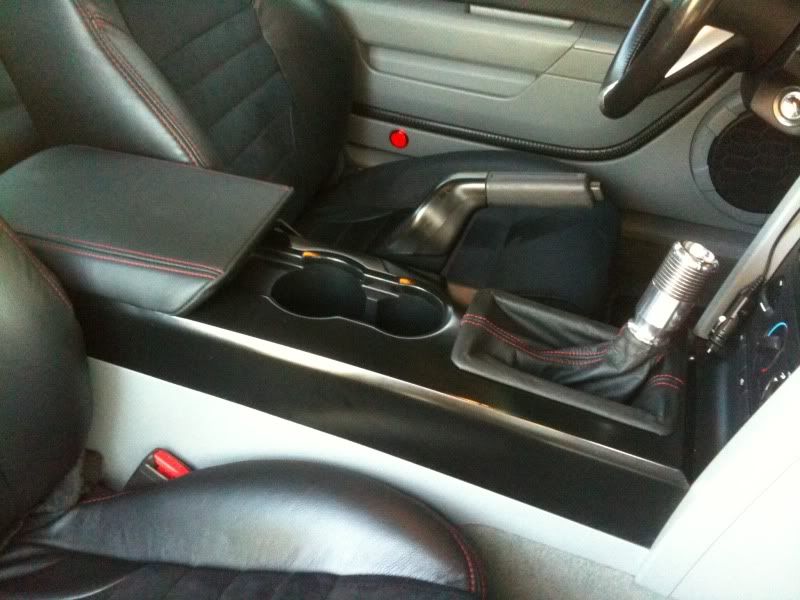
A great product for a great price from amustangrocks. Check him out.
http://amustangrocksleather.com/
I have a black ’06 GT with the dove grey interior, and the IUP. I really wanted black interior, but as I was buying a used car I couldn’t be that selective. And over time my grey interior was growing on me, but I came across these seat covers on Roush eBay store at an unbelievable price so I couldn’t pass it up. These are black leather with a black suede insert and red stitching, and I was questioning how they would look in a car with grey interior.
This is my stock grey interior, you can see the wear on the drivers seat, the rear seats were perfect though.
All seats removed!
You can see here that I had to paint the grey plastic pieces black, they just didn't look right with the seats. But the Roush Performance floor mats I already had went with them just fine.
I plan on getting a new shift boot and console lid cover in black leather with red stitching to match.
Got the console lid cover and shift boot installed!
A great product for a great price from amustangrocks. Check him out.
http://amustangrocksleather.com/
Last edited by crummyarchitect; Aug 3, 2011 at 10:05 AM.
Shelby GT350 Member
Joined: February 24, 2005
Posts: 2,227
Likes: 22
From: Delray Beach , FL
Nice seats  ... I too got a set off the Roush eBay store , I looked at those , but they had one set of the Stage 3 left and I got those. What's amazing is , if you look at the Roush web site they're still on there for about $1600 , I got mine for $250 plus $50 shipping. It was the only bid on them , I assume it was because they were for a convertible , but since I only wanted to do the front seats it didn't matter to me ...
... I too got a set off the Roush eBay store , I looked at those , but they had one set of the Stage 3 left and I got those. What's amazing is , if you look at the Roush web site they're still on there for about $1600 , I got mine for $250 plus $50 shipping. It was the only bid on them , I assume it was because they were for a convertible , but since I only wanted to do the front seats it didn't matter to me ...
Thread Starter
Member
Joined: May 18, 2011
Posts: 30
Likes: 1
05YellowGT - Yeah, those seats you have were exactly like the ones I was wanting/bidding on (only it was a full set) and they were 'sniped' from under me for $400. But I ended up getting mine by 'sniping' them from somebody for $350! I liked that the ones I got had the suede inserts though, they are much cooler (temperature wise) than the all leather!
Member
Joined: July 7, 2011
Posts: 36
Likes: 0
First off, I’m kind of new to the forums, so I apologize if a post similar to mine below has already been made.
I have a black ’06 GT with the dove grey interior, and the IUP. I really wanted black interior, but as I was buying a used car I couldn’t be that selective. And over time my grey interior was growing on me, but I came across these seat covers on Roush eBay store at an unbelievable price so I couldn’t pass it up. These are black leather with a black suede insert and red stitching, and I was questioning how they would look in a car with grey interior.
This is my stock grey interior, you can see the wear on the drivers seat, the rear seats were perfect though.
All seats removed!
You can see here that I had to paint the grey plastic pieces black, they just didn't look right with the seats. But the Roush Performance floor mats I already had went with them just fine.
I plan on getting a new shift boot and console lid cover in black leather with red stitching to match.

Member
Joined: January 21, 2011
Posts: 33
Likes: 0
From: Florida
Crummyarchitect and 05YellowGT. I also got a set of these Roush seat covers off of Roush's overstock ebay store. Yours look great installed
I have a set of black and blue stage 3's and was wondering if you did the install yourself or if you took it somewhere? If you did it your self how easy was it and what tools do you need. If you took it somewhere what kind of shop did you take it to and what was the price to install?
I have a set of black and blue stage 3's and was wondering if you did the install yourself or if you took it somewhere? If you did it your self how easy was it and what tools do you need. If you took it somewhere what kind of shop did you take it to and what was the price to install?
Shelby GT350 Member
Joined: February 24, 2005
Posts: 2,227
Likes: 22
From: Delray Beach , FL
Charles , I didn't use the back seats , but I had both front seats done at a local upholstery shop for $120. I know a lot of guy's on the forum here have put on seatcovers on themselves ...
Thread Starter
Member
Joined: May 18, 2011
Posts: 30
Likes: 1
http://www.youtube.com/watch?v=qMgSwHfFt2U
The installation went pretty much just like the video, except for the seat backs of the front seats. With the seat covers I got you got new foam (which appears to be the case for all Roush seat covers) but I had to separate the backs from the seats (4 bolts) and had extreme difficulty for some reason with just the passenger seat. I ended up doing it twice, but the drivers seat went smoothly. That being said, the video says you should set aside a day w/ help from a friend, and I did it by myself and it took me a weekend. I spaced it out when I started having difficulty, and needed to give my hands some time to recover, because all the cutting on the factory installed hog clips was pretty hard on the hands (i maybe could have used some better cutters).
Thread Starter
Member
Joined: May 18, 2011
Posts: 30
Likes: 1
Mach 1 Member
Joined: September 15, 2009
Posts: 679
Likes: 2
From: Traverse City MI.
but to make you feel better, the hog rings are way better than zip ties. as they wont last.
the factory seat covers come with the foam on the backs of the frt seats too. the frt seats are a little tricky, i thought the headrests were the toughest part, but clamping them in a vice to hold them made that go better. using the plastic is the key to sliding the parts on( just like my armrest covers) the rear seat is a breeze.
Member
Joined: January 21, 2011
Posts: 33
Likes: 0
From: Florida

Member
Joined: January 21, 2011
Posts: 33
Likes: 0
From: Florida
yeah I did it myself, and although I have never done a reupholster job, because I talked to a guy who did, I assumed I could too. It was one of the most difficult things I've done. The tools you need aren't anything you probably don't already have, except for the hog ring pliers and hog rings. But what helped me out more than anything was this video that my friend told me to look at, this helped out a bunch.
http://www.youtube.com/watch?v=qMgSwHfFt2U
The installation went pretty much just like the video, except for the seat backs of the front seats. With the seat covers I got you got new foam (which appears to be the case for all Roush seat covers) but I had to separate the backs from the seats (4 bolts) and had extreme difficulty for some reason with just the passenger seat. I ended up doing it twice, but the drivers seat went smoothly. That being said, the video says you should set aside a day w/ help from a friend, and I did it by myself and it took me a weekend. I spaced it out when I started having difficulty, and needed to give my hands some time to recover, because all the cutting on the factory installed hog clips was pretty hard on the hands (i maybe could have used some better cutters).

Mach 1 Member
Joined: September 15, 2009
Posts: 679
Likes: 2
From: Traverse City MI.
Yeah I have been looking at the video for a while. The only thing is getting the new foam padding on their right. I am so picky with the mods on my car if I screw this up I won't be able to deal with it and end up paying someone to fix my screw up and may end up costing me more
Shelby GT350 Member
Joined: February 24, 2005
Posts: 2,227
Likes: 22
From: Delray Beach , FL
Charles , where are you at in Florida , the shop that did mine is in Pompano Beach on Sample Rd , Between the turnpike and 95. If you're close enough it might be worth a trip , I dropped my car off at 8 am and picked it up at noon , of course that was just the front seats ...
Thread Starter
Member
Joined: May 18, 2011
Posts: 30
Likes: 1
Yeah the installation wasn't as bad as I made it out. In fact I knew if I attempted it again I would do a lot better because I now know what I would be getting into. And the back seats are super easy to remove and install covers. The foam for the front seats is easy too, it just slips over the seat frame - it isn't really attached in any way (w/ glue or ties or anything, so your're old foam is still usable after you remove it). It really is a money saver doing it yourself.

