
homelink install

Shelby GT350 Member
Joined: February 5, 2008
Posts: 2,339
Likes: 3
From: Chattanooga
I just got my 2010 Mustang and a new house with a garage. I ordered the same unit from eBay as described and shown above. Unfortunately, the Homelink unit will not mount in the roof console in the 2010+ models. Ford relocated the passenger airbag light into the roof console and it takes up the room needed to mount the homelink unit. I figured the next solution would be to mount it in the headliner in front of the roof console but the headliner is a bit too thick for the Homelink button faceplate to install. So my next solution is to get a Homelink unit from an Audi which has the same Homelink unit mounted in it's own surface mount faceplate. I ordered one from eBay. I will follow up with the install.
Last edited by watchdevil; Mar 17, 2012 at 12:26 AM.
Shelby GT350 Member
Joined: February 5, 2008
Posts: 2,339
Likes: 3
From: Chattanooga
Well, major change in plans how I did this but I finally installed the Homelink unit for my garage door opener. I decided against mounting the large faceplate Audi visor mount Homelink on the headliner in front of the overhead map light console because I test placed it and it just looked too nasty like it didn't belong there.
I only need one button to open my garage door. I decided to use the regular 3 button Homelink unit. To prepare for this install, I temporarily hooked it up for power and programmed my garage door opener to work with the Homelink unit. It keeps the rolling codes programmed in the memory even if you disconnect the power.
The next step I removed the trim bezel and three conjoined rubber buttons which snap off the Homelink unit's plastic case. I opened the Homelink unit's plastic case which opens like a book. This exposes the circuit board and the three touch switches mounted to it. I used a piece of scrap flat plastic and cut it out in a small square that was slightly larger than the middle touch switch and glued it to the lid of the plastic case under the center hole where the middle button comes in contact with the middle touch switch. When I close the plastic case, it keeps the middle button pressed down continuously.
Next I used a small round 1/4" black momentary pushbutton switch that I bought from Radio Shack. It's very low profile, flush mount and discrete, no bigger around than one of my fingers. I soldered two leads from the switch and mounted it centered between the map light buttons in the overhead map light housing. I was then ready to make my connections from the Homelink unit by tapping the 12+ into the yellow wire of the map light harness and the ground to the momentary switch. From the opposite lead of the momentary switch I connected it to the ground of the map light wiring harness which is black/yellow.
I mounted the Homelink unit completely concealed within the overhead map light console before I snapped the entire map light housing back into place.
So now I have a single touch button that works like a charm. The wiring set up works on the same circuit as the map lights on demand, so it will always work when the car is on until the battery saver times it out when the car is off. It reactivates when the doors are unlocked and the door is opened.
With modifications to this install, one could use three buttons if they needed them.
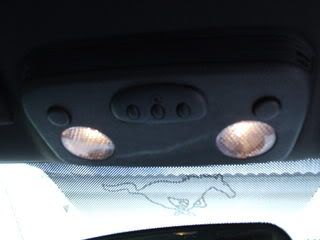
Here is how it turned out. Strange how dark charcoal photographs lighter, because in normal lighting you really do not notice the difference between the black pushbutton and the maplight housing which is dark charcoal.
I only need one button to open my garage door. I decided to use the regular 3 button Homelink unit. To prepare for this install, I temporarily hooked it up for power and programmed my garage door opener to work with the Homelink unit. It keeps the rolling codes programmed in the memory even if you disconnect the power.
The next step I removed the trim bezel and three conjoined rubber buttons which snap off the Homelink unit's plastic case. I opened the Homelink unit's plastic case which opens like a book. This exposes the circuit board and the three touch switches mounted to it. I used a piece of scrap flat plastic and cut it out in a small square that was slightly larger than the middle touch switch and glued it to the lid of the plastic case under the center hole where the middle button comes in contact with the middle touch switch. When I close the plastic case, it keeps the middle button pressed down continuously.
Next I used a small round 1/4" black momentary pushbutton switch that I bought from Radio Shack. It's very low profile, flush mount and discrete, no bigger around than one of my fingers. I soldered two leads from the switch and mounted it centered between the map light buttons in the overhead map light housing. I was then ready to make my connections from the Homelink unit by tapping the 12+ into the yellow wire of the map light harness and the ground to the momentary switch. From the opposite lead of the momentary switch I connected it to the ground of the map light wiring harness which is black/yellow.
I mounted the Homelink unit completely concealed within the overhead map light console before I snapped the entire map light housing back into place.
So now I have a single touch button that works like a charm. The wiring set up works on the same circuit as the map lights on demand, so it will always work when the car is on until the battery saver times it out when the car is off. It reactivates when the doors are unlocked and the door is opened.
With modifications to this install, one could use three buttons if they needed them.
Here is how it turned out. Strange how dark charcoal photographs lighter, because in normal lighting you really do not notice the difference between the black pushbutton and the maplight housing which is dark charcoal.
Last edited by watchdevil; Mar 21, 2012 at 01:08 AM.
Shelby GT350 Member
Joined: February 5, 2008
Posts: 2,339
Likes: 3
From: Chattanooga
While messing around with all this, I also figured out a clever place to mount a regular clip-on garage door opener instead of on the sunvisor. Snap off the overhead console. Clip the garage door opener to the edge of the headliner opening facing you. Snap the overhead console back in place. This fits perfectly snug with no slop or movement.
___
___
Last edited by watchdevil; Mar 17, 2012 at 12:52 AM.

Bullitt Member
Joined: February 27, 2012
Posts: 229
Likes: 1
While messing around with all this, I also figured out a clever place to mount a regular clip-on garage door opener instead of on the sunvisor. Snap off the overhead console. Clip the garage door opener to the edge of the headliner opening facing you. Snap the overhead console back in place.
Shelby GT350 Member
Joined: February 5, 2008
Posts: 2,339
Likes: 3
From: Chattanooga
Currently a Corvette Owner!
Joined: December 16, 2011
Posts: 2,003
Likes: 48
From: Las Vegas, Nevada
Question for watchdevil please...I've read on other forums that the 2011-2012 models' Passenger Airbag warning light gets in the way and prevents the homelink fitting as you describe...can you shed any light on this please? Thanks!
Shelby GT350 Member
Joined: February 5, 2008
Posts: 2,339
Likes: 3
From: Chattanooga
Now those who are trying to mount the Homelink unit using the buttons and faceplate that comes with the unit, it is mounted front to back. The people making this work have to cut away some of the mounting support for the passenger airbag light housing to allow clearance. Also, they have to eliminate the wiring harness connector that plugs into the Homelink unit and cut away some of the plastic housing of the Homelink unit. With the wiring harness connector not used, wires are soldered directly to the contacts on the circuit board that the connector normally comes in contact with.
There are two ways people have been installing the Homelink unit with the buttons and faceplate. One is to carefully cut a large hole in the maplight housing slightly bigger than the button faceplate. To me that looks more like a hack job.
The other method I have seen someone make holes in the map light housing just for the extensions on the back of the buttons to poke through. This requires using something like cut pencil erasers to make up for the extra gap so that the buttons can touch the contact switches inside the Homelink unit. The buttons and faceplate do not sit flush against the maplight housing which is too thick and will not snap into the plastic case of the Homelink unit to secure it.
The plastic map light housing is too thick to mount a Homelink unit with the buttons and faceplate installed like they are with a visor mount. The gap between the Homelink unit and the button faceplate is only large enough to slip headliner material between it and nothing thicker.
Cobra Member
Joined: December 4, 2011
Posts: 1,418
Likes: 3
From: Central Florida
Well, major change in plans how I did this but I finally installed the Homelink unit for my garage door opener. I decided against mounting the large faceplate Audi visor mount Homelink on the headliner in front of the overhead map light console because I test placed it and it just looked too nasty like it didn't belong there.
I only need one button to open my garage door. I decided to use the regular 3 button Homelink unit. To prepare for this install, I temporarily hooked it up for power and programmed my garage door opener to work with the Homelink unit. It keeps the rolling codes programmed in the memory even if you disconnect the power.
The next step I removed the trim bezel and three conjoined rubber buttons which snap off the Homelink unit's plastic case. I opened the Homelink unit's plastic case which opens like a book. This exposes the circuit board and the three touch switches mounted to it. I used a piece of scrap flat plastic and cut it out in a small square that was slightly larger than the middle touch switch and glued it to the lid of the plastic case under the center hole where the middle button comes in contact with the middle touch switch. When I close the plastic case, it keeps the middle button pressed down continuously.
Next I used a small round 1/4" black momentary pushbutton switch that I bought from Radio Shack. It's very low profile, flush mount and discrete, no bigger around than one of my fingers. I soldered two leads from the switch and mounted it centered between the map light buttons in the overhead map light housing. I was then ready to make my connections from the Homelink unit by tapping the 12+ into the yellow wire of the map light harness and the ground to the momentary switch. From the opposite lead of the momentary switch I connected it to the ground of the map light wiring harness which is black/yellow.
I mounted the Homelink unit completely concealed within the overhead map light console before I snapped the entire map light housing back into place.
So now I have a single touch button that works like a charm. The wiring set up works on the same circuit as the map lights on demand, so it will always work when the car is on until the battery saver times it out when the car is off. It reactivates when the doors are unlocked and the door is opened.
With modifications to this install, one could use three buttons if they needed them.
Here is how it turned out. Strange how dark charcoal photographs lighter, because in normal lighting you really do not notice the difference between the black pushbutton and the maplight housing which is dark charcoal.
Shelby GT350 Member
Joined: February 5, 2008
Posts: 2,339
Likes: 3
From: Chattanooga
A thousand thanks for putting this write up here! I did this same install this weekend in my 2011. I have sync, and thought the microphones in this overhead console were going to prevent this type of installation, as the homelink box did not have enough room to sit in the overhead console with a ground switch. What I did was lengthen the power and ground wire of the homelink box, then I "stuffed" it into the headliner, aft of the overhead console. The switch was an easy fit, so all is well. For under $35.00 ($25.00 for an Ebay homelink unit; $5.00 for the "interrupt" switch), I too now have a homelink garage door opener.
Just curious if you also used my directions for programming the unit and making the programmed button stay pressed down?
Just so everyone knows, the Sync microphone is on top of the rearview mirror. What you might think are the microphones in the overhead console are actually the motion sensors for the Anti-theft security system. My 08 Mustang had it but my newer 2010 does not. So yeah if someone does not have room under the overhead console for the Homelink unit then there is plenty of room in the headliner behind it. Just no one try to mount it so the buttons come through the headliner. The headliner is just too thick for the button faceplate to fasten. Just use the remote mounted button I suggested earlier.
Last edited by watchdevil; May 21, 2012 at 11:24 PM.
Cobra Member
Joined: December 4, 2011
Posts: 1,418
Likes: 3
From: Central Florida
Good to hear you are all fixed up and set to go!
Just curious if you also used my directions for programming the unit and making the programmed button stay pressed down?
Just so everyone knows, the Sync microphone is on top of the rearview mirror. What you might think are the microphones in the overhead console are actually the motion sensors for the Anti-theft security system. My 08 Mustang had it but my newer 2010 does not. So yeah if someone does not have room under the overhead console for the Homelink unit then there is plenty of room in the headliner behind it. Just no one try to mount it so the buttons come through the headliner. The headliner is just too thick for the button faceplate to fasten. Just use the remote mounted button I suggested earlier.
Thanks for the correction on what I thought was the sync microphones in that center console; I got a working homelink for way less then a set of '12 sunvisor/homelink setup, and learned something too!
Again, great write-up. That's what these forums are all about!


Member
Joined: October 2, 2012
Posts: 16
Likes: 0
From: Henderson, NV
I installed a homelink unit out of a town car visor into the overhead console, works great and turned out looking like a factory install, no more fumbling for garage door openers, I programmed 1 button to open the gate at the entrance of the community I live in and 1 button to open my garage door.
Jeff
Shelby GT350 Member
Joined: February 5, 2008
Posts: 2,339
Likes: 3
From: Chattanooga
There are dozens of these for sale on ebay. Just search it. Just make sure you get one with rolling codes as this is what most garage door openers use.
Last edited by watchdevil; Dec 6, 2012 at 04:42 PM.

Thread
Thread Starter
Forum
Replies
Last Post
tj@steeda
2015 - 2023 MUSTANG
0
Sep 10, 2015 12:44 PM