
Hardwiring Radar Detector


Thread Starter
Mach 1 Member
Joined: May 2, 2007
Posts: 563
Likes: 0
Hardwiring Radar Detector
Ok so b4 I was banned from the MFs site (for informing a fellow Mustang enthusiast about an S197-specific forum), I'd posted this question and got a response, but since I don't have access to that info anymore...maybe y'all can help me out?
I was told there's a fuse panel in the passenger footwell, and that I could buy a little thing that looked like a fuse but actually is a sort of jumper from which I can draw power to hardwire the radar detector, and that using this power source would also have the bennie of being ignition switch activated, so that I could leave the RD "on" and power would be cut when the ignition is switched off...
Well I found the part at AutoZone , and I also bought the hardwiring kit from Valentine to make the install super easy, but after removing the snap-in panel cover, I unsnapped what appears to be a safety-latch, and immediately heard an electric motor...whirring, which sort of freaked me out, so I quickly re-snapped the safety latch and decided to wait till day light to tackle it (I'd just washed/dried the car and it was dusk)...
so what can y'all tell me about this fuse box, and why is there an electric motor whirring when I attempt to open it? Should I disconnect the battery before attempting this? If I do disconnect the battery, what are side-effects? Will I lose programmed radio stations etc?
Your guidance, as always, is appreciated!
Thanks
Cobra Member
Joined: February 18, 2007
Posts: 1,301
Likes: 0
From: SE PA
I'm not sure what you unplugged, but you shouldn't hear a motor driving when you pop the cover off of the fuse panel. Do it in daylight and you'll be fine. No need to disconnect the battery.

Mach 1 Member
Joined: October 15, 2006
Posts: 658
Likes: 1
Here is a pic of the fuse box with the cover off. I have a feeling you probably slid the grey lock handle you can see in the top of this photo, which is not necessary to access the fuse panel. When I did my Raptor install, I used fuse number 14, which is switched. It also has room below it to allow for the Add a Circuit you are using. Fuse selection is up to you. Here is a link to the owners manual as well, so you can see what fuse numbers are for what.....
Mike
http://www.mustangblog.com/info/2006.ownersmanual.pdf
Mike
http://www.mustangblog.com/info/2006.ownersmanual.pdf
Shelby GT350 Member
Joined: April 9, 2007
Posts: 2,463
Likes: 0
From: Ellenton, FL
I hardwired to the fuse box and heard nothing. I mean its jsut a plastic cover your removing which has no sensors that Im aware of.
I wouldn't worry about disconnecting the battery.
I wouldn't worry about disconnecting the battery.
Thread Starter
Mach 1 Member
Joined: May 2, 2007
Posts: 563
Likes: 0
Here is a pic of the fuse box with the cover off. I have a feeling you probably slid the grey lock handle you can see in the top of this photo, which is not necessary to access the fuse panel. When I did my Raptor install, I used fuse number 14, which is switched. It also has room below it to allow for the Add a Circuit you are using. Fuse selection is up to you. Here is a link to the owners manual as well, so you can see what fuse numbers are for what.....
Mike
http://www.mustangblog.com/info/2006.ownersmanual.pdf
Mike
http://www.mustangblog.com/info/2006.ownersmanual.pdf
Mach 1 Member
Joined: October 15, 2006
Posts: 658
Likes: 1
Yeah I know the cover is just a panel, I was talking about the grey lock handle Got Oatz pointed out in his reply.
The whirring sound came as soon as I undid that grey lock handle in the upper left of the pic....
Thanks for the pic and Manual. The add a switch seems to have space for a fuse to be inserted into it, I assume so that you actually keep that circuit fused. You said you used #14, which appears to be the A/C Cycle switch, correct?
Mike
Thread Starter
Mach 1 Member
Joined: May 2, 2007
Posts: 563
Likes: 0
I used 15, which was empty, but turns out its "switched"...I tested it when I had all the wiring hanging out, the V1 connected and turned on, and the key in the ignition.
I used a 3 amp fuse, but it's reduntant because the hardwiring kit from Valentine has a traditional-shape (cylindrical) fuse in-line as well.
I tried to post pics, but for soem reason it doesn't let me....
Edit: still won't let me...but,
you can see the pics and semi-write-up on hardwiring a radar detector here.
I tried to post pics, but for soem reason it doesn't let me....
Edit: still won't let me...but,
you can see the pics and semi-write-up on hardwiring a radar detector here.
Cobra Member
Joined: February 18, 2007
Posts: 1,301
Likes: 0
From: SE PA
Same here for the wife's '07 Expedition. I'm installing a Parrot bluetooth kit and had a heck of a time trying to find a switched hot. There are NO switched hots in the dash, so I have to use an add-a-circuit in the box as well. Everything in the Expy is on the CAN bus. I miss the good 'ole days!
Member
Joined: November 15, 2006
Posts: 37
Likes: 0
Well I found the part at AutoZone , and I also bought the hardwiring kit from Valentine to make the install super easy, but after removing the snap-in panel cover, I unsnapped what appears to be a safety-latch, and immediately heard an electric motor...whirring, which sort of freaked me out, so I quickly re-snapped the safety latch and decided to wait till day light to tackle it (I'd just washed/dried the car and it was dusk)...
so what can y'all tell me about this fuse box, and why is there an electric motor whirring when I attempt to open it? Should I disconnect the battery before attempting this? If I do disconnect the battery, what are side-effects? Will I lose programmed radio stations etc?
so what can y'all tell me about this fuse box, and why is there an electric motor whirring when I attempt to open it? Should I disconnect the battery before attempting this? If I do disconnect the battery, what are side-effects? Will I lose programmed radio stations etc?
Oh, and on the radar issue, the two schools of thought are mounting your radar detector near your dashboard or near your rearview mirror. What I've been able to figure out is that mounting it high is a little better for detecting radar (X, K, Ka) and mounting it low makes it a lot better for detecting laser. (I have mine mounted low)
Cobra Member
Joined: February 18, 2007
Posts: 1,301
Likes: 0
From: SE PA
I have an '07 GT and I just did the same hard-wiring job this last week. I don't know why you're hearing an electric motor whirring - I didn't. I personally chose to tap the A/C fuse - works great, radar turns itself on when you start the car. No need to disconnect the battery, just turn the car off.
Oh, and on the radar issue, the two schools of thought are mounting your radar detector near your dashboard or near your rearview mirror. What I've been able to figure out is that mounting it high is a little better for detecting radar (X, K, Ka) and mounting it low makes it a lot better for detecting laser. (I have mine mounted low)
Oh, and on the radar issue, the two schools of thought are mounting your radar detector near your dashboard or near your rearview mirror. What I've been able to figure out is that mounting it high is a little better for detecting radar (X, K, Ka) and mounting it low makes it a lot better for detecting laser. (I have mine mounted low)
Thread Starter
Mach 1 Member
Joined: May 2, 2007
Posts: 563
Likes: 0
Bullitt Member
Joined: January 28, 2007
Posts: 362
Likes: 0
I got "nailed" last week by FT. Worth running laser.
My BEL yelled "laser". I slammed on the brakes.
Drove by the officer with a meek grin on my face.
The Officer was about 1/2 mile ahead of me when he fired.
(Thank Goodness he was obviously untrained on how to use a Laser Gun)
My BEL yelled "laser". I slammed on the brakes.
Drove by the officer with a meek grin on my face.
The Officer was about 1/2 mile ahead of me when he fired.
(Thank Goodness he was obviously untrained on how to use a Laser Gun)
Cobra Member
Joined: February 18, 2007
Posts: 1,301
Likes: 0
From: SE PA
I got "nailed" last week by FT. Worth running laser.
My BEL yelled "laser". I slammed on the brakes.
Drove by the officer with a meek grin on my face.
The Officer was about 1/2 mile ahead of me when he fired.
(Thank Goodness he was obviously untrained on how to use a Laser Gun)
My BEL yelled "laser". I slammed on the brakes.
Drove by the officer with a meek grin on my face.
The Officer was about 1/2 mile ahead of me when he fired.
(Thank Goodness he was obviously untrained on how to use a Laser Gun)
Thread Starter
Mach 1 Member
Joined: May 2, 2007
Posts: 563
Likes: 0
DYI: Radar Detector (V1) Hardwire Install (the thorough method)
RD= Radar Detector
First remove the Glove Box (while closed, remove 4 7mm screws at the bottom of the glove box, then press the sides in so that the box releases from the catches, and out it comes.
Next, remove the A-Pillar cover. Your factory pillar is attached to the car with five mounting clips that lock the pillar onto the unibody. To remove the original piece, work your fingers under the edge of the pillar at the rear of the driver’s door. Applying even pressure, pull the pillar away from its mounting point. A firm, slightly quick motion will release the upper
clips with ease. Once the upper clips are free, continue to pull the pillar downwards releasing the mounting clips as you work towards the dash top. be carefull with the last one, almost to where the A-pillar meets with the dash...at this point the clip is just a guide that is slipped into the A-pillar cover, and mine fell off and rolled into the area between the glove box and door frame, and I had to waste 10 minutes looking for it. There's a vid link of the removal courtesy of Don_w (2nd from the bottom).
2005+ Mustang Pillar Removal and Installation Video:
2005+ Mustang Pillar Removal and Installation Video:
Optional: Removal of the passenger side kick panel. This is the panel that the fuse panel is behind. Remove the insertable fuse panel cover, and tug at the kick panel from the bottom, pulling towards the drivers side (there's one pressure snap there), then tug towards the rea of the car to release the 2nd pressure snap. At this oint you notice you have to partially lift the piece along the botton of the door, the step area, because the end of the kickpanel is tucked underneath it. Lastly, tug the slim vertical piece from the door frame towards the rea of the car.
Now you have unimpeded access to the areas yoou need.
I started wiring at the RD, and tied the wire around the rearvew mirror mount, so that if the RD's suction cups come unstuck, the weight of the RD wouldn't pull the wire out of the headliner. I then wrapped the wire in 3/8" flexible black plastic ribbon conduit, and ran the conduit from directly above the rear view mirror, tucked just inside the headliner, to the passenger-side corner where the headliner meets the A-pillar.
At this point you will see a wiring harness for all electrics inside the car's dome. I used strips of white duct tape to tape the RD's wire to the harness, following the harness all the down, into the innars of the dash and to the fuse panel. The easy way to thread it down there is to insert the left arm/hand under the dash, while the right hand is feeding the wire; when the lfet gets a hold of the wire, pull and continue to tape the wire to the harness.
Instead of splicing into a wire (which in theory could overload a circuit), I used an "Add-A-Circuit" fuse jumper, and placed it in one of the empty fuse holders (#15) in the passenger footwell fuse panel. #15 was empty, but turns out its "switched"...I tested it when I had all the wiring hanging out, the V1 connected and turned on, and the key in the ignition. This means the V1 now has a dedicated circuit, a safety item IMHO.
The pic of the fuse panel shows that #15 is the empty slot under the middle 5 Amp A/C Cycle fuse (middle from top to bottom) on the 3rd column from right to left. I also made a U-shaped hole in the fuse box cover for the wire to exit freely. The V1 hardwire harness comes with a snap on splicer that makes it very easy to connect the V1 harness to the Add-A-Circuit. The ground wire from the V1 harness was bolted to a bolt that secured the entire fuse panel assembly to the car's body.
Used a 3 amp fuse in the add-a-circuit, but its redundant because the V1 hardwire kit comes with a traditional shaped (cylindrical) fuse in-line (you can see it in-line on the red wire).
I then secured the V1 hardwire harness to the kick-panel, leaving the in-line fuse in the V1 harness accessible when the fuse panel cover is removed.
Looks professional, and now I won't forget to turn the dang thing on, and I can see my TC button again...gotta love a clean, uncluttered dash, and no wires visible except the 6 inches coming from the headliner to the RD, which I placed just under the rear view mirror.
I have good pics, but again for some reason I'm not able to upload them, which is strange, because I can do so w/o problem on www.S197Forum.com
Here's the thread where I posted the pics...oh yeah, and there a dude suggesting an alternative method as well....
DYI Pics on Radar Detector Hardwire
Shelby GT350 Member
Joined: June 4, 2006
Posts: 2,244
Likes: 0
From: McAllen, TX
*Angels sing*
the all mighty fuse box pic
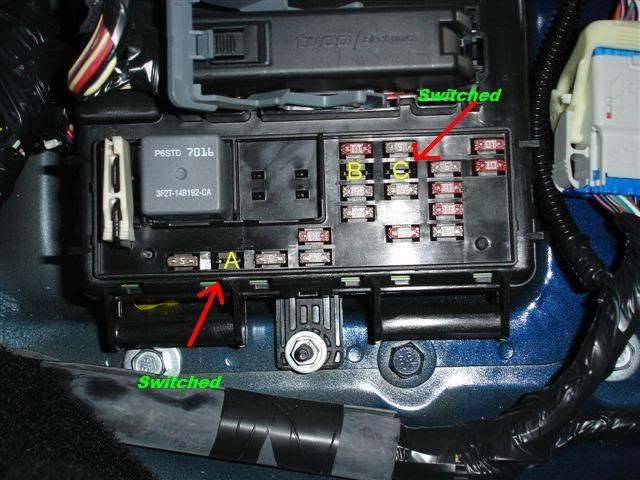
just add an add-a-curcuit to one of the switched slots and crimp the power wire from the V1 to the red wire from the Add-a-curcuit and the ground to a screw somewhere and there you go, that is what i did for my escort 8500 X50 and ran the wire up the A-pillar and between the headliner and roof.
the all mighty fuse box pic
just add an add-a-curcuit to one of the switched slots and crimp the power wire from the V1 to the red wire from the Add-a-curcuit and the ground to a screw somewhere and there you go, that is what i did for my escort 8500 X50 and ran the wire up the A-pillar and between the headliner and roof.