AutoMeter and SOS Dash Panel Install...PICS
 12/13/08, 08:57 PM
#1
Mach 1 Member
Thread Starter

AutoMeter and SOS Dash Panel Install...PICS
So, in preparation of installing the Vortech on my 05, I decided to get the gauges in place prior to the install. I'm personally not very fond of pillar pods, nor did I want to use a center dash pod, due to visibility issues, as well as trying to stay as covert as possible.
My gauges of choice are the AutoMeter Z Series, which in my opinion are the low key look I was going for, and quite honestly, they are one of the more reasonably priced gauges from AutoMeter.
As mentioned above, I personally am not a big fan of pillar pods or center dash pods. So, I decided on the Speed of Sound Radio Dash Panel. More on that later.
I won't bore everyone with the removal of the center console and such, because most people have already done that, or at least read the procedure somewhere. Anyway, here is what it looks like with the center stack torn down to the radio.

Removal of radio and in my case, the single DIN storage cubby....
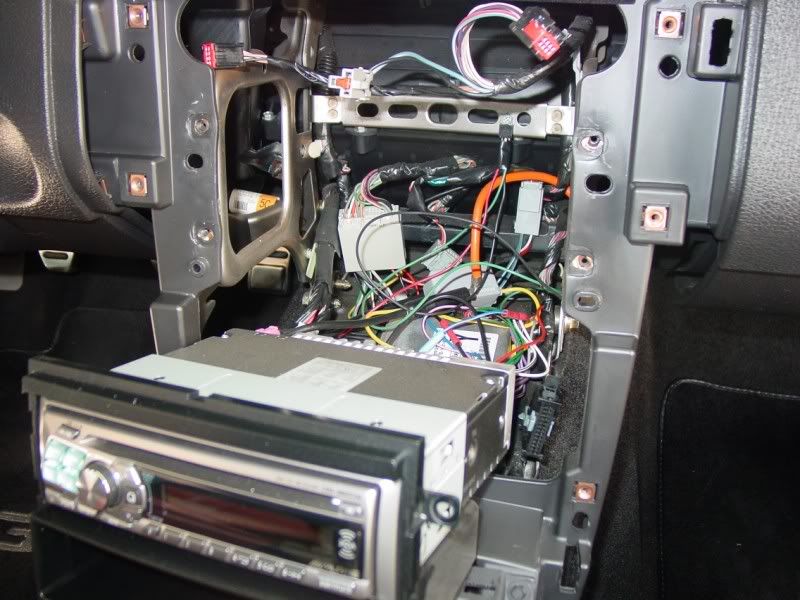
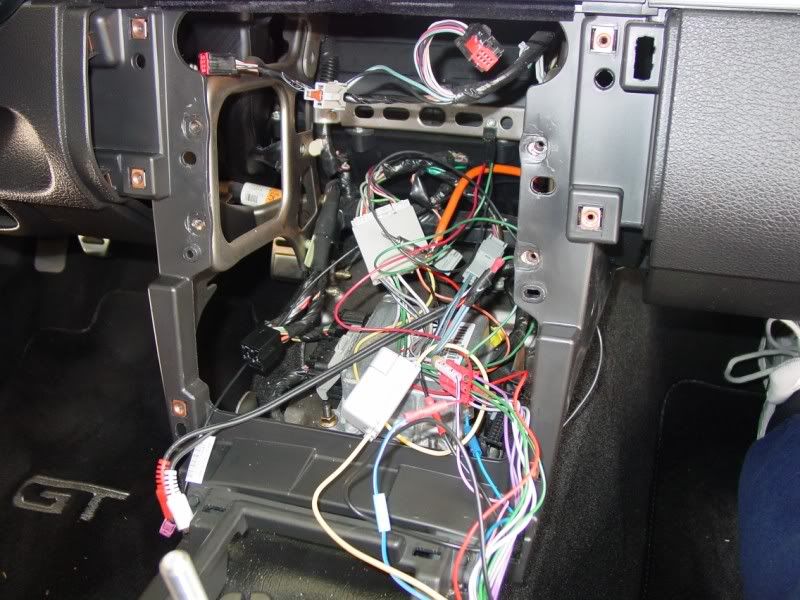
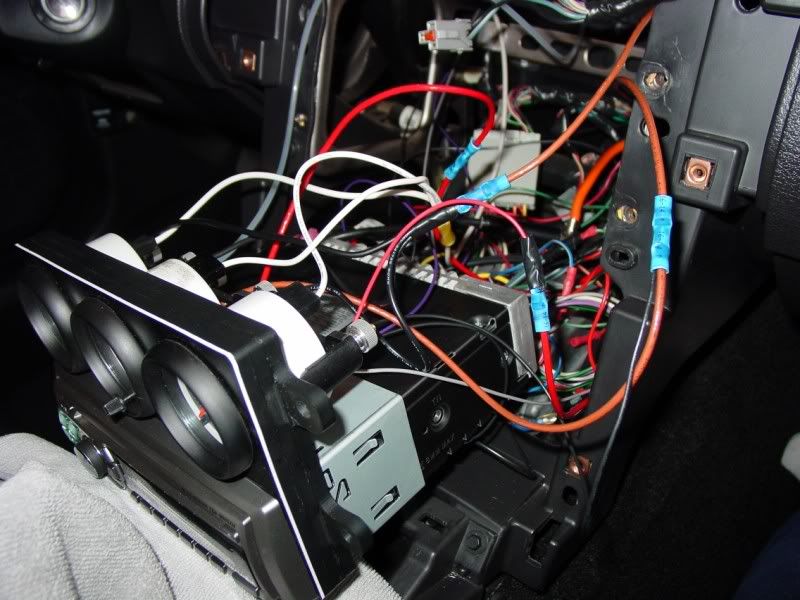
And, the remaining mess...
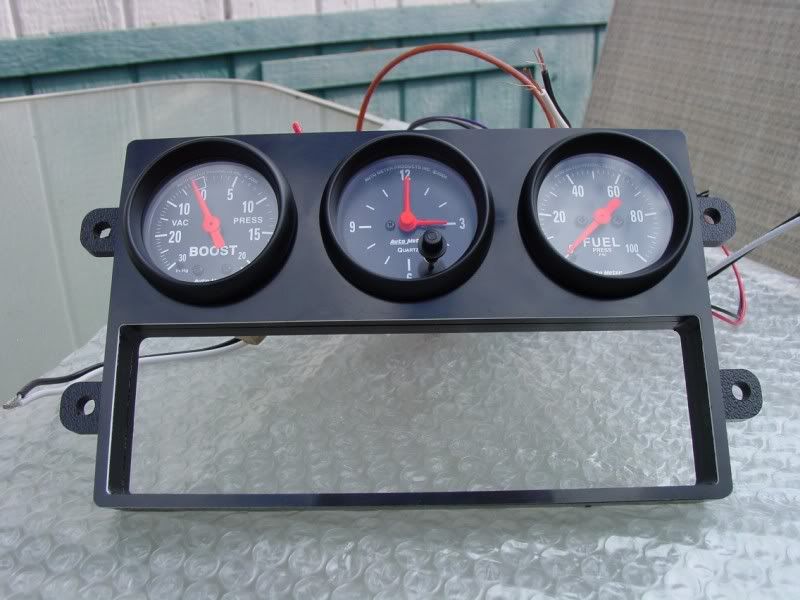
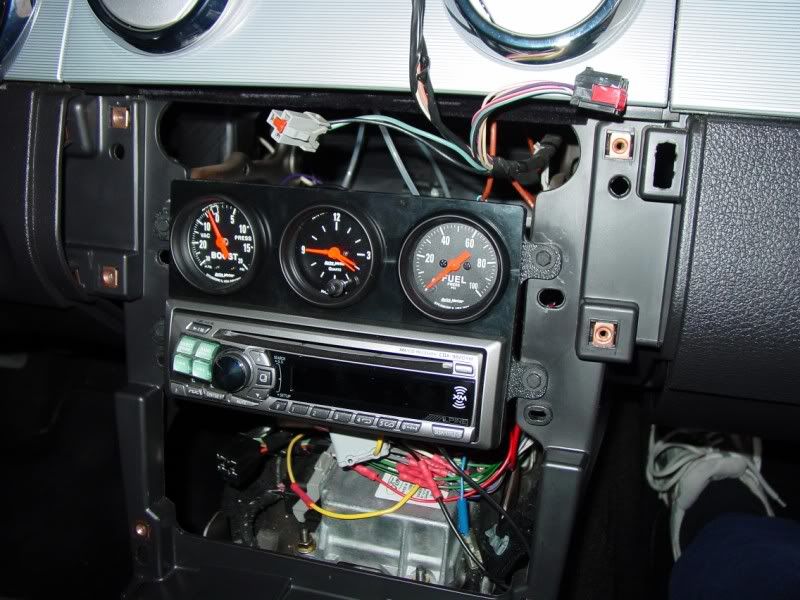
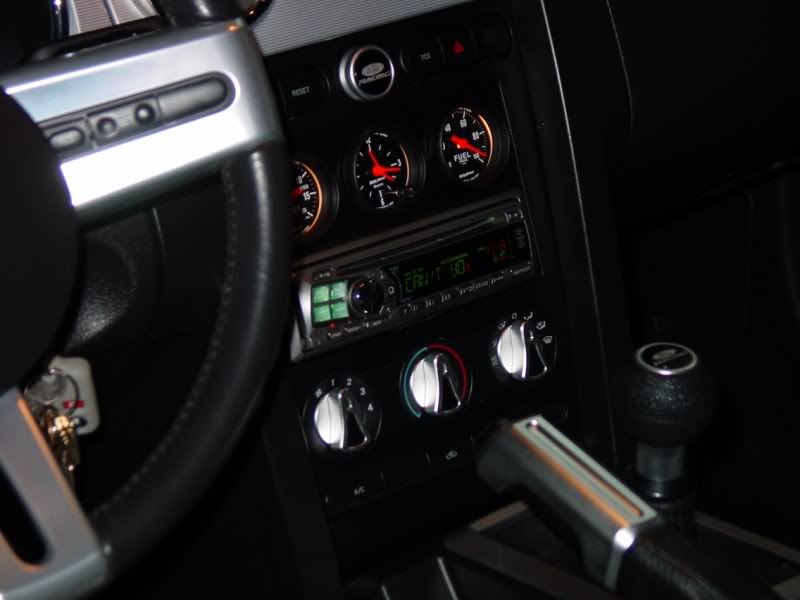
Here is the SOS dash panel with the gauges already installed. I was going to remove the gauges and show just the panel, but more on that later...
This is with the installation box for the stereo in place...

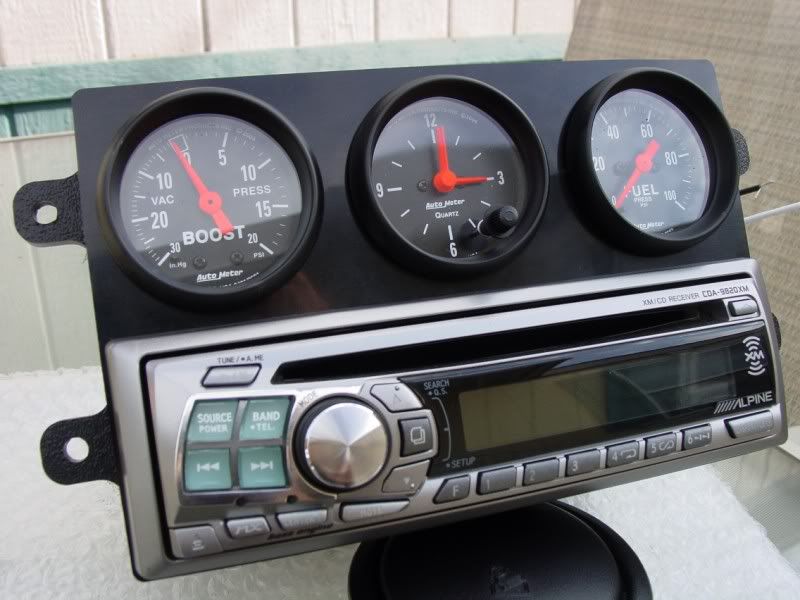
And finally, with the radio re-installed in the dash panel...
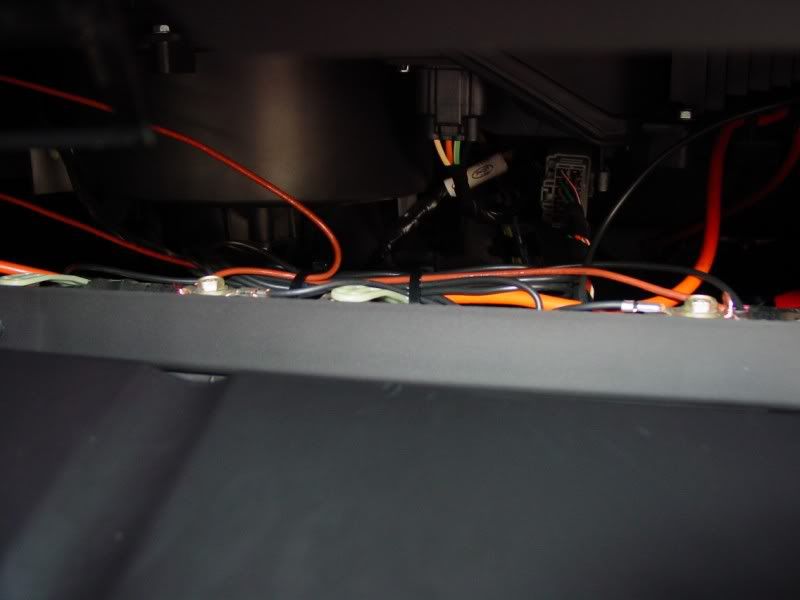
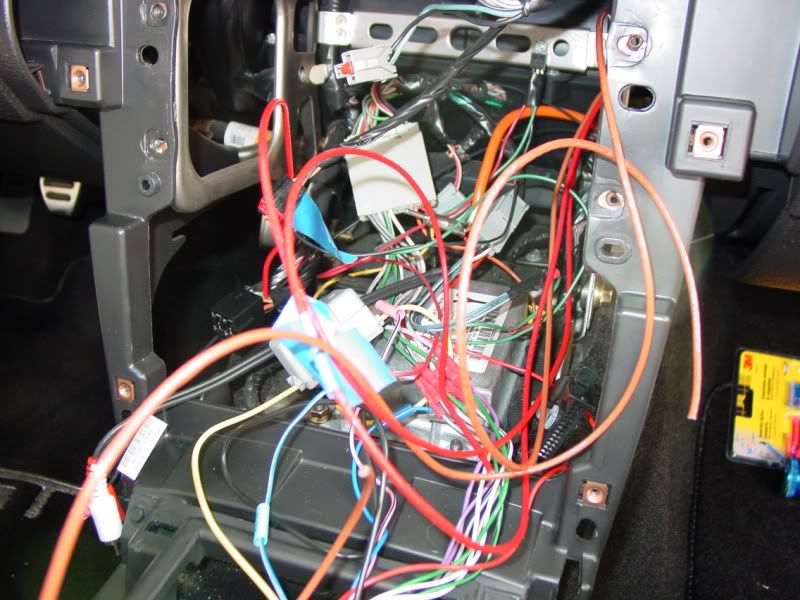
The two main lines that need to be pulled into the radio area for the gauge install are power and ground. If you drop down the glove box, by squeezing in the side panels, you will see two very nice ground bolts just waiting to be used...
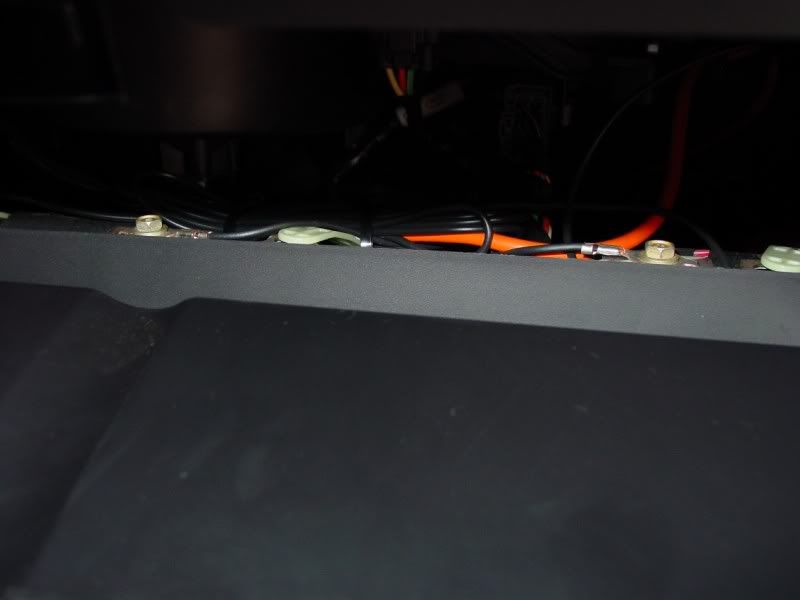
I ran two ground wires, one from each bolt. One ground to use on the gauge lighting, and one ground to use on the gauge function itself...
As far as the power connections, I ran two lines over to the fuse panel in the passenger kick panel. One to be switched, and one to be unswitched. (for the clock I installed) The add a circuit you see connected was already there from my shift light install. I used the same add a circuit for the switched power to the gauges. Not shown, I added a second add a circuit to a constant hot fuse, in my case, the fuse for the power mirrors.
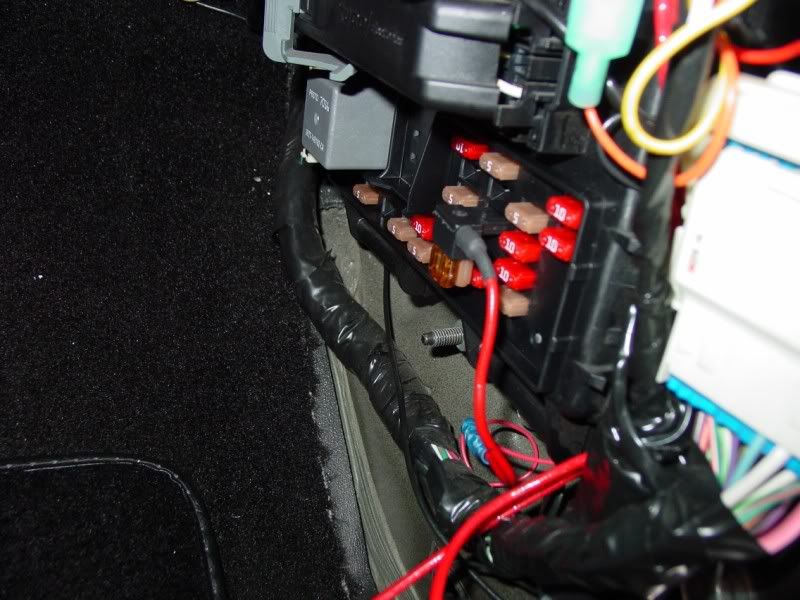
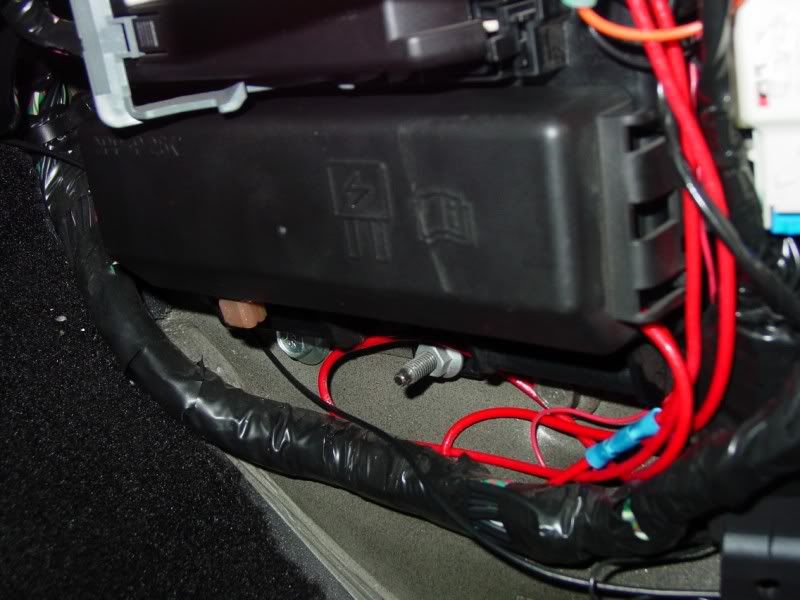
After connecting both add a circuit power lines, the fuse box gets buttoned back up...
So at this point, this is what your dash opening looks like...
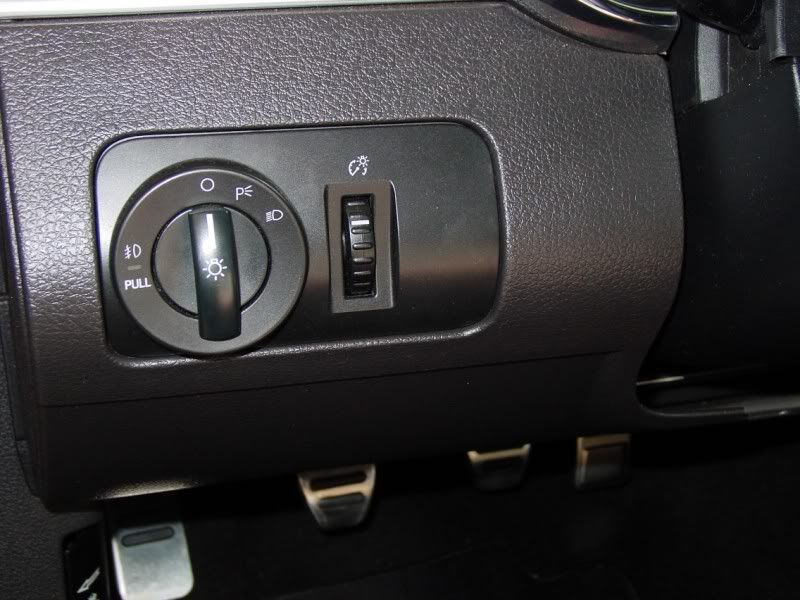
Next, we need to run power to the lights of the gauges. You also want this to be dimmer controlled. So, pop out the headlight switch. This can be done with no tools. Just press up from under the round area on the switch, and it will pop out....Run one wire from the headlight switch area over to your dash opening...
The second pin, which is a white wire with a blue stripe, is the dimmer controlled light power. I used a quick connect to tap this wire for the gauges...

Re-install the light switch...
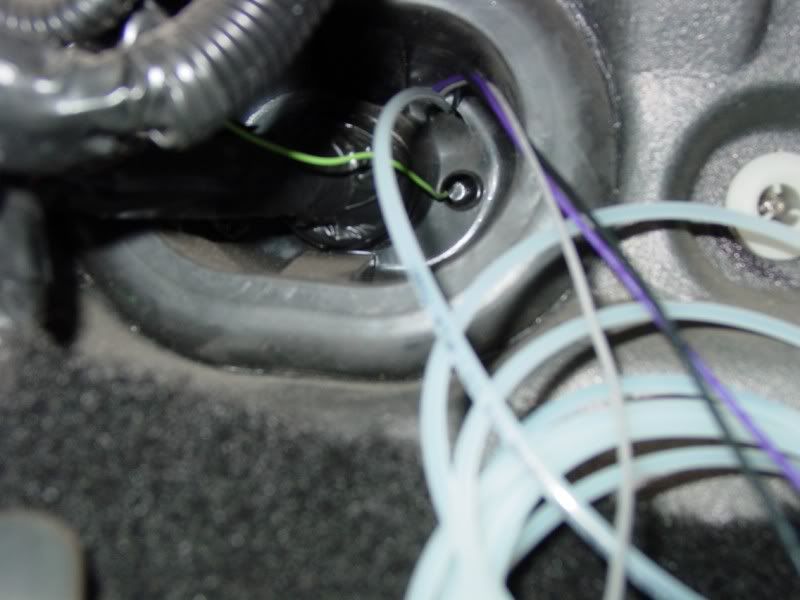
Directly behind the clutch pedal, there is a rubber grommet that is the perfect access to get your lines (fuel pressure wire loom, and boost / vacuum tubing) into the engine bay. The green wire you see is the wire that I had run previously for the shift light.
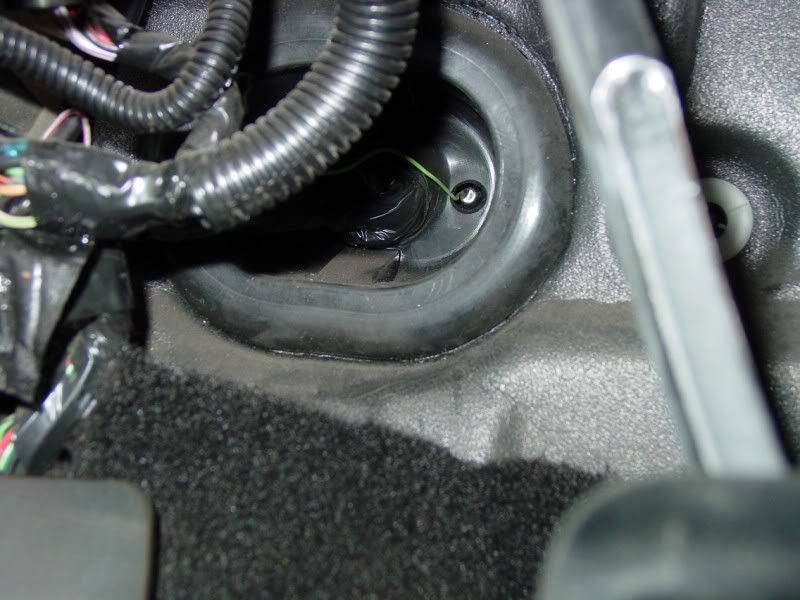
Because of the size of the connector for the fuel pressure gauge, I slit the top of the grommet to allow the lines to be fed through from the inside.
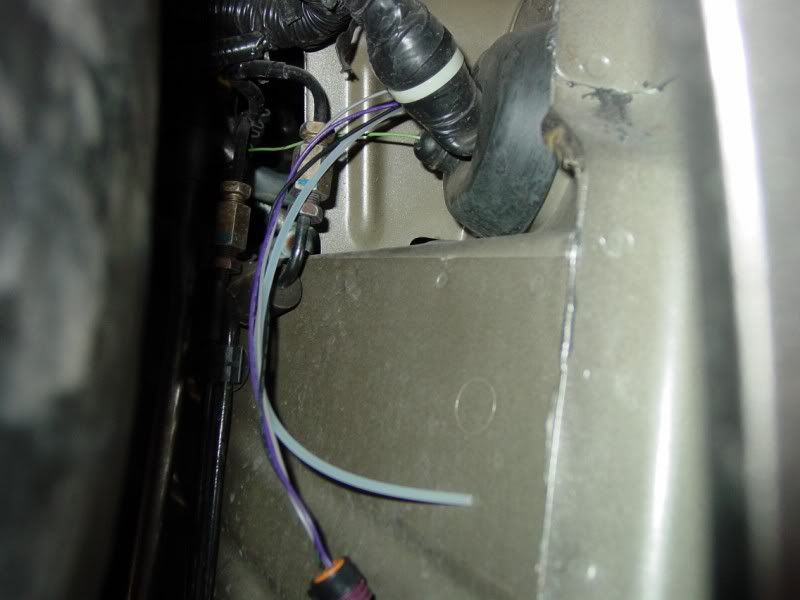
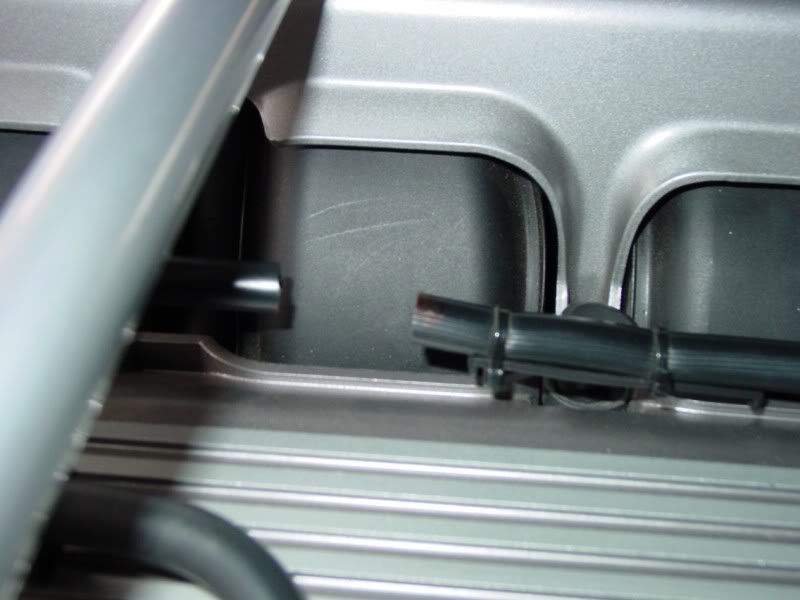
Now, to access those lines you just fed through, you need to remove three push pin connectors from the inside of the drivers side wheel well, and peel it back. When you do, you will see the lines that you fed through from the drivers compartment...
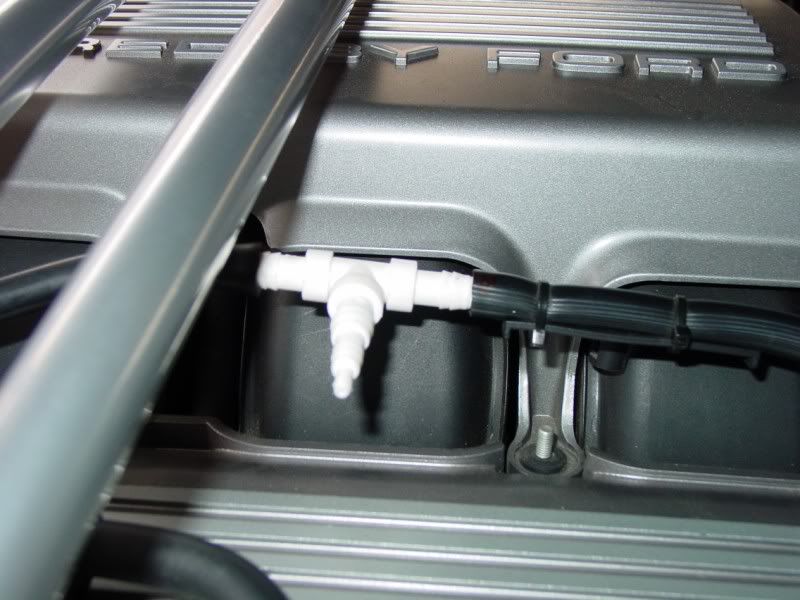
Now, under the hood, you can reach down below the master brake cylinder, and grab these lines that you fed through...
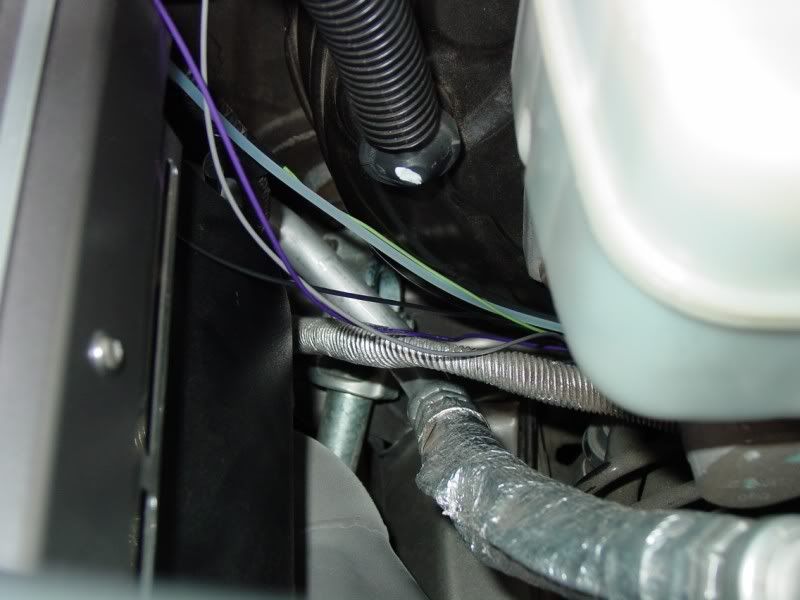
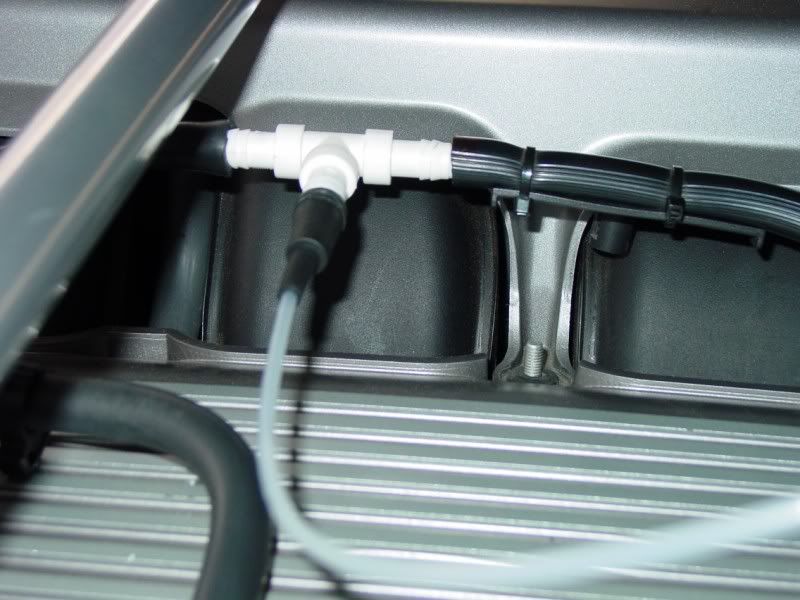
Be very gentle when pulling the lines up to the engine bay. The tubing for the boost gauge will kink very easily, and you do not want to re-do this part...
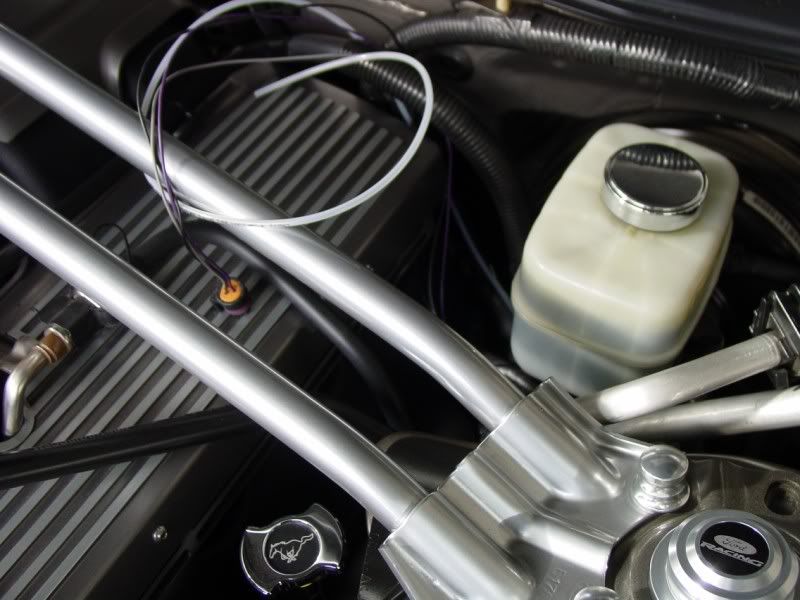
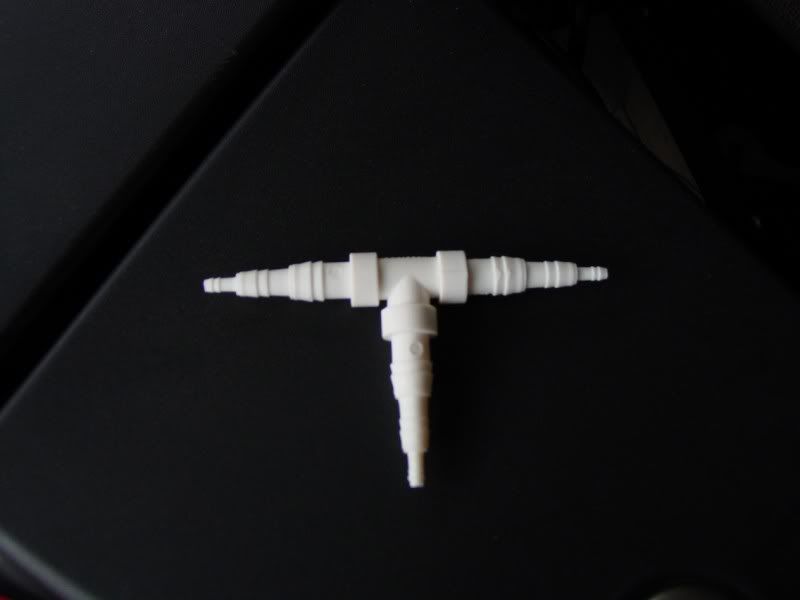
The vacuum Tee that comes with the gauge will not work for this particular application, but, this multi size Tee is easily available at your local auto parts store, and fits the bill perfectly...
The vacuum line that runs to the fuel pressure sensor is easily accessable for this application...
I left some slack in the vacuum line, because the fuel rail adapter that I was expecting did not arrive. When it is installed, it will elevate the vacuum line from where it now sits.

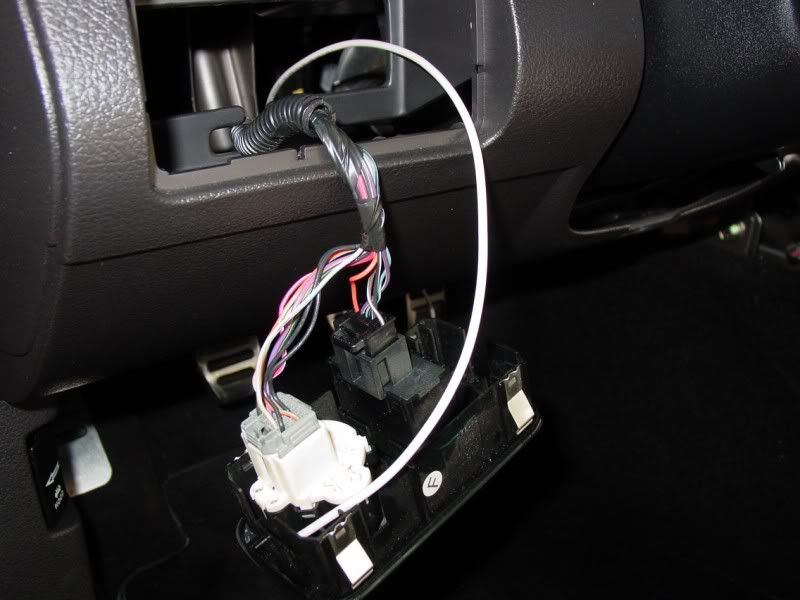
Now that all the wiring and mechanical lines are run, it's time to connect everything to the gauges. Won't bore you with all those connections...

Once those connections are done, time to slide the entire assembly back into the dash...
Once the assembly is slid back into place, re-secure it with the four bolts...
Before buttoning up the rest of the dash stack, I tested the gauges and lighting at this point.
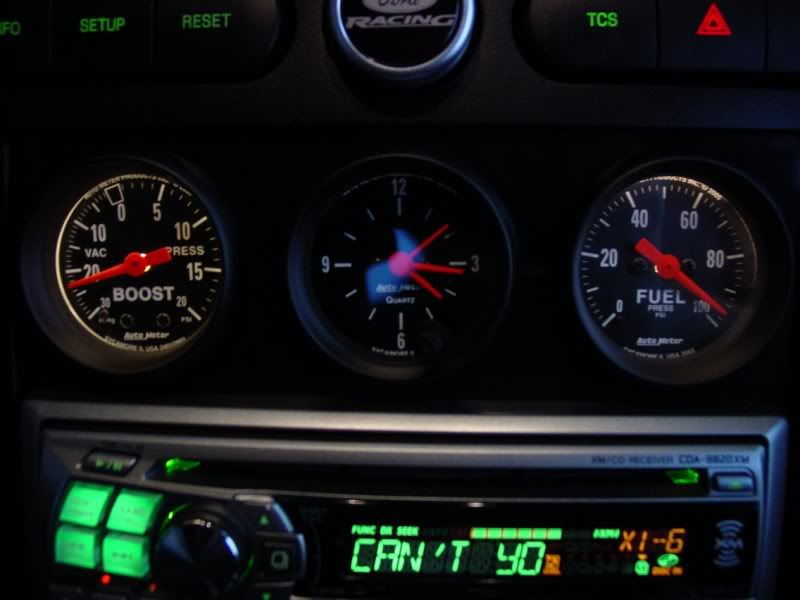
As noted earlier, my fuel rail adapter did not arrive as planned. I thought the fuel gauge would just stay dead without being hooked up under the hood...WRONG!! I caught the key before the gauge wrapped completely. At this point, I pulled the panel back off, and disconnected the wire loom from the back of the gauge until I receive the fuel rail adapter and install it. At that point, I will also be installing blue LCD bulbs in the gauges to match the my color I normally use...
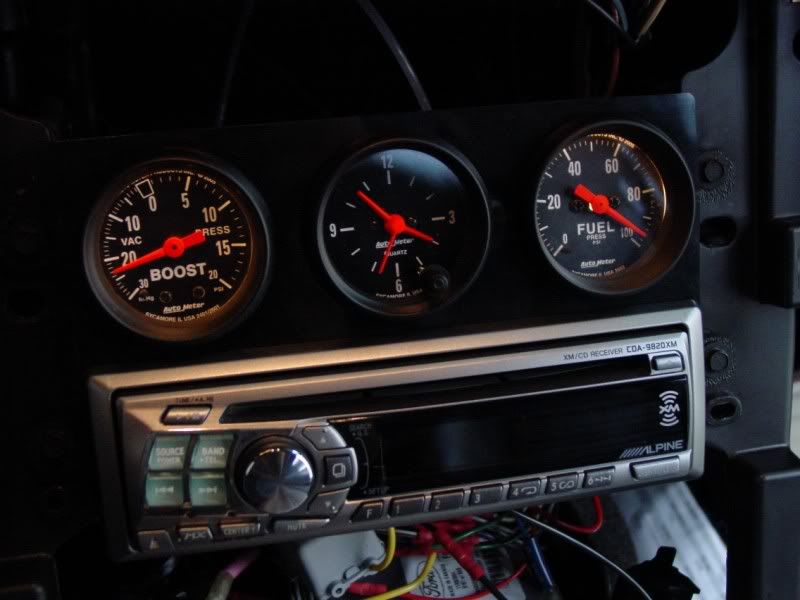
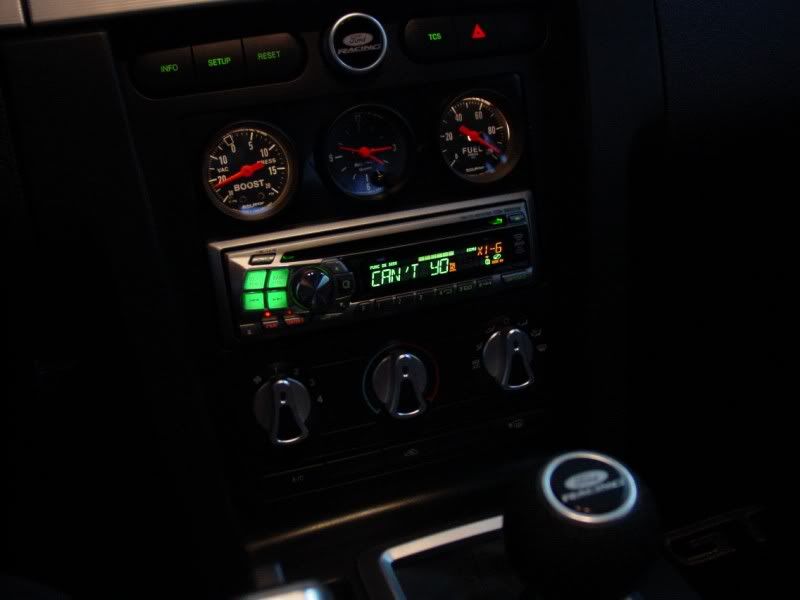
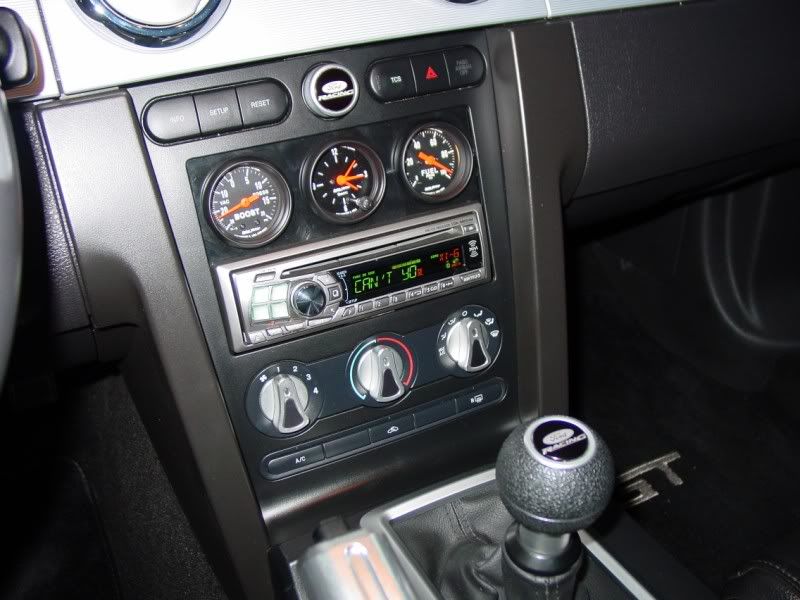
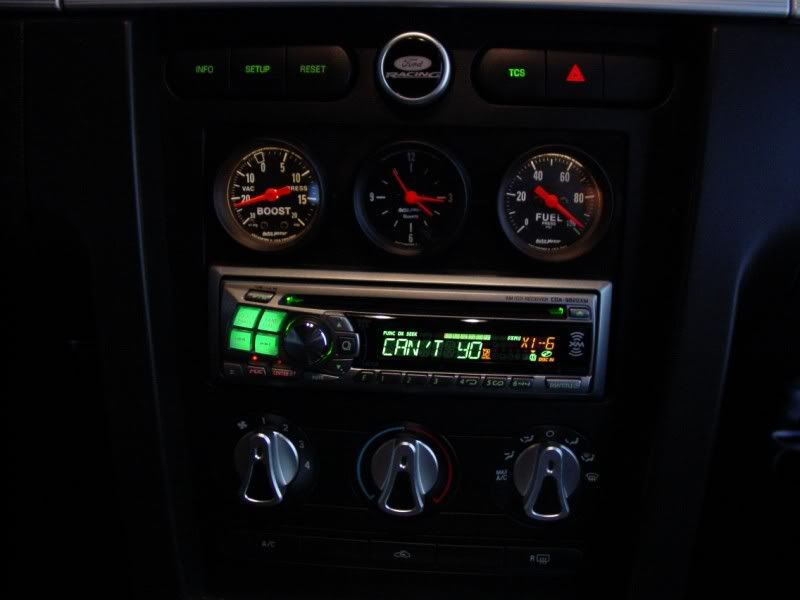
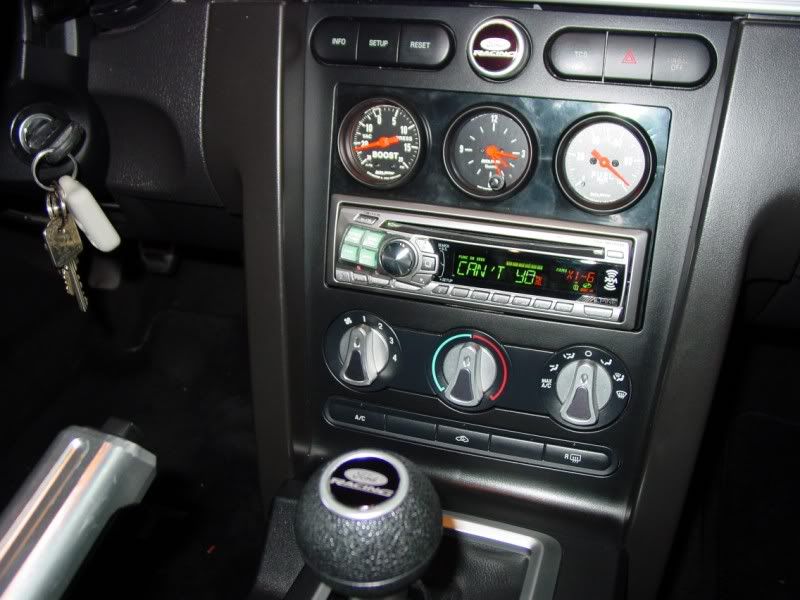
And here is the finished project...
So, about the SOS dash panel.....
I am pleased with the results of the mod. Exactly what I was looking for, from a standpoint of keeping the gauges low key, and I already had a single DIN radio. So for me, works pefectly....But....
When I looked at the SOS website, this is the description they give of the dash panel...
Quote:
These CNC machined panels are made with the quality and attention to detail you�d expect from Speed of Sound. Your choice of Brushed Aluminum or Satin Black finish is available. The panels bolt firmly in place using the OEM radio bolt locations for a tight, trouble-free installation.
I made very poor assumption that this was describing a metal piece. It is not. The dash panel is plastic. The face of it, that is exposed, is made of a formica, or masonite type material....Will it work? Yes. Worth the purchase price? We shall see...
Secondly, because of the close tolerance of available room, once the gauges are placed in location, there is not enough room behind them to completely use the securing brackets furnished by AutoMeter. The middle location is fine, but the two sides are so snug left to right, that I had to modify both of those brackets to work..That said....
The holes for the gauges are SO TIGHT, it was a struggle to get the gauges in all the way flush. Secondly, the DIN area for the radio was also way too snug. I had to use a file, and clean up all four corners to get the radio installation bracket to fit, and even then, it was very snug.....
Tight tolerance is one thing, and appreciated, but I think this one could have been machined with a bit more tolerance, to facilitate a much easier install....
My gauges of choice are the AutoMeter Z Series, which in my opinion are the low key look I was going for, and quite honestly, they are one of the more reasonably priced gauges from AutoMeter.
As mentioned above, I personally am not a big fan of pillar pods or center dash pods. So, I decided on the Speed of Sound Radio Dash Panel. More on that later.
I won't bore everyone with the removal of the center console and such, because most people have already done that, or at least read the procedure somewhere. Anyway, here is what it looks like with the center stack torn down to the radio.
Removal of radio and in my case, the single DIN storage cubby....
And, the remaining mess...
Here is the SOS dash panel with the gauges already installed. I was going to remove the gauges and show just the panel, but more on that later...
This is with the installation box for the stereo in place...
And finally, with the radio re-installed in the dash panel...
The two main lines that need to be pulled into the radio area for the gauge install are power and ground. If you drop down the glove box, by squeezing in the side panels, you will see two very nice ground bolts just waiting to be used...
I ran two ground wires, one from each bolt. One ground to use on the gauge lighting, and one ground to use on the gauge function itself...
As far as the power connections, I ran two lines over to the fuse panel in the passenger kick panel. One to be switched, and one to be unswitched. (for the clock I installed) The add a circuit you see connected was already there from my shift light install. I used the same add a circuit for the switched power to the gauges. Not shown, I added a second add a circuit to a constant hot fuse, in my case, the fuse for the power mirrors.
After connecting both add a circuit power lines, the fuse box gets buttoned back up...
So at this point, this is what your dash opening looks like...
Next, we need to run power to the lights of the gauges. You also want this to be dimmer controlled. So, pop out the headlight switch. This can be done with no tools. Just press up from under the round area on the switch, and it will pop out....Run one wire from the headlight switch area over to your dash opening...
The second pin, which is a white wire with a blue stripe, is the dimmer controlled light power. I used a quick connect to tap this wire for the gauges...
Re-install the light switch...
Directly behind the clutch pedal, there is a rubber grommet that is the perfect access to get your lines (fuel pressure wire loom, and boost / vacuum tubing) into the engine bay. The green wire you see is the wire that I had run previously for the shift light.
Because of the size of the connector for the fuel pressure gauge, I slit the top of the grommet to allow the lines to be fed through from the inside.
Now, to access those lines you just fed through, you need to remove three push pin connectors from the inside of the drivers side wheel well, and peel it back. When you do, you will see the lines that you fed through from the drivers compartment...
Now, under the hood, you can reach down below the master brake cylinder, and grab these lines that you fed through...
Be very gentle when pulling the lines up to the engine bay. The tubing for the boost gauge will kink very easily, and you do not want to re-do this part...
The vacuum Tee that comes with the gauge will not work for this particular application, but, this multi size Tee is easily available at your local auto parts store, and fits the bill perfectly...
The vacuum line that runs to the fuel pressure sensor is easily accessable for this application...
I left some slack in the vacuum line, because the fuel rail adapter that I was expecting did not arrive. When it is installed, it will elevate the vacuum line from where it now sits.
Now that all the wiring and mechanical lines are run, it's time to connect everything to the gauges. Won't bore you with all those connections...
Once those connections are done, time to slide the entire assembly back into the dash...
Once the assembly is slid back into place, re-secure it with the four bolts...
Before buttoning up the rest of the dash stack, I tested the gauges and lighting at this point.
As noted earlier, my fuel rail adapter did not arrive as planned. I thought the fuel gauge would just stay dead without being hooked up under the hood...WRONG!! I caught the key before the gauge wrapped completely. At this point, I pulled the panel back off, and disconnected the wire loom from the back of the gauge until I receive the fuel rail adapter and install it. At that point, I will also be installing blue LCD bulbs in the gauges to match the my color I normally use...
And here is the finished project...
So, about the SOS dash panel.....
I am pleased with the results of the mod. Exactly what I was looking for, from a standpoint of keeping the gauges low key, and I already had a single DIN radio. So for me, works pefectly....But....
When I looked at the SOS website, this is the description they give of the dash panel...
Quote:
These CNC machined panels are made with the quality and attention to detail you�d expect from Speed of Sound. Your choice of Brushed Aluminum or Satin Black finish is available. The panels bolt firmly in place using the OEM radio bolt locations for a tight, trouble-free installation.
I made very poor assumption that this was describing a metal piece. It is not. The dash panel is plastic. The face of it, that is exposed, is made of a formica, or masonite type material....Will it work? Yes. Worth the purchase price? We shall see...
Secondly, because of the close tolerance of available room, once the gauges are placed in location, there is not enough room behind them to completely use the securing brackets furnished by AutoMeter. The middle location is fine, but the two sides are so snug left to right, that I had to modify both of those brackets to work..That said....
The holes for the gauges are SO TIGHT, it was a struggle to get the gauges in all the way flush. Secondly, the DIN area for the radio was also way too snug. I had to use a file, and clean up all four corners to get the radio installation bracket to fit, and even then, it was very snug.....
Tight tolerance is one thing, and appreciated, but I think this one could have been machined with a bit more tolerance, to facilitate a much easier install....
 12/14/08, 07:00 PM
#3
Looks great! Get that fuel line hooked up! 
12/14/08, 07:13 PM
#4
Cobra Member
Join Date: October 15, 2008
Location: Brew City
Posts: 1,373
Likes: 0
Received 0 Likes
on
0 Posts
Nice set-up for a car with an aftermarket stereo. Now, if you could get a piece of the matching dash face material to cover the black formica panel, that set-up would almost look stock!
12/19/08, 12:22 PM
#8

Looks great Mike!
12/19/08, 12:43 PM
#9
Mach 1 Member
Thread Starter
Thanks Bill, appreciate it very much. Getting ready for the Vortech install, hopefully in the next three or so weeks. If you have a chance, any gotchas or look outs you can pass on would be most appreciated.
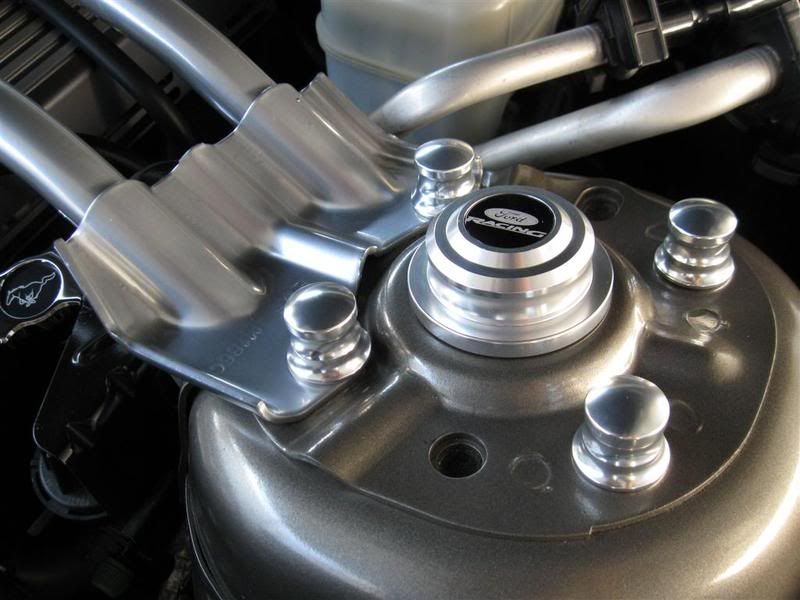
As far as the Ford racing inserts, they are actually the inserts that are made for my strut tower covers. I ordered an extra set from NDZ performance, and just glued them into the shifter and power point plugs...I like em too. Need to get some Ford Racing mats now.....
Thanks again,
Mike
As far as the Ford racing inserts, they are actually the inserts that are made for my strut tower covers. I ordered an extra set from NDZ performance, and just glued them into the shifter and power point plugs...I like em too. Need to get some Ford Racing mats now.....
Thanks again,
Mike
1/1/09, 09:49 AM
#10
Member

Join Date: September 25, 2005
Posts: 31
Likes: 0
Received 0 Likes
on
0 Posts
When I looked at the SOS website, this is the description they give of the dash panel...
Quote:
These CNC machined panels are made with the quality and attention to detail you�d expect from Speed of Sound. Your choice of Brushed Aluminum or Satin Black finish is available. The panels bolt firmly in place using the OEM radio bolt locations for a tight, trouble-free installation.
I made very poor assumption that this was describing a metal piece. It is not. The dash panel is plastic. The face of it, that is exposed, is made of a formica, or masonite type material....Will it work? Yes. Worth the purchase price? We shall see...
Secondly, because of the close tolerance of available room, once the gauges are placed in location, there is not enough room behind them to completely use the securing brackets furnished by AutoMeter. The middle location is fine, but the two sides are so snug left to right, that I had to modify both of those brackets to work..That said....
The holes for the gauges are SO TIGHT, it was a struggle to get the gauges in all the way flush. Secondly, the DIN area for the radio was also way too snug. I had to use a file, and clean up all four corners to get the radio installation bracket to fit, and even then, it was very snug.....
Tight tolerance is one thing, and appreciated, but I think this one could have been machined with a bit more tolerance, to facilitate a much easier install....
From you quote, you can see we do not say this part is metal. The entire part is made from ABS plastic, there is no formica or masonite used whatsoever, in any of our products. At $59, I feel it's quite reasonable for a part which can be customized in numerous configurations - and delivered within days. A 3/4" plate of aluminum, custom machined to meet every customer's different needs, could easily cost triple or more. Maybe it's because I'm the guy making them, but I feel our part delivers plenty for a very reasonable price.
The gauge holes are milled to a diameter of 2.063", which is very close to the 2 1/16" standard. The tight fit you mention is intentional, and facilitates the mounting of the gauges *without* the brackets you struggled with. As you state, there's not a lot of room back there to work with, so we chose a press-fit (or friction fit) to get some of that mess out of the way. I'll take a look at updating our instructions, but I'm at the mercy of the customer's choice of gauges. Not every manufacturer's 2 1/16" equals 2 1/16", I've found considerable variances out there, as well as mounting methods.
The same holds true for DIN mounting cages. An Alpine cage may indeed be tight, but a Pioneer, Sony, Eclipse, etc may not be. The panel is cut to the DIN reference dimensions. However, not all radio cages adhere to this dimension with precision. I spent a lot of years working in car audio, and found similar instances with dash kits from Metra, Scosche, AI, etc.
For those of you reading this thread: Don't waste a minute struggling with an install of our part. CONTACT US and let us help. You would be surprised to see your questions answered on night/weekends/holidays - not just 9-5. Customer service is part of what you pay for, and if you look around, you'll see we deliver it with quality that has few equals.
I'm glad you got the install worked out, and apologize if you had to endure a headache or two along the way.
Alan @ SOS
1/1/09, 04:30 PM
#11
Mach 1 Member
Thread Starter
I appreciate your comments and the time taken to do your write-up. The finished install looks great. I was just browsing around and noticed this thread. Some of the issues you mention above could have been addressed/eliminated if you'd contacted us about them. For the benefit of others here, I'd like to comment:
From you quote, you can see we do not say this part is metal. The entire part is made from ABS plastic, there is no formica or masonite used whatsoever, in any of our products. At $59, I feel it's quite reasonable for a part which can be customized in numerous configurations - and delivered within days. A 3/4" plate of aluminum, custom machined to meet every customer's different needs, could easily cost triple or more. Maybe it's because I'm the guy making them, but I feel our part delivers plenty for a very reasonable price.
The gauge holes are milled to a diameter of 2.063", which is very close to the 2 1/16" standard. The tight fit you mention is intentional, and facilitates the mounting of the gauges *without* the brackets you struggled with. As you state, there's not a lot of room back there to work with, so we chose a press-fit (or friction fit) to get some of that mess out of the way. I'll take a look at updating our instructions, but I'm at the mercy of the customer's choice of gauges. Not every manufacturer's 2 1/16" equals 2 1/16", I've found considerable variances out there, as well as mounting methods.
The same holds true for DIN mounting cages. An Alpine cage may indeed be tight, but a Pioneer, Sony, Eclipse, etc may not be. The panel is cut to the DIN reference dimensions. However, not all radio cages adhere to this dimension with precision. I spent a lot of years working in car audio, and found similar instances with dash kits from Metra, Scosche, AI, etc.
For those of you reading this thread: Don't waste a minute struggling with an install of our part. CONTACT US and let us help. You would be surprised to see your questions answered on night/weekends/holidays - not just 9-5. Customer service is part of what you pay for, and if you look around, you'll see we deliver it with quality that has few equals.
I'm glad you got the install worked out, and apologize if you had to endure a headache or two along the way.
Alan @ SOS
Thanks for the kudos on the write up. I do appreciate it. Please, make no mistake, I am not, nor was I, bad-mouthing SOS. That is not, nor has it ever been my style. When I do write up of mods, I try to stay as objective as possible, and If I cannot do that, I just don't do a write up. I stated in my write up that it was a bad assumption on my part to think the piece was metal. I also stated I could have avoided that with a simple phone call. I did not do that....And, when I started my narrative that you quoted, I also said this....
So, about the SOS dash panel.....
I am pleased with the results of the mod. Exactly what I was looking for, from a standpoint of keeping the gauges low key, and I already had a single DIN radio. So for me, works pefectly....But....
I am pleased with the results of the mod. Exactly what I was looking for, from a standpoint of keeping the gauges low key, and I already had a single DIN radio. So for me, works pefectly....But....
If you look at this pic that I posted, you will see what appears to be a "light stress connecting line" running between the gauge faces...
This occurred from pressing the gauges into place....Well, since install, these have somewhat exagerated beyond the point there were at install. And I think we all know that vibrations will continue with this car.
Again Alan, you have a great, unique, effective piece here. And I will tell you that if I had not gone with this piece, I would have gone with your triple dash pod. So please do not take the write up in the wrong light. I just like to share with people my experiences with installs and after market parts, and try to let them make objective decisions on their own....
Regards, and Happy New Year!!
Mike
1/1/09, 08:15 PM
#12
Member
Join Date: September 25, 2005
Posts: 31
Likes: 0
Received 0 Likes
on
0 Posts
I, too, must be clear in stating it was not my intent to be defensive in regards to your posting, but rather touch on some of the points where I felt an explanation from "the horse's mouth" could help. I take no offense at your post, quite the opposite, actually. Please know I did not feel I was being "bashed". I often pop into discussions about SOS products across dozens of web forums.
First things, first:
I'd like to replace your panel, if you're willing to swap it out with a fresh one. That stress crack would bother me to no end, so I don't expect you to live with it. Just say "go", and we'll ship you out a new one. I can (and will) adjust the bore size a little larger, but feel you should re-install without the brackets. I prefer a snug fit, but will make sure there's no unnecessary effort to seat the gauges.
However...
I can say that I've noticed a variance in Autometer's gauge bodies. Part-to-part, these have a little difference themselves. I'm quite certain this comes from multiple mold cavities used in their manufacturing, and their tolerances being slightly different. This is not unexpected, just an observation I've made in handling many, many gauges over the past 5 years. At this time, I have Autometer Ultra-lite series gauges in my shop, and will personally test-fit these prior to shipping your replacement part (should you wish to get one).
I am quite glad you're pleased with the application we've created. I'm also pleased to hear another one of our products was your "next choice". We don't have some of the luxuries of the HUGE companies we compete against, yet hold our own proudly. As my company grows, I hope you (and others) can only expect us to raise our own bar for creativity and quality. This is my intent, and I'm highly focused upon it.
Happy new year to you, and thanks again for choosing my product for your car!
1/1/09, 09:44 PM
#13
Mach 1 Member
Thread Starter
I, too, must be clear in stating it was not my intent to be defensive in regards to your posting, but rather touch on some of the points where I felt an explanation from "the horse's mouth" could help. I take no offense at your post, quite the opposite, actually. Please know I did not feel I was being "bashed". I often pop into discussions about SOS products across dozens of web forums.
First things, first:
I'd like to replace your panel, if you're willing to swap it out with a fresh one. That stress crack would bother me to no end, so I don't expect you to live with it. Just say "go", and we'll ship you out a new one. I can (and will) adjust the bore size a little larger, but feel you should re-install without the brackets. I prefer a snug fit, but will make sure there's no unnecessary effort to seat the gauges.
However...
I can say that I've noticed a variance in Autometer's gauge bodies. Part-to-part, these have a little difference themselves. I'm quite certain this comes from multiple mold cavities used in their manufacturing, and their tolerances being slightly different. This is not unexpected, just an observation I've made in handling many, many gauges over the past 5 years. At this time, I have Autometer Ultra-lite series gauges in my shop, and will personally test-fit these prior to shipping your replacement part (should you wish to get one).
I am quite glad you're pleased with the application we've created. I'm also pleased to hear another one of our products was your "next choice". We don't have some of the luxuries of the HUGE companies we compete against, yet hold our own proudly. As my company grows, I hope you (and others) can only expect us to raise our own bar for creativity and quality. This is my intent, and I'm highly focused upon it.
Happy new year to you, and thanks again for choosing my product for your car!
First things, first:
I'd like to replace your panel, if you're willing to swap it out with a fresh one. That stress crack would bother me to no end, so I don't expect you to live with it. Just say "go", and we'll ship you out a new one. I can (and will) adjust the bore size a little larger, but feel you should re-install without the brackets. I prefer a snug fit, but will make sure there's no unnecessary effort to seat the gauges.
However...
I can say that I've noticed a variance in Autometer's gauge bodies. Part-to-part, these have a little difference themselves. I'm quite certain this comes from multiple mold cavities used in their manufacturing, and their tolerances being slightly different. This is not unexpected, just an observation I've made in handling many, many gauges over the past 5 years. At this time, I have Autometer Ultra-lite series gauges in my shop, and will personally test-fit these prior to shipping your replacement part (should you wish to get one).
I am quite glad you're pleased with the application we've created. I'm also pleased to hear another one of our products was your "next choice". We don't have some of the luxuries of the HUGE companies we compete against, yet hold our own proudly. As my company grows, I hope you (and others) can only expect us to raise our own bar for creativity and quality. This is my intent, and I'm highly focused upon it.
Happy new year to you, and thanks again for choosing my product for your car!
Mike
1/1/09, 10:25 PM
#15
Member
Join Date: September 25, 2005
Posts: 31
Likes: 0
Received 0 Likes
on
0 Posts
Thank you Alan.......GO!! I think this is a very generous offer, and the very least I can do is invest a bit of my time and effort to bring this project to the point that both of us are looking for. Let me add also, that this is what sets a very few companies apart, and assures repeat and referral business....It's called CUSTOMER SERVICE!! Unsolicited, I might add....Bravo to you and thank you.
Mike
Mike
Shoot me a PM with your full name, so I can pull your records when I get into the office tomorrow. Bonus points if you have an order/invoice #, however don't go digging around since your name will do just fine. Also, if your ship-to info has changed since you got this panel, let me know.
1/2/09, 09:35 AM
#17
Member
Join Date: September 25, 2005
Posts: 31
Likes: 0
Received 0 Likes
on
0 Posts
Got it, and I'm on it! 
I may have found the culprit on your panel, too. I'm going to check some tool offsets, as a different cutting tool may have thrown the tolerance off enough to make your gauges fit too tight. Might not be the problem, either, but it's the only thing that comes to mind.
Either way, round 2 should be easier on you.
One other thing:
In your pics, I can't tell if you used the spacers on the lower two bolts of the panel. I can't see them, but maybe they are there? I'm going to send new spacers with the new panel, just in case you didn't get them the first time (?).
1/2/09, 10:29 AM
#18
Mach 1 Member
Thread Starter
Got it, and I'm on it!
I may have found the culprit on your panel, too. I'm going to check some tool offsets, as a different cutting tool may have thrown the tolerance off enough to make your gauges fit too tight. Might not be the problem, either, but it's the only thing that comes to mind.
Either way, round 2 should be easier on you.
One other thing:
In your pics, I can't tell if you used the spacers on the lower two bolts of the panel. I can't see them, but maybe they are there? I'm going to send new spacers with the new panel, just in case you didn't get them the first time (?).
No, no spacers....if they were there, I did not see them. I saw mention in the instructions, but just kinda assumed (bad Mike) that perhaps they were for a different application....What is the purpose of them??
1/2/09, 12:00 PM
#19
Member
Join Date: September 25, 2005
Posts: 31
Likes: 0
Received 0 Likes
on
0 Posts
The spacers are used for the lower two bolts, due to the Shaker radio having a radiused/curved face. The spacers allow our flat panel to fit flush in the opening. If you look at your panel, you may see a gap on the lower 1/3 (or so) around the edges. May not be a problem, but you'll have them this time - just in case.
1/3/09, 09:55 AM
#20
Mach 1 Member
Thread Starter
Can't say someone didn't forget to put them in the box. I'll break out my whip, and the spacers are already sitting with your box for the replacement panel. "El Jefe" is handling this one personally, from milling the part to packing it for shipment.
The spacers are used for the lower two bolts, due to the Shaker radio having a radiused/curved face. The spacers allow our flat panel to fit flush in the opening. If you look at your panel, you may see a gap on the lower 1/3 (or so) around the edges. May not be a problem, but you'll have them this time - just in case.
The spacers are used for the lower two bolts, due to the Shaker radio having a radiused/curved face. The spacers allow our flat panel to fit flush in the opening. If you look at your panel, you may see a gap on the lower 1/3 (or so) around the edges. May not be a problem, but you'll have them this time - just in case.
Obviously "El Jefe" was very busy yesterday, as I have already received FedEx shipping notification of the new panel.....

Thank you Alan......
Mike