
Alpine IVA-W205 & Lorex SG4933R rear camera install (w/pics)


Alpine IVA-W205 & Lorex SG4933R rear camera install (w/pics)
EDIT (3/8/10): Please note edit changes in RED.
As you probably have seen from my other related threads, I installed both the Alpine and backup camera along with the Raptor shift light and SOS switch panel at the same time.
I'll just go over some install highlights for the Alpine (w/video bypass) and rear cam.
What you'll need besides the Alpine..
Metra in-dash receiver kit, part number 99-5807 (available through Crutchfield, item #120995807).
Crutchfield wire harness kit, Item #120705521.
Radio Shack +5V Fixed-Voltage Regulator, model 7805, catalog #276-1770 (to eliminate the 'pop' sound from the door subs when turning the stereo on).
(For Shaker 500 ONLY!) RCA 'Y' adapter: 2 male to 1 female
Extra wires (different colors) for jumping, wire strippers, solder (and iron), heat gun, and shrink tube.
EDIT (3/8/10): Instead of the voltage regulator, you can use a 1.5' resistor. link
EDIT (3/8/10): I did not use the RCA 'Y' adapter, plugged both L/R into the RCA preout on the headunit and everything works just fine.
If you wish to bypass the video safety feature (keep in mind that it's illegal probably in all 50 States to do this), you'll need to get the PAC TR-7 Universal Trigger Output Module (available through eBay).
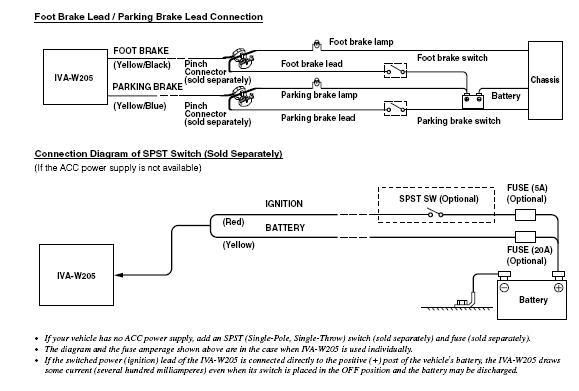
Otherwise, the only way to watch a DVD video is to hook up the parking brake and foot brake wires per Alpine's instructions. The sequence that must be performed is to put your foot on the brake pedal, cycle your e-brake handle twice, then release the foot brake.
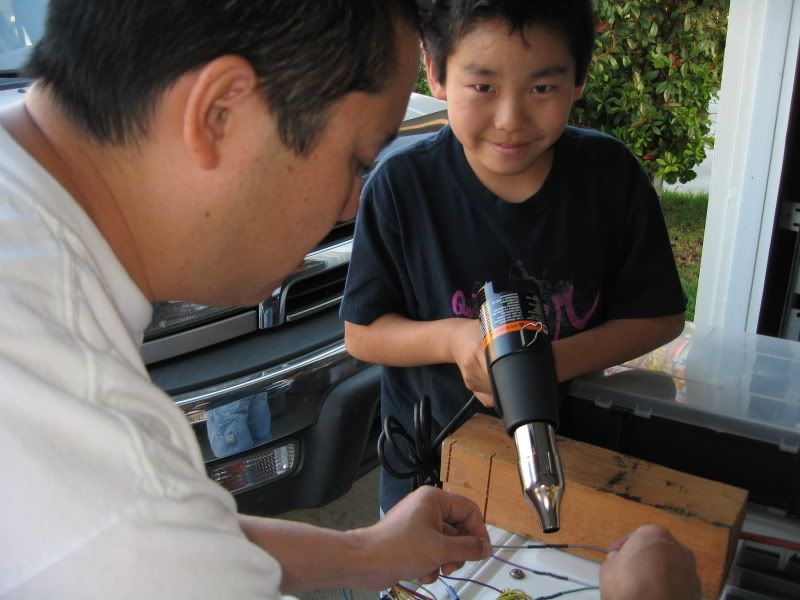
It's a good idea to make all the harness connections and solder the voltage regulator before getting into the actual install.
If you're going to wire in the TR-7, do it at the same time as the Metra harness.
The Metra harness color coded wires are a direct match with Alpine's.
Here are some reference pics before you get started.
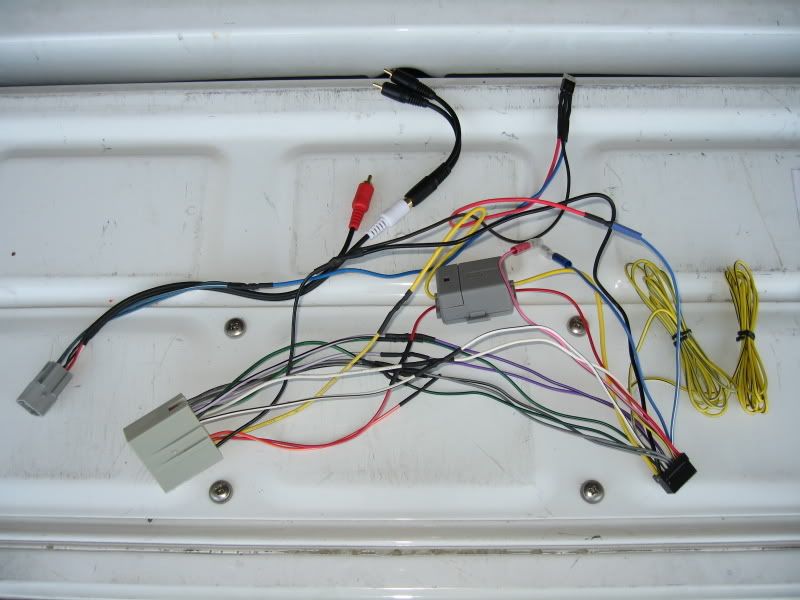
Alpine main harness
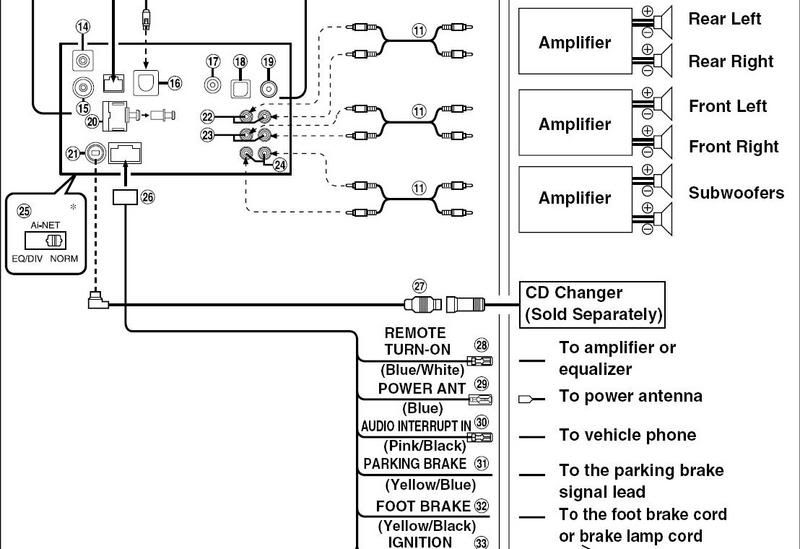
Alpine video safety wires
Voltage Regulator
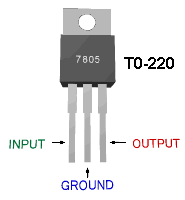
Voltage Regulator wiring: (edit 3/8/10)
INPUT: splice to both Blue/White wires on smaller Metra harness (wire all 3 wires together)
GROUND: splice to black chassis ground on Alpine harness
OUTPUT: to wire 28 of Alpine harness
Edit (3/8/10): Another option instead of the voltage regulator is getting a 1.5k resistor and solder it in-line between the remote turn-on wire of the headunit and the (2) blue/white wires of the Metra harness.
Either methods above will eliminate the amp turn-on 'pop' thru the front door subs.
TR-7 wiring:
Brown: Not used; tape off
Orange: Not used; tape off
Green: Alpine Blue/White (splice into the jumper wire that connects to both Alpine Blue/White wires. On the Shaker 500, one of them is not used)
Blue: Alpine Yellow/Black
White: Alpine Yellow/Blue (if installing a toggle switch (like me), install it between these two wires)
Red: switched 12V (can splice into Red wire of Alpine harness)
Black: splice into Black ground of Alpine harness
Metra harness:
Orange/White: Not used, tape off.
(For Shaker 500 owners) Plug the single 'Y' RCA end of adapter into the white RCA of the small Metra harness (leaving the red open). Opposite end of 'Y' will plug into the #24 RCA output (bottom one, both L&R) of the IVA-W205.
(For Shaker 1000 owners) Plug the Metra RCA's straight into #24 RCA output.
Edit (3/8/10): I have the Shaker 500 and plugged both RCA cables like the Shaker 1000 instruction above and it worked perfectly. Check playabilty before re-installing the headunit back into the dash.
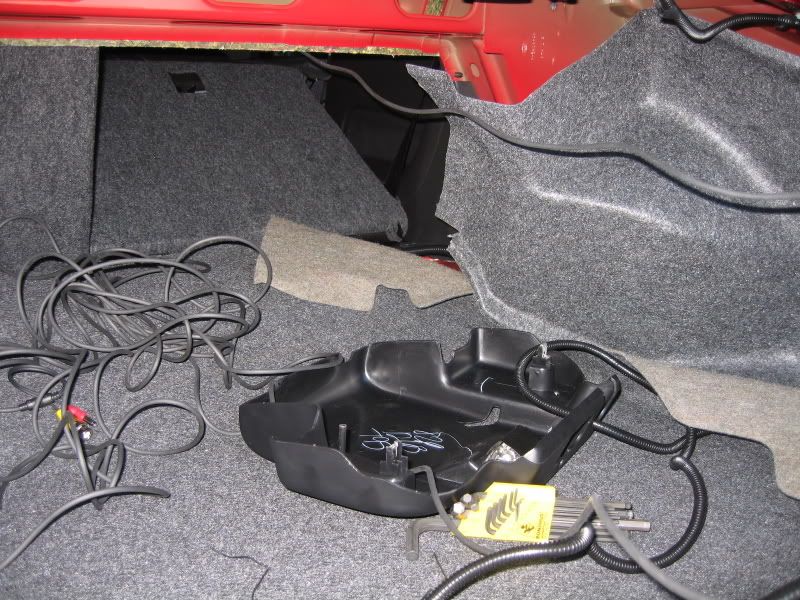
Some baseline pictures


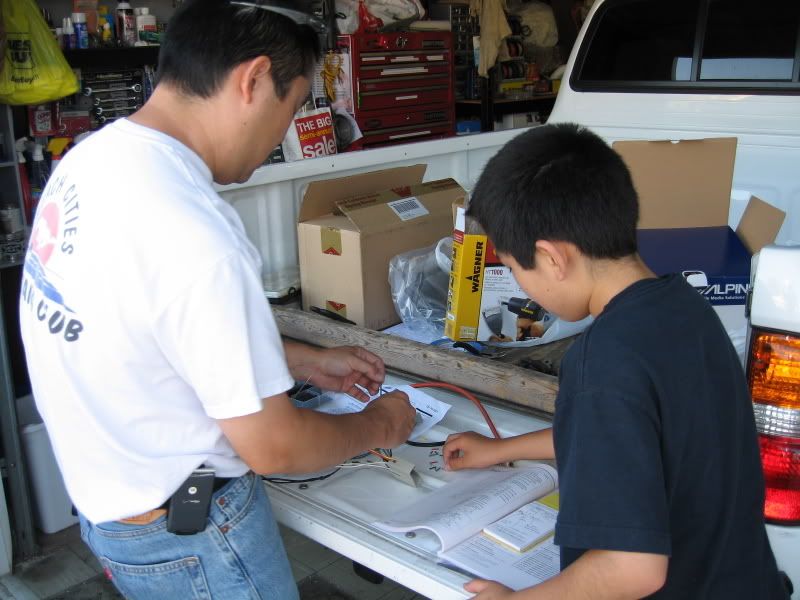
Wiring up the Metra harness to the Alpine harness
Note: I got my TR-7 after I did this, that's why you don't see it
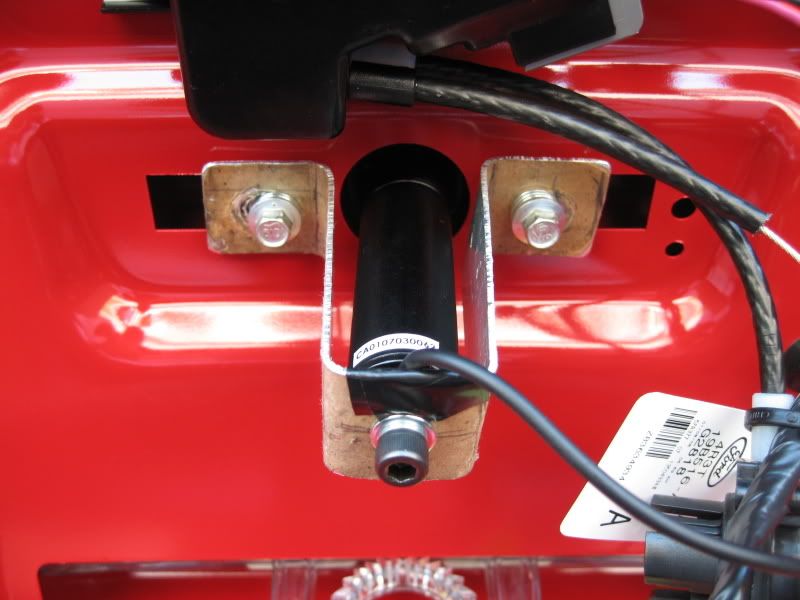
Rear camera install and wiring
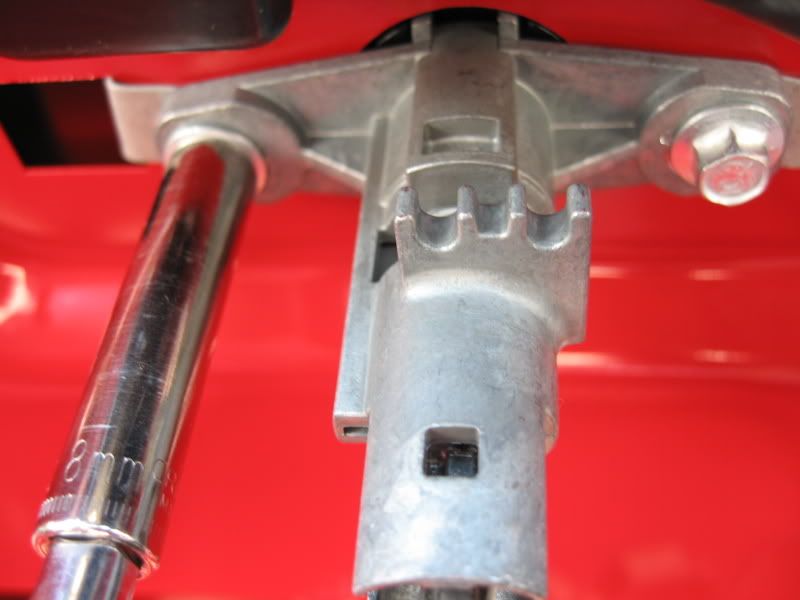
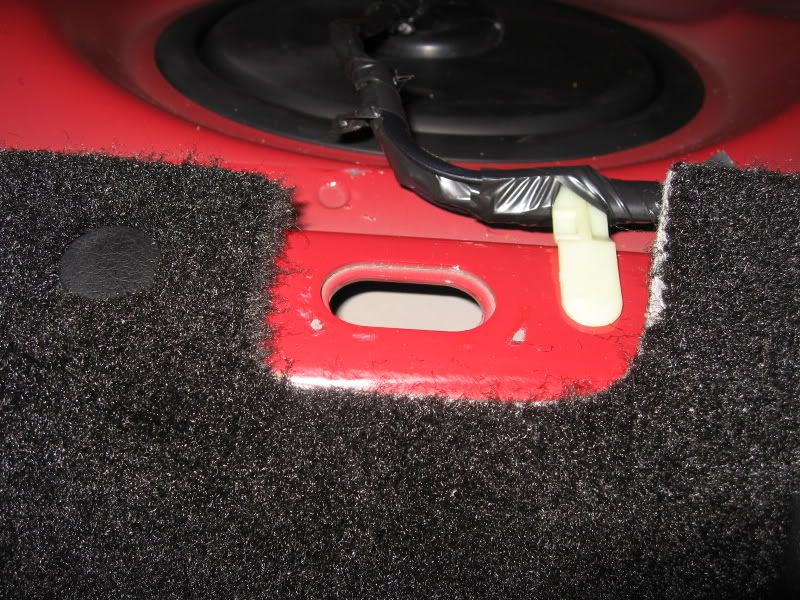
Open the rear decklid. Using your fingers, pop the plastic cover off from under the decklid. Route the 'anti-carjack' handle thru the cover and unplug the light harness.
Pull the end cap off the lock assembly.
Remove lock assembly
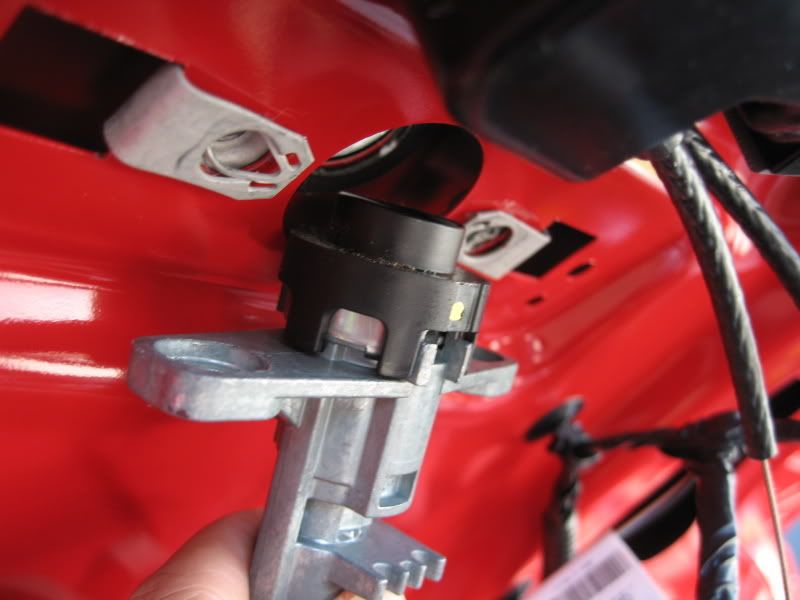
Mount camera
I copied hags1's excellent idea for the camera mount. See his post here for detailed lics of it.
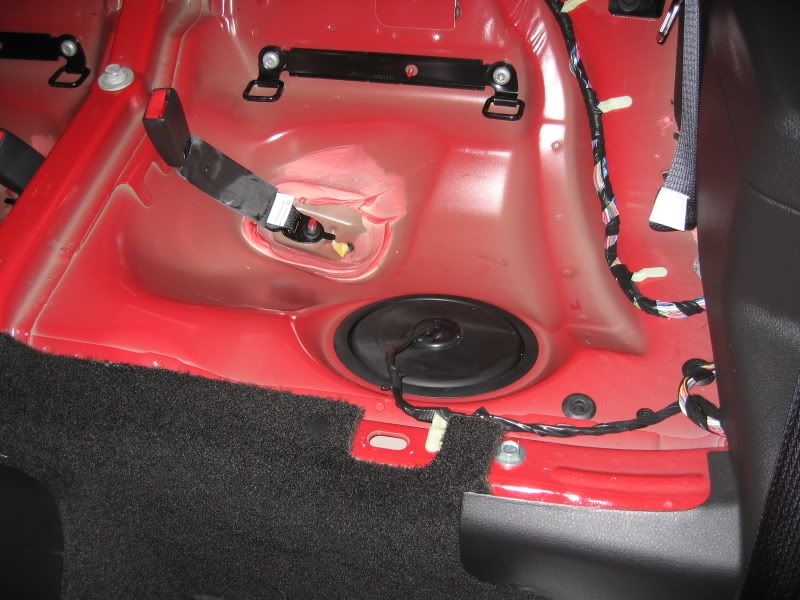
Remove back lower seat
There's 2 plastic hook tabs, abound 8 inches in on both sides of the bottom seat cushion, just feel for them (where you see the 'U' cut out in the carpet). Press the tabs in and the rear lower seat will simply lift off. Carefully remove the lower seat from the car.
FYI: The silver bolt head you see in-between the center seat belts is where the UCA attaches.
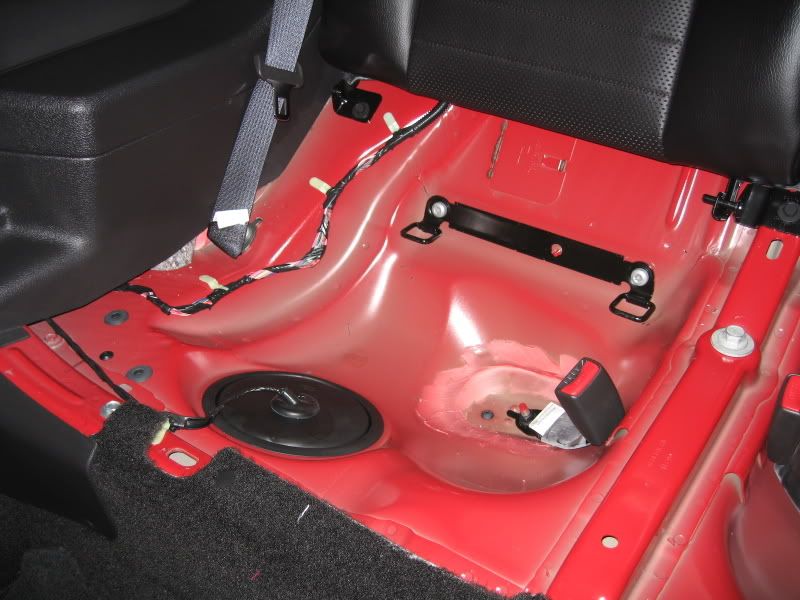
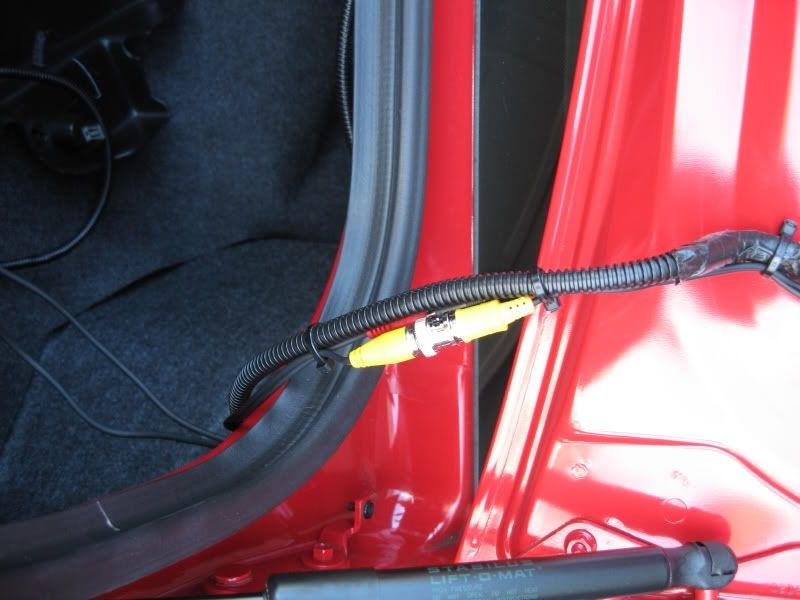
Route the camera wires to the front
Note: If you want the camera to power up only when in Reverse, only route the yellow video cable to the front. If you want to control the on/off function of the camera, route both power and video cables to the front.
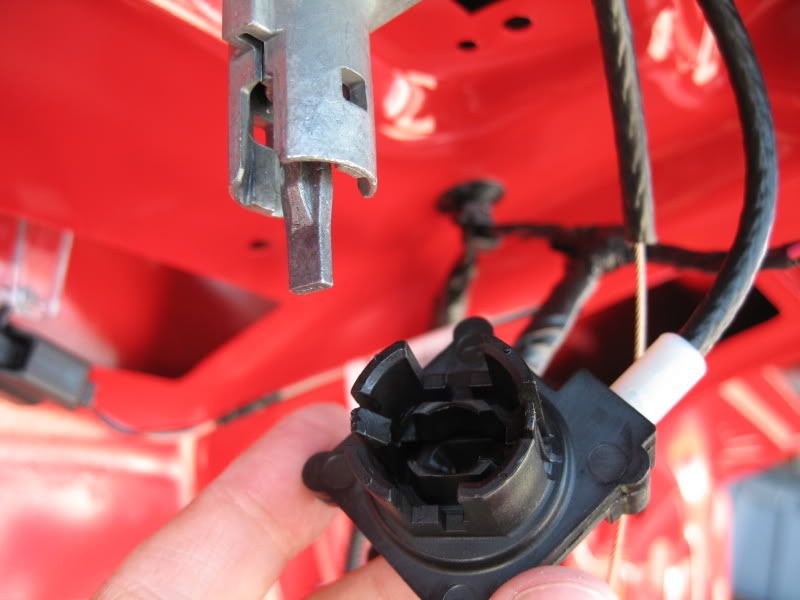
Note: The camera operates on 12V. Cut the plug off the end of the camera power cord. Pull wires apart to seperate. One wire will have a white dash, the other will have an ID stamp. The white dash wire is NEGATIVE, the ID wire is POSITIVE.
I followed the convoluted tubing under the trunk lid zip tieing the wire to it every several inches. The wiring was then routed behind the side carpet in the trunk and into the passenger side rear seat. All the excess length of camera wire I coil and stowed under the rear passenger seat. There's a circular cutout in the plastic moding on the underside of the seat. The coil fit there perfectly without buldging the seat cushion up.
I chose the direct route by going straight in the center of the tunnel under the carpet. Others choose to go to the sides and under the door sill. Since I was wiring the camera to my switch plate, the choice was obvious for me.
Getting the wiring under the carpet is a bit tricky. The factory used a lot adhesive, but managed to get wiggle thru some mechanical fingers to grab the wires to pull through.
Reinstall rear seat
After the camera wires are routed to the front, reinstall the lower seat. Install is in reverse order, just make sure the rear hooks into the black square rings in back.
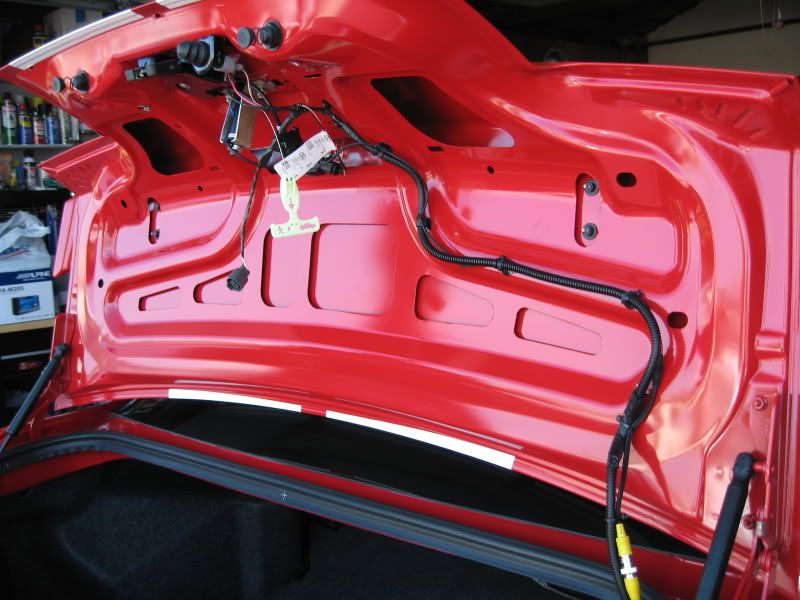
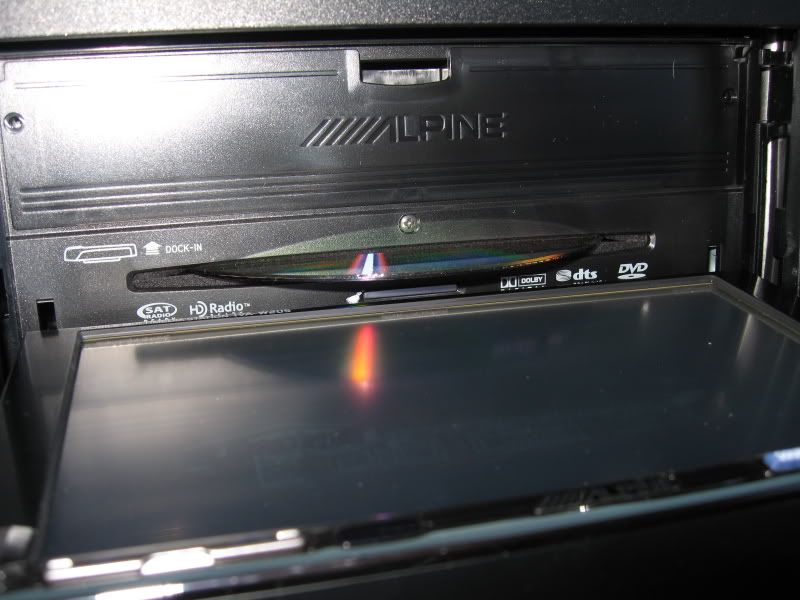
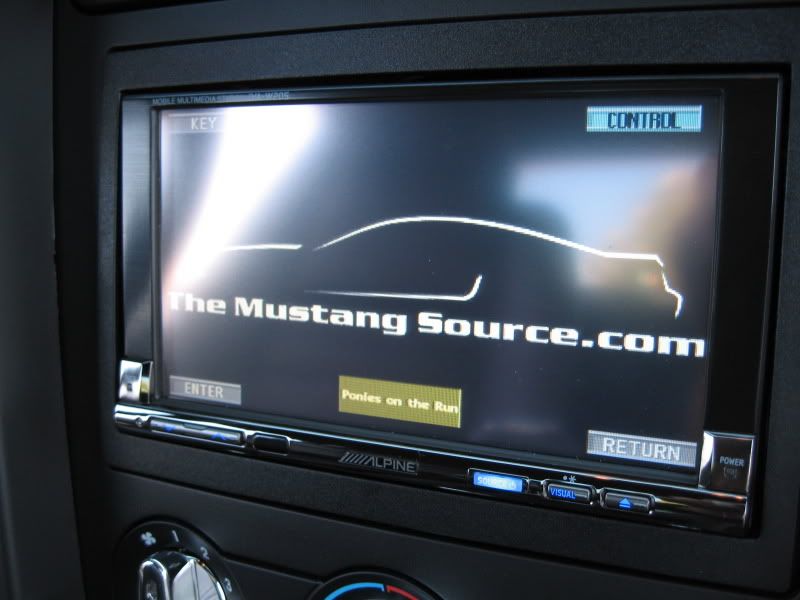
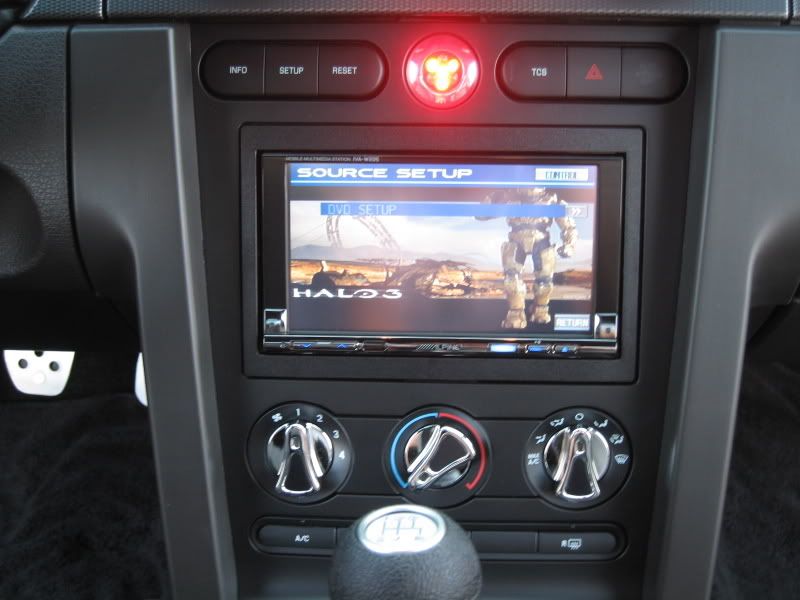
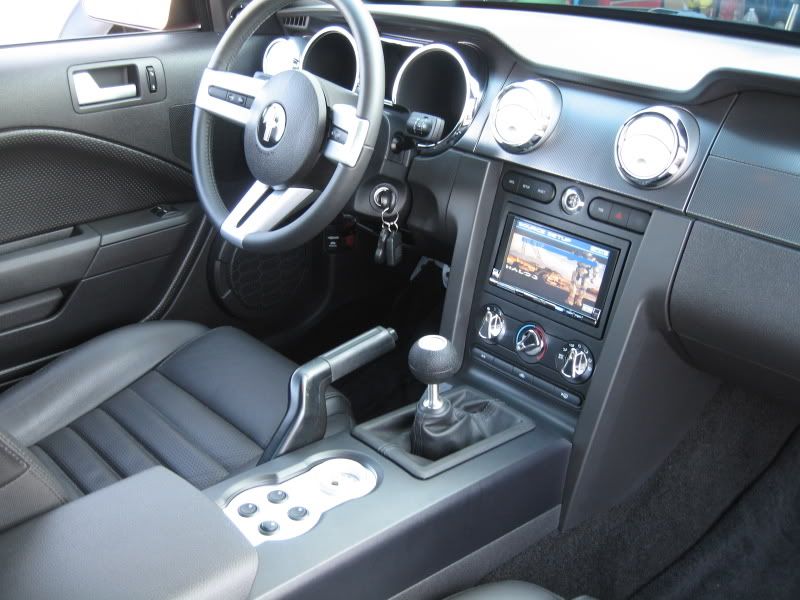
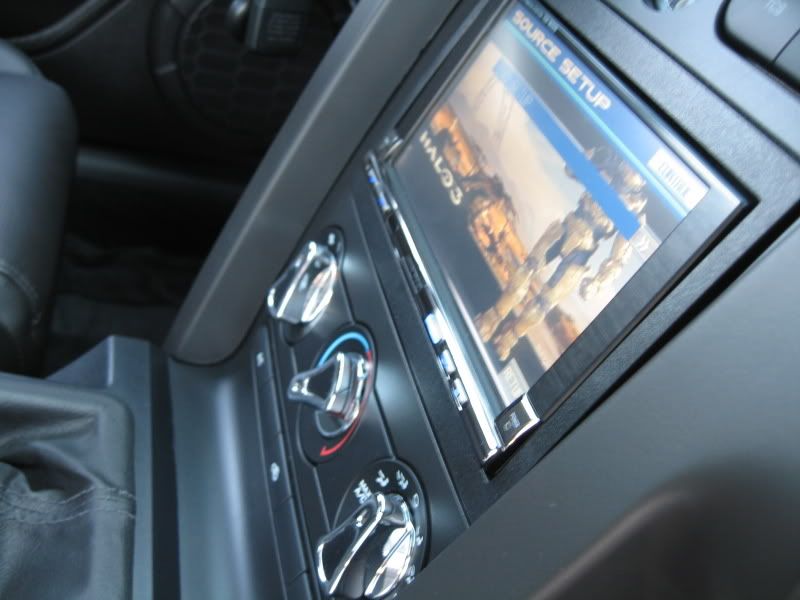
Alpine Installation
Follow the following removal directions to gain access to the center dash from my amplified antenna install all the way until the A-pillar removal.
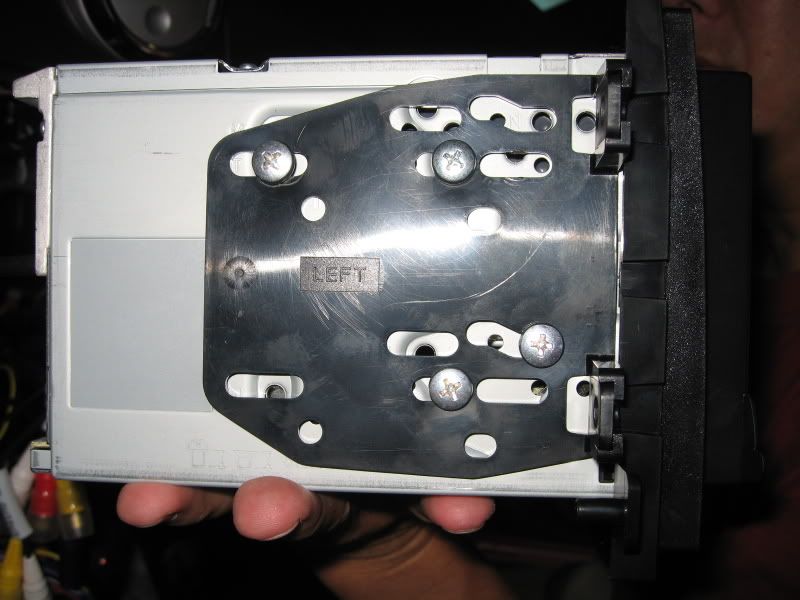
Ready the head unit for installation by installing the Metra dash kit along with the 2 large side supports (use 2 screws minimum, 3 preferred). I flush mounted mine to the dash kit bezel, but becareful! If you go too far in or if you don't leave enogh of a gap between the top of the HU and bezel, the screen won't be able to flip open (I know this from experience!).
This is where we jump ahead a bit in fast forward...
Connect both the Metra harnesses to the Ford factory harnesses.
Note: 1 Ford plug will remain open; not used.
Make sure the TR-7 switch is set to 'OFF'. The 'ON' feature is for programming only!
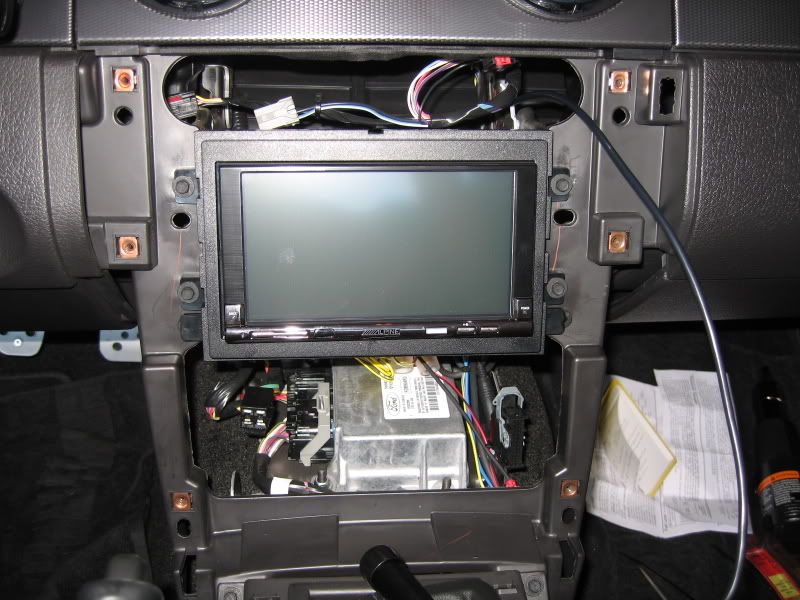
Position the Alpine close the dash and connect the alpine harness (which now should be plugged into the Ford harness via the Crutchfield harness). The Voltage Regulator and TR-7 should already be inside the dash opening at this point.
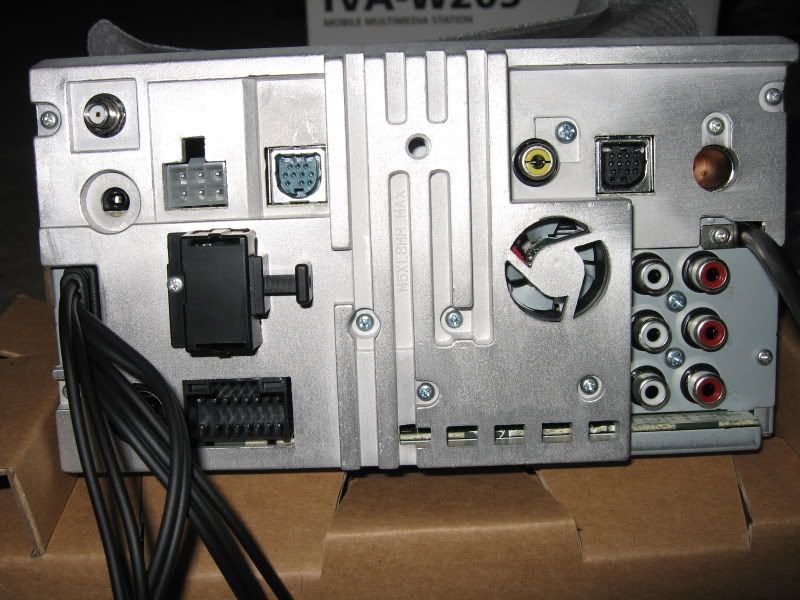
Connect the rear camera video (use the RCA to BNC adapter that's included with the kit) to the yellow video RCA input on the back of the Alpine (#17 on diagram).
Connect antenna jack.
Connect the RCA's from Metra harness for subwoofers (#24 on diagram).
Secure the Alpine with the 4 mounting screws.
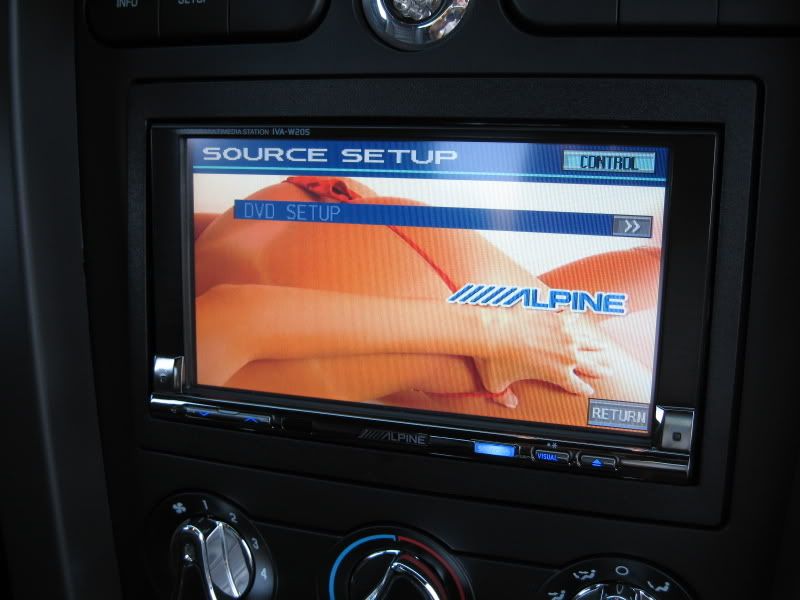
Power up the Alpine and make sure it plays. Also check function of the flip out screen to ensure it's not interfering with anything.
The TR-7 will automatically pulse the correct signal sequence to the Alpine, so you should be able to play a DVD movie at this point.
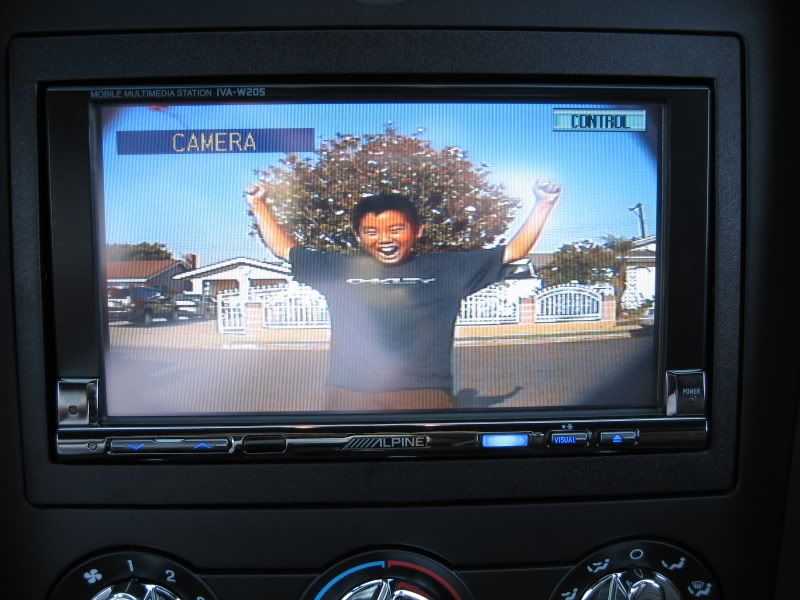
To check the camera, make sure it's powered up. You'll have to turn on the camera feature through the settings function to enable it. Consult the Alpine user manual for this.
Once everything is verified, reinstall the rest of the center dash and center console in reverse order. Do not forget to plug back in all the center dash electrical connections, including the 2 behind the climate control.
Installation complete!
As you probably have seen from my other related threads, I installed both the Alpine and backup camera along with the Raptor shift light and SOS switch panel at the same time.
I'll just go over some install highlights for the Alpine (w/video bypass) and rear cam.
What you'll need besides the Alpine..
Metra in-dash receiver kit, part number 99-5807 (available through Crutchfield, item #120995807).
Crutchfield wire harness kit, Item #120705521.
Radio Shack +5V Fixed-Voltage Regulator, model 7805, catalog #276-1770 (to eliminate the 'pop' sound from the door subs when turning the stereo on).
(For Shaker 500 ONLY!) RCA 'Y' adapter: 2 male to 1 female
Extra wires (different colors) for jumping, wire strippers, solder (and iron), heat gun, and shrink tube.
EDIT (3/8/10): Instead of the voltage regulator, you can use a 1.5' resistor. link
EDIT (3/8/10): I did not use the RCA 'Y' adapter, plugged both L/R into the RCA preout on the headunit and everything works just fine.
If you wish to bypass the video safety feature (keep in mind that it's illegal probably in all 50 States to do this), you'll need to get the PAC TR-7 Universal Trigger Output Module (available through eBay).
Otherwise, the only way to watch a DVD video is to hook up the parking brake and foot brake wires per Alpine's instructions. The sequence that must be performed is to put your foot on the brake pedal, cycle your e-brake handle twice, then release the foot brake.
It's a good idea to make all the harness connections and solder the voltage regulator before getting into the actual install.
If you're going to wire in the TR-7, do it at the same time as the Metra harness.
The Metra harness color coded wires are a direct match with Alpine's.
Here are some reference pics before you get started.
Alpine main harness
Alpine video safety wires
Voltage Regulator
Voltage Regulator wiring: (edit 3/8/10)
INPUT: splice to both Blue/White wires on smaller Metra harness (wire all 3 wires together)
GROUND: splice to black chassis ground on Alpine harness
OUTPUT: to wire 28 of Alpine harness
Edit (3/8/10): Another option instead of the voltage regulator is getting a 1.5k resistor and solder it in-line between the remote turn-on wire of the headunit and the (2) blue/white wires of the Metra harness.
Either methods above will eliminate the amp turn-on 'pop' thru the front door subs.
TR-7 wiring:
Brown: Not used; tape off
Orange: Not used; tape off
Green: Alpine Blue/White (splice into the jumper wire that connects to both Alpine Blue/White wires. On the Shaker 500, one of them is not used)
Blue: Alpine Yellow/Black
White: Alpine Yellow/Blue (if installing a toggle switch (like me), install it between these two wires)
Red: switched 12V (can splice into Red wire of Alpine harness)
Black: splice into Black ground of Alpine harness
Metra harness:
Orange/White: Not used, tape off.
(For Shaker 500 owners) Plug the single 'Y' RCA end of adapter into the white RCA of the small Metra harness (leaving the red open). Opposite end of 'Y' will plug into the #24 RCA output (bottom one, both L&R) of the IVA-W205.
(For Shaker 1000 owners) Plug the Metra RCA's straight into #24 RCA output.
Edit (3/8/10): I have the Shaker 500 and plugged both RCA cables like the Shaker 1000 instruction above and it worked perfectly. Check playabilty before re-installing the headunit back into the dash.
Some baseline pictures
Wiring up the Metra harness to the Alpine harness
Note: I got my TR-7 after I did this, that's why you don't see it
Rear camera install and wiring
Open the rear decklid. Using your fingers, pop the plastic cover off from under the decklid. Route the 'anti-carjack' handle thru the cover and unplug the light harness.
Pull the end cap off the lock assembly.
Remove lock assembly
Mount camera
I copied hags1's excellent idea for the camera mount. See his post here for detailed lics of it.
Remove back lower seat
There's 2 plastic hook tabs, abound 8 inches in on both sides of the bottom seat cushion, just feel for them (where you see the 'U' cut out in the carpet). Press the tabs in and the rear lower seat will simply lift off. Carefully remove the lower seat from the car.
FYI: The silver bolt head you see in-between the center seat belts is where the UCA attaches.
Route the camera wires to the front
Note: If you want the camera to power up only when in Reverse, only route the yellow video cable to the front. If you want to control the on/off function of the camera, route both power and video cables to the front.
Note: The camera operates on 12V. Cut the plug off the end of the camera power cord. Pull wires apart to seperate. One wire will have a white dash, the other will have an ID stamp. The white dash wire is NEGATIVE, the ID wire is POSITIVE.
I followed the convoluted tubing under the trunk lid zip tieing the wire to it every several inches. The wiring was then routed behind the side carpet in the trunk and into the passenger side rear seat. All the excess length of camera wire I coil and stowed under the rear passenger seat. There's a circular cutout in the plastic moding on the underside of the seat. The coil fit there perfectly without buldging the seat cushion up.
I chose the direct route by going straight in the center of the tunnel under the carpet. Others choose to go to the sides and under the door sill. Since I was wiring the camera to my switch plate, the choice was obvious for me.
Getting the wiring under the carpet is a bit tricky. The factory used a lot adhesive, but managed to get wiggle thru some mechanical fingers to grab the wires to pull through.
Reinstall rear seat
After the camera wires are routed to the front, reinstall the lower seat. Install is in reverse order, just make sure the rear hooks into the black square rings in back.
Alpine Installation
Follow the following removal directions to gain access to the center dash from my amplified antenna install all the way until the A-pillar removal.
Ready the head unit for installation by installing the Metra dash kit along with the 2 large side supports (use 2 screws minimum, 3 preferred). I flush mounted mine to the dash kit bezel, but becareful! If you go too far in or if you don't leave enogh of a gap between the top of the HU and bezel, the screen won't be able to flip open (I know this from experience!).
This is where we jump ahead a bit in fast forward...
Connect both the Metra harnesses to the Ford factory harnesses.
Note: 1 Ford plug will remain open; not used.
Make sure the TR-7 switch is set to 'OFF'. The 'ON' feature is for programming only!
Position the Alpine close the dash and connect the alpine harness (which now should be plugged into the Ford harness via the Crutchfield harness). The Voltage Regulator and TR-7 should already be inside the dash opening at this point.
Connect the rear camera video (use the RCA to BNC adapter that's included with the kit) to the yellow video RCA input on the back of the Alpine (#17 on diagram).
Connect antenna jack.
Connect the RCA's from Metra harness for subwoofers (#24 on diagram).
Secure the Alpine with the 4 mounting screws.
Power up the Alpine and make sure it plays. Also check function of the flip out screen to ensure it's not interfering with anything.
The TR-7 will automatically pulse the correct signal sequence to the Alpine, so you should be able to play a DVD movie at this point.
To check the camera, make sure it's powered up. You'll have to turn on the camera feature through the settings function to enable it. Consult the Alpine user manual for this.
Once everything is verified, reinstall the rest of the center dash and center console in reverse order. Do not forget to plug back in all the center dash electrical connections, including the 2 behind the climate control.
Installation complete!
Last edited by TacoBill; Mar 8, 2010 at 08:18 AM.


GT Member
Joined: August 28, 2005
Posts: 156
Likes: 1
From: Deltona FL.
Bill
I can't believe you didn't take 1 picture of the backup camera be fore you installed it!!!! Just kidding so is it tapered on the end or was it just straight? Did you mount just like hags 1? I should get mine tomorrow. Can't you cut the cable that comes with the camera and just put a new end on it?
Chip
I'm not sure about cutting that video cable. I thought about it, but found it easier to just coil and stow it under the rear seat.
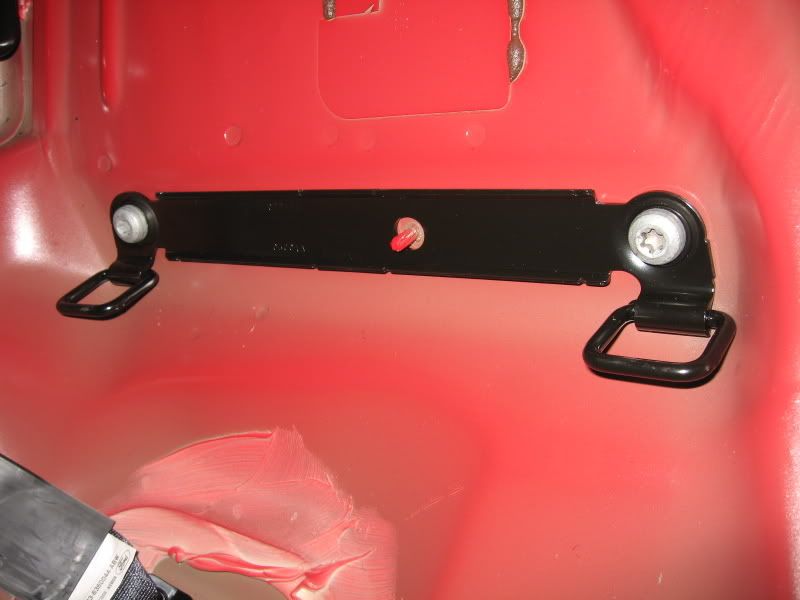
I got through making the final adjustments on my rear cam this afternoon.
Bracket looks unfinished and I even thought of painting it black, but ehh, it's completely not visible once the cover is in place.
Also got a better shot of the cam in action, this thing is pretty clear (you can see the Taco on the left)!
Bracket looks unfinished and I even thought of painting it black, but ehh, it's completely not visible once the cover is in place.
Also got a better shot of the cam in action, this thing is pretty clear (you can see the Taco on the left)!

Member
Joined: August 12, 2007
Posts: 1
Likes: 0
bill u r a mustang modding god!! i put my new head unit in friday night and i couldn't figure out why the speakers popped on turn on. i scour the internet that night and wouldn't sleep till i found it (persistance, stubbornness, or both) and around 3 in the morning i find this website along with this guide and your suggestion with the voltage regulator. suffice to say, worked like a charm!! me and my speakers thank you!
of course i still have to do the parking brake thing, but dual isn't as crazy as alpine, they only provide one wire to the e-brake and its a simple sequence, i'll probably just wire it the correct way, who knows
of course i still have to do the parking brake thing, but dual isn't as crazy as alpine, they only provide one wire to the e-brake and its a simple sequence, i'll probably just wire it the correct way, who knows
Mach 1 Member
Joined: October 18, 2004
Posts: 543
Likes: 2
From: Antwerp, Belgium
bill u r a mustang modding god!! i put my new head unit in friday night and i couldn't figure out why the speakers popped on turn on. i scour the internet that night and wouldn't sleep till i found it (persistance, stubbornness, or both) and around 3 in the morning i find this website along with this guide and your suggestion with the voltage regulator. suffice to say, worked like a charm!! me and my speakers thank you!
of course i still have to do the parking brake thing, but dual isn't as crazy as alpine, they only provide one wire to the e-brake and its a simple sequence, i'll probably just wire it the correct way, who knows
of course i still have to do the parking brake thing, but dual isn't as crazy as alpine, they only provide one wire to the e-brake and its a simple sequence, i'll probably just wire it the correct way, who knows

Bullitt Member
Joined: January 7, 2007
Posts: 367
Likes: 0
Wow, lots of stuff is missing
I'm amazed at the amount of stuff that was lost from the crash...
Anyway,
Bill,
The link for the camera install is gone, so I have a question. I recently did my install and had 2 issues.
Chad
Anyway,
Bill,
The link for the camera install is gone, so I have a question. I recently did my install and had 2 issues.
- What did you use to seal the camera to the trunk. I actually used a rubber washer that you use to put in a faucet handle. You know the one that is shaped like this /\ I took off the lens cover and this fit perfect. It's actually installed with the angle side facing the camera.
- Next issue. Because I used this and had to tilt the camera down due to the angle of the trunk, the rubber has a gap on the top part from the camera stretching in places it isn't meant to.
Chad
- What did you use to seal the camera to the trunk. I actually used a rubber washer that you use to put in a faucet handle. You know the one that is shaped like this /\ I took off the lens cover and this fit perfect. It's actually installed with the angle side facing the camera.
- Next issue. Because I used this and had to tilt the camera down due to the angle of the trunk, the rubber has a gap on the top part from the camera stretching in places it isn't meant to.
2. Not sure what the solution is for you about the gap. Maybe some black RTV?
Mach 1 Member
Joined: November 3, 2005
Posts: 566
Likes: 0
From: Cary, NC
Thanks, Bill. Thought so, but never used one so wasn't sure. You like it better than soldering? Does it hold up pretty well? I pretty much suck at soldering, so if this is easier and close to as strong, I may go buy one.
Bullitt Member
Joined: October 16, 2004
Posts: 474
Likes: 0
From: HB, CA
I got through making the final adjustments on my rear cam this afternoon.
Bracket looks unfinished and I even thought of painting it black, but ehh, it's completely not visible once the cover is in place.
Also got a better shot of the cam in action, this thing is pretty clear (you can see the Taco on the left)!
Bracket looks unfinished and I even thought of painting it black, but ehh, it's completely not visible once the cover is in place.
Also got a better shot of the cam in action, this thing is pretty clear (you can see the Taco on the left)!
Also - your avatar...
 More please.
Tommy, I had my brother-in-law fab that bracket from scrap metal, sort of like 'bend to fit'.
It's modeled off a design from the originator of the rear deck cam, hawgman over at S197F.
IMPORTANT UPDATES POSTED IN POST 1, CHANGES ARE IN RED.
Thanks to Robbie (Robbieg) for the clarification on the voltage regulator hookup..
To hook this up you need 3 pieces of wire. The regulator has 3 prongs on it input-ground-output. Solder a small length of wire to each lead and then tape or shrink wrap each one. now take the regulator with the wires attached to the car and you will hook up the ground to GROUND, the OUTPUT to the D3's system remote lead(amp turn on) and the INPUT to the amp lead on the car. This will make it power on the amps with no pop's or noise, it works perfect.
Last edited by TacoBill; Mar 8, 2010 at 08:24 AM. Reason: See Post 1 for edits.