2008 Mustang GT carputer install (warning: many pics)
#1
Thread Starter
Joined: May 31, 2007
Posts: 1,201
Likes: 0
From: Washington DC Metro Area
2008 Mustang GT carputer install (warning: excessive number of pics)
Did this in December, but was too busy to take final pics & post until now..
Carputer install:
Design: 1 day, Carputer chassis: 1 weekend, Dash fabrication: 1 weekend, Install: 1 weekend, Software: 1 weekend
Features:
* Old desktop computer: AMD 3500+, 2GB RAM, 160GB HD, Radeon X850 XT 256MB.
* 7" Touchscreen LCD, DVD player/burner, HD Radio, GPS navigation, Sprint broadband wireless internet, OBD-ii through Xcal2, Backup cam, Front cam, Roadrunner front end on WinXP
* Stock Shaker500 door subs & amps, cheap aftermarket amp powering stock speakers, Alpine Type-X 12" sub & Alpine PDX-1.1000 amp in the trunk
Credits:
Inspiration: Hessian. Thanks to your writeup on the bondo fabrication, I decided to learn how to do it myself. Link to Hessian's CarPC thread.
Backup cam: Hags1. Thanks for the great writeup on the keyhole backup cam and idea for bending a piece of metal for the camera mount. Link to his thread.
Video(s):
Front cam video (camera in driver side sun visor):

Before:

After:

External USB port in cig lighter location:

Custom Windows bootup screen:

Desktop:

RoadRunner interface:

HD Radio:

GPS (iGuidance 4):

Weather (Haha yes, I can look out the window, but this comes in handy when I'm making a quick decision on whether or not to wash my car, or plan an oil change.. also good to know when it's going to snow so you can leave your wipers up):

Backup cam (power to camera wired to backup light):

Futurama:

SCT XCal2 permanently connected via USB to show engine stats, etc (currently graphing coolant temp and intake temp):

Internet / TMS:

SCT Xcal2 accessible from glove box:

SCT Xcal2 stowed away in glove box:

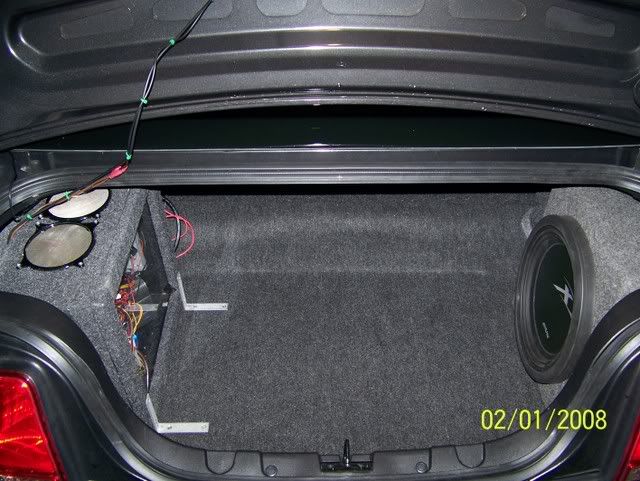
Trunk (carputer on left, amp rack in center, Alpine Type-X 12" in Scosche Mustang enclosure on right):

Trunk at night:

Carputer at night:

Backup camera in trunk keyhole location:

BU-353 USB Weatherproof magnetic GPS receiver (on quarter panel):

Front camera (can you spot it? - it's mounted to the sun visor)
Carputer install:
Design: 1 day, Carputer chassis: 1 weekend, Dash fabrication: 1 weekend, Install: 1 weekend, Software: 1 weekend
Features:
* Old desktop computer: AMD 3500+, 2GB RAM, 160GB HD, Radeon X850 XT 256MB.
* 7" Touchscreen LCD, DVD player/burner, HD Radio, GPS navigation, Sprint broadband wireless internet, OBD-ii through Xcal2, Backup cam, Front cam, Roadrunner front end on WinXP
* Stock Shaker500 door subs & amps, cheap aftermarket amp powering stock speakers, Alpine Type-X 12" sub & Alpine PDX-1.1000 amp in the trunk
Credits:
Inspiration: Hessian. Thanks to your writeup on the bondo fabrication, I decided to learn how to do it myself. Link to Hessian's CarPC thread.
Backup cam: Hags1. Thanks for the great writeup on the keyhole backup cam and idea for bending a piece of metal for the camera mount. Link to his thread.
Video(s):
Front cam video (camera in driver side sun visor):

Before:

After:

External USB port in cig lighter location:

Custom Windows bootup screen:

Desktop:

RoadRunner interface:

HD Radio:

GPS (iGuidance 4):

Weather (Haha yes, I can look out the window, but this comes in handy when I'm making a quick decision on whether or not to wash my car, or plan an oil change.. also good to know when it's going to snow so you can leave your wipers up):

Backup cam (power to camera wired to backup light):

Futurama:

SCT XCal2 permanently connected via USB to show engine stats, etc (currently graphing coolant temp and intake temp):

Internet / TMS:

SCT Xcal2 accessible from glove box:

SCT Xcal2 stowed away in glove box:

Trunk (carputer on left, amp rack in center, Alpine Type-X 12" in Scosche Mustang enclosure on right):

Trunk at night:

Carputer at night:

Backup camera in trunk keyhole location:

BU-353 USB Weatherproof magnetic GPS receiver (on quarter panel):

Front camera (can you spot it? - it's mounted to the sun visor)

#2
Thread Starter
Joined: May 31, 2007
Posts: 1,201
Likes: 0
From: Washington DC Metro Area
Chassis construction
Weekend 1: Design & Carputer chassis construction
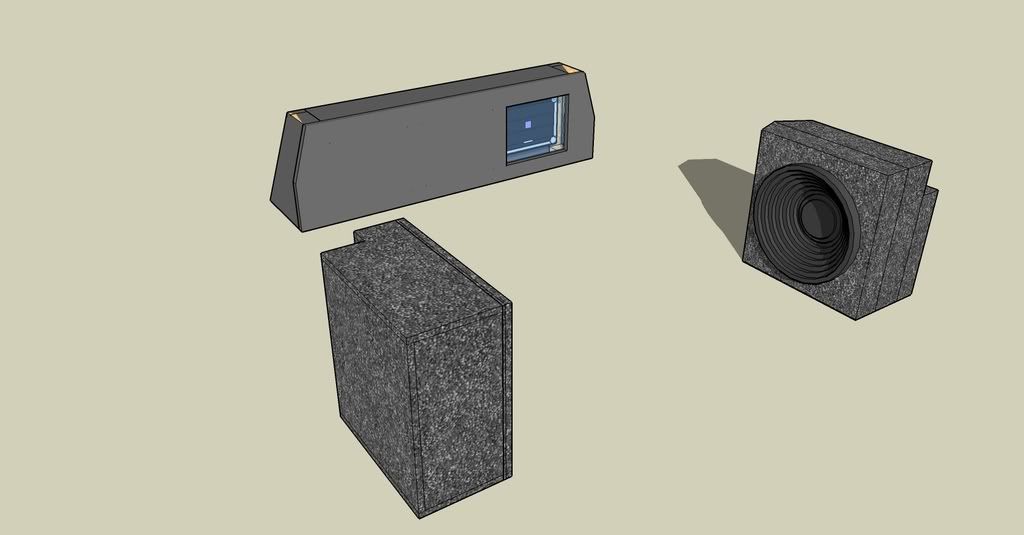
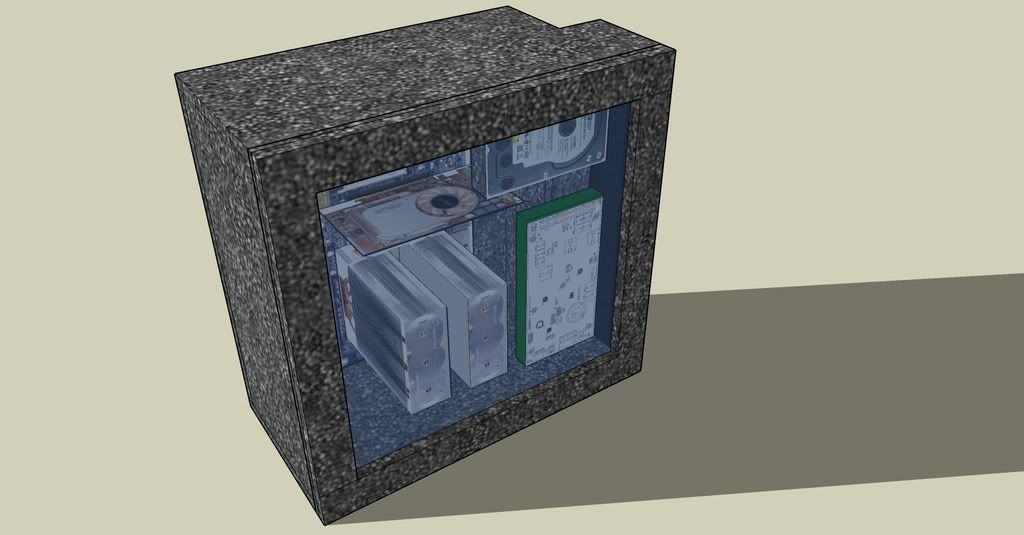
Design (made in Google sketch.. these are to scale and the computer models were used to size the MDF pieces):
Weekend 1: Computer chassis construction
Dremel circle cutter tool for 120mm fan holes:

Dowels + wood glue to attach MDF pieces:

Allow to dry and sand:

5 coats of primer:

5 coats of black paint on interior surfaces:

Dry:

Dremel metal cutoff tool to hack apart brand new computer case ($20 on craigslist):

Salvage motherboard plate from case, mount onto painted MDF board:

Install motherboard:

Connect all components using desktop power supply to install operating system & software:

Install into chassis:

3M spray on adhesive + trunk carpet:

This carpet + 3M adhesive is really easy to work with.. looks ugly now, but...

Cut some fan holes:

Make sure rear motherboard panel is removable, guard is in place to prevent 3M adhesive from making the rear panel permenant:

In the end, it looks good:

Front (before lexan/plexiglass cover):

Route mess of wires into carputer chassis:

Design (made in Google sketch.. these are to scale and the computer models were used to size the MDF pieces):


Weekend 1: Computer chassis construction
Dremel circle cutter tool for 120mm fan holes:

Dowels + wood glue to attach MDF pieces:

Allow to dry and sand:

5 coats of primer:

5 coats of black paint on interior surfaces:

Dry:

Dremel metal cutoff tool to hack apart brand new computer case ($20 on craigslist):

Salvage motherboard plate from case, mount onto painted MDF board:

Install motherboard:

Connect all components using desktop power supply to install operating system & software:

Install into chassis:

3M spray on adhesive + trunk carpet:

This carpet + 3M adhesive is really easy to work with.. looks ugly now, but...

Cut some fan holes:

Make sure rear motherboard panel is removable, guard is in place to prevent 3M adhesive from making the rear panel permenant:

In the end, it looks good:

Front (before lexan/plexiglass cover):

Route mess of wires into carputer chassis:

#3
Thread Starter
Joined: May 31, 2007
Posts: 1,201
Likes: 0
From: Washington DC Metro Area
Dash fabrication
Weekend 2: Dash fabrication
Obtain Xenarc 7" touchscreen LCD:

Rip it apart:

OEM dash and LCD plastic case need to become one:

Also, DVD ROM drive needs to be integrated:

Epoxy to hold pieces in place, some Dynotron plastic bumper repair kit to fill in the gaps:

Alot of dynotron:

Sand, reapply dynotron to fill in bubbles:

Repeat above about 4-5 times. I was in a hurry, but if you want to do it right (version 2.0 for me), you will probably want to repeat about 10+ times to get a perfect surface.
Primer, sand, primer sand, primer sand, paint sand, paint:

This dash could look alot better.. there are alot of imperfections and it doesn't look very OEM. If I had the time to do it properly the first time around, I would have done more rounds of dynotron/sanding before applying primer/paint. I have a "real" dash planned in the future, that I will take my time on now that I have this placeholder dash that works for now.
Obtain Xenarc 7" touchscreen LCD:

Rip it apart:

OEM dash and LCD plastic case need to become one:

Also, DVD ROM drive needs to be integrated:

Epoxy to hold pieces in place, some Dynotron plastic bumper repair kit to fill in the gaps:

Alot of dynotron:

Sand, reapply dynotron to fill in bubbles:

Repeat above about 4-5 times. I was in a hurry, but if you want to do it right (version 2.0 for me), you will probably want to repeat about 10+ times to get a perfect surface.
Primer, sand, primer sand, primer sand, paint sand, paint:

This dash could look alot better.. there are alot of imperfections and it doesn't look very OEM. If I had the time to do it properly the first time around, I would have done more rounds of dynotron/sanding before applying primer/paint. I have a "real" dash planned in the future, that I will take my time on now that I have this placeholder dash that works for now.
#4
Thread Starter
Joined: May 31, 2007
Posts: 1,201
Likes: 0
From: Washington DC Metro Area
Final install
Weekend 3: Installation
Stick everything in there.. when I originally did this I left a mess of wires and it was actually difficult squeezing my LCD into there:

I re-arranged the wires and did some cable management yesterday.. much better now:

This mess of wires was hard to fit under the door sill panel (1 insulated VGA, 1 USB, 2 RCA's, 1 microphone, 8 speaker level wires):

Route wires under rear seats:

Cut aluminum rectangle with jigsaw:

Bent into rough shape and rough holes drilled into it.. this is very rough, I used my fingers to measure:

Camera mounted in bracket:

Backup camera installed in GT emblem / keyhole: (Thanks hags1 for the idea and writeup)

It is done.
Screen-grab of main menu:

Stick everything in there.. when I originally did this I left a mess of wires and it was actually difficult squeezing my LCD into there:

I re-arranged the wires and did some cable management yesterday.. much better now:

This mess of wires was hard to fit under the door sill panel (1 insulated VGA, 1 USB, 2 RCA's, 1 microphone, 8 speaker level wires):

Route wires under rear seats:

Cut aluminum rectangle with jigsaw:

Bent into rough shape and rough holes drilled into it.. this is very rough, I used my fingers to measure:

Camera mounted in bracket:

Backup camera installed in GT emblem / keyhole: (Thanks hags1 for the idea and writeup)

It is done.

Screen-grab of main menu:

#8
Thread Starter
Joined: May 31, 2007
Posts: 1,201
Likes: 0
From: Washington DC Metro Area
Thanks for the feedback guys.. this is probably the one thing I've put the most effort into in my entire life (mostly because of the tight schedule I set for myself).
I thought I was done messing with electronics for at least a year or so, but now Deric came up with the great idea of replacing the stock LEDs.. and now.. it must be done. Argh!
I thought I was done messing with electronics for at least a year or so, but now Deric came up with the great idea of replacing the stock LEDs.. and now.. it must be done. Argh!
#13
Looks Good. Thanks for the link on the camera install. I had thought about putting one in there. I'm getting ready to do the same thing exept I'm going for a Mini-ITX install to replace the headunit. How do you like the monitor? Is it readable much during the day?
Edit: Also put that GPS reciever under the carpet in the back window area. There is a nice recessed spot that it should fit great in. Several people have done it and have no reception issues that I know of.
Edit: Also put that GPS reciever under the carpet in the back window area. There is a nice recessed spot that it should fit great in. Several people have done it and have no reception issues that I know of.
#15
Thread Starter
Joined: May 31, 2007
Posts: 1,201
Likes: 0
From: Washington DC Metro Area
Good idea. Yeah, the CPU heatsink worries me too, it's already oversized to begin with. I can't find a good way to reinforce it. I think I'm just going to buy a standard size heatsink that has a fan.. (I have no use for a giant passive/quiet CPU cooler in a trunk-PC..)
#16
Thread Starter
Joined: May 31, 2007
Posts: 1,201
Likes: 0
From: Washington DC Metro Area
Looks Good. Thanks for the link on the camera install. I had thought about putting one in there. I'm getting ready to do the same thing exept I'm going for a Mini-ITX install to replace the headunit. How do you like the monitor? Is it readable much during the day?
Edit: Also put that GPS reciever under the carpet in the back window area. There is a nice recessed spot that it should fit great in. Several people have done it and have no reception issues that I know of.
Edit: Also put that GPS reciever under the carpet in the back window area. There is a nice recessed spot that it should fit great in. Several people have done it and have no reception issues that I know of.
Monitor: Xenarc 700TSV. It's good - I actually originally bought a Lilliput, but then realized that it is IMPOSSIBLE to get a true native resolution of 800x480 on the Lilliput (As in, most pixels seem 1:1, but maybe every 5th pixel is "off"). The Xenarc requires some witchcraft/trickery to pull off 1 pixel = 1 pixel native resolution, but it is possible and their website specifies the exact settings (scan rates, signal up/down times, witchcraft like that). So basically what this means is that if you make your background into a checkerboard of black/white dots that are 1 pixel in size, with the Xenarc you will be able to make out every pixel after configuring it, but the Lilliput has no known solution and will lose some pixels and produce Moire interference patterns.
Sun-light readability: Average. I do not have issues operating it during the day, but it does look a whole lot dimmer. I don't run the monitor at full brightness/contrast to maintain image quality, but it is possible to make it very bright in the sunlight by turning those settings up, but you sacrifice colors. However, given that, I think this is still the best solution out there for a touchscreen for under $400. mp3car.com will modify your xenarc with a transreflective coating to make it sunlight readable for a few hundred bucks. Disclaimer: I have 20% tints on my windows - this helps with daytime visibility..
GPS under carpet: Good idea, I'll try that. I also have a sprint wireless internet dongle resting on my rear deck.. I'll try sticking that under the carpet too..
#17
Good idea. Yeah, the CPU heatsink worries me too, it's already oversized to begin with. I can't find a good way to reinforce it. I think I'm just going to buy a standard size heatsink that has a fan.. (I have no use for a giant passive/quiet CPU cooler in a trunk-PC..)
Scythe Mini or one of the Zalman setups that stay down low to the board. Then there's no worries. I've used pretty much every one of the Zalman products, there ain't a bad one in the bunch, and the Mini has reviewed REAL well.
#18
Thread Starter
Joined: May 31, 2007
Posts: 1,201
Likes: 0
From: Washington DC Metro Area
More on Lilliput vs Xenarc:
Lilliput: made in china, support numbers all in china. People report that the support staff is really friendly and they WANT/TRY to help, but due to their poor english, nothing is ever resolved. Also the call is long distance. To china. So basically, no support. And you can't run native resolution.. But $100 cheaper.
Xenarc: made in USA, support numbers in USA. Great product, great support - you get what you pay for. They monitors are similar in specs and features - but for any display that "matters" or that will be displaying text, I recommend the Xenarc (Lilliput would be good as a secondary display that only shows movies/pictures/etc).
Disclaimer again: I don't care about USA vs foreign - I just buy the best product or the best deal..
#19
Thread Starter
Joined: May 31, 2007
Posts: 1,201
Likes: 0
From: Washington DC Metro Area
 . I might just move back to the stock heatsink/fan, or something that looks like the stock heatsink that's somewhat more efficient..


