
How I Deleted my Spoiler

Mach 1 Member
Joined: October 13, 2004
Posts: 985
Likes: 6
Yes. I painted plugs prior to installation.
Yes. I used superglue on the bottom of the plugs. You may want to get other opininions on this. There is probably a smarter/better way.
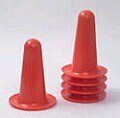
The ones I got had circular gill-like flaps around the shaft of the plug. The attached picture looks nothing like my hole plugs, but image the shaft of the plug having the look of the ones on the right. Hope that makes sense.
Even without the superglue, they wouldn't just fall out. You would need to really pull on them
I have no idea how the 05+ holes compare to the 96 holes.
Yes. I used superglue on the bottom of the plugs. You may want to get other opininions on this. There is probably a smarter/better way.
The ones I got had circular gill-like flaps around the shaft of the plug. The attached picture looks nothing like my hole plugs, but image the shaft of the plug having the look of the ones on the right. Hope that makes sense.
Even without the superglue, they wouldn't just fall out. You would need to really pull on them
I have no idea how the 05+ holes compare to the 96 holes.
the 05+ holes have 2 different sizes. the plugs are 3/8 inch hole plugs (they are white to begin with). 2 holes are perfect and 2 have to be enlarged. I recommend using a dremmel to enlarge them. I will post pics this evening of the plugs I am using. I used the pen type with the brush from ford and a can of clearcoat that is used on wheels. They dont require any glue as they are designed to "clip" in. (it is evident how they clip by seeing them).
GTR Member
Joined: April 20, 2005
Posts: 4,660
Likes: 2
From: Tampa,FL
[quote=RUgoinUp?;842147]I'd be glad to lend a hand, Chuck. However, I am confident that you could DIY with a forum How-To and some pics. That's how I got started wrenching on cars 4 years ago.
Off-topic, my 100th post. Cool
Bullitt Member
Joined: October 15, 2004
Posts: 383
Likes: 0
The plugs would then look different on the trunk lid. One hole is also more oval shaped, so you have to round it out. and yes I drilled the smaller holes larger so the same size plugs fit. with a dremmel it is very easy.
Here is a photo of my trunk lid with hole plugs.

Bullitt Member
Joined: October 15, 2004
Posts: 383
Likes: 0
these are the hole plugs I used, 3/8 nch hole plugs from lowes, 1.04 for a pkg of 2. Sorry it is so big, I cant figure out how to make it smaller. I tried to resize it on photo bucket but when I paste it it doesnt get any smaller.

Bullitt Member
Joined: April 25, 2005
Posts: 389
Likes: 0
From: Plant City, FL
The tape got me thinking, though. Now I'm looking for a very thin piece of metal, preferably aluminum with very thin adhesive on the back. I will cut this into small circles like JohnMichael did with the tape. Paint them to match and stick them on. I think they will be less conspicuous than the plugs and less prone to indentations than the tape. It’s on my very long list of ‘things to do’.
Legacy TMS Member
Joined: November 13, 2005
Posts: 2,193
Likes: 46

Cobra R Member
Joined: February 25, 2004
Posts: 1,796
Likes: 0
i personally wouldnt rock a car with a tacked on plasticy, ugly tall spoiler that didnt have any positive affect on the aero of my car.
i was just lucky enough to have the ability to order mine with spoiler delete from the factory
Legacy TMS Member
Joined: November 13, 2005
Posts: 2,193
Likes: 46
i hear you, but everyone has their own thing
i personally wouldnt rock a car with a tacked on plasticy, ugly tall spoiler that didnt have any positive affect on the aero of my car.
i was just lucky enough to have the ability to order mine with spoiler delete from the factory
i personally wouldnt rock a car with a tacked on plasticy, ugly tall spoiler that didnt have any positive affect on the aero of my car.
i was just lucky enough to have the ability to order mine with spoiler delete from the factory
Thread Starter
Bullitt Member
Joined: August 6, 2006
Posts: 451
Likes: 0
As previously mentioned, it's only temporary. A new spoiler is coming as soon I choose the one I want.
Since I like these types of projects, I simply could not overcome the temptation to get rid of the spoiler ASAP. Plus I grew tired of the rear view obstruction it posed.
BTW, it only cost me 25 "stacks" out-the-door.
Chuck, LMK when you want to tackle the covers.
Since I like these types of projects, I simply could not overcome the temptation to get rid of the spoiler ASAP. Plus I grew tired of the rear view obstruction it posed.
BTW, it only cost me 25 "stacks" out-the-door.
Chuck, LMK when you want to tackle the covers.

Mach 1 Member
Joined: June 17, 2005
Posts: 900
Likes: 0
As previously mentioned, it's only temporary. A new spoiler is coming as soon I choose the one I want.
Since I like these types of projects, I simply could not overcome the temptation to get rid of the spoiler ASAP. Plus I grew tired of the rear view obstruction it posed.
BTW, it only cost me 25 "stacks" out-the-door.
Chuck, LMK when you want to tackle the covers.
Since I like these types of projects, I simply could not overcome the temptation to get rid of the spoiler ASAP. Plus I grew tired of the rear view obstruction it posed.
BTW, it only cost me 25 "stacks" out-the-door.
Chuck, LMK when you want to tackle the covers.
Mach 1 Member
Joined: October 13, 2004
Posts: 985
Likes: 6
I don't plan on going back (after deleting) so I guess I don't have a problem drilling to make the holes the same size. Even then if I needed to re-install the stock spoiler it shouldn't be a problem.
This is very doable and I'd rather delete the spoiler than put another spoiler on that I kinda like when I really don't want one at all. Also I'd rather do this and avoid the costs of filling and painting and move on to better uses for the $$$ like a shifter!
Thanks for the info and the pics!

Bullitt Member
Joined: October 17, 2005
Posts: 245
Likes: 0
when i had my 99 i didnt even plug the holes (passed on the way of the redneck and took the ghetto approach) water never got in. not sure if the trunk on the 05+s have the same design though. regardless it looks good. i am a big fan of the spoiler deletion
Thread Starter
Bullitt Member
Joined: August 6, 2006
Posts: 451
Likes: 0
On that note, I just went to the auto parts store w/ my son to pick up a red brake caliper paint kit, and some older gent complimented the car and said he had never seen one in red.

Bullitt Member
Joined: October 15, 2004
Posts: 383
Likes: 0
That looks phenomenal!
I don't plan on going back (after deleting) so I guess I don't have a problem drilling to make the holes the same size. Even then if I needed to re-install the stock spoiler it shouldn't be a problem.
This is very doable and I'd rather delete the spoiler than put another spoiler on that I kinda like when I really don't want one at all. Also I'd rather do this and avoid the costs of filling and painting and move on to better uses for the $$$ like a shifter!
Thanks for the info and the pics!
Team Mustang Source
Joined: September 27, 2004
Posts: 964
Likes: 6
So how are your DIY spoiler deletes holding up?
Anyone else try this yet? Any suggestions from those who've done this?
I'm thinking of giving this a shot. My ducktail, louvers are in but I have to get them painted and installed. So I figured I'd get a head start and remove the stock spoiler.
Anyone else try this yet? Any suggestions from those who've done this?
I'm thinking of giving this a shot. My ducktail, louvers are in but I have to get them painted and installed. So I figured I'd get a head start and remove the stock spoiler.
Dethroned Nascar Guru
Joined: January 30, 2004
Posts: 10,059
Likes: 2
My DIY has been on since 2002. As I indicated above, I should have more coats on the hole fillers, but I've had no issues with the plugs themselves. Plus you can always put the spoiler back on if you change your mind.

Thread Starter
Bullitt Member
Joined: August 6, 2006
Posts: 451
Likes: 0
Thanks. Mine looks just as good as day 1, and not a drop of water inside. I recently taped over the duct tape with red tape so it didn't look tacky when the trunk was lifted.
It looks even better now that I lowered it (Roush rears), painted the calipers red, and added white Roush racing stripes. Tomorrow I'm ordering my painted Roush spoiler. The spoiler delete was nice while it lasted.
It looks even better now that I lowered it (Roush rears), painted the calipers red, and added white Roush racing stripes. Tomorrow I'm ordering my painted Roush spoiler. The spoiler delete was nice while it lasted.