Fresh Mods Installed - LOTS of Pics & a Mini Walkthru!!
 11/16/09, 09:46 PM
#1
GT Member
Thread Starter
Join Date: October 24, 2009
Location: FL
Posts: 115
Likes: 0
Received 0 Likes
on
0 Posts
Fresh Mods Installed - LOTS of Pics & a Mini Walkthru!!
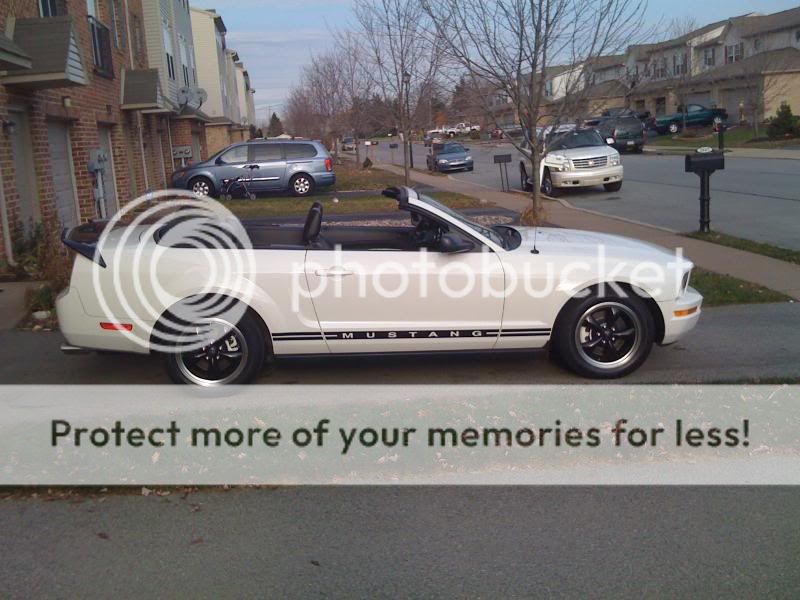
This is kinda long because I figured I'd do a mini write up for those of you out there thinking about installing the Roush spoiler. After doing this I'm so glad I didn't pay a shop $200 to drill a few holes and mount it. Once you use the center punch to mark the holes and drill the first hole all of the stress is gone and the whole process is done quickly after that. I would recommend having another set of hands around to help with some of the steps. My fiancee was my extra set of hands and she did a great job. I also installed Spectre Speed Reusable Air Filter. What do you guys think of my handy work? Thanks for reading!!
2010 GT Take Off Mufflers...
Picked Up

Prep Work Done...

2 Coats Of Primer

2 Coats of Rustoleum Rust Proof 2000 Degree Paint

Tape Removed...

Side By Side Comparison w/v6 Stock Muffler

I'll post more pics tomorrow when I get some sun...I'm very impressed with the difference in sound.
On to the next mod.....
Roush Spoiler Install - My Attempt at a mini walkthru
Stock Spoiler

Step #1 - Remove Stock Spoiler and Clean Rear Decklid(Use Goo Gone followed by good ol' soap & water)

Step #2 - This is optional, but I had a ton of water spots under my factory spoiler, so I used a Clay Bar after cleaning off the gunk(If you do this be sure to go over the area that was clayed with a wax of your choice to ensure paint is protected. I used Megs Quick Spray Wax and a soft microfiber towel)
Water Spots

Clay Bar Kit

After Using Clay Bar Kit

Step #3 - Cut Out Center Template and Align it using pre-existing holes. FWIW it won't be exactly centered using the holes, which is fine, because you will be widening the factory spoiler holes. Once you're happy tape the template down.

Step #4 - Cut Out the templates for the two side pieces and line them up using the center template as a guide. Once you are happy with placement secure in place with tape.

Step #5 - Once the templates are secure use a Automatic Center Punch to mark the center of the 10 holes to be drilled. now for the hard part....this will bring most of you to tears. This is why i don't have any pics of this part :icon_frown:
Step #6 - Drilling Additional Mounting Holes
- Use 1/8" bit to start all holes(When drilling in the center be sure to go through the underlying support
- Center Spoiler Mounts - Widen all holes with a 7/16" bit
- Side Spoiler Mounts - Widen the 1/8" Holes with a 5/16" bit
Step #7 - Do a test fit to ensure everything is lining up properly and fits to your liking.(Tip - This helped me out later in the process. Instead of using a 5/16" bit for the sides I used a 7/16" bit so I could have room to adjust the sides. Doing this will give you a little wiggle room later for making adjustments prior to tightening everything down)

Step #8 - Assuming you are ok with the test fitting remove the templates and discard.

Step #9 - Apply Rust Inhibitor to all of the holes to prevent possible rusting of exposed metal

Step #10 - Apply tape and foam pads to underside of spoiler per Roush instructions(Center only shown)

Step #11 - Conduct another test fitting prior to removing tape backing. Once you are satisfied remove tape backing and lightly press center into place.
Step #12 - Per instructions place and tighten all nuts & bolts.

Step #13 - Step back and take some photos...admire the hard work and the tears you shed after drilling into your car!!!

2010 GT Take Off Mufflers...
Picked Up
Prep Work Done...
2 Coats Of Primer
2 Coats of Rustoleum Rust Proof 2000 Degree Paint
Tape Removed...
Side By Side Comparison w/v6 Stock Muffler
I'll post more pics tomorrow when I get some sun...I'm very impressed with the difference in sound.
On to the next mod.....
Roush Spoiler Install - My Attempt at a mini walkthru
Stock Spoiler
Step #1 - Remove Stock Spoiler and Clean Rear Decklid(Use Goo Gone followed by good ol' soap & water)
Step #2 - This is optional, but I had a ton of water spots under my factory spoiler, so I used a Clay Bar after cleaning off the gunk(If you do this be sure to go over the area that was clayed with a wax of your choice to ensure paint is protected. I used Megs Quick Spray Wax and a soft microfiber towel)
Water Spots
Clay Bar Kit
After Using Clay Bar Kit
Step #3 - Cut Out Center Template and Align it using pre-existing holes. FWIW it won't be exactly centered using the holes, which is fine, because you will be widening the factory spoiler holes. Once you're happy tape the template down.
Step #4 - Cut Out the templates for the two side pieces and line them up using the center template as a guide. Once you are happy with placement secure in place with tape.
Step #5 - Once the templates are secure use a Automatic Center Punch to mark the center of the 10 holes to be drilled. now for the hard part....this will bring most of you to tears. This is why i don't have any pics of this part :icon_frown:
Step #6 - Drilling Additional Mounting Holes
- Use 1/8" bit to start all holes(When drilling in the center be sure to go through the underlying support
- Center Spoiler Mounts - Widen all holes with a 7/16" bit
- Side Spoiler Mounts - Widen the 1/8" Holes with a 5/16" bit
Step #7 - Do a test fit to ensure everything is lining up properly and fits to your liking.(Tip - This helped me out later in the process. Instead of using a 5/16" bit for the sides I used a 7/16" bit so I could have room to adjust the sides. Doing this will give you a little wiggle room later for making adjustments prior to tightening everything down)
Step #8 - Assuming you are ok with the test fitting remove the templates and discard.
Step #9 - Apply Rust Inhibitor to all of the holes to prevent possible rusting of exposed metal
Step #10 - Apply tape and foam pads to underside of spoiler per Roush instructions(Center only shown)
Step #11 - Conduct another test fitting prior to removing tape backing. Once you are satisfied remove tape backing and lightly press center into place.
Step #12 - Per instructions place and tighten all nuts & bolts.
Step #13 - Step back and take some photos...admire the hard work and the tears you shed after drilling into your car!!!
 11/16/09, 10:00 PM
#3
Cobra Member
Join Date: September 9, 2009
Location: Tulsa OK
Posts: 1,465
Likes: 0
Received 0 Likes
on
0 Posts
nice. man id really like to know if theres a difference between the '10 GT mufflers and 05 GT mufflers. anyways im sure ur car sounds more aggressive  is that the color u chose the have the spoiler painted or are u eventually going to paint it the color of the car? (might be a stupid question judging the obvious clearcoat shine)
is that the color u chose the have the spoiler painted or are u eventually going to paint it the color of the car? (might be a stupid question judging the obvious clearcoat shine)
11/16/09, 10:12 PM
#4
GT Member
Thread Starter
Join Date: October 24, 2009
Location: FL
Posts: 115
Likes: 0
Received 0 Likes
on
0 Posts
nice. man id really like to know if theres a difference between the '10 GT mufflers and 05 GT mufflers. anyways im sure ur car sounds more aggressive is that the color u chose the have the spoiler painted or are u eventually going to paint it the color of the car? (might be a stupid question judging the obvious clearcoat shine)
is that the color u chose the have the spoiler painted or are u eventually going to paint it the color of the car? (might be a stupid question judging the obvious clearcoat shine)Yeah, I got it painted Black (Ford Factory Color Code UA). I'm accenting the car with black. I like the look of the black 'n white contrast. I tried to find out if there was a difference, but everyone just kept telling me that the tips are a little longer and that's it. But just like the 05-09 GT takeoffs they are leaps and bounds above the stock v6 muffler.
 11/17/09, 07:53 AM
#9
Cobra Member
Join Date: October 15, 2008
Location: Brew City
Posts: 1,373
Likes: 0
Received 0 Likes
on
0 Posts
 11/17/09, 12:05 PM
#12
Bullitt Member
Join Date: October 16, 2004
Location: HB, CA
Posts: 474
Likes: 0
Received 0 Likes
on
0 Posts
I think the tips on the '10 GT Mufflers are 2" longer than the '05-09 tips. I'm curious to see what these are going to look like OPs car.
Post pics of the mufflers installed!
Post pics of the mufflers installed!


 11/17/09, 02:49 PM
#16
GT Member
Thread Starter
Join Date: October 24, 2009
Location: FL
Posts: 115
Likes: 0
Received 0 Likes
on
0 Posts
Thanks! U and my fiancee are of the same opinion. She wanted just a regular blackout...I however want the honeycomb blackout to match the front. That is definitely on the list. I'm taking a break with the exterior until spring. This winter sometime I'm doing a flush 'n fill of the radiator, transmission fluid drain 'n fill, new cabin filter, fuel filter change, screamin demon, livewires & new plugs,
U and my fiancee are of the same opinion. She wanted just a regular blackout...I however want the honeycomb blackout to match the front. That is definitely on the list. I'm taking a break with the exterior until spring. This winter sometime I'm doing a flush 'n fill of the radiator, transmission fluid drain 'n fill, new cabin filter, fuel filter change, screamin demon, livewires & new plugs,
11/17/09, 04:22 PM
#17
I will buy Jack Stands!!!
Honeycomb is the only way to go. And make sure it comes out to be flush with the tails, not recessed like the actual trunk panel is. That's a pet peeve of mine
11/17/09, 11:30 PM
#20
Bullitt Member
Join Date: November 10, 2008
Location: Las Vegas
Posts: 408
Likes: 0
Received 0 Likes
on
0 Posts
Looks awesome. You forgot to include step 1.5. Drink out of anger at how well 3M automotive grade adhesive does its **** job.
Looks great though. I really like the contrast you have there too. The Roush spoiler looks a lot more involved than I thought.
Looks great though. I really like the contrast you have there too. The Roush spoiler looks a lot more involved than I thought.