
Spark Plug Replace and install HOW TO

Thread Starter
Bullitt Member
Joined: January 28, 2007
Posts: 362
Likes: 0
Spark Plug Replace and install HOW TO
Ok,
I've been asking around, on several different forums and no one could produce a How To pertaining to the removal and replacement of the spark plugs.
So as I am no expert, I have built an "article" if you will, of how I replaced my sparkplugs. It was fairly easy, (much harder than replacing the plugs on my old Honda) and the total time involved was a couple of hours. I know it can be done much faster, but I took my time, documented everything and checked the condition of my old plugs before progressing.
Here Goes:
Step 1
I cleaned the engine. As I have neglected the underhood appearance of things for a few months, I wanted to remove as much dirt and debris as possible. Beginning by blowing everything off, I was amazed at the amount of loose dirt I was able to remove. Secondly, I gave the engine a good bath. I used a safe degreaser, and followed with a soaking from my Mr. Clean spot free car wash kit. (I didn't forget to cover the intake, alternator, etc...) The next step i used was to break out the yard blower and remove as much loose water as possible. The yard blower has become an intergral part of my car cleaning tool box and I see no reason it can't be used under the hood as well. The cherry on top was to spray everything with Meguier's detailing spray and hand dry everything I could reach.
Step 2
As the temperature reached 105 in the shade today, I worked in my garage. Setting up lighting was a huge help as the spark plugs reside in dark unholy caves within the bowels of our S197's.
Step 3
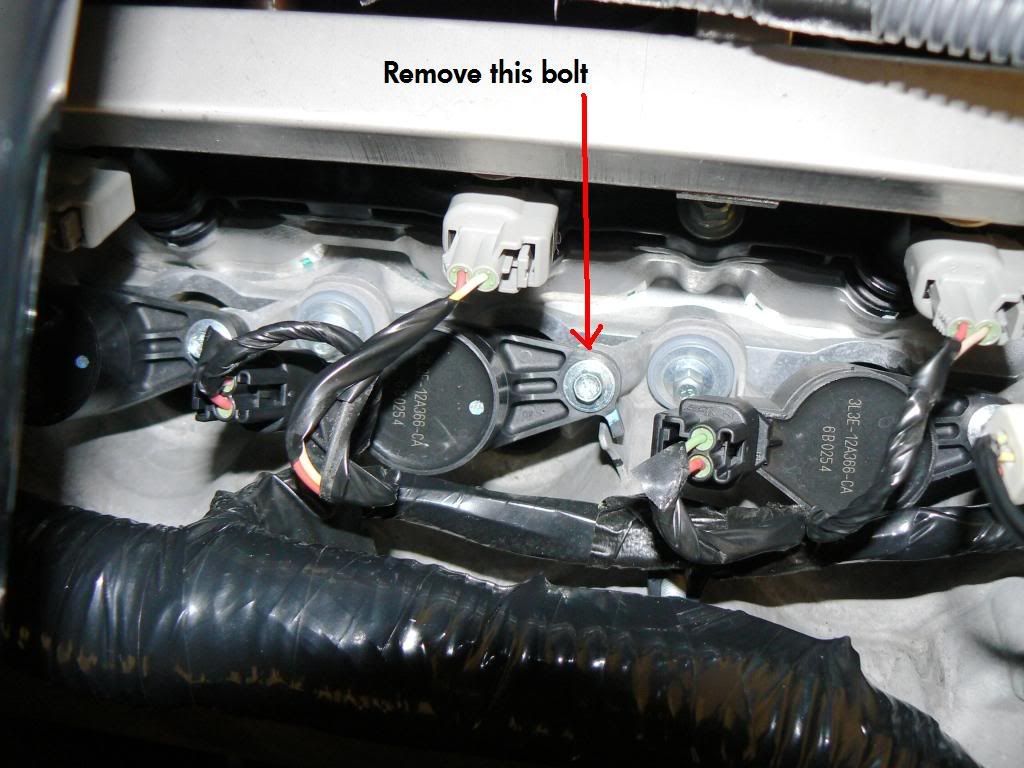
Now were doing what we set out to do. Removal of the Coil on Plugs ( COPs). In the picture below you'll see the bolt that holds the COP in place. I noticed that they were EASY to remove and I thought it was cool how they floated over the plug sockets.
Additionally, the connector needs to be removed to get the COPs out of the engine bay.
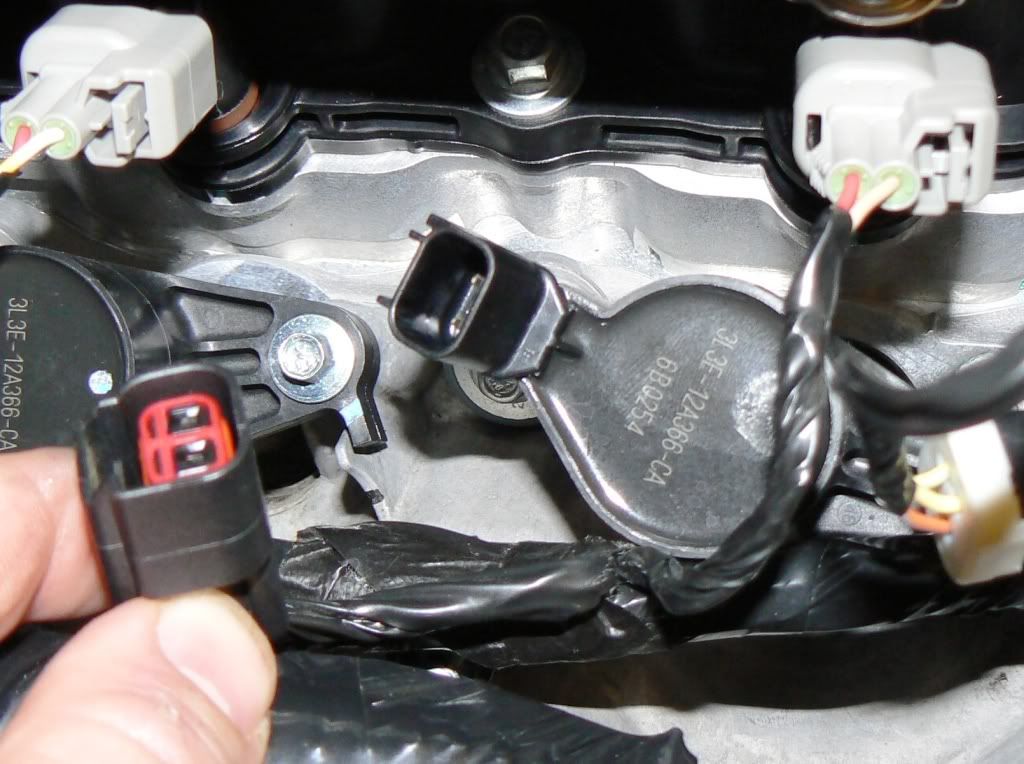
The COP itself can now be pulled out of the plug socket. I simply reached around the bottom of the COP and gently tugged. Now that I have the COP out of the engine bay, I gave it a good wipe down and inspected the COP and Boot for any wear or tear.
Step 4
Removal of the Spark Plug.
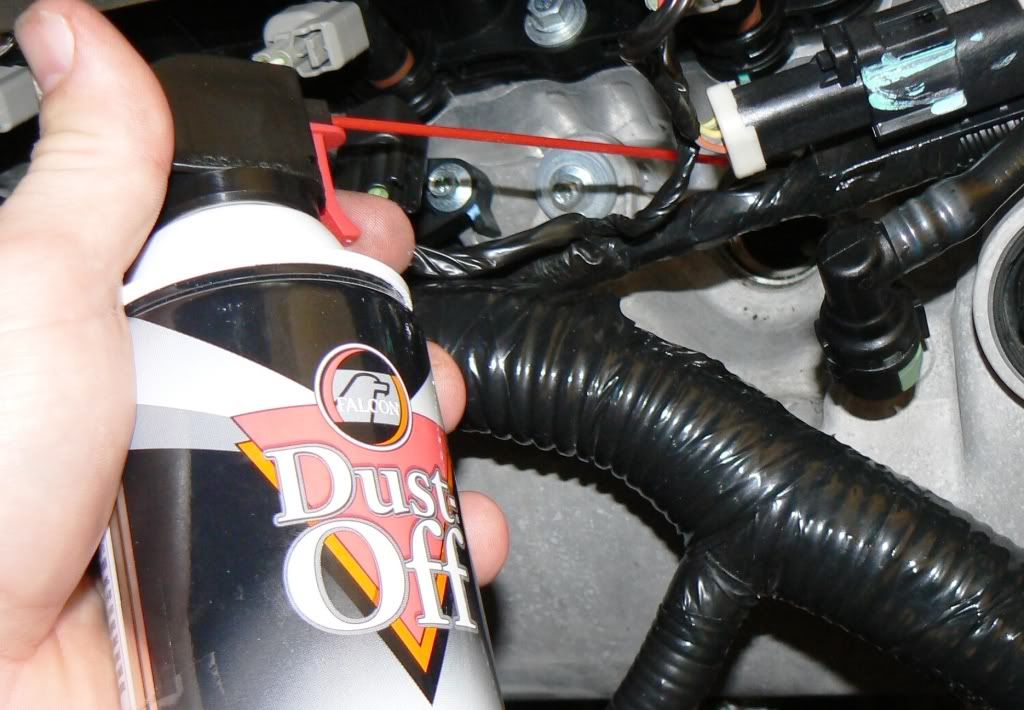
Using a can of compressed air I blew out the Plug hole. I was suprised to see how much dust and sand that came out of each one. (do this before you remove the plug you don't want debris going down into the cylinder)
I used a 14mm socket to remove the plugs. I also greased the outside of my plug socked with each plug removal. IT WAS A VERY THIGHT FIT, ALMOST TOO TIGHT.

Inside before blowing out hole.
Step 5
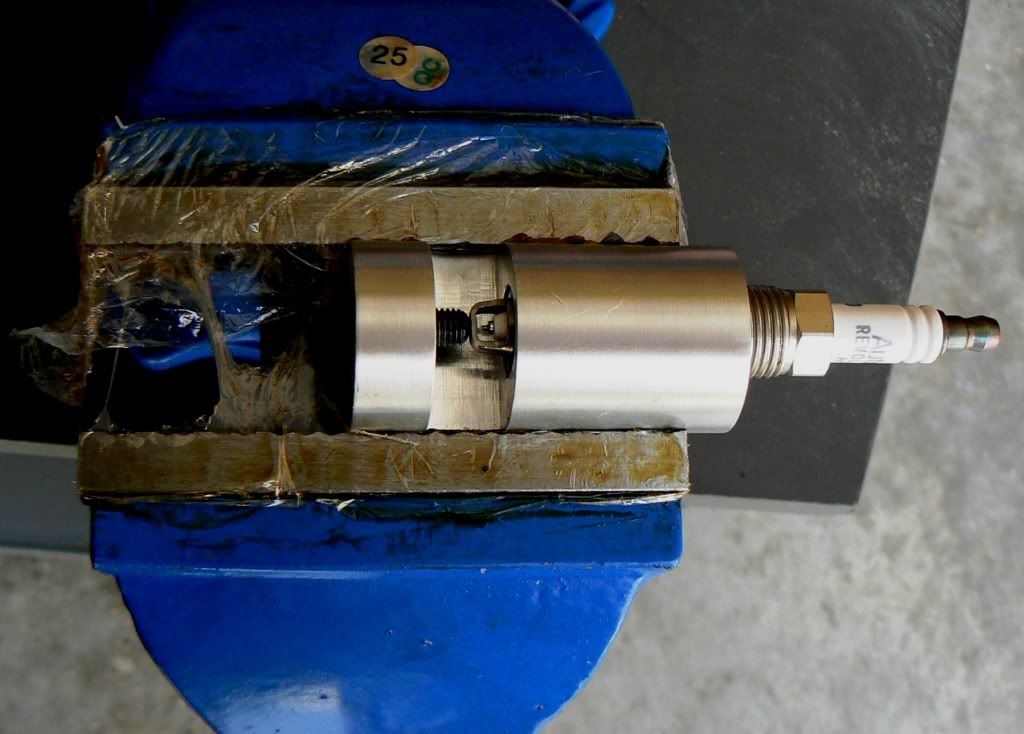
Gap them plugs
The pic below is pretty much self explanatory. I won't get into how much gap and why. That's another write-up entirely.
Step 6
Reverse Direction.
I applied a SMALL amount of anti-seize compound to the threads of the plug. I then used a section of fuel line to hand thread the plugs into their new homes. These cars have aluminum head and it is paramount that you do nothing to damage them.

A torque wrench is another MUST HAVE.
I torqued my plugs to 25 ft lbs.
Step 7
I applied a small amount of brake caliper grease to the bottom of the COP's boot. Using gentle pressure I pushed them over the new plugs. Installed the COP's retention bolt and reattached the COP's connector.
I put a dot of touch-up paint over the OEM dot to mark that a plug was complete.

Then I did it all 7 more times.
I've been asking around, on several different forums and no one could produce a How To pertaining to the removal and replacement of the spark plugs.
So as I am no expert, I have built an "article" if you will, of how I replaced my sparkplugs. It was fairly easy, (much harder than replacing the plugs on my old Honda) and the total time involved was a couple of hours. I know it can be done much faster, but I took my time, documented everything and checked the condition of my old plugs before progressing.
Here Goes:
Step 1
I cleaned the engine. As I have neglected the underhood appearance of things for a few months, I wanted to remove as much dirt and debris as possible. Beginning by blowing everything off, I was amazed at the amount of loose dirt I was able to remove. Secondly, I gave the engine a good bath. I used a safe degreaser, and followed with a soaking from my Mr. Clean spot free car wash kit. (I didn't forget to cover the intake, alternator, etc...) The next step i used was to break out the yard blower and remove as much loose water as possible. The yard blower has become an intergral part of my car cleaning tool box and I see no reason it can't be used under the hood as well. The cherry on top was to spray everything with Meguier's detailing spray and hand dry everything I could reach.
Step 2
As the temperature reached 105 in the shade today, I worked in my garage. Setting up lighting was a huge help as the spark plugs reside in dark unholy caves within the bowels of our S197's.
Step 3
Now were doing what we set out to do. Removal of the Coil on Plugs ( COPs). In the picture below you'll see the bolt that holds the COP in place. I noticed that they were EASY to remove and I thought it was cool how they floated over the plug sockets.
Additionally, the connector needs to be removed to get the COPs out of the engine bay.
The COP itself can now be pulled out of the plug socket. I simply reached around the bottom of the COP and gently tugged. Now that I have the COP out of the engine bay, I gave it a good wipe down and inspected the COP and Boot for any wear or tear.
Step 4
Removal of the Spark Plug.
Using a can of compressed air I blew out the Plug hole. I was suprised to see how much dust and sand that came out of each one. (do this before you remove the plug you don't want debris going down into the cylinder)
I used a 14mm socket to remove the plugs. I also greased the outside of my plug socked with each plug removal. IT WAS A VERY THIGHT FIT, ALMOST TOO TIGHT.
Inside before blowing out hole.
Step 5
Gap them plugs
The pic below is pretty much self explanatory. I won't get into how much gap and why. That's another write-up entirely.
Step 6
Reverse Direction.
I applied a SMALL amount of anti-seize compound to the threads of the plug. I then used a section of fuel line to hand thread the plugs into their new homes. These cars have aluminum head and it is paramount that you do nothing to damage them.
A torque wrench is another MUST HAVE.
I torqued my plugs to 25 ft lbs.
Step 7
I applied a small amount of brake caliper grease to the bottom of the COP's boot. Using gentle pressure I pushed them over the new plugs. Installed the COP's retention bolt and reattached the COP's connector.
I put a dot of touch-up paint over the OEM dot to mark that a plug was complete.
Then I did it all 7 more times.

Bullitt Member
Joined: June 24, 2005
Posts: 311
Likes: 0
Great write-up and pics, Sharky.
How many miles were on your car when you changed the plugs?
Was the engine cold, warm, or hot when you changed them?
Were you able to easily reverse thread the old plugs out of their sockets, or did you have to use penetrating oil to help remove them?
Did the old plugs have any carbon build-up?
Thanks.

Thread Starter
Bullitt Member
Joined: January 28, 2007
Posts: 362
Likes: 0
Related Chemicals & Lubricants
The following Motorcraft® chemicals and lubricants are recommended for the replacement of spark plugs:
Power Flush Injector Fluid
Silicone Brake Caliper Grease and Dielectric Compound
High Temperature Nickel Anti-Seize Lubricant
Thread Starter
Bullitt Member
Joined: January 28, 2007
Posts: 362
Likes: 0
Great write-up and pics, Sharky.
How many miles were on your car when you changed the plugs?
Was the engine cold, warm, or hot when you changed them?
Were you able to easily reverse thread the old plugs out of their sockets, or did you have to use penetrating oil to help remove them?
Did the old plugs have any carbon build-up?
Thanks.
How many miles were on your car when you changed the plugs?
Was the engine cold, warm, or hot when you changed them?
Were you able to easily reverse thread the old plugs out of their sockets, or did you have to use penetrating oil to help remove them?
Did the old plugs have any carbon build-up?
Thanks.
I changed the plugs with the engine almost at ambient temperature.
The plugs were not difficult to remove but some did require a little oomph to get them to budge.
And the old plugs still had alot of life left in them. No damage what-so-ever and had the exact amount of deposits/ carbon that i'd expect from any plug that's been abused for 10k miles
 .
.
Mach 1 Member
Joined: October 12, 2004
Posts: 881
Likes: 1
Just an FYI to add here--Ford has a TSB of some sort on removing spark plugs. There is a known issue with the plugs getting carbon build-up on them and separating on the way out on 3 valve heads. Not a fun repair if the plug is in pieces. I can't locate the .pdf file for the TSB, but I did keep the basic instructions:
1. Get the motor up to operating temp
2. Let the engine cool till it is comfortable to work on.
3. Pull the coil packs
4. Squirt a little penetrant in each hole
5. Loosen each spark plug aprox 1 turn
6. Squirt more penetrant in each hole allowing the penetrant to soak for a few minutes.
7. You should now be able to remove the plugs, take it easy, Ford says if it takes more than 35ft-lbs, then apply more penetrant. 35ft-lbs is the point that the plug can seperate, if it feels tight turn it back in a little and then continue loosening. Also, listen to the plugs, if they are making a ton of noise then they have carbon buildup that is preventing them from coming out easily.
Thread Starter
Bullitt Member
Joined: January 28, 2007
Posts: 362
Likes: 0
I did learn that our plugs CAN be not only Gapped but Degapped. It is a delicate operation but can be done! I was forced to find a way after I applied a little too much oomph while gapping one.
Thread Starter
Bullitt Member
Joined: January 28, 2007
Posts: 362
Likes: 0
Thread Starter
Bullitt Member
Joined: January 28, 2007
Posts: 362
Likes: 0
Just an FYI to add here--Ford has a TSB of some sort on removing spark plugs. There is a known issue with the plugs getting carbon build-up on them and separating on the way out on 3 valve heads. Not a fun repair if the plug is in pieces. I can't locate the .pdf file for the TSB, but I did keep the basic instructions:
1. Get the motor up to operating temp
2. Let the engine cool till it is comfortable to work on.
3. Pull the coil packs
4. Squirt a little penetrant in each hole
5. Loosen each spark plug aprox 1 turn
6. Squirt more penetrant in each hole allowing the penetrant to soak for a few minutes.
7. You should now be able to remove the plugs, take it easy, Ford says if it takes more than 35ft-lbs, then apply more penetrant. 35ft-lbs is the point that the plug can seperate, if it feels tight turn it back in a little and then continue loosening. Also, listen to the plugs, if they are making a ton of noise then they have carbon buildup that is preventing them from coming out easily.
1. Get the motor up to operating temp
2. Let the engine cool till it is comfortable to work on.
3. Pull the coil packs
4. Squirt a little penetrant in each hole
5. Loosen each spark plug aprox 1 turn
6. Squirt more penetrant in each hole allowing the penetrant to soak for a few minutes.
7. You should now be able to remove the plugs, take it easy, Ford says if it takes more than 35ft-lbs, then apply more penetrant. 35ft-lbs is the point that the plug can seperate, if it feels tight turn it back in a little and then continue loosening. Also, listen to the plugs, if they are making a ton of noise then they have carbon buildup that is preventing them from coming out easily.
Shelby GT500 Member
Joined: September 2, 2004
Posts: 2,594
Likes: 0
From: Chicago
You forgot a 0 in front of your specs. My HTO's are gapped to .028.
Mach 1 Member
Joined: December 1, 2006
Posts: 860
Likes: 0
Yes, as I understand it, the lower gap for forced induction helps prevent spark blowout.
I guess I forgot we were talking about modified cars.
I've got a keychain that is a circle and starts thinner and gets thicker as it goes around. Ir measures gap and apparently you can insert it, and tap the electrode to shorten the gap. That's probably not the best way to set it though. I'm guessing there is some kind of tool from your above pictures.
The Iridiums I put in my Stealth have such a sharp electrode, you can't really gap them.
I guess I forgot we were talking about modified cars.
I've got a keychain that is a circle and starts thinner and gets thicker as it goes around. Ir measures gap and apparently you can insert it, and tap the electrode to shorten the gap. That's probably not the best way to set it though. I'm guessing there is some kind of tool from your above pictures.
I did learn that our plugs CAN be not only Gapped but Degapped.
I also used a dremel to narrow down my feeler gage so it would fit under the electrode.
