
Next round of mods coming, continued....

Thread Starter
Legacy TMS Member
Joined: October 8, 2005
Posts: 12,395
Likes: 29
From: Medina county, OH
Next round of mods coming, continued....
Continued from a previous thread.....
I bought a couple of new mods last week, and received the parts this week and began the install. Up for installation was FRPP ceramic-coated shorty headers, and a MGW shifter. I was performing the installation myself with basic hand tools, a creeper, and proper refreshments (as is key to any install project ). This isn't going to be a very detailed write up (sorry TacoBill) but none-the-less maybe it will be helpful to some of you that are contemplating installing your own parts and saving a buttload of $$ on labor.
First off, the FRPP shorties: let me say this first- on a scale of 1 to 10, I give this job an 8 beer difficulty rating! If you don't have the patience, some knowledge, or a bunch of alcohol to dull the pain, DO NOT ATTEMPT THIS AT HOME, LOL!
I bought these as slightly used from a fellow forum member for $200- I figured for that money, WTH may as well buy them. I got the headers and had to buy new flange studs- for future reference these are 12MM size with 1.75 pitch. Only one place in my town had them, so take that into consideration if you purchase used headers.
Had to remove the H pipe first-easy. I started on removing the pass side factory manifold and it was a breeze. Nothing special, just unbolt and drop. The drivers side was more involved- had to:
1) Support the engine with a jack and raise it slightly.
2) Unbolt the driver's side engine mount; didn't remove it completely, just unbolted and swung it outta the way.
3) Unbolt and move the steering shaft outta the way.
4) Unbolt and remove the factory manifold.
At this point, I was probably about 2.5 hours total work time. Again this was by myself and woulda went faster with an extra set of hands. Having both factory manifolds removed, I went to install the driver's side header. This went fairly well, other than having to remove all the head studs to make enough clearance. Got the studs removed, the header lined up, reinstalled the studs and began tightening the header down. This is when I realized that the head studs are long enough and the design of the FRPP header is such that when the header is flat against the head, there is not enough room between the stud and the exhuast tubing to get the nut on the stud. So had to re-loosen what I had started and pull the header off slightly, to get all the nuts started. This was a time consuming PITA because of the cramped location and being on a creeper. Oh lastly, I could NOT get the shorty into place with the O2 sensor installed, so I had to install the sensor after the header was inplace, and snake a wrench up there to tighten it down. This was a boatload of fun right there.....
Onto the passenger side..... I was looking forward to this side, because the removal of the factory manifold was so darn easy I figured this would only take an hour. Well, yeah right after three beers into it I finally decided that wasn't the case. I ended up having to:
1) Raise the engine slightly more....
2) Loosen and COMPLETELY REMOVE the pass side motor mount. But, to get the motor mount outta there, had to
3) Remove the starter.
After all that was done, the new shorty went right into place and bolted down nicely.
Since I had to reinstall the pass side motor mount, I figured I'd loosen the driver's side up again and center the engine between the shock towers. This was easy and after a quick test drive today, there is no problems with the headers hitting either side of the engine bay or the steering shaft.
Next up was the MGW shifter, which was a breeze. Refer to the write up that the omnipotent TacoBill did on the shifter for details.
Pix to follow...
I bought a couple of new mods last week, and received the parts this week and began the install. Up for installation was FRPP ceramic-coated shorty headers, and a MGW shifter. I was performing the installation myself with basic hand tools, a creeper, and proper refreshments (as is key to any install project
First off, the FRPP shorties: let me say this first- on a scale of 1 to 10, I give this job an 8 beer difficulty rating! If you don't have the patience, some knowledge, or a bunch of alcohol to dull the pain, DO NOT ATTEMPT THIS AT HOME, LOL!
I bought these as slightly used from a fellow forum member for $200- I figured for that money, WTH may as well buy them. I got the headers and had to buy new flange studs- for future reference these are 12MM size with 1.75 pitch. Only one place in my town had them, so take that into consideration if you purchase used headers.
Had to remove the H pipe first-easy. I started on removing the pass side factory manifold and it was a breeze. Nothing special, just unbolt and drop. The drivers side was more involved- had to:
1) Support the engine with a jack and raise it slightly.
2) Unbolt the driver's side engine mount; didn't remove it completely, just unbolted and swung it outta the way.
3) Unbolt and move the steering shaft outta the way.
4) Unbolt and remove the factory manifold.
At this point, I was probably about 2.5 hours total work time. Again this was by myself and woulda went faster with an extra set of hands. Having both factory manifolds removed, I went to install the driver's side header. This went fairly well, other than having to remove all the head studs to make enough clearance. Got the studs removed, the header lined up, reinstalled the studs and began tightening the header down. This is when I realized that the head studs are long enough and the design of the FRPP header is such that when the header is flat against the head, there is not enough room between the stud and the exhuast tubing to get the nut on the stud. So had to re-loosen what I had started and pull the header off slightly, to get all the nuts started. This was a time consuming PITA because of the cramped location and being on a creeper. Oh lastly, I could NOT get the shorty into place with the O2 sensor installed, so I had to install the sensor after the header was inplace, and snake a wrench up there to tighten it down. This was a boatload of fun right there.....
Onto the passenger side..... I was looking forward to this side, because the removal of the factory manifold was so darn easy I figured this would only take an hour. Well, yeah right after three beers into it I finally decided that wasn't the case. I ended up having to:
1) Raise the engine slightly more....
2) Loosen and COMPLETELY REMOVE the pass side motor mount. But, to get the motor mount outta there, had to
3) Remove the starter.
After all that was done, the new shorty went right into place and bolted down nicely.
Since I had to reinstall the pass side motor mount, I figured I'd loosen the driver's side up again and center the engine between the shock towers. This was easy and after a quick test drive today, there is no problems with the headers hitting either side of the engine bay or the steering shaft.
Next up was the MGW shifter, which was a breeze. Refer to the write up that the omnipotent TacoBill did on the shifter for details.
Pix to follow...
Thread Starter
Legacy TMS Member
Joined: October 8, 2005
Posts: 12,395
Likes: 29
From: Medina county, OH
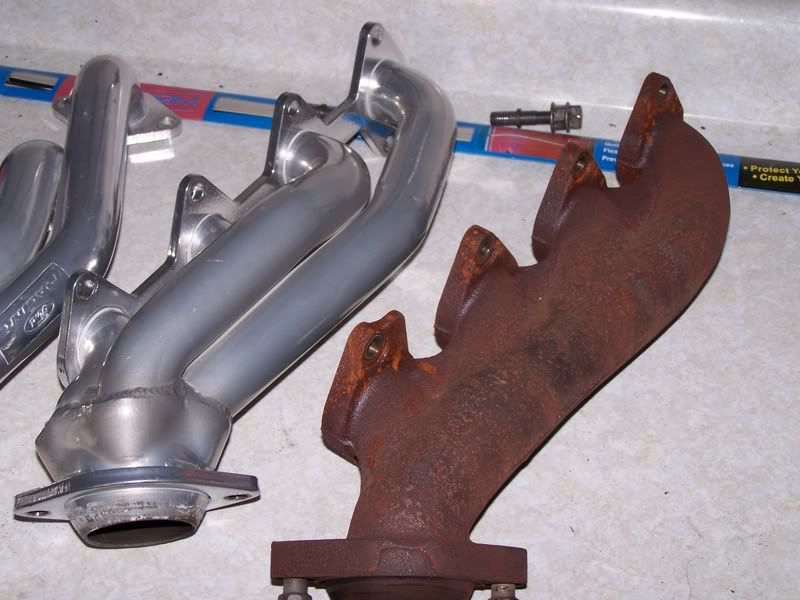
Comparison: factory manifold to FRPP ceramic-coated shorty header:
Driver's side installed:

Passenger side- starter removed, motor mount gone, ready for install:

Pass side inplace, and almost done:

Drivers side complete:

Pass side complete:

Driver's motor mount:
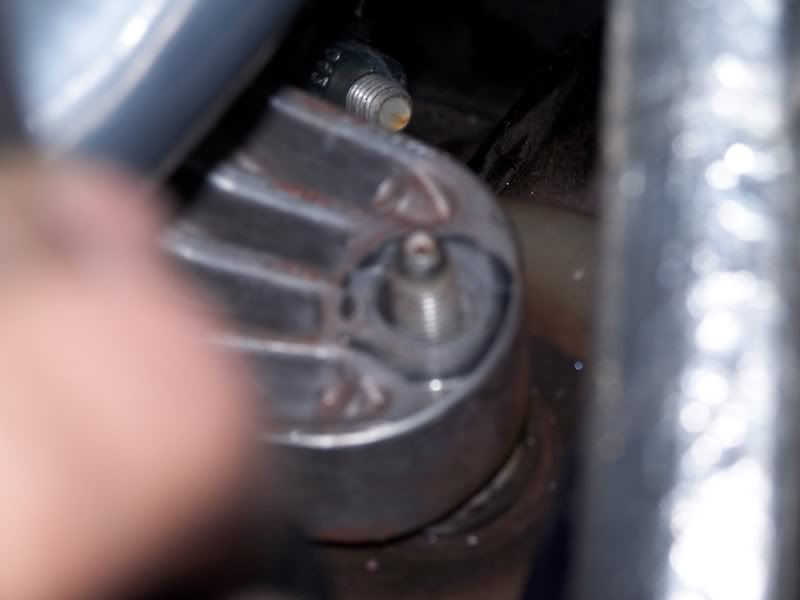
Pass motor mount:

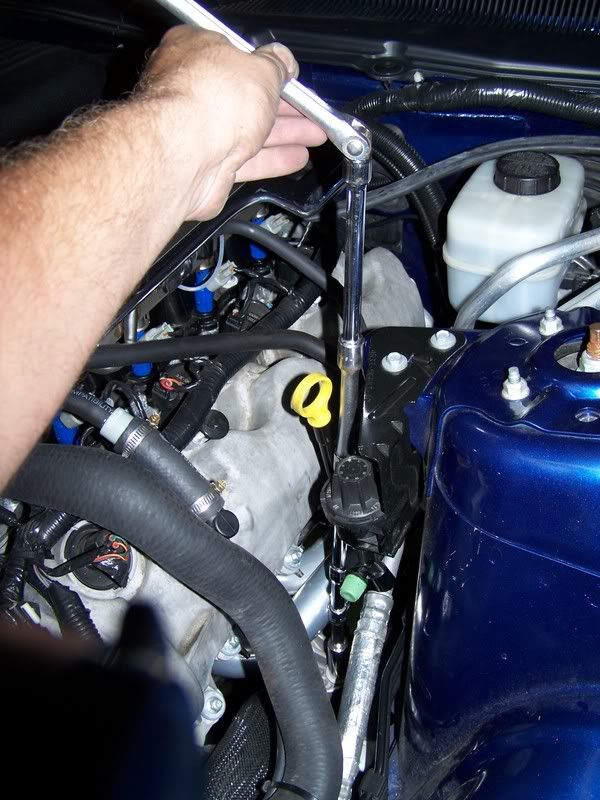
Motor mount tool of choice:
MGW shifter, and my soul companion for this installation (ok, the companion had relatives with him):

Driver's side installed:
Passenger side- starter removed, motor mount gone, ready for install:
Pass side inplace, and almost done:
Drivers side complete:
Pass side complete:
Driver's motor mount:
Pass motor mount:
Motor mount tool of choice:
MGW shifter, and my soul companion for this installation (ok, the companion had relatives with him):
 Lookin good.
Thread Starter
Legacy TMS Member
Joined: October 8, 2005
Posts: 12,395
Likes: 29
From: Medina county, OH
Just some initial impressions:
-Headers: I don't think the headers sound any different than the factory manifolds. The car does seem to run smoother though, so maybe the better flow did net me some more HP, or atleast torque down low. Overall for the cash and my labor, I'm happy.
-MGW shifter: I've been driving with the Pro50 unit for six months now. I really, really liked that shifter. As far as a comparison between the two, I don't think that the MGW is any more quiet than the Pro50. However, the shifts are much shorter (my MGW is set on 9 turns out)- so that is a big bonus. It is very easy to get in gear, however not as easy as the Pro was but I'm guessing the MGW will loosen up a tad in time. Overall, between the two units, I'd pick the MGW because of the shorter throw although it does take alittle more effort.
If it rains this weekend, I plan to paint the calipers with the blue G2 kit I purchased; I'll post pix when done.

Thread Starter
Legacy TMS Member
Joined: October 8, 2005
Posts: 12,395
Likes: 29
From: Medina county, OH
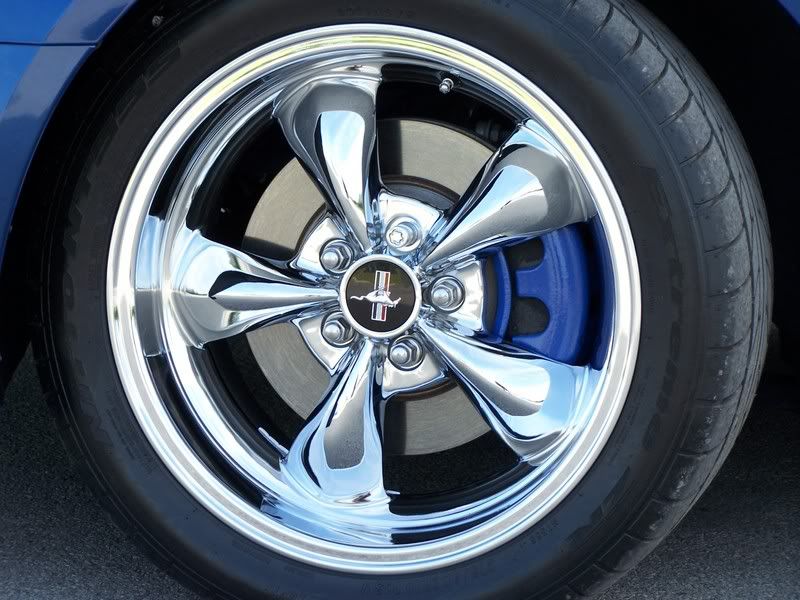
Calipers are painted- the G2 kit is awesome!! But, it's raining and I can't get any good pix from inside the garage so they'll have to wait until tomorrow.
G2 kit:
Rain:
G2 kit:
Rain:


Legacy TMS Member
Joined: January 9, 2005
Posts: 6,982
Likes: 6
From: New Carlisle, Ohio (20 miles north of Dayton)
The calipers do look good.  That blue matches your car perfectly. I have considered this mod myself but I am not sure what color would look right with my white car.
Having heard you car in person I am not sure it sounds any different with the shorties on it.. but it sure will look better under the hood at those up coming car shows.
Scott
That blue matches your car perfectly. I have considered this mod myself but I am not sure what color would look right with my white car. Having heard you car in person I am not sure it sounds any different with the shorties on it.. but it sure will look better under the hood at those up coming car shows.
Scott

Thread Starter
Legacy TMS Member
Joined: October 8, 2005
Posts: 12,395
Likes: 29
From: Medina county, OH
Powder-coated cam covers!
And thanks to everyone else for your comments!
Mach 1 Member
Joined: December 18, 2004
Posts: 669
Likes: 0
Nice work Tom. 
Man, those are some familiar views!!
Between your pics and mine, should give folks a good idea what to look fwd to when it comes to a shortie or LT header install.
That raising the engine thing was a lot more important than I would have thought. It cost me about 4 hrs yesterday, 'cause I didn't have the pass side raised up/supported well enough.
Sounds like the stud/nuts combo was a PITA. I'm glad the ARH LTs have all new bolts. But you prevailed!
Looks like we had to go thru the same processes to get the job done. Did you have to remove the 2 10mm nuts inside the car to get the steering linkage loose?
<== I just have to throw that smiley up again whenever there is a discussion about header installs.