
Autometer oil pressure and water temp gauge install

Thread Starter
9 is not my lucky number.
Joined: March 12, 2004
Posts: 3,663
Likes: 1
This is going to be a progressive post. I haven't completed this install yet, it is taking a long time.
These are the gauges I am installing. Autometer Cobalt electric half sweep oil pressure and water temp gauges. I'm using a Speed of Sound gauge A-pillar.


These are the gauges I am installing. Autometer Cobalt electric half sweep oil pressure and water temp gauges. I'm using a Speed of Sound gauge A-pillar.
Thread Starter
9 is not my lucky number.
Joined: March 12, 2004
Posts: 3,663
Likes: 1
Water Temp sender install
The sender goes on the left side of the engine, where the coolant comes out of the block. This gives you the most accurate engine temperature.
Disconnect the coolant hose. Make sure the engine is cold when you do this or coolant will come spilling out. If there is coolant in there, it will drop on its own I found.
[attachmentid=44973]
Then you have to tap the coolant housing for the sender. To minimize the amount of chips falling in when you drill the hole, take a thin piece of cardboard rolled into a half circle and stick it all the way down there under where you have to drill. The opening goes about 8" deep and is angled downward. I guess you could use a shop vac with a long nozzle to suck up the chips as they fall, but might not work as good.
I pilot drilled the housing with a 1/8" drill about 1/4" down to get the hole started. Then I used a size R drill after that. Make sure you keep blowing the chips away because you want to minimize the amount that is going to fall in when you blow through. Once you get all the way through, take out the cardboard and dump the chips. Stick it back in and do the threads. The sender's threads are 1/8" NPT or 1/8"-27. I used a 1/8-27 tap and tapped the hole. Make sure you use tapping oil (motor oil will work too). Back it out after every few turns and clean the chips off the tap. You only have one shot at making the hole right, or else you will need to order and install another coolant housing from Ford, not cool. Once you finish tapping, use Teflon tape on the threads of the sender and screw it in.
[attachmentid=44974]
See how the black bracket is bent? I had to bang it with a hammer to get it out of the way when I was drilling/tapping. It won't hurt anything. It is too much of a pain to remove because that bracket is holding the alternator in place. It would require you to remove the serpentine belt and CAI to get it off.
Now you can reconnect the coolant hose. If you're really concerned about the aluminum chips that fell in, an unorthidox way of removing them would be to turn the car on for about 1 second and shutting it off. The coolant would squirt on the ground. Just make sure you top off the resevoir if you lost too much. I think any chips that made itself into circulation would just get trapped in the radiator or something, it really isn't going to hurt anything.
Thread Starter
9 is not my lucky number.
Joined: March 12, 2004
Posts: 3,663
Likes: 1
OIL PRESSURE SENDING UNIT
Boy this was a big pain. I did a lot of research before I even tried doing this. I had no idea where the stock sender even was. Some of you guys helped me out, especially MTAS who came through for me on installing it correctly.
The factory oil sender is located right above the oil filter when you look at it from underneath.
[attachmentid=44976]
Kind of looks like a spark plug with a plastic connector on it. The threads on the factory sending unit are 1/4" NPT in case anyone cares. Before you take it out you need to drain the oil from the engine and remove the filter. The filter being out of the way will help you a lot and make your life easier. Once the oil is gone and the filter is out, disconnect the wire going to the factory sender and use a wrench to unscrew/remove it. this is what it looks like.
[attachmentid=44977]
Now that the oil pressure sending unit is out, there are several choices to be made. You can choose to leave the factory oil pressure gauge disconnected permanently, or you can hook up both the Autometer and factory sender on a tee. At first I chose to disconnect the factory sender, but changed my mind later. The following pics will show how I disconnected the factory sender, so don't get confused. Later on I will show you how to hook up both sending units. I decided to keep the factory sender for 2 reasons, I want an alarm that tells me there is no oil pressure (my hosing connections are leaking bad). The second reason is that I won't be able to finish this install for a few weeks, so I would be flying blind the whole time. If the first reason happened I would have no notification and I would grenade my motor.
Okay there's no way you're going to fit the autometer sender under there, you have to mount it remotely. Per MTAS's suggestion I ordered Autometer's 3234 tubing and line kit. It's part number ATM-3234 at Summit. It has all the parts you need.
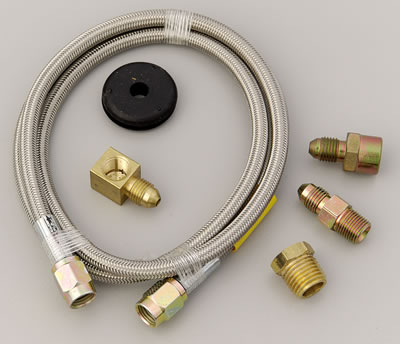
Connect the fittings together with Teflon tape and tighten them tight. This is the hose kit assembled with the Autometer sender attached.
[attachmentid=44978]
Then hook up your hose to the factory sender location. I didn't tighten it very tight because I was afraid of stripping the threads, but it is tight enough.
[attachmentid=44979]
[attachmentid=44980]
Boy this was a big pain. I did a lot of research before I even tried doing this. I had no idea where the stock sender even was. Some of you guys helped me out, especially MTAS who came through for me on installing it correctly.
The factory oil sender is located right above the oil filter when you look at it from underneath.
[attachmentid=44976]
Kind of looks like a spark plug with a plastic connector on it. The threads on the factory sending unit are 1/4" NPT in case anyone cares. Before you take it out you need to drain the oil from the engine and remove the filter. The filter being out of the way will help you a lot and make your life easier. Once the oil is gone and the filter is out, disconnect the wire going to the factory sender and use a wrench to unscrew/remove it. this is what it looks like.
[attachmentid=44977]
Now that the oil pressure sending unit is out, there are several choices to be made. You can choose to leave the factory oil pressure gauge disconnected permanently, or you can hook up both the Autometer and factory sender on a tee. At first I chose to disconnect the factory sender, but changed my mind later. The following pics will show how I disconnected the factory sender, so don't get confused. Later on I will show you how to hook up both sending units. I decided to keep the factory sender for 2 reasons, I want an alarm that tells me there is no oil pressure (my hosing connections are leaking bad). The second reason is that I won't be able to finish this install for a few weeks, so I would be flying blind the whole time. If the first reason happened I would have no notification and I would grenade my motor.
Okay there's no way you're going to fit the autometer sender under there, you have to mount it remotely. Per MTAS's suggestion I ordered Autometer's 3234 tubing and line kit. It's part number ATM-3234 at Summit. It has all the parts you need.
Connect the fittings together with Teflon tape and tighten them tight. This is the hose kit assembled with the Autometer sender attached.
[attachmentid=44978]
Then hook up your hose to the factory sender location. I didn't tighten it very tight because I was afraid of stripping the threads, but it is tight enough.
[attachmentid=44979]
[attachmentid=44980]
Thread Starter
9 is not my lucky number.
Joined: March 12, 2004
Posts: 3,663
Likes: 1
If you choose to disconnect the factory sender permanently, you have to trick the computer that it is still there, or else the "OIL PRESSURE LOW" message will flash permanently. About an inch back from the connector, clip the factory sender wire and solder or use a crimp connector to an 18 gauge wire. I ran my wire up to the K&N heat shield. All the sender does it tell the CPU that there is some kind of pressure, not how much. It is an on and off switch, hence the factory gauge is pretty useless. The good thing about this is that you can just ground that sending wire and the CPU thinks that there is always pressure.
[attachmentid=44985]
Then I snaked the sender up to my K&N heat shield. Keep the hose away from the exhaust headers and serpentine belt. I zip tied mine to the coolant hose. Then I used a insulated clamp and drilled it to the K&N heat shield.
[attachmentid=44986]
After I did this I was paranoid about not having a working pressure gauge for 2 weeks so I went out to home depot and bought a 1/4" NPT tee, two 1/4" to 1/8" reducers, and a 1" long 1/8" NPT nipple. Then I disconnected the grounding wire I made and attached it back to the sending unit and screwed the sending unit to the tee. Both sending units are hooked up now. I did this in the dark so I will post a pic of that tomorrow.
Thread Starter
9 is not my lucky number.
Joined: March 12, 2004
Posts: 3,663
Likes: 1
I have not wired up any of the sending units yet but I have pre-wired the gauges to the gauge pod. I did everything real professional looking and used a wire label writer I had at work. Since it's all labeled I won't be getting confused later on. I like to do things the right way the first time. I followed the Autometer instruction sheet and wired the suckers up. I used 18 gauge wires. I got the 4 amp fuse and fuse holders at Radio Shack. The splice and insulated spade connectors I got at WalMart.
[attachmentid=44991]
[attachmentid=44992]
[attachmentid=44993]
I'll use insulted spade connectors on the 6 wires going down into the dash. That way I won't have any problem removing the pillar in the future.
This is as far as I have gotten so far. Maybe next weekend I'll finish wiring. It's supposed to snow tomorrow [img]style_emoticons/<#EMO_DIR#>/crying.gif[/img]
Team Mustang Source
Joined: January 30, 2004
Posts: 2,298
Likes: 4
From: Tampa FL
<div class='quotetop'>QUOTE(dustindu4 @ February 11, 2006, 9:19 PM) Quoted post</div><div class='quotemain'>
OIL PRESSURE SENDING UNIT
Boy this was a big pain. I did a lot of research before I even tried doing this. I had no idea where the stock sender even was. Some of you guys helped me out, especially MTAS who came through for me on installing it correctly.
The factory oil sender is located right above the oil filter when you look at it from underneath.
[attachmentid=44976]
Kind of looks like a spark plug with a plastic connector on it. The threads on the factory sending unit are 1/4" NPT in case anyone cares. Before you take it out you need to drain the oil from the engine and remove the filter. The filter being out of the way will help you a lot and make your life easier. Once the oil is gone and the filter is out, disconnect the wire going to the factory sender and use a wrench to unscrew/remove it. this is what it looks like.
[attachmentid=44977]
[/b][/quote]
Looking great! And a tip for anyone who might want to do this, but doesn't want to wait until oil change time to remove the sending unit. If you remove it, you'll only lose about 3 or 4 tablespoons of oil [img]style_emoticons/<#EMO_DIR#>/wink.gif[/img]
Lookin good Dustin,
Just remember that stainless braided hose shouldn't be allowed to chafe up against anything including an aluminum block.
It will cut through anything like a sawblade if it vibrates.
At work I use large diameter heat shrink tubing over all my stainless braided lines.
Another way to keep them from vibrating is to silicone caulk them in place.
It's not an attractive way to do it for an automotive application but good for an industrial one.

Bullitt Member
Joined: February 19, 2006
Posts: 211
Likes: 0
<div class='quotetop'>QUOTE(dustindu4 @ February 11, 2006, 8:34 PM) Quoted post</div><div class='quotemain'>
All the sender does it tell the CPU that there is some kind of pressure, not how much. It is an on and off switch, hence the factory gauge is pretty useless.
[/b][/quote]
are you sure about that?
if so where did you get your info?
when you grounded it did your gauge peg out ?
jay
All the sender does it tell the CPU that there is some kind of pressure, not how much. It is an on and off switch, hence the factory gauge is pretty useless.
[/b][/quote]
are you sure about that?
if so where did you get your info?
when you grounded it did your gauge peg out ?
jay
Cobra Member
Joined: May 17, 2004
Posts: 1,476
Likes: 0
<div class='quotetop'>QUOTE(speco2005 @ February 21, 2006, 11:41 PM) Quoted post</div><div class='quotemain'>
Oh Sorry Jay I was talking to the dude with the silver Roush. Still PM me though.
[/b][/quote]
<div class='quotetop'>QUOTE(Torrence @ February 22, 2006, 4:29 AM) Quoted post</div><div class='quotemain'>
I am going to have to get that Saleen. Now, your ready for the Shelby when it hits the streets.
[/b][/quote]
Good write-up! [img]style_emoticons/<#EMO_DIR#>/thumb.gif[/img]
Team Mustang Source
Joined: January 30, 2004
Posts: 2,298
Likes: 4
From: Tampa FL
<div class='quotetop'>QUOTE(tkogt @ February 22, 2006, 5:38 PM) Quoted post</div><div class='quotemain'>
are you sure about that?
if so where did you get your info?
when you grounded it did your gauge peg out ?
jay
[/b][/quote]
Nope - the needle just sits there just to the right of center and never moves, just like when it was still connected to the switch [img]style_emoticons/<#EMO_DIR#>/rolleyes.gif[/img]
Tasca Super Boss 429 Member
Joined: January 4, 2006
Posts: 3,904
Likes: 32
<div class='quotetop'>QUOTE(MTAS @ February 22, 2006, 8:30 PM) Quoted post</div><div class='quotemain'>
Nope - the needle just sits there just to the right of center and never moves, just like when it was still connected to the switch [img]style_emoticons/<#EMO_DIR#>/rolleyes.gif[/img]
[/b][/quote]
My Ranger has an "on-off needle for the gauge too". Remember what Fernado says, "It is better to look good than feel good". That way Ford could call them "full gauge packages". [img]style_emoticons/<#EMO_DIR#>/headscratch.gif[/img] ...And they look Marvelous.

Mach 1 Member
Joined: December 27, 2005
Posts: 516
Likes: 0
Dustin, what kit or unit did you use for the water temp? and which if any extra parts did you need. I have a CDC guage pod for the dash and auto meter phantom 2 1/16 guages. Im looking to add water temp guage I already have a voltage and oil pressure guage. I was originally going to put a digital tach in it but I changed my mind.
Thread Starter
9 is not my lucky number.
Joined: March 12, 2004
Posts: 3,663
Likes: 1
I'm done. It was a pain doing all the wiring. It wasn't hard but time consuming. I'll show you later how I ran the wires into the engine bay from inside the car. For now I'll just tease you with these.
movie
[attachmentid=46421]
Hooking the gauge light up to the dash light dimmer was easy. I'll show you how to do that. I kind of rushed at the end and didn't get into real detail how to do the final hooking up of the wires. If you're going to try this I shouldn't have to show you how to do that. This isn't like hard wiring a radar detector, this isnt a job for the novice.
Team Mustang Source
Joined: January 30, 2004
Posts: 2,298
Likes: 4
From: Tampa FL
<div class='quotetop'>QUOTE(dustindu4 @ March 6, 2006, 12:35 AM) Quoted post</div><div class='quotemain'>
I'm done. It was a pain doing all the wiring. It wasn't hard but time consuming. I'll show you later how I ran the wires into the engine bay from inside the car. For now I'll just tease you with these.
movie
[attachmentid=46421]
Hooking the gauge light up to the dash light dimmer was easy. I'll show you how to do that. I kind of rushed at the end and didn't get into real detail how to do the final hooking up of the wires. If you're going to try this I shouldn't have to show you how to do that. This isn't like hard wiring a radar detector, this isnt a job for the novice.
[/b][/quote]
Sweet! Congrats on getting it done [img]style_emoticons/<#EMO_DIR#>/worship.gif[/img]