
700hp Cobra Terminator: Bringing Black Back to Life
 8/24/11 | 09:37 AM
#1
Thread Starter
Detailing Guru
Joined: May 16, 2011
Posts: 348
Likes: 0
From: SE Michigan
700hp Cobra Terminator: Bringing Black Back to Life

The owner was gracious enough to give us the time needed to bring the best out of his ride, and much to our dismay, we'd end up needing it. Working during the hottest week of 2011 thus far, work was slow and paintful from high heat and humidity. With air so thick you could back-stroke through it, we ended up purchasing a dehumidifier to better control how products worked while the heat index held steadily over 100 degrees. It seems Mother Nature wanted me to remember what I was missing being away from Fort Bragg for the last few years

Upon Arrival:

Light swirls? No problem!!

Wait...

What's that? Enhance!

Light etching marks in addition to the swirls? Shouldn't be too much of a problem though...right?
Lightly dirty interior surfaces were due for a nice cleaning as well.


Even the red tail light housings had some light swirling that was distracting from the glossy look they could, and should have.

Before we got started, we pulled the lightly dirty Cobra in the garage to cool down. During that time, we also started examining the other thing's we'd need to address over the course of our work.
The underside of the hood had some light water marks and splashing from being driven in the rain.

Trunk water chanels with dirt build-up isn't unusual, but on a low mileage vehicle like this is an eye-sore.

The same type of dirt seemed to be in / around the door hinges. Looks like she has been driven down a dirt-road at some point.

Other things: The blower in need of a light cleaning:

Block:

The beautiful wheels are a nice design...but not a nice design to have to clean.

Tim began going over the engin bay to clean her up a bit. This is a car that has sees her fair share of time on the strip, so we didn't go overboard and instead wanted to maximize the return compaired to time spent.


In the mean time, I began by treating the tires to a thorough cleaning, ridding old dressing and browning from the finish, and then turned my attention to the wheels which weren't going to be fun with all the bolts on the finish.


As I continued on the wheels, Tim worked on the nooks that needed a cleaning.


Let there be white!


With the initial foam application loosening up and suspending dirt from the surface, Tim turned his attention to the exhaust tips which thankfully cleaned up easily (some of you know how fun it can be to clean exhaust off track toys).


Rinsed, re-foamed, washed, and rinsed again, we could see a physical difference in the feel of the finish. While the current owner has yet to wax her (poor girl has been stranded in a garage far too long!), it's very apparent the last owner surely did in some capacity. The finish wasn't truly silky when we started, but it felt like it had something. Now stripped, the finish had a dull feeling; the feeling a car gives you when imperfections were formerly masked. This was the first of four major alarms we experienced.
Claying was the second major alarm moment... heavy contamination:

Suddenly this youthful pretty girl wasn't so attractive. She looked great with all her make-up on, but now that we had her under bright lights, the truth began to shine through. Every now and then, you're pleasently surprised, and other times you're not-so-pleasantly surprised when seeing the true condition of a car's paint. The sterile paint could now be properly assessed, and what was more evident than ever was the major etching over the entire finish. At some point, she was either left outside in the rain and then the sun came out baking the raindrops onto the car, or (more likely) was a victim of lawn sprinklers. Now with this third alarm ringing loud and clear, the original work plan for the car was already looking obsoete. We wanted to begin with polishing prior to talking to the owner, as this would confirm if more time would potentially be needed. Our fouth alarm wasn't of much surprise as paint thickness readings averaged low. The non-metal trunk, fenders, hood, rear spoiler, pillars, bumpers, and side scoops all joined their metal panel brothers in grinning their teeth at us, knowing we'd be slaves to carefully bringing them back to life during the hottest temperatures the Mid-West has seen this year.
 8/24/11 | 09:37 AM
#2
Thread Starter
Detailing Guru
Joined: May 16, 2011
Posts: 348
Likes: 0
From: SE Michigan


Initial testing would give good results: Surbuf with M105 (twice) followed by Meg's 205


What we didn't forsee is certain panels would require more convincing to come back to life. Some areas needing as many as 4-5 thorough passes, other's still refusing to give up their ground completely; their finish tattooed with evidence of past etching. These were areas we'd have to agree to not perfect in the name of preserving the finish for any potential future polishing sessions. A chat with the owner would afford us a few extra hours of work timerequired for a proper result.
Working Meg's 105 like mad-men in the heat to resurface the clear-coat, Tim and I created quite a dust storm of broken down polish and clear-coat residue.


It's all in the name of progress, and a bit a dust is hardly our biggest concern. Only results matter.

Polished tails:

Continuing...


With Ultrafine Machine Polish finished (the last of the 5-8 polishing steps), we could move on to the next step: the final wash.

A rainbow of oils from polishing. No filler agents here: everything is restripped to leave the finish sterile once again. The finish that will be observed from here out will be the actual finish itself.


Blown dry, we still had small details to attend to like old wax residue

Interior vacuuming:


Yeah, yeah, interior, blah, blah: everyone wants to see more paint shots! The reflection prior to wax being applied:

Final steps! Dodo Juice Lime Prime Lite pre-wax cleanser followed by Dodo Juice Supernatural. The Lime Prime Lite leaves the finish much slicker allowing for a super thin layer of wax to go down very easily compaired to a finish without this step.

Applied with a red pad on a low speed in a thin layer and wiped off immediately, Lime Prime Lite is great to use if you have a little extra time and really want to maximize the look and feel of a properly polished finish.

And finally... Supernatural.

As I applied, Tim waited until properly set and followed me removing the residue with a fresh clean microfiber towel. The final look resulted in me putting some money in the stock of Depends adult diapers.

 8/24/11 | 09:38 AM
#3
Thread Starter
Detailing Guru
Joined: May 16, 2011
Posts: 348
Likes: 0
From: SE Michigan

I'm multiplying!


Done? I think not. We didn't Supernatural everything. This is a drag car, and some areas will need something stronger than carnauba wax. Optimum Opti-Coat was applied to the super-soft plastic panels (the lower side rocker panels, the mirrors, the door handles, and the side vents), along with the rear bumper (to protect it from shredded tire debris).


Tim worked the beautiful wheels with Dodo Juice Supernatural Metal Polish: a painfully slow process that gives beautiful results.

During Tim's fun adventure, I worked the leather side bolsters with Leather Master Soft Cleaner and a toothbrush via the Fermani Method.

Following, the suede inserts were treated with Leather Master Eco-Protector.

As I finished the suede, Tim applied Leather Master Protection Cream to the bolsters of the seats.

The license plate was polished with Klasse All In One, and then recieved a layer of Dodo Juice Supernatural. Even the plate looked proper.

Finally, Blackfire was applied to all windows except the windshield, which was Aquapel'ed.


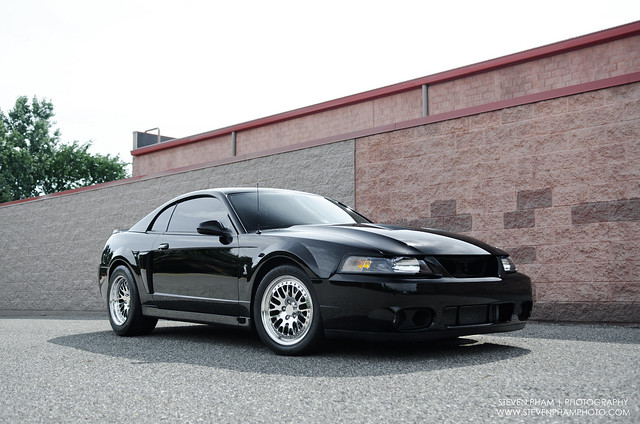
Two days later, the owner showed up to collect his baby. At the same time, we were lucky enough to have Stevie P stop by to get a couple final pics.


Many thank's to the owner for the opportunity, and thanks for taking a look!
-Marc
 8/24/11 | 07:51 PM
#6
NTTAWWT
Joined: January 27, 2007
Posts: 14,453
Likes: 35
From: That town you drive through to get to Myrtle Beach
spectacular job!
Nice to see some people that know what detailing really is, not just paint, but getting the nooks and crannies that make the difference!
What was your process to clean the underside of the hood and the trunk lip?
Nice to see some people that know what detailing really is, not just paint, but getting the nooks and crannies that make the difference!
What was your process to clean the underside of the hood and the trunk lip?
8/27/11 | 01:15 PM
#9
Thread Starter
Detailing Guru
Joined: May 16, 2011
Posts: 348
Likes: 0
From: SE Michigan
Thanks for the kind words!
Thank youCleaning things like the underside of the hood required a spray of a gentle citrus based all purpose cleaner, and a boar's hair brush to agitate. Rinse thoroughly and then use a quick detailer after to add a tad of protection while leaving the surface streak-free.
Thanks for taking a look!
Thank you! I'm in Michigan.
 8/27/11 | 03:05 PM
#11
Thread Starter
Detailing Guru
Joined: May 16, 2011
Posts: 348
Likes: 0
From: SE Michigan
I try to post a little in multiple places. I found this site bc of some motownmuscle members, and figured I'd sign up and do some posting to help those that have some questions. Don't forget; I'm a car guy too!
8/27/11 | 05:37 PM
#13
Thread Starter
Detailing Guru
Joined: May 16, 2011
Posts: 348
Likes: 0
From: SE Michigan
Sometimes. We have a PC and Griot's DA as well as a Flex DA, Flex rotary, and Makita rotary polishers. Pads range from some CCS, to wool, to Surbuf, to flat foam pads. You use what works best for the given finish you're working on.
When in doubt, you can usually achieve great results with a Dual Action polisher like a PC with appropriate pads and some good polishes.
When in doubt, you can usually achieve great results with a Dual Action polisher like a PC with appropriate pads and some good polishes.

