
Question about splash guards in the front - possible rust/damage?

Thread Starter
Legacy TMS Member
Joined: October 2, 2006
Posts: 4,777
Likes: 16
From: Southeast Michigan
Question about splash guards in the front - possible rust/damage?
I was trying to think of a logical reason why Ford did not make a molded splash guard for the front and it hit me.
What happens when dirt/grit/pebbles/gunk falls in between the splash guard and the front fender? Wouldn't the vibration of the car and the flexing of the guard cause the grit to start to dig into the paint finish? THere's nothing on top to prevent the grit from falling into the spot between the guard and fender.
On the rear, you're dealing with a urethane? bumper which won't rust but I think there still may be some problem with the vibration and grit. Has anyone removed their splash guards after 1-2 years of use to observe the condition of the paint?
Bullitt Member
Joined: May 13, 2004
Posts: 394
Likes: 0
I was able to install mine to the plastic rocker panel using the factory holes with new friction-fit rivet-style fasteners that I got from my hardware store. No extra holes so I can easily return it to stock if I choose.
GT Member
Joined: November 1, 2006
Posts: 161
Likes: 0
Hey Bob, do you have any pics of this? You have almost my EXACT car that I ordered. I'd love to see what you did with this. Also, what part of RI are you from? What dealership did you go through too? I had a wicked problem with a certain RI Ford dealership, but I won't say what their name is-o (*hint*) .
.
Thread Starter
Legacy TMS Member
Joined: October 2, 2006
Posts: 4,777
Likes: 16
From: Southeast Michigan
I would like to use the F6ZZ-16A550-BA front flat guards and drill the guards to use the rocker panel mounts.
How secure is this setup and what exactly do I need to do to make it work?
Do the front flat guards come pre-drilled?
How do I remove those plastic fasteners?
How secure is this setup and what exactly do I need to do to make it work?
Do the front flat guards come pre-drilled?
How do I remove those plastic fasteners?
Cobra Member
Joined: May 16, 2006
Posts: 1,322
Likes: 0
From: NV
I attached some flat splash guards behind the front wheels the same way Bob did, but I was able to reuse the stock fasteners.
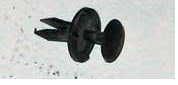
If you look at the fasteners, they are made up of two pieces. There is a "base" that looks kind of like a washer, and the "head" which looks like the head of a rivet. There is a flat indentation on the lower base part. Stick the end of a correctly sized flat blade screw driver under the head of the "rivet" , twist and carefully pry up the head. Once the head is pried up enough, carefully remove both pieces of the fastener. It should pull out of the hole easily.
To reuse, assemble the two pieces but don't push head of the rivet down all the way into the base. Insert the fastener in the hole so that the base is flush with surface and push the rivet head in until it's flush and you feel it snap in place.
The splash guards I used were undrilled, so to mark the place on the splash gaurds to the drill the holes, I put a dab of red lacquer glazing putty on the center of the head of each fastener (before I removed them from the car of course). I carefully pressed the splash guard against the fasteners being careful not to smear the putty, which marks the location of the holes to drill. I then wiped the putty off the top of the fasteners.

Member
Joined: August 27, 2006
Posts: 45
Likes: 0
front flaps
i used universal flaps from auto parts store ($3.99)black vinyl used stock clips from rocker moldings work great very secure.stacked layers of dbl sided tape where flaps are above molding to fill the void between fender and flap (looks factory)
what i did to get hole drilled in flaps to match holes in molding was:
1: removed plastic from flap package
2:used carboard packaging as a templete of flap
3:removed clips from rocker molding
4:duct taped templete to inner fender to align and level flap
5:when aligned and leveled felt for rocker molding holes pushed
pushed through holes with phillips screwdriver
6:drilled out flaps to match templete installed with factory clips
(very secure)
7:just flip templete over your already set up for other side
note: my dbl sided tape is working great but if not use blk silicone
to fill void between fender and flap
Thread Starter
Legacy TMS Member
Joined: October 2, 2006
Posts: 4,777
Likes: 16
From: Southeast Michigan
I thought about the gasket material and think I'll use bicycle tire inner tube that is cut to form around the clip holes. I just need to isolate the guard from the painted surfaces to prevent repeated marring while driving.
Bullitt Member
Joined: May 13, 2004
Posts: 394
Likes: 0
Hey Bob, do you have any pics of this? You have almost my EXACT car that I ordered. I'd love to see what you did with this. Also, what part of RI are you from? What dealership did you go through too? I had a wicked problem with a certain RI Ford dealership, but I won't say what their name is-o (*hint*).
And sorry for taking so long to get back to everyone but I've been out on the PS3 and Nintendo Wii hunt - happy to say I was successful with both!
I'll send you a PM with my email address. Let me know when your car comes in and if you want any help.
Bullitt Member
Joined: May 13, 2004
Posts: 394
Likes: 0
OK, guys and gals, here's what I did:
Bought the factory rear mats but couldn't find a set for the front. Looked all over town but finally settled for a plain flat mid-sized pair from Advance Auto Parts on Reservoir Ave on the Cranston/Providence RI line. I think they were like all of $3.00 for the pair!!
Attachment 15008
Attachment 15009
Then I removed the stock fasteners from the rocker panels and took them to Durfee Hardware in Cranston, RI, to match them up with something the same diameter but just a bit longer to ensure that they'd hold fit through the thickness of the new splash guards and still hold everything firmly and securely. See the pick of the stock and new fasteners side by side. The new fastners fit snugly in the holes and have a push pin that forces the sides of the fastener out when it's locked down. The only problem is that the new fasteners are white - I'm sure if I looked around more I could have found a similar style in black. Heck, if I had just driven a couple of extra miles to my brothers body shop, I probably could have gotten black ones from him. No biggee, and now that they've gotten dirty from the miles, you can't even see them.
Attachment 15010
Attachment 15011
Test fit them in the holes to be sure they were good and snug
Attachment 15012
Test fit the new guards using a level to make sure everything was plumb and level, and a box below to keep them consistent side to side, marked the holes with a sharpie marker, put tape on the inside of the guards, and pushed them in place to transfer the hole locations. Then drilled the guard, checked the fit once more, then flipped it over and transferred the markings to the guard for the other side (no need to remeasure everything once one side is good).
Attachment 15013
Attachment 15014
Attachment 15015
Attachment 15016
The finished project:
Attachment 15017
This one went smooth and easy. And just so you know I'm not perfect, last weekend I set off to install a roof rack, hood deflector and fog lights on my Ridgeline. Got the roof rack on fine, the moved to the fogs. Forgot to remove one clip on the bumper....pulled a little bit.....why won't this thing come off?? Must need a good hard pull! Then R-I-P! Yup, I ended up TEARING the bumper cover! That cost me about four hours while the guys at my brohter's shop finished removing the last clip from the bumper cover and then proceeded to repair and repaint the bumper on my new truck. Oh well, live and learn.
Bought the factory rear mats but couldn't find a set for the front. Looked all over town but finally settled for a plain flat mid-sized pair from Advance Auto Parts on Reservoir Ave on the Cranston/Providence RI line. I think they were like all of $3.00 for the pair!!
Attachment 15008
Attachment 15009
Then I removed the stock fasteners from the rocker panels and took them to Durfee Hardware in Cranston, RI, to match them up with something the same diameter but just a bit longer to ensure that they'd hold fit through the thickness of the new splash guards and still hold everything firmly and securely. See the pick of the stock and new fasteners side by side. The new fastners fit snugly in the holes and have a push pin that forces the sides of the fastener out when it's locked down. The only problem is that the new fasteners are white - I'm sure if I looked around more I could have found a similar style in black. Heck, if I had just driven a couple of extra miles to my brothers body shop, I probably could have gotten black ones from him. No biggee, and now that they've gotten dirty from the miles, you can't even see them.
Attachment 15010
Attachment 15011
Test fit them in the holes to be sure they were good and snug
Attachment 15012
Test fit the new guards using a level to make sure everything was plumb and level, and a box below to keep them consistent side to side, marked the holes with a sharpie marker, put tape on the inside of the guards, and pushed them in place to transfer the hole locations. Then drilled the guard, checked the fit once more, then flipped it over and transferred the markings to the guard for the other side (no need to remeasure everything once one side is good).
Attachment 15013
Attachment 15014
Attachment 15015
Attachment 15016
The finished project:
Attachment 15017
This one went smooth and easy. And just so you know I'm not perfect, last weekend I set off to install a roof rack, hood deflector and fog lights on my Ridgeline. Got the roof rack on fine, the moved to the fogs. Forgot to remove one clip on the bumper....pulled a little bit.....why won't this thing come off?? Must need a good hard pull! Then R-I-P! Yup, I ended up TEARING the bumper cover! That cost me about four hours while the guys at my brohter's shop finished removing the last clip from the bumper cover
and then proceeded to repair and repaint the bumper on my new truck. Oh well, live and learn.
Thread Starter
Legacy TMS Member
Joined: October 2, 2006
Posts: 4,777
Likes: 16
From: Southeast Michigan
How much ground clearance do you have under the front splash guards? How much of the guard is extended from the body (to fit the tire profile)?
Thanks in advance.
Thanks in advance.
Bullitt Member
Joined: May 13, 2004
Posts: 394
Likes: 0
Mine are 3 inches from the ground and they extend out about 1.5 inches from the widest point on the rocker. I installed them so that they extend out the sides in line with the outter sidewall of the tire. They look good in my opinion.
Thread Starter
Legacy TMS Member
Joined: October 2, 2006
Posts: 4,777
Likes: 16
From: Southeast Michigan
I wonder why Ford didn't make molded front guards?
The Ford rear guards look like they fit PERFECTLY and will be an EASY install. I don't see why they couldn't make similar quality guards for the front I bought the Ford universal Mustang splash guards ($14 shipped) so I could get the nice shiny Ponies
The Ford rear guards look like they fit PERFECTLY and will be an EASY install. I don't see why they couldn't make similar quality guards for the front
I bought the Ford universal Mustang splash guards ($14 shipped) so I could get the nice shiny Ponies

Thread
Thread Starter
Forum
Replies
Last Post
houtex
05-09 Exterior Modifications
13
Apr 17, 2025 10:53 PM
whysoserious
05-09 Interior and Audio Mods
3
Oct 27, 2023 06:42 PM
RRRoamer
2015 - 2023 MUSTANG
33
Jan 19, 2017 05:27 PM