How To: Blue LED HVAC and Gauges
 9/16/09, 12:19 AM
#1
Thread Starter
Join Date: August 23, 2004
Location: Bay Area, California
Posts: 3,599
Likes: 0
Received 3 Likes
on
2 Posts
How To: Blue LED HVAC and Gauges
This is not my writeup. Credit belongs solely to [TxCobrA98] from SN95Forums. If you have any questions, I know a few guys on this board have done this modification, including bluethunderhorse, whom I know would be willing to give input if you have specific questions on the install.
Please read this post in its entirety before you attempt this. Recently some of the instructions on bulb choice has changed. I try to keep this as updated as possible, but the responses you find later in this thread reflect others' real life experience on doing this procedure, and I suggest reading the whole thread if you have the time.
I have done this install. Please feel free to PM me, but it is fairly straight forward.
If anyone would like the link to the original thread it is here. I'm going to be attempting to rewrite some of the coding so it works here, so please bear with me while I attempt to sort it out.
DISCLAIMER - I am not responsible for any problems (cluster failures, HVAC failures, shortages, electrical issues, personal harm to you or anyone else, etc...) from YOU attempting to do this LED swap. MY HOW TO article is to simply guide you through the process and help those that are unsure. I assume no responsibility if anything were to go wrong. However, I am responsible for all POSITIVE outcomes. =] This swap is very simple, just need basic knowledge and tools. You have been warned! If you wish to proceed, please continue, be safe and have fun!
After receiving about 5-10 PM's per day dealing solely with my 1998 Cobra's Gauge Cluster and HVAC controls, I have decided to write a "HOW TO" article. First and for most, I would like to clarify a few questions I have been asked. The gauge cluster and HVAC controls you will see in the following pictures or the first pictures are not aftermarket, not reverse-glo, not special edition or anything else. My gauge cluster and HVAC controls are the ones that were installed in my car from the factory.
Q. Now you might be asking, why do my gauges and controls look "bluer" or "brighter" than all of the other "stock" gauge clusters and HVAC controls?
A. I swapped out the stock "incandescent" bulbs in my cluster and controls with super bright "LED's."
Q. So whats the difference in the incandescent bulbs and LED bulbs and why does it make it appear blue?
A. Behind our clusters and HVAC controls lies a blue film (the film behind the number and dial cut outs are blue[Edit by cntchds: 94-00 have blue film behind the cluster. According to members in this thread 01 and later Mustangs have green film behind the gauges. I am unsure of what this would look like if using white LED's, but I would believe that blue LED's should let off a distinctly blue light still. I would recommend blue LED's, not white, if you wish to have blue gauges in these later New Edge Mustangs.]). An incandescent bulb emits a yellowish light (like most household bulbs that are incandescent). When you mix this yellowish light with a blue film, you get a green hue showing through the numbers of our clusters and dials of our controls. NOW, when you take the stock incandescent bulbs out and swap in their places the super bright, pure white LED's and mix it with the stock blue film, you get a BLUE hue. So white and blue = blue. Hopefully you get what im saying. That is why my gauge numbers and HVAC controls are now BLUE and not the stock green.
What you will need

7 Super Bright White LED's - Socket 194/168 (sockets are the same, just different numbers)
I bought my LED's from here. (mine are the WLED-x5 Wedge Based Bulbs)
If you have a 99-04 New Edge you will need size 74 bulbs. You will need five of them.
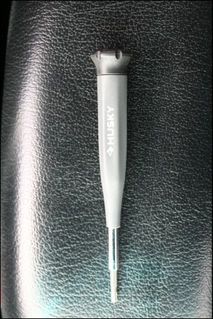
A T-15 Torx Screwdriver
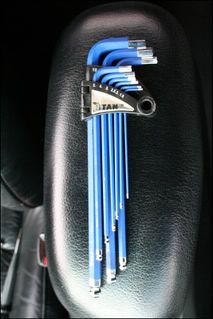
A 2 mm (I believe that's what it was) allen/hex wrench. YOU ONLY NEED THIS IF YOU HAVE AN AFTERMARKET HEADLIGHT ****!
An 8mm Socket, Socket Wrench and a few LONG extensions. YOU ONLY NEED THESE IF YOU ARE PLANNING ON DOING THE HVAC CONTROL LED SWAP!
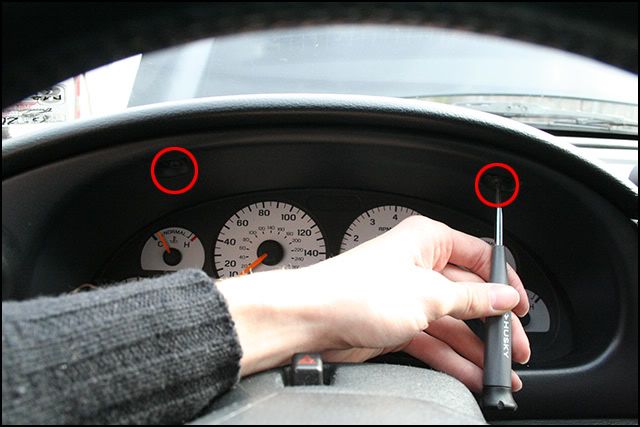
Step 1
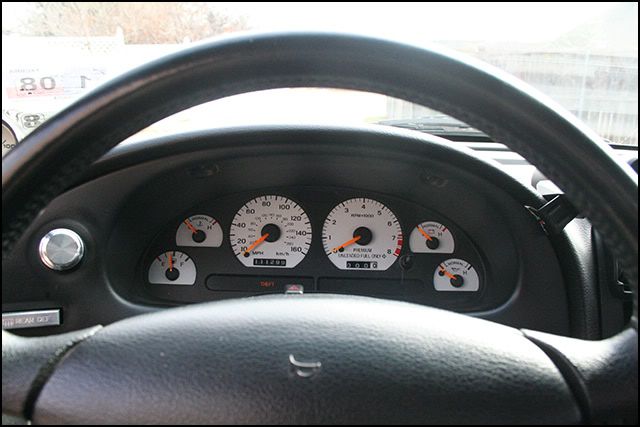
Start with your untouched gauge cluster.
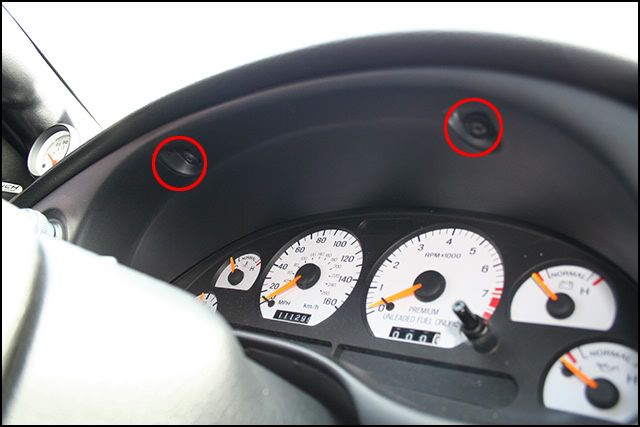
Remove the two T-15 Torx head screws.
Step 2
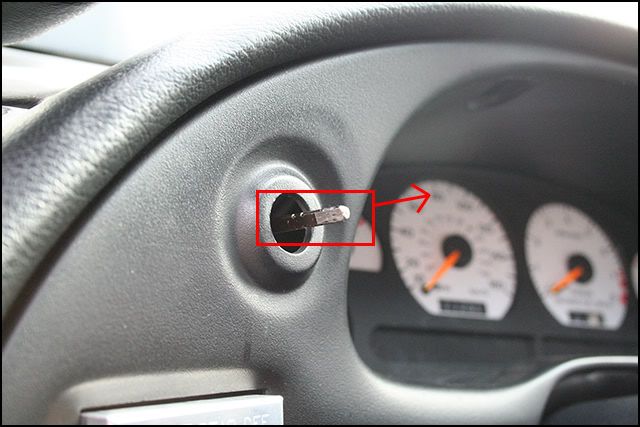
STOCK HEADLIGHT ****

"You need to pull a retainer clip outwards (away from the shaft) and then pull this **** off gently." - MustangWorld.com
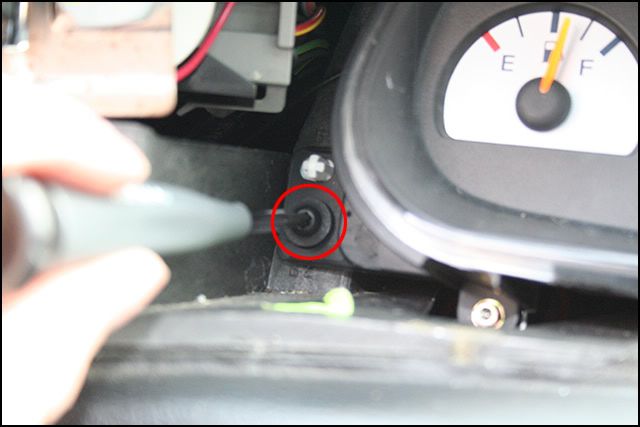
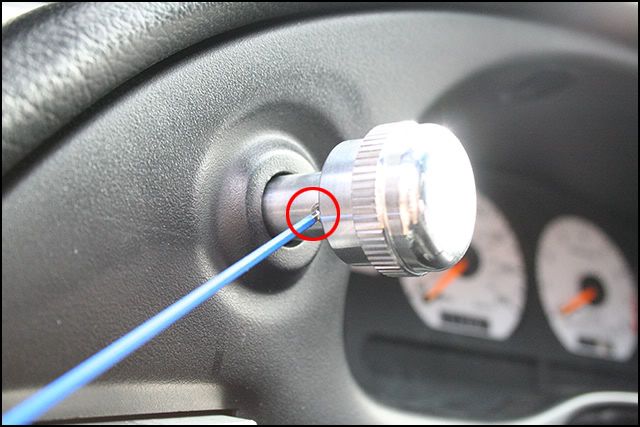
Aftermarket Headlight ****
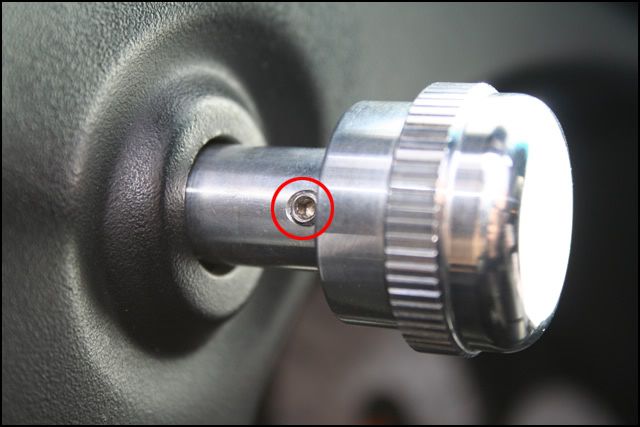
Remove the 2 mm Allen/Hex screw in the side of your Headlight **** Switch
Step 3
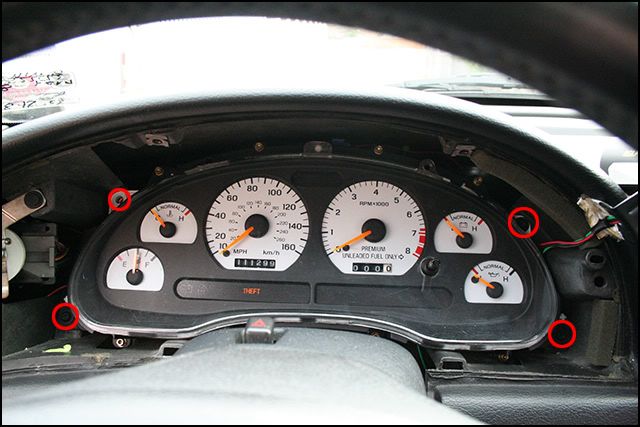
Once you have the **** taken care of, carefully remove the gauge clusters bezel (clusters surrounding piece). It will be stubborn more than likely but it should come out, just try not to break it! After the bezel is out, unscrew the four surrounding bolts to remove the cluster itself. They are again T-15 Torx headed bolts.
Step 4
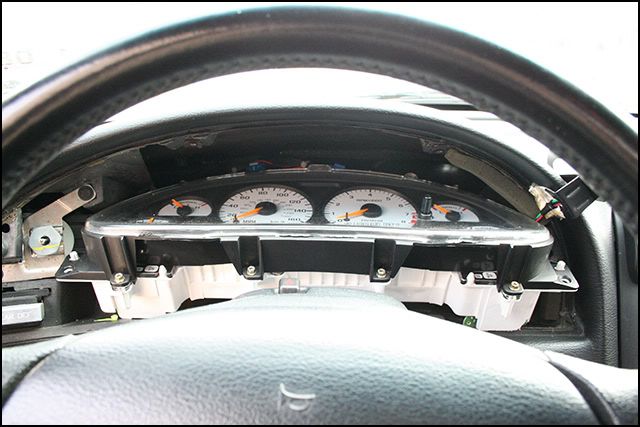
Tilt the cluster by bringing the bottom out first. (like you would be putting the gauge faces pointing upwards)
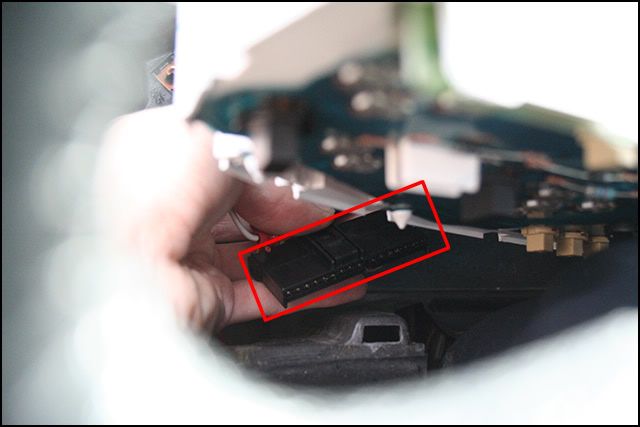
Step 4.1
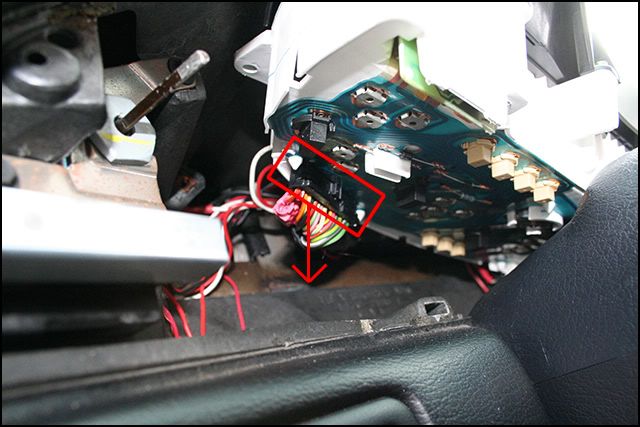
Remove the black connector that is connected into the back of the cluster. Carefully pull it straight back and out.
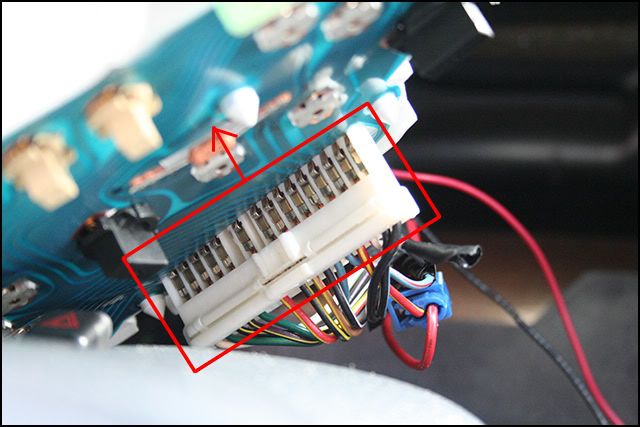
Step 4.2
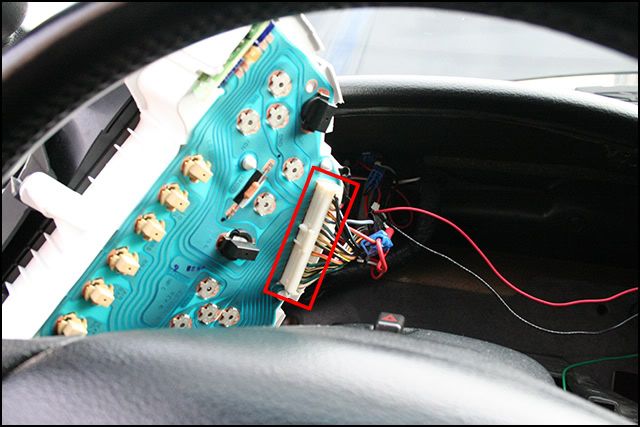
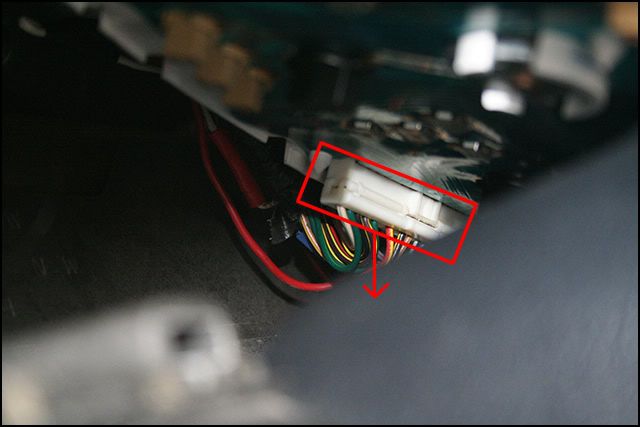
Notice the white connector on the opposite end of the gauge cluster. Just like the black connector, remove the white connector the same way. Carefully pull straight back and out.
Step 5
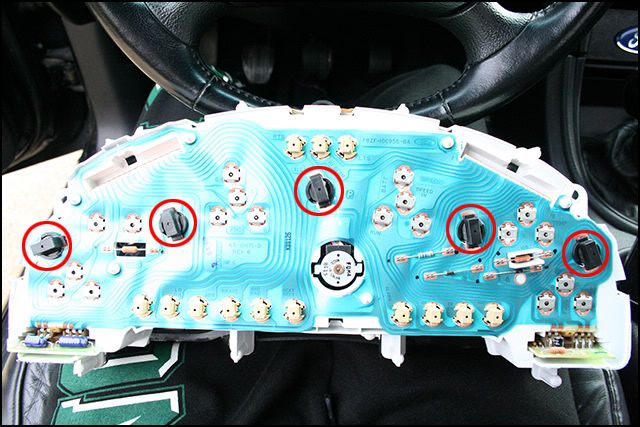
Once the two connectors are unplugged from the back of the cluster, carefully pull the cluster out. (It helps if you have the wheel tilted as low as it can go). From there, flip the cluster over and notice the 5 black TWIST style sockets. Untwisting the black sockets to the left will unlock them and allow you to pull them straight out.
Step 6
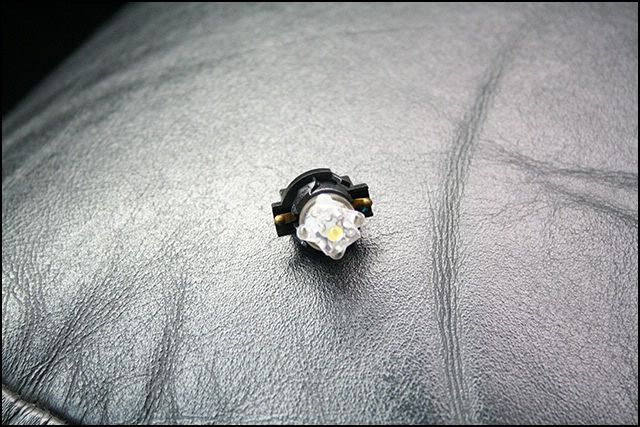
Notice MY already installed LED.
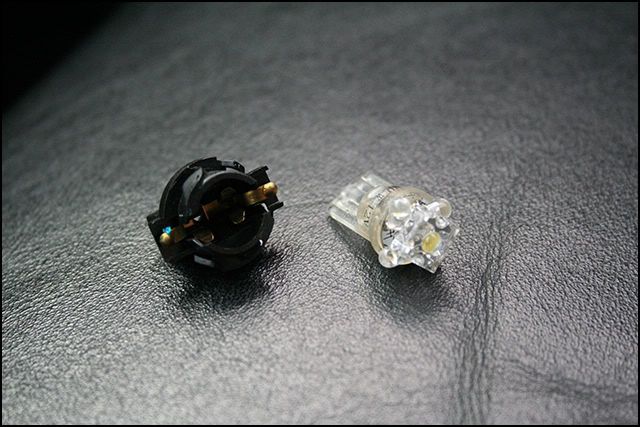
To replace the bulbs with your new LED's, simply pull the stock bulb out and replace with the LED. Put all the sockets back into the holes and get ready to reinstall the cluster!
So CONGRATS, we are halfway done with the swap! See, its not so bad right!?
REINSTALLATION of the Cluster
Step 7
Start by re-inserting the white connector the the back of the gauge cluster. Do not force it in, it will go in if you have it aligned right. It will require a bit of pressure but not 100% strength lol.
Step 7.1
Then go to the opposite side of the cluster and reinsert the black connector. Rules are the same as the white connector.
Step 7.2
Reinsert the Cluster with the gauge faces pointing upwards again and slide the bottom up and back to insert the cluster in its original position.
Step 7.3
ATTENTION! I would now suggest that you reconnect the negative battery cable to ensure your newly installed LED's are all working! Once you verify they are all on and in working condition, go back and DISCONNECT your negative battery cable.
Step 8
Screw in the 4 T-15 Torx headed bolts to hold the cluster in place (be careful not to drop the bolts behind the cluster, you may not get them back!)
Step 9
ATTENTION! Dont forget about the HEADLIGHT ****! Ive done this and reinstalled everything and its annoying to think your done and then notice your missing a headlight ****! Go ahead and pull out the headlight ***** shaft to the ON position and THEN install the gauge clusters bezel.
Step 10
Reinstall your Headlight **** with your 2 mm Allen/Hex wrench or simply push your stock **** back on (i remember having to adjust the retaining clip inside the **** when I had mine so you may have to play with it)
Step 11
Reinstall the two T-15 Torx headed bolts into the clusters bezel and vwalah! or walah! or.... you get the point.
------------------------------------------------------------
So, we have no completed the gauge cluster LED swap! If you are continuing on and doing the HVAC control LED swap, now is a great time to have a coke, pop, soda, w/e... Hey, im 18 so no beer for me. =P
------------------------------------------------------------
Step 1
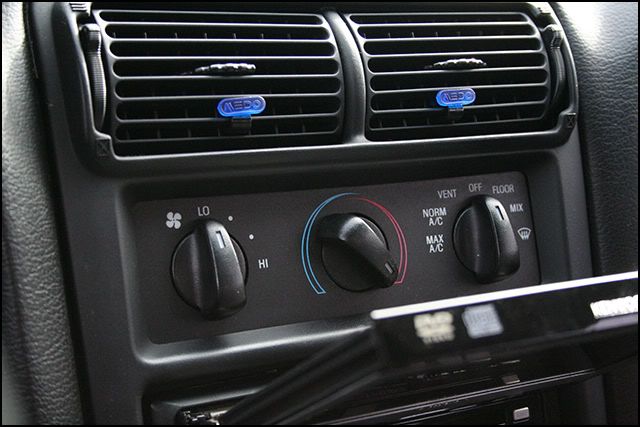
Here we start with a stock HVAC control head unit. If you have a DVD player, make sure you fold the face down before unplugging the negative battery cable.
Step 2
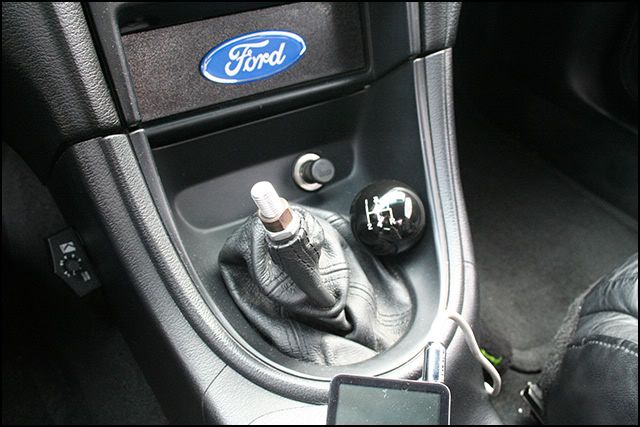
Here I undid my shifter **** so I can remove the shifters bezel and boot.
Step 2.1
Once the shifter bezel and boot is taken off of the main console, unplug the cigarette lighter.
Step 3
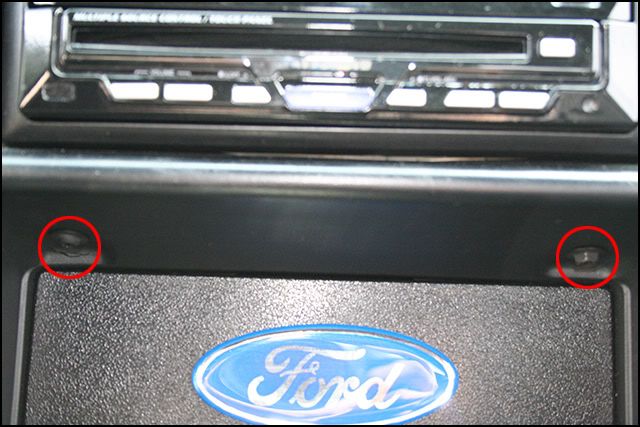
Continuing, unscrew the two T-15 Torx headed screws securing the bezel.
Step 4
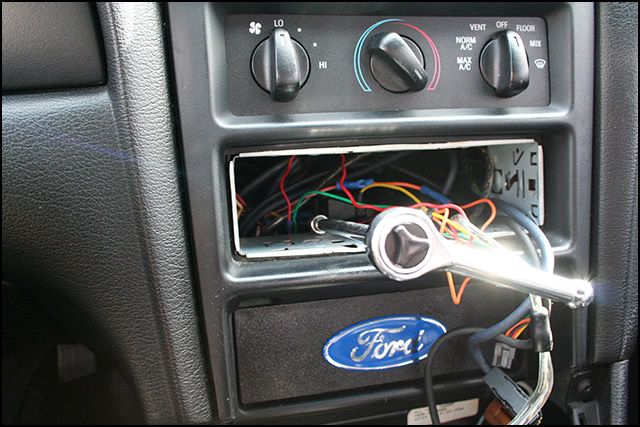
After taking out your stereo's head unit, take your extensions as well as your 8mm (i believe thats what I used) socket and socket wrench.
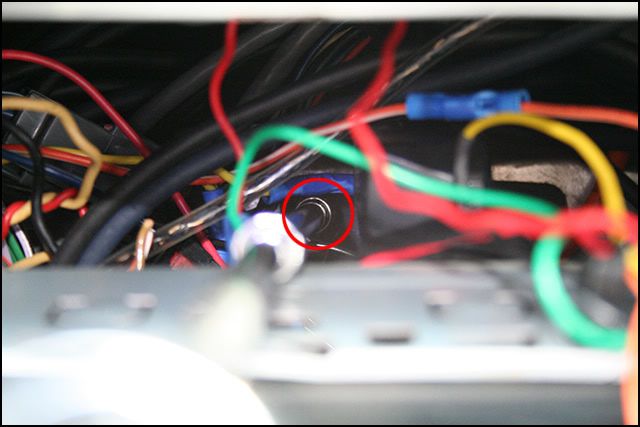
Unscrew the 8mm headed bolt that secure the bezel in place inside of the dash. (It is directly behind the stereo head unit. Follow the long black plastic piece)
Step 5
YAY! Our bezel can now come off after a few pulls around the perimeter of the bezel! Like the gauge cluster bezel, be careful not to break it! The bezel will be stubborn but should come out with a bit of strength!
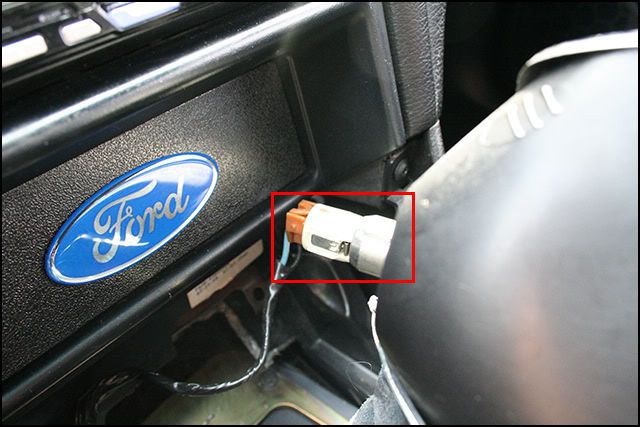
Step 6
Here is the long black piece attached to the bezel and the hole that the 8mm screw goes in.
Step 7
After the bezel is removed and carefully set down to avoid scratches, take your T-15 Torx screw driver and unscrew the four bolts holding the HVAC controls in place.
Step 7.1
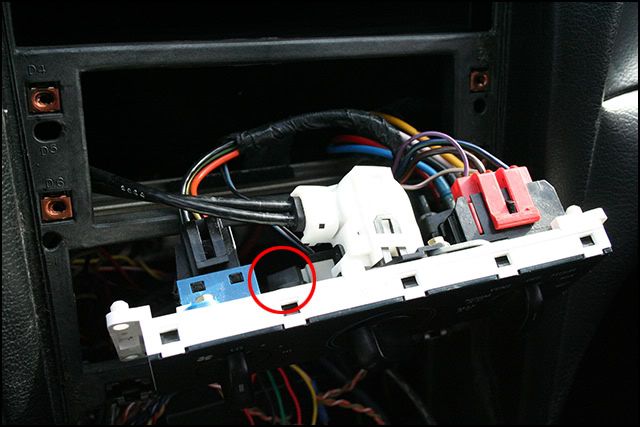
Once the four bolts are removed, carefully pull out the HVAC control unit and look for the 2 black TWIST style sockets. (These are exactly the same as the gauge cluster sockets)
Step 8
Twist out the sockets, replace the bulbs, and reinstall.
ATTENTION! I would suggest replugging up the negative battery cable and making sure the LED's work like before. Once you verify they are working, go ahead and unplug the negative battery cable again. After doing that, reinstall EVERYTHING in REVERSE order! Reconnect your negative battery cable, pull the headlight **** and again, VWALAH! You should now be greeted with a nice blue gauge cluster and HVAC controls!
Thats it! Not to long of a job but it can be aggravating. However, the results definitely speak for themselves! Hope my HOW TO was easy to follow and you got the output you desired
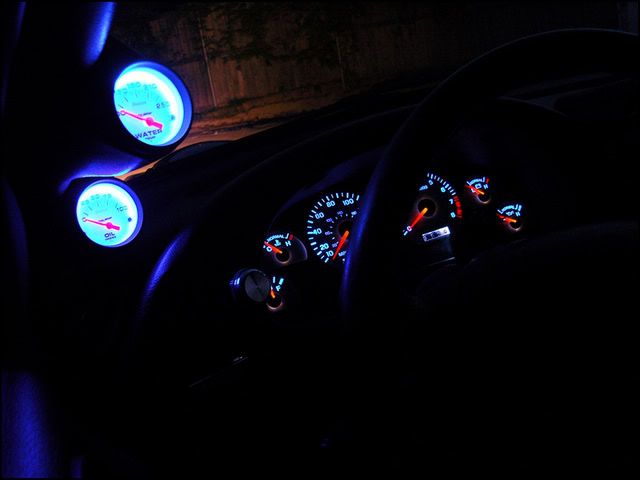
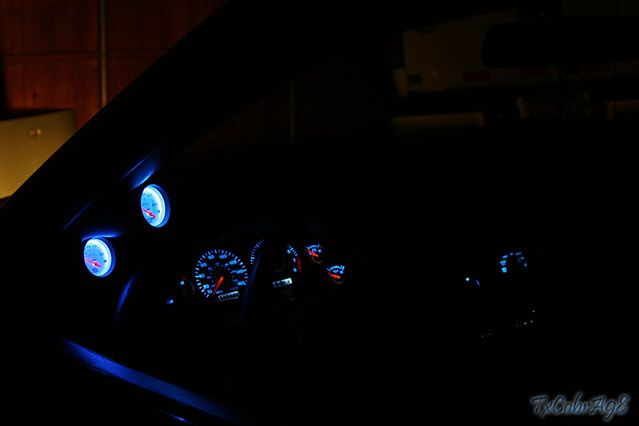
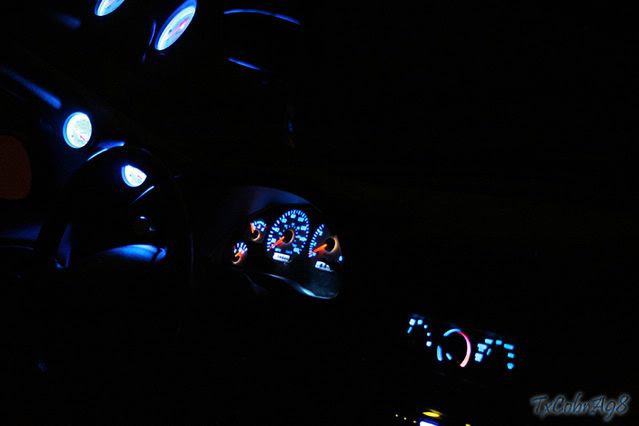
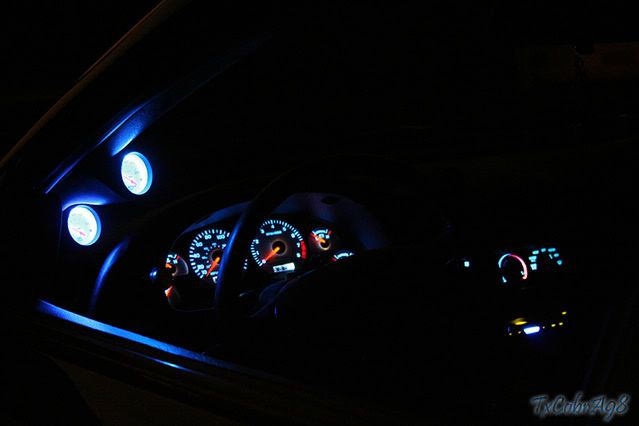
After shots!
This tutorial was brought to you by Trey - "TxCobrA98". If you have ANY QUESTIONS, feel free to email me at elewarfare [AT] yahoo [dot] com or go to www.sn95forums.com and look in almost any thread for me. (TxCobrA98)
Please read this post in its entirety before you attempt this. Recently some of the instructions on bulb choice has changed. I try to keep this as updated as possible, but the responses you find later in this thread reflect others' real life experience on doing this procedure, and I suggest reading the whole thread if you have the time.
I have done this install. Please feel free to PM me, but it is fairly straight forward.
If anyone would like the link to the original thread it is here. I'm going to be attempting to rewrite some of the coding so it works here, so please bear with me while I attempt to sort it out.
Originally Posted by TxCobrA98
DISCLAIMER - I am not responsible for any problems (cluster failures, HVAC failures, shortages, electrical issues, personal harm to you or anyone else, etc...) from YOU attempting to do this LED swap. MY HOW TO article is to simply guide you through the process and help those that are unsure. I assume no responsibility if anything were to go wrong. However, I am responsible for all POSITIVE outcomes. =] This swap is very simple, just need basic knowledge and tools. You have been warned! If you wish to proceed, please continue, be safe and have fun!
After receiving about 5-10 PM's per day dealing solely with my 1998 Cobra's Gauge Cluster and HVAC controls, I have decided to write a "HOW TO" article. First and for most, I would like to clarify a few questions I have been asked. The gauge cluster and HVAC controls you will see in the following pictures or the first pictures are not aftermarket, not reverse-glo, not special edition or anything else. My gauge cluster and HVAC controls are the ones that were installed in my car from the factory.
Q. Now you might be asking, why do my gauges and controls look "bluer" or "brighter" than all of the other "stock" gauge clusters and HVAC controls?
A. I swapped out the stock "incandescent" bulbs in my cluster and controls with super bright "LED's."
Q. So whats the difference in the incandescent bulbs and LED bulbs and why does it make it appear blue?
A. Behind our clusters and HVAC controls lies a blue film (the film behind the number and dial cut outs are blue[Edit by cntchds: 94-00 have blue film behind the cluster. According to members in this thread 01 and later Mustangs have green film behind the gauges. I am unsure of what this would look like if using white LED's, but I would believe that blue LED's should let off a distinctly blue light still. I would recommend blue LED's, not white, if you wish to have blue gauges in these later New Edge Mustangs.]). An incandescent bulb emits a yellowish light (like most household bulbs that are incandescent). When you mix this yellowish light with a blue film, you get a green hue showing through the numbers of our clusters and dials of our controls. NOW, when you take the stock incandescent bulbs out and swap in their places the super bright, pure white LED's and mix it with the stock blue film, you get a BLUE hue. So white and blue = blue. Hopefully you get what im saying. That is why my gauge numbers and HVAC controls are now BLUE and not the stock green.
What you will need
7 Super Bright White LED's - Socket 194/168 (sockets are the same, just different numbers)
I bought my LED's from here. (mine are the WLED-x5 Wedge Based Bulbs)
If you have a 99-04 New Edge you will need size 74 bulbs. You will need five of them.
A T-15 Torx Screwdriver
A 2 mm (I believe that's what it was) allen/hex wrench. YOU ONLY NEED THIS IF YOU HAVE AN AFTERMARKET HEADLIGHT ****!
An 8mm Socket, Socket Wrench and a few LONG extensions. YOU ONLY NEED THESE IF YOU ARE PLANNING ON DOING THE HVAC CONTROL LED SWAP!
MAKE SURE YOU UNPLUG THE NEGATIVE BATTERY CABLE FROM THE NEGATIVE BATTERY TERMINAL!
OK, so lets get started!
OK, so lets get started!
Step 1
Start with your untouched gauge cluster.
Remove the two T-15 Torx head screws.
Step 2
STOCK HEADLIGHT ****
"You need to pull a retainer clip outwards (away from the shaft) and then pull this **** off gently." - MustangWorld.com
Aftermarket Headlight ****
Remove the 2 mm Allen/Hex screw in the side of your Headlight **** Switch
Step 3
Once you have the **** taken care of, carefully remove the gauge clusters bezel (clusters surrounding piece). It will be stubborn more than likely but it should come out, just try not to break it! After the bezel is out, unscrew the four surrounding bolts to remove the cluster itself. They are again T-15 Torx headed bolts.
Step 4
Tilt the cluster by bringing the bottom out first. (like you would be putting the gauge faces pointing upwards)
Step 4.1
Remove the black connector that is connected into the back of the cluster. Carefully pull it straight back and out.
Step 4.2
Notice the white connector on the opposite end of the gauge cluster. Just like the black connector, remove the white connector the same way. Carefully pull straight back and out.
Step 5
Once the two connectors are unplugged from the back of the cluster, carefully pull the cluster out. (It helps if you have the wheel tilted as low as it can go). From there, flip the cluster over and notice the 5 black TWIST style sockets. Untwisting the black sockets to the left will unlock them and allow you to pull them straight out.
Step 6
Notice MY already installed LED.
To replace the bulbs with your new LED's, simply pull the stock bulb out and replace with the LED. Put all the sockets back into the holes and get ready to reinstall the cluster!
So CONGRATS, we are halfway done with the swap! See, its not so bad right!?
REINSTALLATION of the Cluster
Step 7
Start by re-inserting the white connector the the back of the gauge cluster. Do not force it in, it will go in if you have it aligned right. It will require a bit of pressure but not 100% strength lol.
Step 7.1
Then go to the opposite side of the cluster and reinsert the black connector. Rules are the same as the white connector.
Step 7.2
Reinsert the Cluster with the gauge faces pointing upwards again and slide the bottom up and back to insert the cluster in its original position.
Step 7.3
ATTENTION! I would now suggest that you reconnect the negative battery cable to ensure your newly installed LED's are all working! Once you verify they are all on and in working condition, go back and DISCONNECT your negative battery cable.
Step 8
Screw in the 4 T-15 Torx headed bolts to hold the cluster in place (be careful not to drop the bolts behind the cluster, you may not get them back!)
Step 9
ATTENTION! Dont forget about the HEADLIGHT ****! Ive done this and reinstalled everything and its annoying to think your done and then notice your missing a headlight ****! Go ahead and pull out the headlight ***** shaft to the ON position and THEN install the gauge clusters bezel.
Step 10
Reinstall your Headlight **** with your 2 mm Allen/Hex wrench or simply push your stock **** back on (i remember having to adjust the retaining clip inside the **** when I had mine so you may have to play with it)
Step 11
Reinstall the two T-15 Torx headed bolts into the clusters bezel and vwalah! or walah! or.... you get the point.
------------------------------------------------------------
So, we have no completed the gauge cluster LED swap! If you are continuing on and doing the HVAC control LED swap, now is a great time to have a coke, pop, soda, w/e... Hey, im 18 so no beer for me. =P
------------------------------------------------------------
LED HVAC CONTROLS SWAP
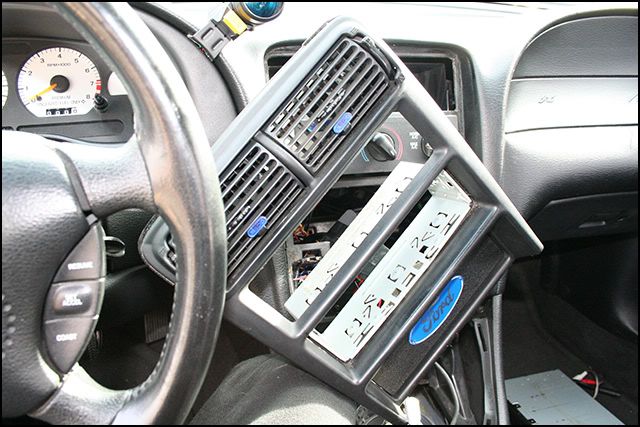
Step 1
Here we start with a stock HVAC control head unit. If you have a DVD player, make sure you fold the face down before unplugging the negative battery cable.
Step 2
Here I undid my shifter **** so I can remove the shifters bezel and boot.
Step 2.1
Once the shifter bezel and boot is taken off of the main console, unplug the cigarette lighter.
Step 3
Continuing, unscrew the two T-15 Torx headed screws securing the bezel.
Step 4
After taking out your stereo's head unit, take your extensions as well as your 8mm (i believe thats what I used) socket and socket wrench.
Unscrew the 8mm headed bolt that secure the bezel in place inside of the dash. (It is directly behind the stereo head unit. Follow the long black plastic piece)
Step 5
YAY! Our bezel can now come off after a few pulls around the perimeter of the bezel! Like the gauge cluster bezel, be careful not to break it! The bezel will be stubborn but should come out with a bit of strength!
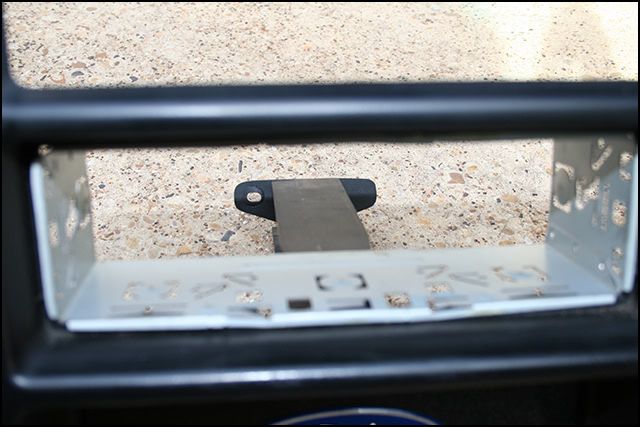
Step 6
Here is the long black piece attached to the bezel and the hole that the 8mm screw goes in.
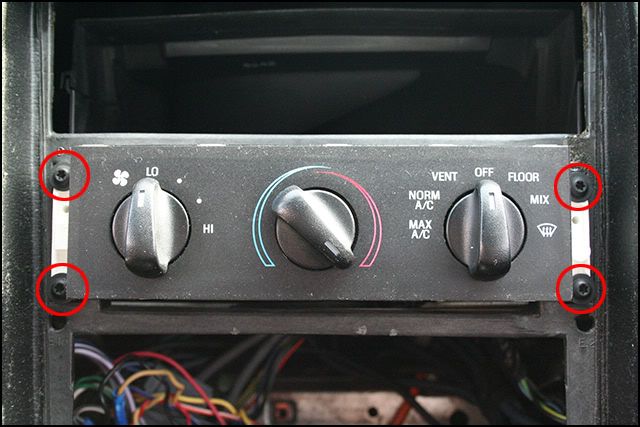
Step 7
After the bezel is removed and carefully set down to avoid scratches, take your T-15 Torx screw driver and unscrew the four bolts holding the HVAC controls in place.
Step 7.1
Once the four bolts are removed, carefully pull out the HVAC control unit and look for the 2 black TWIST style sockets. (These are exactly the same as the gauge cluster sockets)
Step 8
Twist out the sockets, replace the bulbs, and reinstall.
ATTENTION! I would suggest replugging up the negative battery cable and making sure the LED's work like before. Once you verify they are working, go ahead and unplug the negative battery cable again. After doing that, reinstall EVERYTHING in REVERSE order! Reconnect your negative battery cable, pull the headlight **** and again, VWALAH! You should now be greeted with a nice blue gauge cluster and HVAC controls!
Thats it! Not to long of a job but it can be aggravating. However, the results definitely speak for themselves! Hope my HOW TO was easy to follow and you got the output you desired
After shots!
This tutorial was brought to you by Trey - "TxCobrA98". If you have ANY QUESTIONS, feel free to email me at elewarfare [AT] yahoo [dot] com or go to www.sn95forums.com and look in almost any thread for me. (TxCobrA98)
Last edited by cntchds; 2/16/13 at 01:07 PM. Reason: Gauge film was found inconsistent in later SN95 years. Edit to reflect findings.

The following users liked this post:
SouthernGorilla (3/26/22)
9/16/09, 06:45 PM
#2
Cobra R Member
including bluethunderhorse, whom I know would be willing to give input if you have specific questions on the install.

I don't mind helping at all. It's easier than it looks to do

these are the bulbs I ordered and I don't recommend them because they are not bright enough
Last edited by bluethunderhorse; 9/16/09 at 07:01 PM.
9/16/09, 11:54 PM
#3
Thread Starter
Join Date: August 23, 2004
Location: Bay Area, California
Posts: 3,599
Likes: 0
Received 3 Likes
on
2 Posts
I thought you did the install before the crash? If you don't want to be pestered I can edit you out of the post. 
You guys better appreciate that I put an hour worth of changing the code into that post so that it looks the same as it did on SN95. Why can't all the forums just use a standard code?
You guys better appreciate that I put an hour worth of changing the code into that post so that it looks the same as it did on SN95. Why can't all the forums just use a standard code?
9/17/09, 09:00 AM
#4
Cobra R Member
I don't mind helping out I was just poking fun at you. I didn't do this mod until Febuary or March so it went away with the crash. Plus I donnt have the pics on my computer anymore so I'll have to take some new ones tonight
The following users liked this post:
SouthernGorilla (3/26/22)
6/14/11, 01:14 AM
#9
Thread Starter
Join Date: August 23, 2004
Location: Bay Area, California
Posts: 3,599
Likes: 0
Received 3 Likes
on
2 Posts
I finally bought my own LED's to do this swap. I will post some pictures when I get mine, and I'll see if I can fandangle a way to make the digital odometer to glow blue too, but I don't have high expectations of myself in that regard.
6/17/11, 12:11 AM
#11
Thread Starter
Join Date: August 23, 2004
Location: Bay Area, California
Posts: 3,599
Likes: 0
Received 3 Likes
on
2 Posts
Just as a heads up, the lights that were in the original write-up are the wrong size for 99-04 clusters. I'm returning mine for a set of 74-CWHP3 and hopefully that will be the last of it. I am feeling doubly stupid today for not checking things ahead of time. 
7/7/11, 02:58 PM
#12
Member

Join Date: July 7, 2011
Posts: 8
Likes: 0
Received 0 Likes
on
0 Posts
I run a site that sells led kits for cars. I just got done w/ the SRT4. If there is enough interest, I could become a vendor here and start selling some lighting goodies. LMK. I dont know anyone in vegas personally that has a Mustang, but I could work something out to use them as a test car.

7/8/11, 08:07 PM
#13
Cobra Member
 8/9/12, 06:13 PM
#15
Post *****
Join Date: May 13, 2004
Location: Berkeley/Redwood City, CA
Posts: 18,613
Likes: 0
Received 3 Likes
on
2 Posts
Just wanted everyone to know, if you have Bullitt (and I assume Mach 1) gauges, the bulbs for this swap are not the correct ones.
I just tried to put the two spare ones pete had into my car, and while the teardown is essentially the same, even the connectors on the back are a bit different.
most importantly, the bulbs are a completely different size. check it:
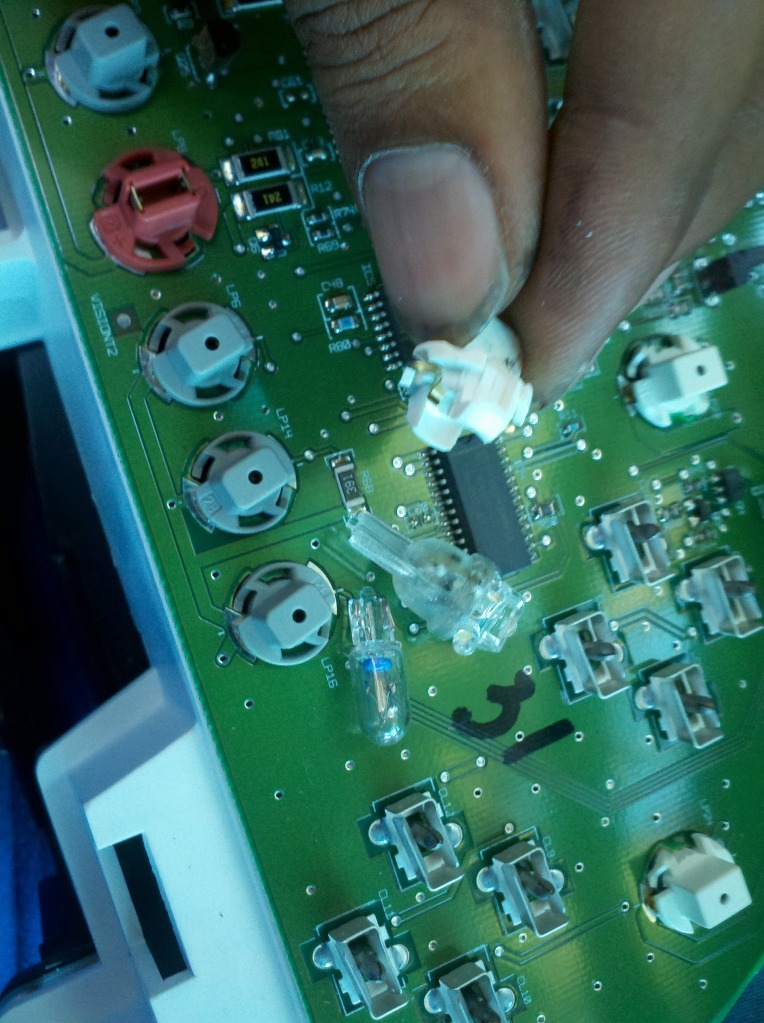
I don't know what the right bulb size is yet, but I'll try and find out.
I just tried to put the two spare ones pete had into my car, and while the teardown is essentially the same, even the connectors on the back are a bit different.
most importantly, the bulbs are a completely different size. check it:
I don't know what the right bulb size is yet, but I'll try and find out.
8/9/12, 08:25 PM
#16
Shelby GT350 Member
Originally Posted by future9er24
Just wanted everyone to know, if you have Bullitt (and I assume Mach 1) gauges, the bulbs for this swap are not the correct ones.
I just tried to put the two spare ones pete had into my car, and while the teardown is essentially the same, even the connectors on the back are a bit different.
most importantly, the bulbs are a completely different size. check it:
I don't know what the right bulb size is yet, but I'll try and find out.
You need size 74 for the gauges
Below pic of the HVAC bulbs and the Bulb from the gauges.
