
Full Detail After 2100 Mile Rally
 7/3/12, 06:51 AM
#1
V6 Member
Thread Starter

Join Date: May 16, 2012
Posts: 86
Likes: 0
Received 0 Likes
on
0 Posts
Full Detail After 2100 Mile Rally
I posted in another thread which was asking about which products you prefer and I posted the following items.
Wash - Meguires Ultimate Wash/Wax -or- Mothers California Gold Carnuba Wash and Wax
Clay - Meguires Clay Kit -or- Mothers California Clay Bar System
Swirl Repair - Meguires Medium Cut Cleaner #1, Swirl Free Polish #82, Machine Glaze #3
Buff - Meguires Show Car Glaze #7
Sealant - Wolfgang Deep Gloss Paint Sealant 3.0
Wax - Pinnacle Liquid Souver�n Car Wax
QD - Mothers California Gold Showtime Instant Detailer -or- Meguires Ultimate Quik Detailer
Wheels & Tires - Meguires All Wheel Cleaner & Meguires Gold Class High Endurance Tire Gel
Windows - Stoner Invisible Glass
Trim - Mothers Back-to-Black
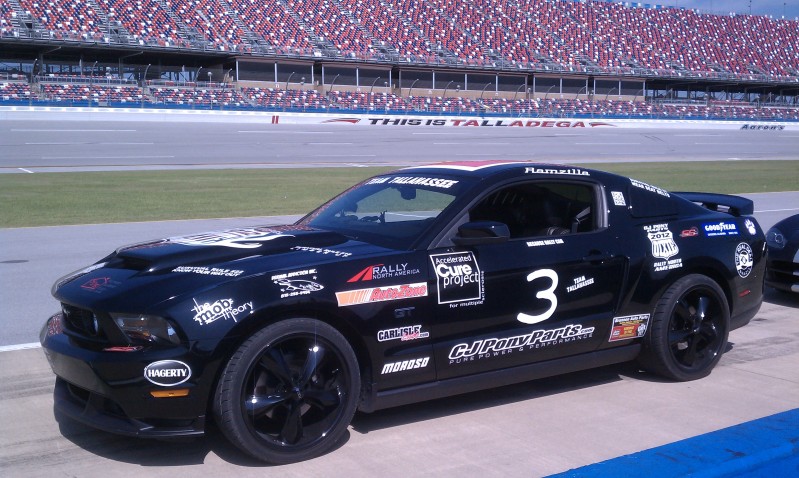
My brother and I just participated in "Rally Dixie 2012" (http://www.rallynorthamerica.com/index.php , http://realdealbrazil.blogspot.com/2...-in-rally.html) which for my car meant approximately 2100 miles over the course of about 5 days and also having decals plastered all over my car.
Decals on the car at Talladega, a stop on the rally
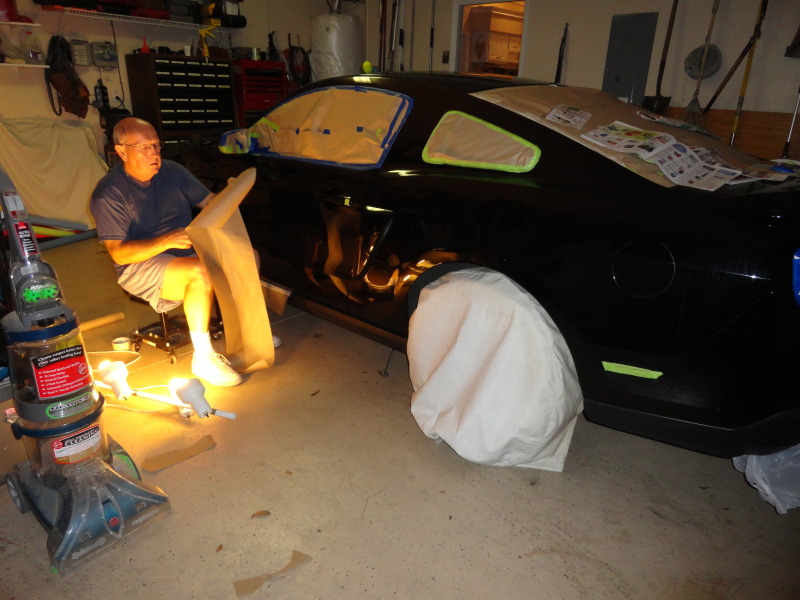
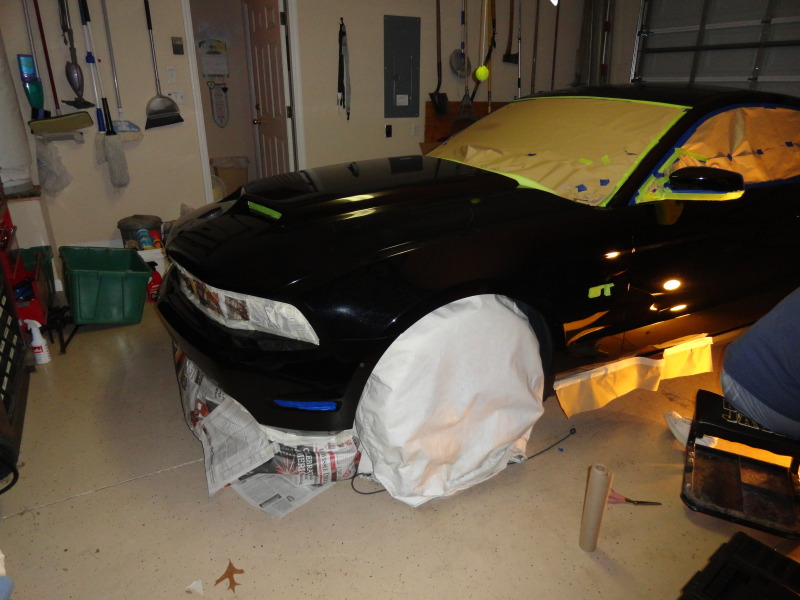
I removed all the decals late last week (June 28 & 29) and then washed and clayed the car the over the weekend (June 30 & July 1) and then brought it to my folks house which has a slightly larger garage than my house but more importantly my Dad has a window AC unit he can pop into place. Last night I brought all the needed stuff to my folks house and inhaled a quick dinner and started taping off the car, my Dad helped but it's still a painfully slow process.
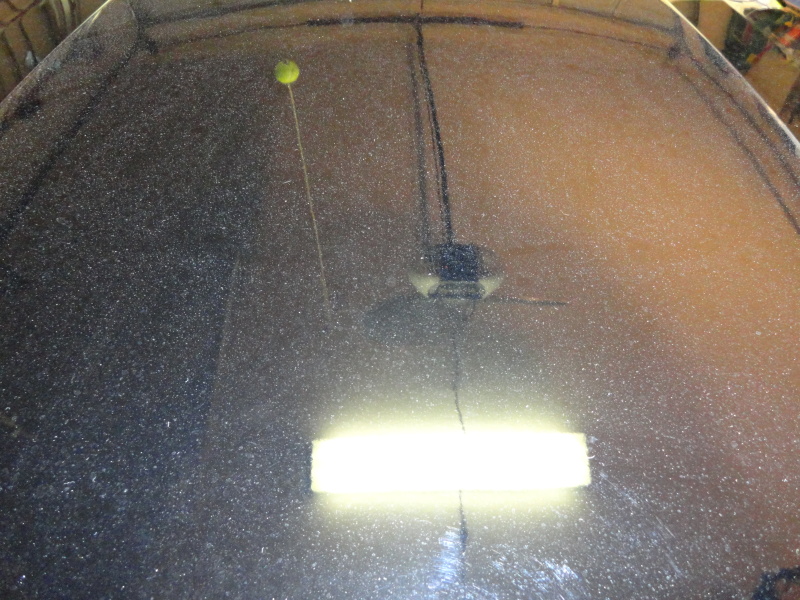
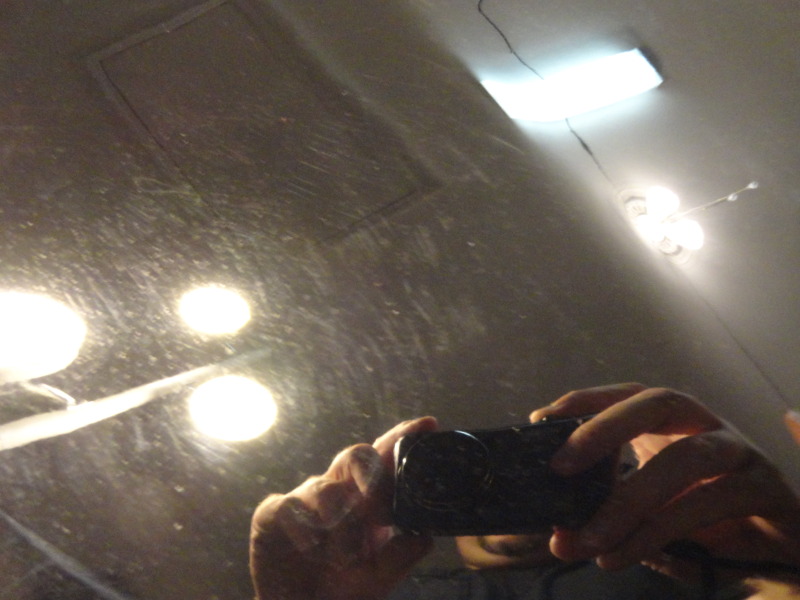
I took a few pictures of swirls and scratches last night, I'll take more tonight before I get started to show everything taped off and give some advice on things I learned thru-out the process. I wanted to get a thread started to document the project and act as a placeholder for where the pictures will go once I've wrapped everything up.
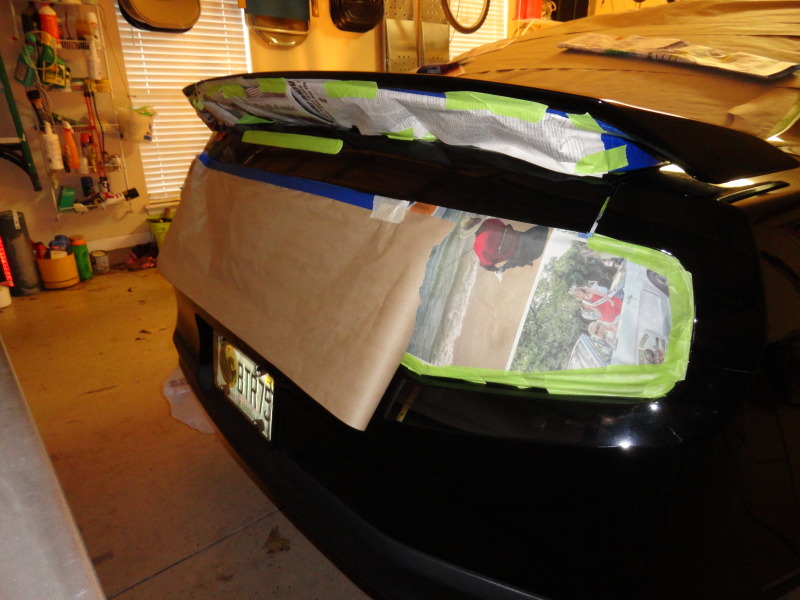
I used a combination of masking tapes (blue, green, tan) to tape things off, the green was the stickiest so I hope that doesn't cause issues later. I also used some of the brown "rolled" paper as well as newspaper to block off larger areas such as the windows and front/rear areas. The wheels my Dad grabbed his wheel covers off his RV and they will work great, a trash bag or something similar would work good as well.

Taping, for anyone curious, is important as the various compounds will "fly" off your DA buffer no matter how careful you try to be and any plastic or rubber area will collect that over spray and be a pain in the butt to clean off later. It's the whole "an ounce of prevention is worth a pound of cure" principle going on here.
Unless you do this for a living of fairly frequently it will take alot of time to tape the car, there are a few tricks that can save some time IF you remember to do them! Some I did remember and some I didn't, a few new tricks I learned thru my Dad helping me.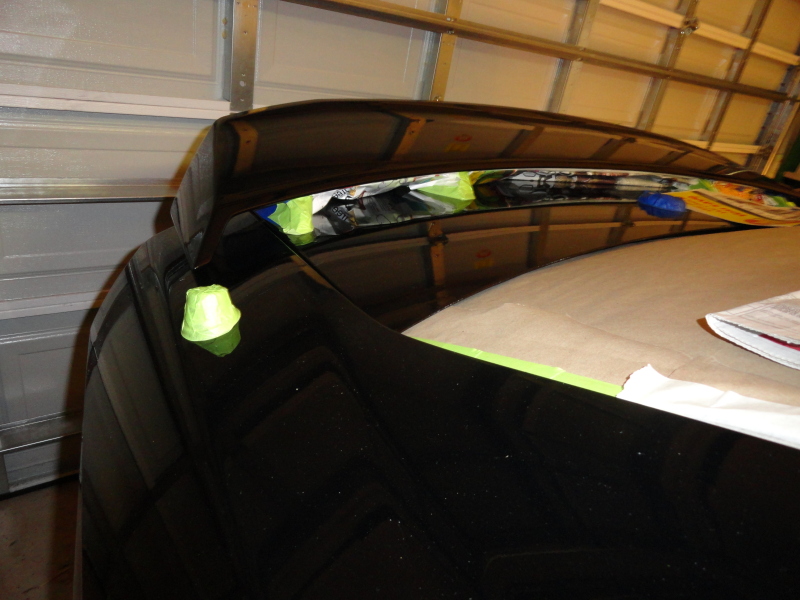
We worked for about 3 hours last night getting everything taped off, if I'd used all the advice I listed above I probably could have shaved about an hour off of that time. I'm going to write these things down in a notebook and keep it with my detailing stuff so I can review my notes before I even begin next time. Doing this once or twice a year is just infrequently enough for me to forget simple things that can really save alot of time.
Again, I will add pictures to this later I just wanted to doo a memory purge before I forgot anything, I will try and get the pictures of all the above stuff posted ASAP. If anyone has a specific picture they'd like to see please let me know and I'll try get it taken. I hope this wall'o'text will be useful to someone, I read alot of posts on car care and do learn something new all the time. If you have any bits of advice you think may be of use to me as I move forward or on something I've already done please feel free to share.
Thanks
Wash - Meguires Ultimate Wash/Wax -or- Mothers California Gold Carnuba Wash and Wax
Clay - Meguires Clay Kit -or- Mothers California Clay Bar System
Swirl Repair - Meguires Medium Cut Cleaner #1, Swirl Free Polish #82, Machine Glaze #3
Buff - Meguires Show Car Glaze #7
Sealant - Wolfgang Deep Gloss Paint Sealant 3.0
Wax - Pinnacle Liquid Souver�n Car Wax
QD - Mothers California Gold Showtime Instant Detailer -or- Meguires Ultimate Quik Detailer
Wheels & Tires - Meguires All Wheel Cleaner & Meguires Gold Class High Endurance Tire Gel
Windows - Stoner Invisible Glass
Trim - Mothers Back-to-Black
My brother and I just participated in "Rally Dixie 2012" (http://www.rallynorthamerica.com/index.php , http://realdealbrazil.blogspot.com/2...-in-rally.html) which for my car meant approximately 2100 miles over the course of about 5 days and also having decals plastered all over my car.
Decals on the car at Talladega, a stop on the rally
I removed all the decals late last week (June 28 & 29) and then washed and clayed the car the over the weekend (June 30 & July 1) and then brought it to my folks house which has a slightly larger garage than my house but more importantly my Dad has a window AC unit he can pop into place. Last night I brought all the needed stuff to my folks house and inhaled a quick dinner and started taping off the car, my Dad helped but it's still a painfully slow process.
I took a few pictures of swirls and scratches last night, I'll take more tonight before I get started to show everything taped off and give some advice on things I learned thru-out the process. I wanted to get a thread started to document the project and act as a placeholder for where the pictures will go once I've wrapped everything up.
I used a combination of masking tapes (blue, green, tan) to tape things off, the green was the stickiest so I hope that doesn't cause issues later. I also used some of the brown "rolled" paper as well as newspaper to block off larger areas such as the windows and front/rear areas. The wheels my Dad grabbed his wheel covers off his RV and they will work great, a trash bag or something similar would work good as well.
Taping, for anyone curious, is important as the various compounds will "fly" off your DA buffer no matter how careful you try to be and any plastic or rubber area will collect that over spray and be a pain in the butt to clean off later. It's the whole "an ounce of prevention is worth a pound of cure" principle going on here.
Unless you do this for a living of fairly frequently it will take alot of time to tape the car, there are a few tricks that can save some time IF you remember to do them! Some I did remember and some I didn't, a few new tricks I learned thru my Dad helping me.
1. Pop both the hood and the trunk to tape off surrounding areas, it�s far easier to go under them onto the window than do it with them closed.
2. Use this same concept for the lower door areas, do the drivers side last in case you need to get in and out for any reason. Once you tape the windows you can�t get back in without wrecking all your taping work.
3. Use rolled paper (not newspaper), for larger areas. Think about where your DA can realistically get and where it won�t be able to go and tape accordingly.
4. The spoiler area, if you have one, is a royal pain to tape. We taped each of the pedestals first then went back and used paper, when I do it again I will use paper to block off the entire area under the spoiler. That area I can do by hand later and not worry about over spray.
We worked for about 3 hours last night getting everything taped off, if I'd used all the advice I listed above I probably could have shaved about an hour off of that time. I'm going to write these things down in a notebook and keep it with my detailing stuff so I can review my notes before I even begin next time. Doing this once or twice a year is just infrequently enough for me to forget simple things that can really save alot of time.
Again, I will add pictures to this later I just wanted to doo a memory purge before I forgot anything, I will try and get the pictures of all the above stuff posted ASAP. If anyone has a specific picture they'd like to see please let me know and I'll try get it taken. I hope this wall'o'text will be useful to someone, I read alot of posts on car care and do learn something new all the time. If you have any bits of advice you think may be of use to me as I move forward or on something I've already done please feel free to share.
Thanks
Last edited by BTR-75; 7/7/12 at 10:18 AM.
 7/4/12, 09:53 AM
#3
NTTAWWT
I dont know on your car, but my spoiler is a quick 4 nuts that need to come off. I've taken the spoiler off on a couple of occasions when working on the decklid.
7/5/12, 10:34 AM
#4
V6 Member
Thread Starter
Join Date: May 16, 2012
Posts: 86
Likes: 0
Received 0 Likes
on
0 Posts
I thought of doing that but when I'd asked around I was told there was also double sided tape in there so I decided not to take it apart.
7/5/12, 10:55 AM
#5
V6 Member
Thread Starter
Join Date: May 16, 2012
Posts: 86
Likes: 0
Received 0 Likes
on
0 Posts
Some additional tips and tricks as I've moved thru the buffing stages...
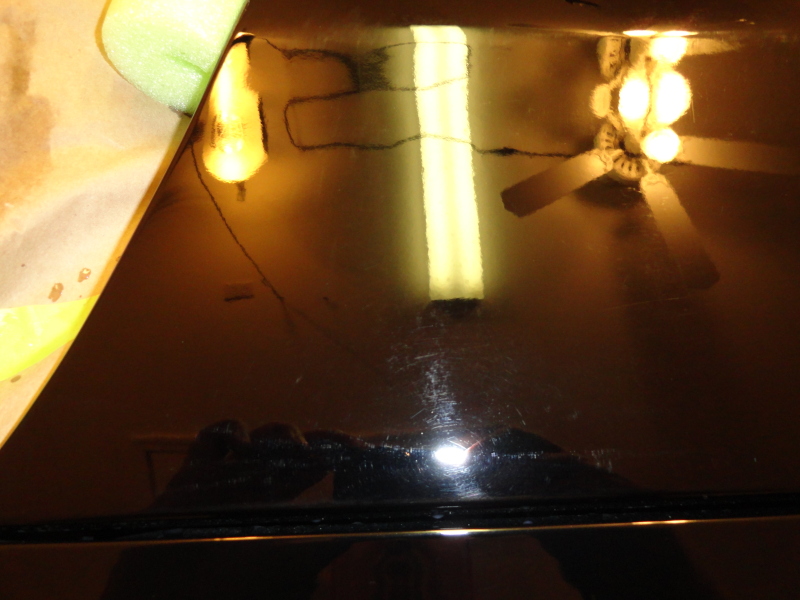
I took quite a few pix before and of the tape, I didn't take any really between stages and I will take more once it's complete. I can still seem some minor defects in the finish but compared to how it started last week the difference is night and day. Could I have spent more time and removed every swirl? Probably, but to be honest the factory finish (orange peel) is the biggest problem I'm facing right now and I'm not comfortable wet-sanding to try and correct that.
Pix still coming, I just need to continue documenting this if for no one else but myself so I can refer to it again the next time and save myself some time.
1. Layer any paper you use as you would lay shingles on a house, this way any flying spray or dust doesn't make its way onto your taped off areas.
2. When placing tape it's good to consider which way your buffer spins, this way you place tape on with the spin so tape doesn't peel off as you buff. This isn't really an issue if you use one long piece of tape but if you use several short pieces you'll find after awhile the tape starts to peel back.
3. Have LOTS of microfiber towels to buff off the various compounds, sealants, waxes, etc. If you have enough towels the supply should last you as long as your forearms and back will last :P
4. Clean your microfibers and buffing pads frequently, towels I use once and throw them into a hamper to be washed. Buffing pads I use them for a section then spray them with cleaning solution and let them soak, after I've done all stages on a section I clean all the pads by hand and spin dry them with my DA.
So far, for those keeping track, my hours have been as follows for this project:2. When placing tape it's good to consider which way your buffer spins, this way you place tape on with the spin so tape doesn't peel off as you buff. This isn't really an issue if you use one long piece of tape but if you use several short pieces you'll find after awhile the tape starts to peel back.
3. Have LOTS of microfiber towels to buff off the various compounds, sealants, waxes, etc. If you have enough towels the supply should last you as long as your forearms and back will last :P
4. Clean your microfibers and buffing pads frequently, towels I use once and throw them into a hamper to be washed. Buffing pads I use them for a section then spray them with cleaning solution and let them soak, after I've done all stages on a section I clean all the pads by hand and spin dry them with my DA.
June 28 - Decal Removal - 2-3 hours
June 29 - Decal Removal/Quick Wash - 2-3 hours
June 30 - Wash/Clay - 3 hours
July 1 - Wash/Clay - 3 hours
July 2 - Tape - 3 hours* (my Dad helped and actually finished off the remaining taping the following day, so approx 2 more hours on top of the 3)
July 3 - Swirl Remove/Seal/Wax - 4 hours (I operated the DA and my Dad followed behind with the microfiber towel)
July 4 - Swirl Remove/Seal/Wax - 6 hours (I operated the DA and my Dad followed behind with the microfiber towel)
July 5 - Swirl Remove/Seal/Wax - 3 hours* (I anticipate taking another 1-2 hours tonight to finish the car and then an hour or so to remove the tape)
Total time, approximately 30 hours for me and another 15-20 for my DadJune 29 - Decal Removal/Quick Wash - 2-3 hours
June 30 - Wash/Clay - 3 hours
July 1 - Wash/Clay - 3 hours
July 2 - Tape - 3 hours* (my Dad helped and actually finished off the remaining taping the following day, so approx 2 more hours on top of the 3)
July 3 - Swirl Remove/Seal/Wax - 4 hours (I operated the DA and my Dad followed behind with the microfiber towel)
July 4 - Swirl Remove/Seal/Wax - 6 hours (I operated the DA and my Dad followed behind with the microfiber towel)
July 5 - Swirl Remove/Seal/Wax - 3 hours* (I anticipate taking another 1-2 hours tonight to finish the car and then an hour or so to remove the tape)
I took quite a few pix before and of the tape, I didn't take any really between stages and I will take more once it's complete. I can still seem some minor defects in the finish but compared to how it started last week the difference is night and day. Could I have spent more time and removed every swirl? Probably, but to be honest the factory finish (orange peel) is the biggest problem I'm facing right now and I'm not comfortable wet-sanding to try and correct that.
Pix still coming, I just need to continue documenting this if for no one else but myself so I can refer to it again the next time and save myself some time.
7/6/12, 06:38 AM
#6
V6 Member
Thread Starter
Join Date: May 16, 2012
Posts: 86
Likes: 0
Received 0 Likes
on
0 Posts
Finished last night, the time spent taping was worth it as I didn't notice any places where compound/sealant/wax built up on plastic after removing the tape/paper. On a related note, newspaper doesn't hold up well to multiple passes with a DA. We had to redo an area with the brown rolled paper where the newspaper wasn't holding together but other than that things went smooth last night and after about 2 hours the car was done.
Pix will come, really...
Pix will come, really...
7/7/12, 10:20 AM
#7
V6 Member
Thread Starter
Join Date: May 16, 2012
Posts: 86
Likes: 0
Received 0 Likes
on
0 Posts
Added in some of the before pix, didn't really take any during pix and today I'm taking the car to a local cruise in at Sonic and will take some after pix. I'll also take some pix that show examples of poor taping as I did find a few spots we didn't tape well and stuff got onto the plastic.
Also, here's a link to a video someone posted on Vimeo that shows some of Rally Dixie 2012
https://vimeo.com/44793599
Also, here's a link to a video someone posted on Vimeo that shows some of Rally Dixie 2012
https://vimeo.com/44793599
Last edited by BTR-75; 7/7/12 at 10:23 AM.

Thread
Thread Starter
Forum
Replies
Last Post
robjh22
Suspension, Brakes, and Tire Tech
4
9/8/15 12:31 PM