Ponies on The Run (Again)
 5/26/07, 03:40 PM
#9161
GTR Member
Join Date: January 26, 2006
Location: Central Florida
Posts: 4,639
Likes: 0
Received 0 Likes
on
0 Posts
Engine and trans are in! 
First time dropping them in as a unit and it went pretty smoothly overall. I had the car too high on jackstands so it was difficult to get them over and in with the transmission pointed down at the same time, but we got it.
Pictures to follow later tonight.
Waiting for Bill's pictures and write-ups!
 5/26/07, 05:26 PM
#9162
GTR Member
Join Date: January 26, 2006
Location: Central Florida
Posts: 4,639
Likes: 0
Received 0 Likes
on
0 Posts
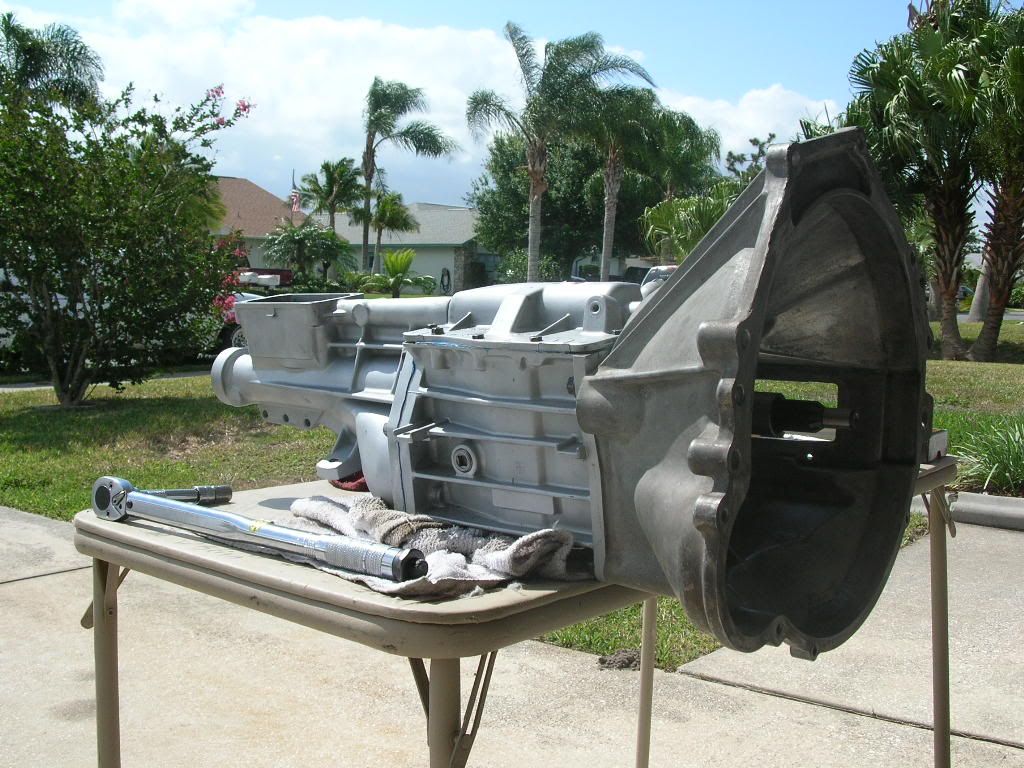
Here are my pics for the engine/transmission install:
 Bellhousing bolted to the new transmission
 This is before installing the clutch fork and throw-out bearing. I must have forgotten to take a picture after I installed them. It's just a fork that moves the throw-out bearing toward the pressure plate, compressing the fingers to dis-engage the clutch. No hydraulic clutch here!
 Plate installed - waiting for the flywheel. Fords have this plate and Chevys don't, for some reason.
 Flywheel installed and torqued with pipe sealant on the threads. (The holes go all the way through the crank and if oil seeped through, it would go right into the clutch).
 New Centerforce Dual Friction Pressure Plate and new pressure plate bolts. You can see the centrifugal weights on the fingers that help apply more and more pressure as RPMs increase.
 New clutch disc. This is the carbon composite puc side that goes toward the flywheel.
 This is the organic side that goes toward the pressure plate.
 My dad holding the alignment tool to show how the disc gets clamped perfectly centered.
 Pressure plate installed and torqued.
 Alignment tool ready to be removed.
 Alignment tool removed. Now the cluch is perfectly centered so the tranmission's input shaft will slide right into the pilot bearing in the crankshaft. Picture is at an angle, so the clutch doesn't look centered, but it is.

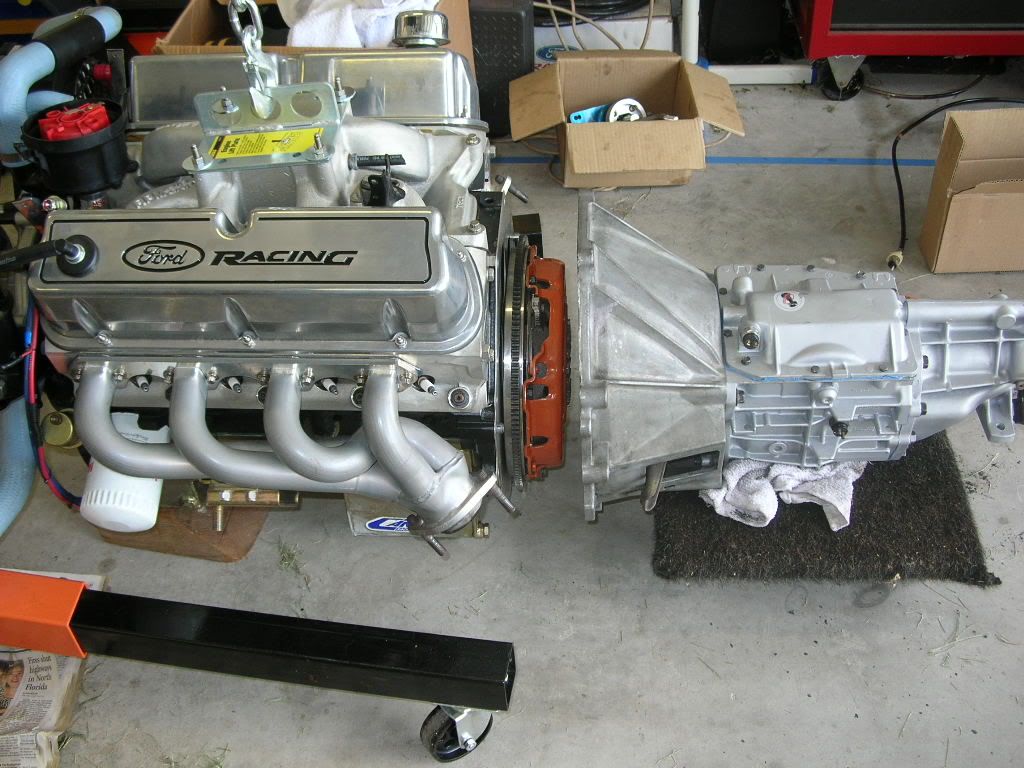
 Sliding the transmission and engine together. Has to be PERFECTLY aligned at all angles to go together.
 Mated! This is the first time I was actually able to torque the 6 bolts to 55 lb-ft. Before (because of no room), I only tightened them as much as I could with a closed-end wrench.
 Tight fit. We ended up wrapping a rope around the end of the transmission and used the engine crossmember as a pulley so we could point the transmission further down as needed.
 No pictures in between "out" and "in" - too busy making sure it went in without hitting anything on the car, engine, or transmission.
 Bellhousing bolted to the new transmission
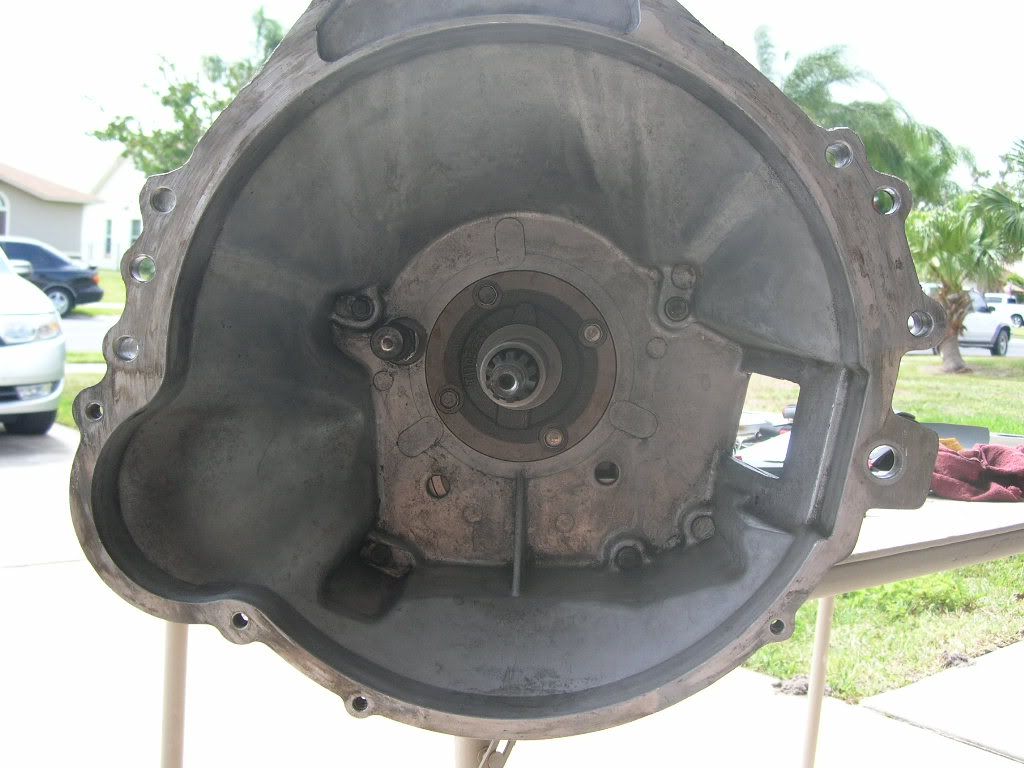 This is before installing the clutch fork and throw-out bearing. I must have forgotten to take a picture after I installed them. It's just a fork that moves the throw-out bearing toward the pressure plate, compressing the fingers to dis-engage the clutch. No hydraulic clutch here!
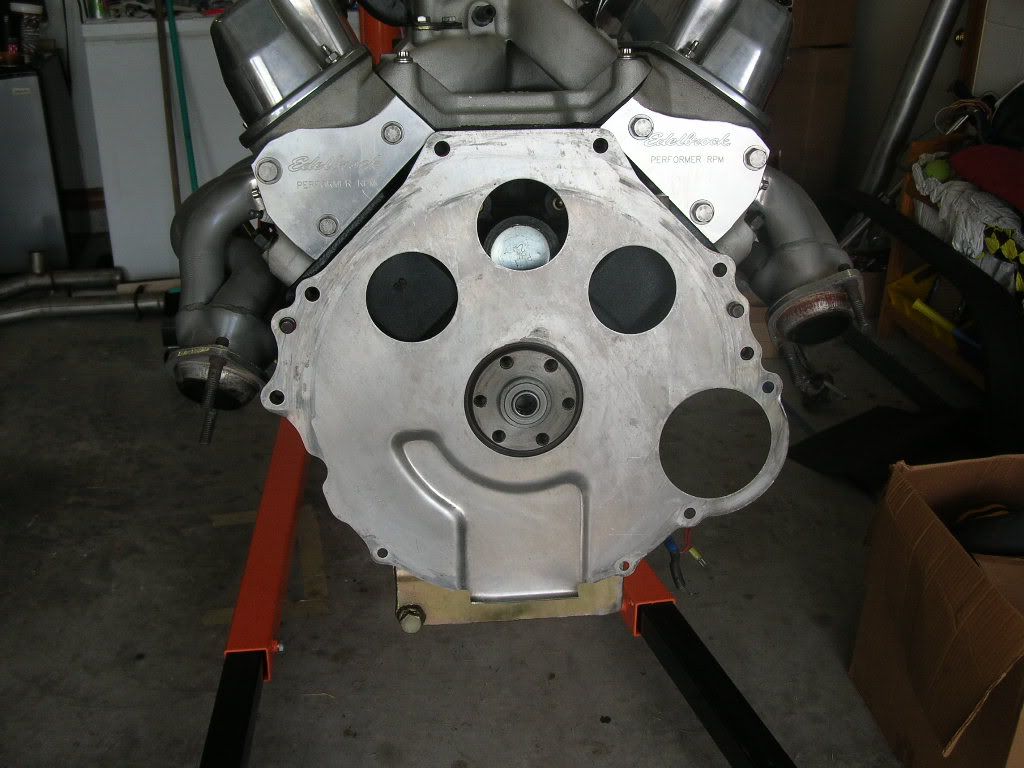 Plate installed - waiting for the flywheel. Fords have this plate and Chevys don't, for some reason.
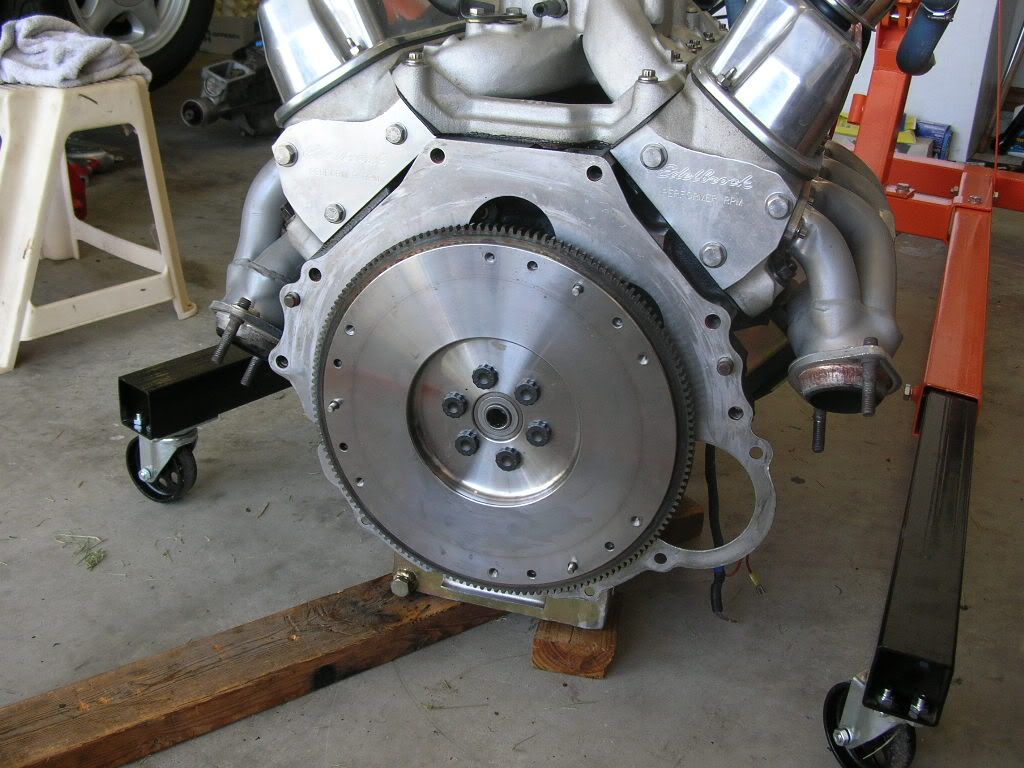 Flywheel installed and torqued with pipe sealant on the threads. (The holes go all the way through the crank and if oil seeped through, it would go right into the clutch).
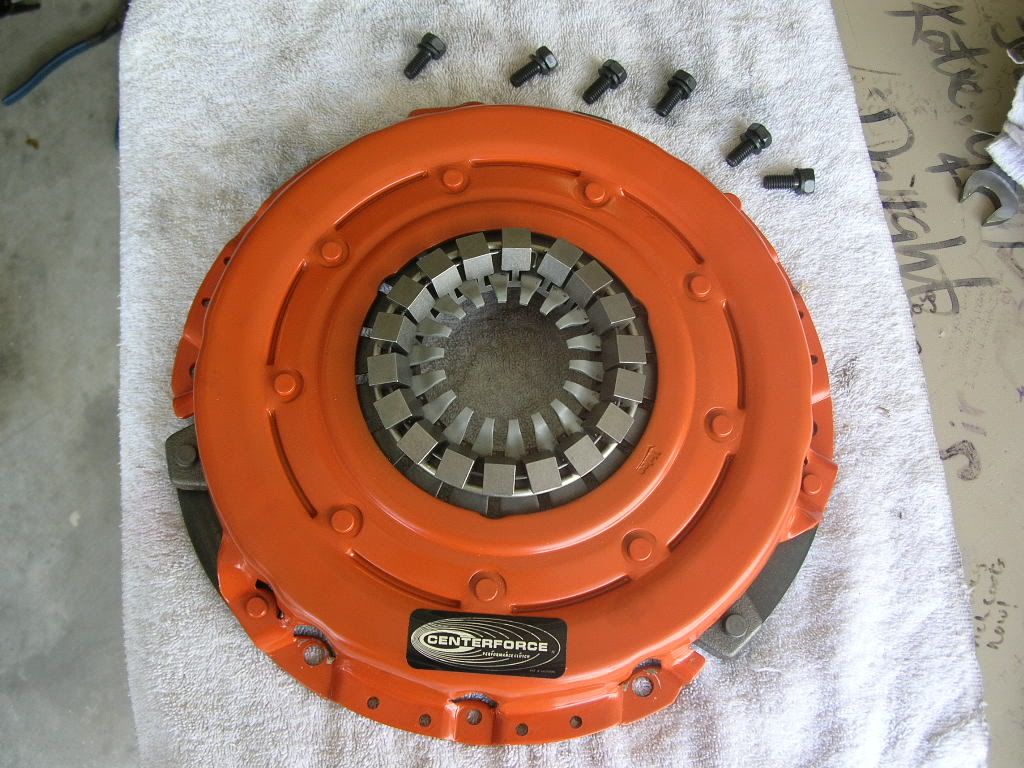 New Centerforce Dual Friction Pressure Plate and new pressure plate bolts. You can see the centrifugal weights on the fingers that help apply more and more pressure as RPMs increase.
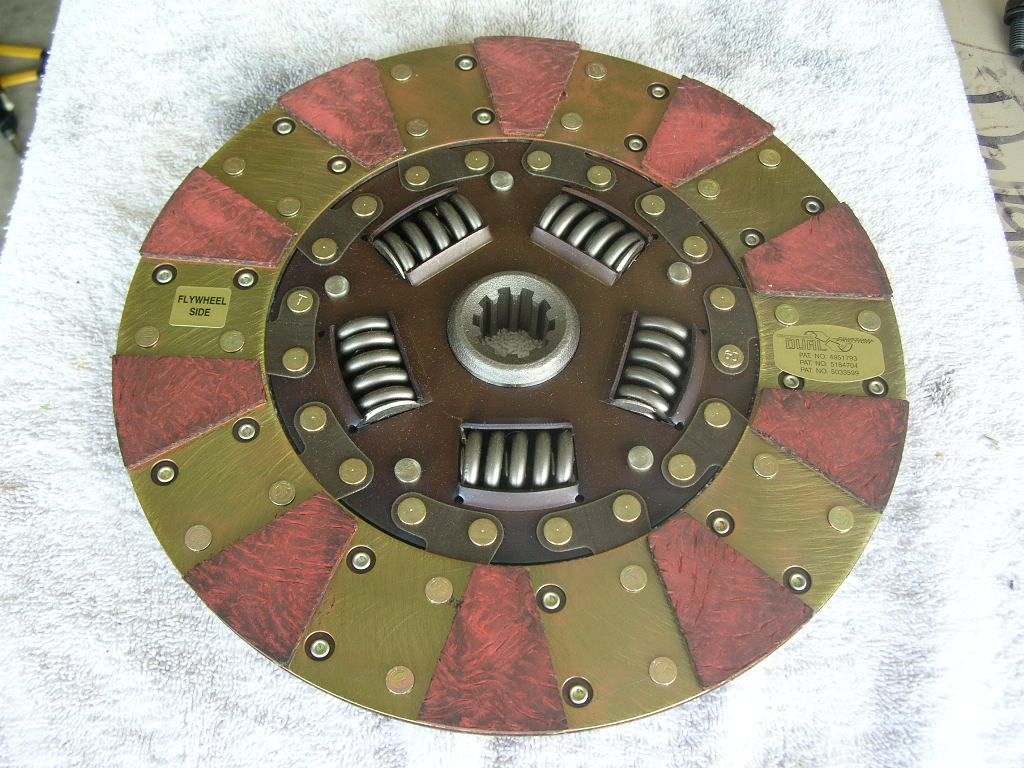 New clutch disc. This is the carbon composite puc side that goes toward the flywheel.
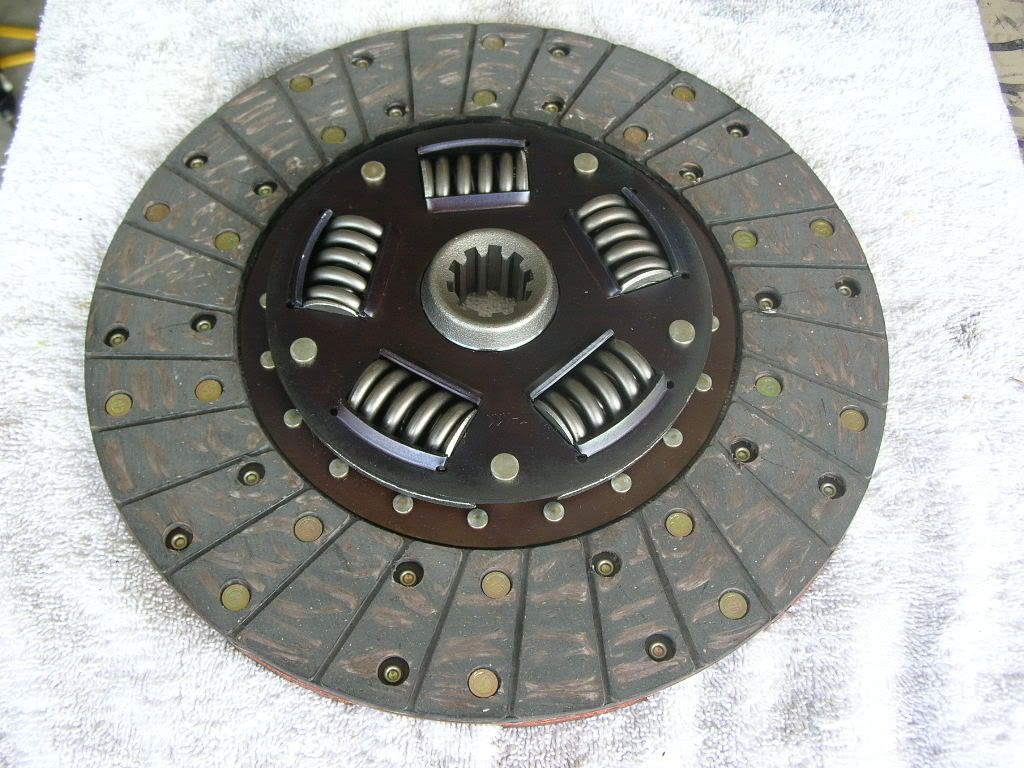 This is the organic side that goes toward the pressure plate.
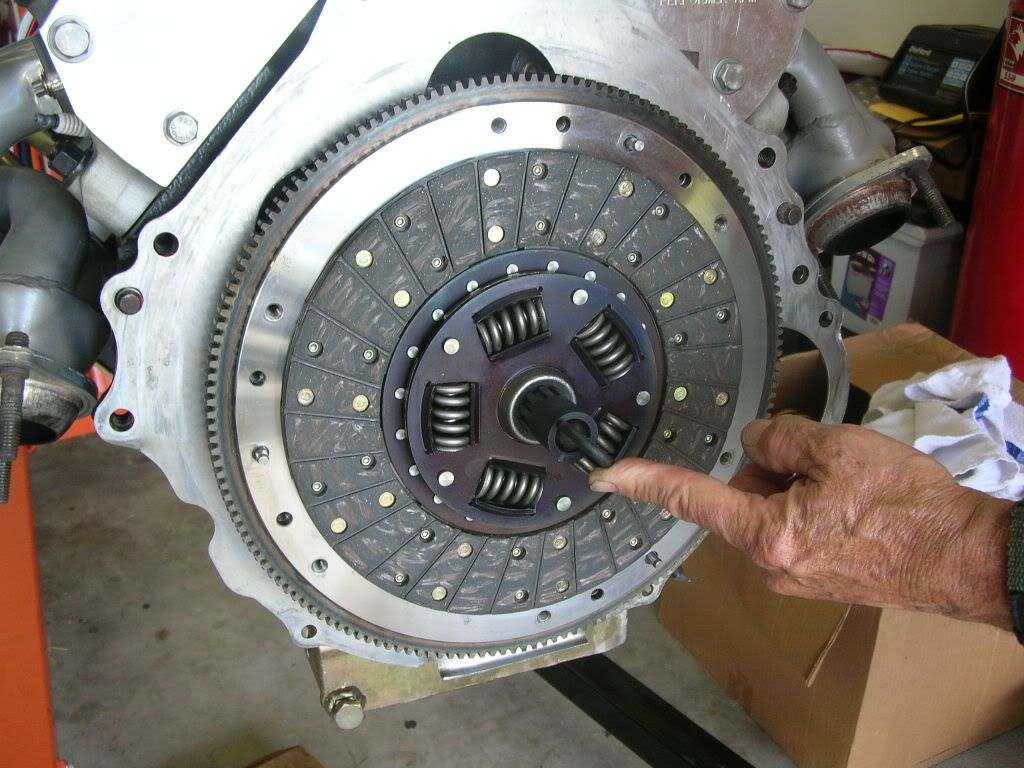 My dad holding the alignment tool to show how the disc gets clamped perfectly centered.
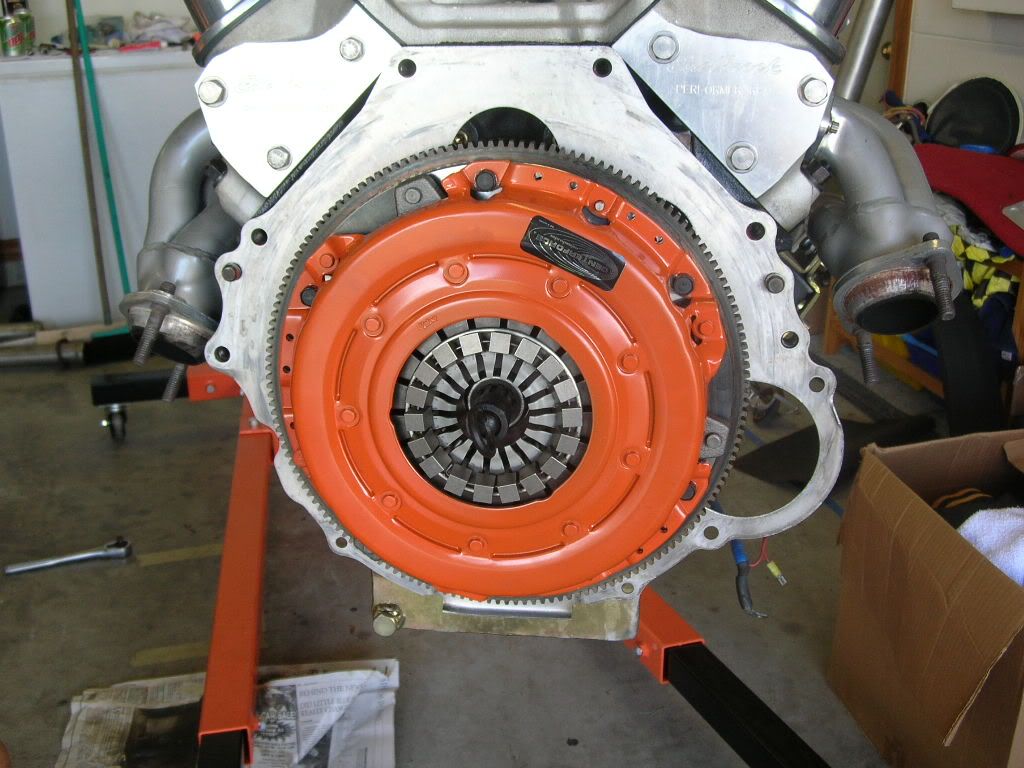 Pressure plate installed and torqued.
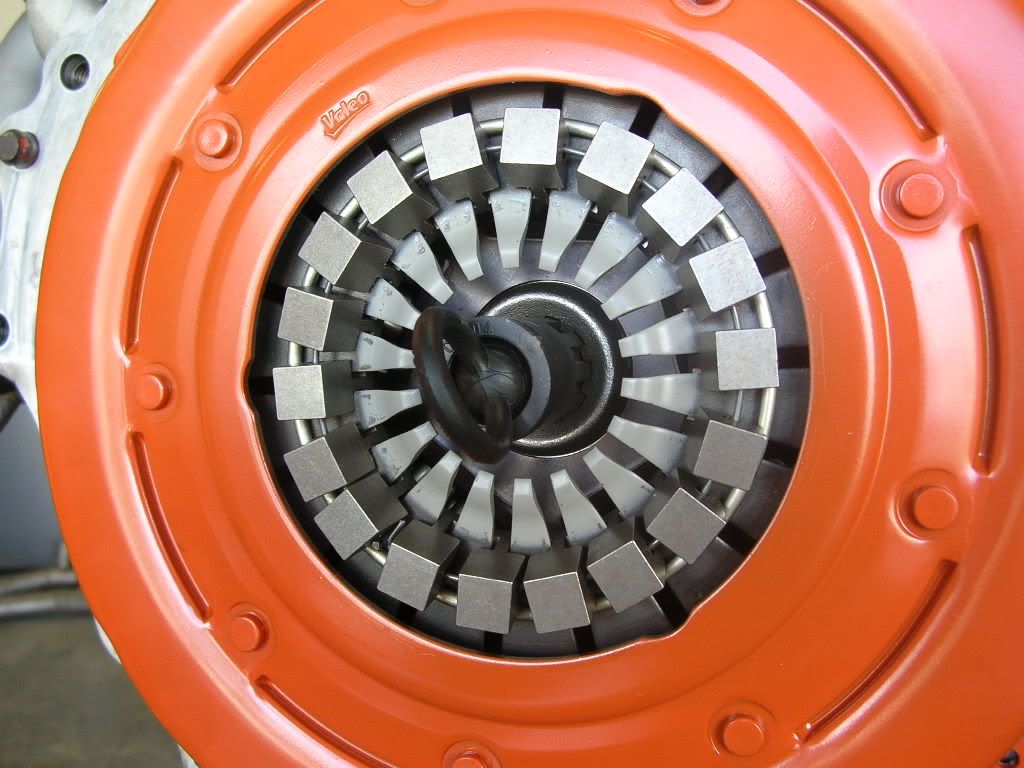 Alignment tool ready to be removed.
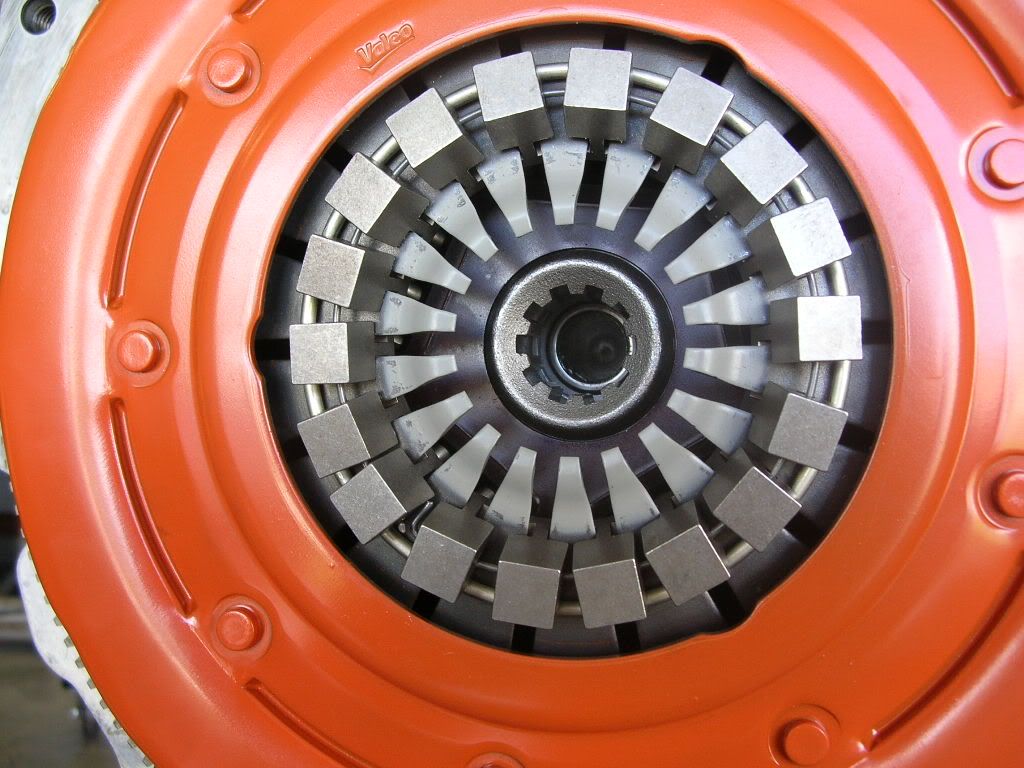 Alignment tool removed. Now the cluch is perfectly centered so the tranmission's input shaft will slide right into the pilot bearing in the crankshaft. Picture is at an angle, so the clutch doesn't look centered, but it is.
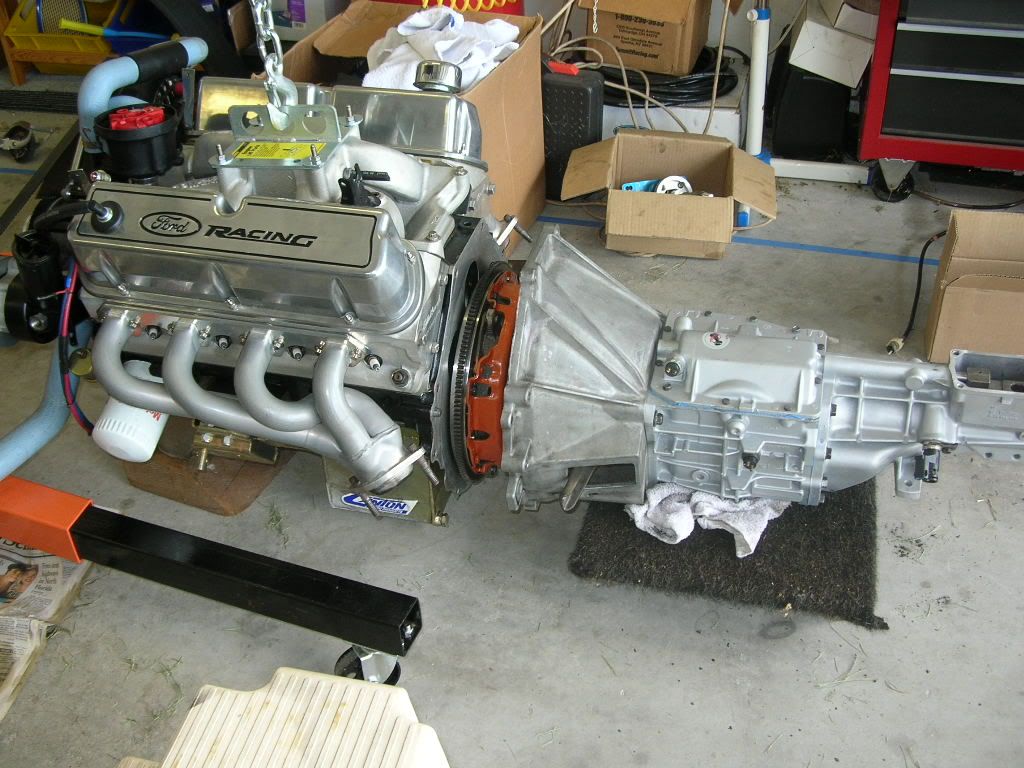
 Sliding the transmission and engine together. Has to be PERFECTLY aligned at all angles to go together.
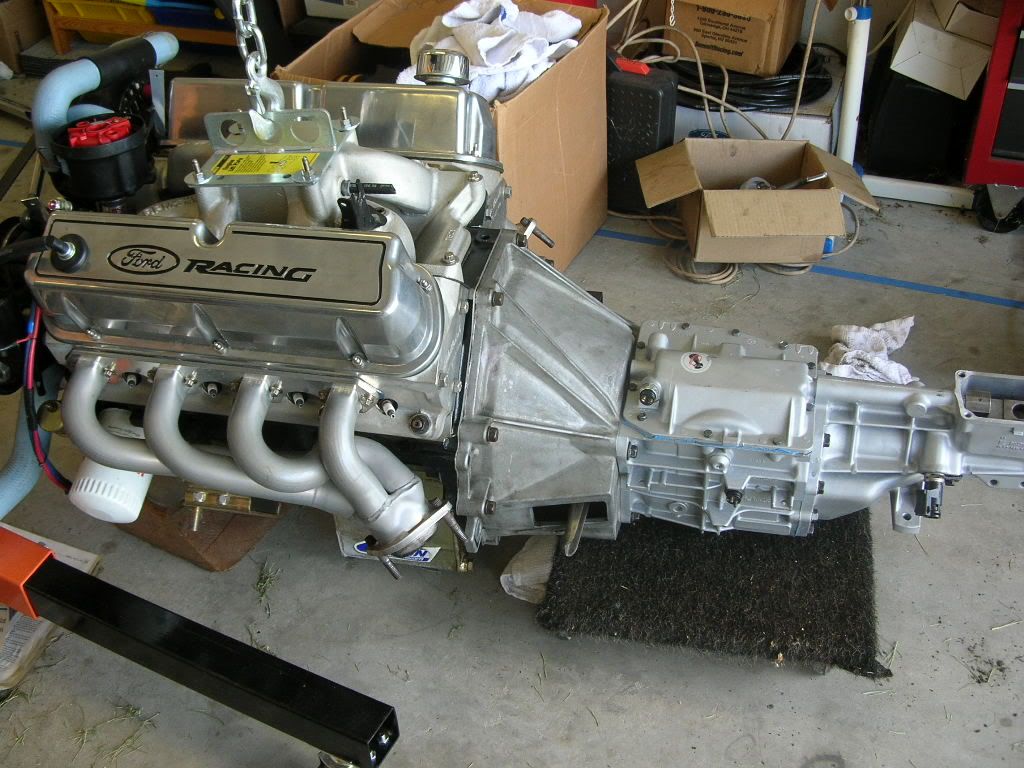 Mated! This is the first time I was actually able to torque the 6 bolts to 55 lb-ft. Before (because of no room), I only tightened them as much as I could with a closed-end wrench.
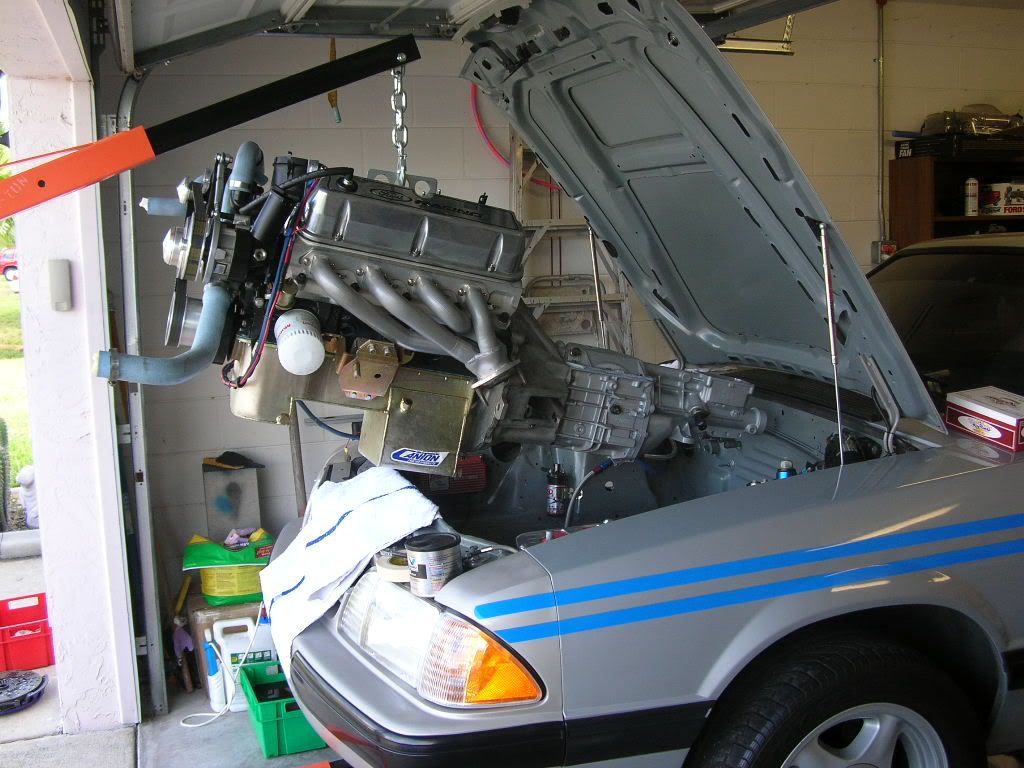 Tight fit. We ended up wrapping a rope around the end of the transmission and used the engine crossmember as a pulley so we could point the transmission further down as needed.
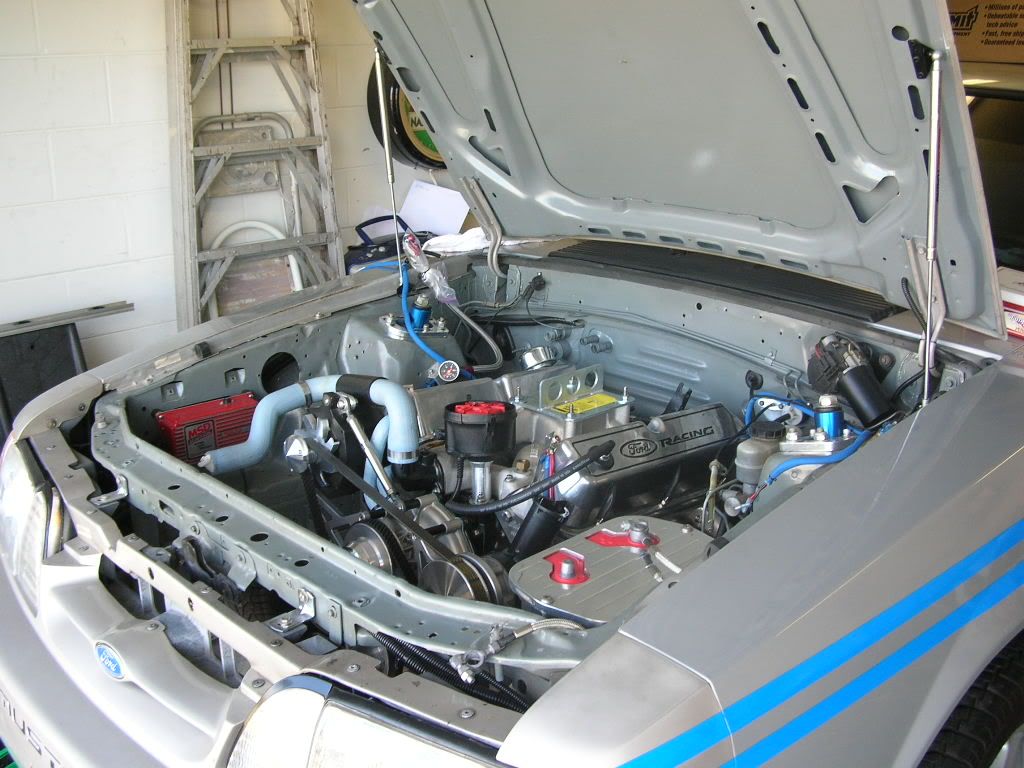 No pictures in between "out" and "in" - too busy making sure it went in without hitting anything on the car, engine, or transmission.
5/26/07, 06:57 PM
No pictures in between "out" and "in" - too busy making sure it went in without hitting anything on the car, engine, or transmission.
5/26/07, 06:57 PM
#9164
GTR Member
Join Date: January 26, 2006
Location: Central Florida
Posts: 4,639
Likes: 0
Received 0 Likes
on
0 Posts
Thanks! And, like I've told you before... it's just the tools. You could do everything I'm doing as long as you have the tools you need. But I do read a lot. Last night I sat down with the service manual and wrote down all the torques for all the bolts I would be installing. I also went over all the stuff I already know how to do just in case I could learn another tip or maybe something I forgot or didn't know.
5/26/07, 07:17 PM
#9165
Team Mustang Source
Congrats Tom !! You gotta tell us how much of a SOTP difference it makes !! Now that the motor is in it's all downhill from here. But connecting everything can be a PITA.
It's too late now, but you could have put the chain/hook on the front hole of the lifting plate and it would have picked the motor up at an front high angle...
Leo,
You can do it. I was lucky as my dad had me working on cars, handing him wrenches, when I was 5 or so. But even being around it all the time it's all about the tools, like Tom said, and it's about actually doing it. Having the right tool for the right job makes all the difference. Then once you do it a couple times it'll be natural. Just like anything else, practice, practice, practice. Oh yeah, having a shop manual around always helps too !!
You gotta tell us how much of a SOTP difference it makes !! Now that the motor is in it's all downhill from here. But connecting everything can be a PITA.It's too late now, but you could have put the chain/hook on the front hole of the lifting plate and it would have picked the motor up at an front high angle...
Leo,
You can do it. I was lucky as my dad had me working on cars, handing him wrenches, when I was 5 or so. But even being around it all the time it's all about the tools, like Tom said, and it's about actually doing it. Having the right tool for the right job makes all the difference. Then once you do it a couple times it'll be natural. Just like anything else, practice, practice, practice. Oh yeah, having a shop manual around always helps too !!
5/26/07, 08:42 PM
#9166

I'm all done too.
Everything works great, no CEL, no fuel leaks, no belt shredding.
I do have a sore lower back though.
Thanks to Kevin and Leo for helping out.
Pics to come.
Everything works great, no CEL, no fuel leaks, no belt shredding.
I do have a sore lower back though.
Thanks to Kevin and Leo for helping out.
Pics to come.
5/26/07, 09:23 PM
#9167
GTR Member
Join Date: January 26, 2006
Location: Central Florida
Posts: 4,639
Likes: 0
Received 0 Likes
on
0 Posts
Congrats Tom !! You gotta tell us how much of a SOTP difference it makes !! Now that the motor is in it's all downhill from here. But connecting everything can be a PITA.
It's too late now, but you could have put the chain/hook on the front hole of the lifting plate and it would have picked the motor up at an front high angle...
You gotta tell us how much of a SOTP difference it makes !! Now that the motor is in it's all downhill from here. But connecting everything can be a PITA.It's too late now, but you could have put the chain/hook on the front hole of the lifting plate and it would have picked the motor up at an front high angle...

As far as the front lifting hole, we were going to do that, but thought it would be too much of an angle and we wouldn't be able to get the trans over the nose of the car. Next time
5/26/07, 09:48 PM
#9168
Team Mustang Source
Thanks! Yeah, with all the power getting to the ground, it might make a little bit of a difference. 450-500 miles of normal driving to let the clutch disc "seat" before applying full power, though.
As far as the front lifting hole, we were going to do that, but thought it would be too much of an angle and we wouldn't be able to get the trans over the nose of the car. Next time I'll try that hole, though.
As far as the front lifting hole, we were going to do that, but thought it would be too much of an angle and we wouldn't be able to get the trans over the nose of the car. Next time
5/26/07, 09:50 PM
#9169
Team Mustang Source
Holy-Crud.. I surpassed 600 posts... Look out Bill, I'm right behind you...
 5/27/07, 07:00 AM
#9170
GTR Member
Join Date: January 26, 2006
Location: Central Florida
Posts: 4,639
Likes: 0
Received 0 Likes
on
0 Posts
With today and tomorrow off, I should be driving it to work on Tuesday.
5/27/07, 08:51 AM
#9171
Steeda U/D Pulley install is complete!
http://forums.bradbarnett.net/showthread.php?t=65956
CMDP write up is next.
http://forums.bradbarnett.net/showthread.php?t=65956
CMDP write up is next.
5/27/07, 08:59 AM
#9172
Great News !!! Is there a Butt-Dyno difference yet ?? or have you had time to try. Can't wait to see the write up. I'm sure it'll be top-notch. Sorry I couldn't make it but this weekend became really busy for me..
Holy-Crud.. I surpassed 600 posts... Look out Bill, I'm right behind you...
Holy-Crud.. I surpassed 600 posts... Look out Bill, I'm right behind you...
In my short test drive, I didn't do any hard T/C off launches, just some quick throttle checks. Coupled with the CMDP's, I know I didn't loose any bottom end torque. It's really hard at this point to see any huge difference because any acceleration test thus far is being overshadowed by the 4.10's. When I get to do some hard launches, I'll provide better feedback.
Congrats on the 600 posts! You're right behind me!
There is a lot to do yet... driveshaft, starter, H-Pipe, radiator, carburetor, air cleaner, gas line, electrical connections, vacuum connections, throttle connection, antifreeze, power steering fluid, transmission fluid, clutch adjustment. Plus I have to put the whole dash back together which had to come apart to change the speedometer cable.
With today and tomorrow off, I should be driving it to work on Tuesday.
With today and tomorrow off, I should be driving it to work on Tuesday.
I'm sure you can't wait to get it all put together and running. Man, I got tired just working on my 2 mods, can't imaging doing what you're doing.
5/27/07, 05:07 PM
#9173
5/27/07, 05:35 PM
#9174
Tasca Super Boss 429 Member
I can't wait until my warranty runs out and I will be adding those sort of mods.
I can tell you are not a numistmatist (coin collector).
That is a Sacagewea not a Susan B. Anthony.
5/27/07, 07:16 PM
#9175
GTR Member
Join Date: January 26, 2006
Location: Central Florida
Posts: 4,639
Likes: 0
Received 0 Likes
on
0 Posts

Great write-up! The charge motion plates are something I think a daily driver would want. At least when I read about their function, they SEEM desirable - and what they do to the airflow at lower RPMs is exactly what you want to happen, so I won't be doing this mod. They sound great for your car, though!
Now you just need that bigger CAI!
5/27/07, 07:29 PM
#9176

You're right, I'm no coin collector!
(I fixed it
Duh, Bill!
Great write-up! The charge motion plates are something I think a daily driver would want. At least when I read about their function, they SEEM desirable - and what they do to the airflow at lower RPMs is exactly what you want to happen, so I won't be doing this mod. They sound great for your car, though!
Now you just need that bigger CAI!
Ahh, a bigger CAI.. Like the C&L Racer?
5/28/07, 12:06 PM
#9177
Team Mustang Source
Went through both write-ups and I gotta say, no one does like you do Bill. I know that if I were going to do these mods your write-ups would be what I'd follow. Great Job !!
5/28/07, 01:34 PM
#9179
Legacy TMS Member
Join Date: May 24, 2006
Location: San Diego
Posts: 7,409
Likes: 0
Received 0 Likes
on
0 Posts
Something to think about for you vert owners.
http://forums.bradbarnett.net/showpo...5&postcount=11
http://forums.bradbarnett.net/showpo...5&postcount=11