Ponies on The Run (Again)
 1/10/07, 02:49 PM
#5381


 I meant covers. I remember the original request, so don't sweat it.
 1/10/07, 02:58 PM
#5382

 1/10/07, 03:21 PM
#5383
Legacy TMS Member
Join Date: May 24, 2006
Location: San Diego
Posts: 7,409
Likes: 0
Received 0 Likes
on
0 Posts
You trying to move in on my cover.
 Looks like I'm going to be getting hell for awhile on that one.
Bill-Tell your friend thanks for the info.
BTW-Fedex just delivered my springs. A big thanks to 65SOHC for the great deal and the speed in which he got them out to me.
 This buds for you! Mr. real fast spring sender.
Looks like I'm going to be getting hell for awhile on that one.Bill-Tell your friend thanks for the info.
BTW-Fedex just delivered my springs.
A big thanks to 65SOHC for the great deal and the speed in which he got them out to me. This buds for you! Mr. real fast spring sender.
1/10/07, 03:36 PM
#5384
Legacy TMS Member
Join Date: May 24, 2006
Location: San Diego
Posts: 7,409
Likes: 0
Received 0 Likes
on
0 Posts
Bill- I'm considering putting the rear springs in today or tomorrow and was wondering what the ETA for install would be? Any special tools, tips or tricks I should be aware of? Tom or anyone else with ultralites feel free to chime in. Remember I'm talking about the rear only. Bill's write-up seems pretty straight foward but I just want to make sure. Thanks in advance.
Any special tools, tips or tricks I should be aware of? Tom or anyone else with ultralites feel free to chime in. Remember I'm talking about the rear only. Bill's write-up seems pretty straight foward but I just want to make sure. Thanks in advance.
1/10/07, 05:53 PM
#5385
Bill- I'm considering putting the rear springs in today or tomorrow and was wondering what the ETA for install would be? Any special tools, tips or tricks I should be aware of? Tom or anyone else with ultralites feel free to chime in. Remember I'm talking about the rear only. Bill's write-up seems pretty straight foward but I just want to make sure. Thanks in advance.
Any special tools, tips or tricks I should be aware of? Tom or anyone else with ultralites feel free to chime in. Remember I'm talking about the rear only. Bill's write-up seems pretty straight foward but I just want to make sure. Thanks in advance.I'd say no more than an hour once it's jacked up.
1/10/07, 06:05 PM
#5386
Legacy TMS Member
Join Date: May 24, 2006
Location: San Diego
Posts: 7,409
Likes: 0
Received 0 Likes
on
0 Posts
1/10/07, 06:42 PM
#5387
GTR Member
Join Date: January 26, 2006
Location: Central Florida
Posts: 4,639
Likes: 0
Received 0 Likes
on
0 Posts
Bill took the 2 bolts out (on each side) where the bushing goes around the sway bar:
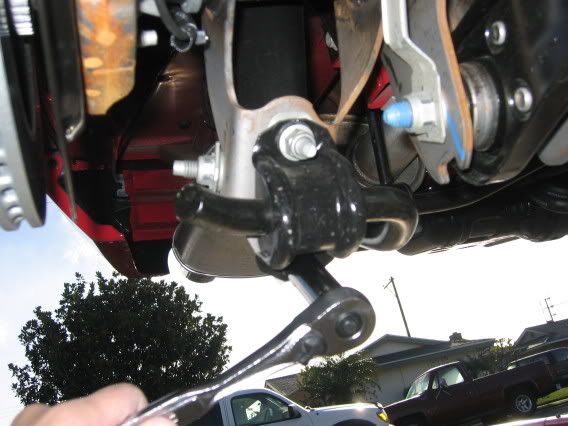
It's a lot easier (and you don't need a deep socket) if you take the one bolt out (on each side) that holds the sway bar link to the body. Then the sway bar and the links just drop down together with the axle. Easier to put back together, too - just lift up the sway bar, align the link, slam the bolt home, and tighten:
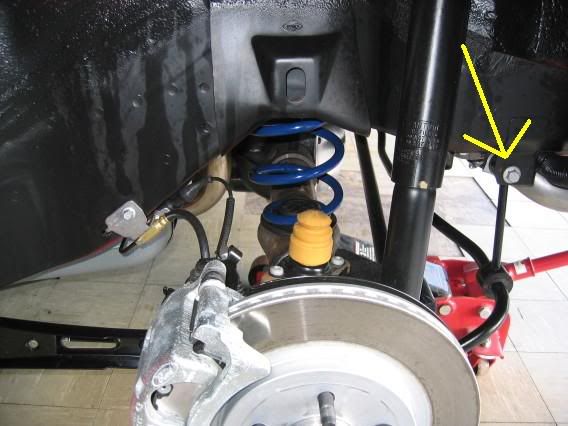
Also, look at the stock springs and note which way the bottom end of the spring is facing (toward the driver's side, toward the rear, etc.). Make sure you install the Steedas the same way. More importantly, make sure both Steeda springs face the same way or there could be a height difference from side to side.
While you are back there, you may want to cut the top section of the bump stop off. As a daily driver, you most likely will hit that and it is very annoying. After the springs settled, I could barely put my finger between the bump stop and the frame. I took the top section off with a razor blade and I haven't bottomed out again since. Easy to do while you are back there.
It's a lot easier (and you don't need a deep socket) if you take the one bolt out (on each side) that holds the sway bar link to the body. Then the sway bar and the links just drop down together with the axle. Easier to put back together, too - just lift up the sway bar, align the link, slam the bolt home, and tighten:
Also, look at the stock springs and note which way the bottom end of the spring is facing (toward the driver's side, toward the rear, etc.). Make sure you install the Steedas the same way. More importantly, make sure both Steeda springs face the same way or there could be a height difference from side to side.
While you are back there, you may want to cut the top section of the bump stop off. As a daily driver, you most likely will hit that and it is very annoying. After the springs settled, I could barely put my finger between the bump stop and the frame. I took the top section off with a razor blade and I haven't bottomed out again since. Easy to do while you are back there.
1/10/07, 07:10 PM
#5388
I didn't cut my bump stop, I wonder what kind of clearance I have? Funny, I never felt or heard anything wierd back there (while driving) like the frame hitting the stops.
1/10/07, 10:51 PM
#5389
Legacy TMS Member
Join Date: May 24, 2006
Location: San Diego
Posts: 7,409
Likes: 0
Received 0 Likes
on
0 Posts
Awesome thanks Tom. That makes an already simple looking install look the much easier. Now I'm assuming this "bumpstop" you speak of is the little yellow thing right? If so, your suggesting I cut just the "upper layer" (meaning layer 1 of 3 if you were counting from top to bottom) off correct?
Looks like my new armrest, ebrake handle assy.,floormats,and mudflaps (remember I said track use only) should be coming into tomorrow. Heck even my HDMI cables should be here. The only thing I'll be waiting on will be the bullit lug nuts and the final shock tower molds. Looks like tomorrow's going to be a very Mustang filled day. Unfortunatly I don't have my old camera or my new camera so I won't be able to get any pics untill I go over Kevins on Saturday.
Looks like my new armrest, ebrake handle assy.,floormats,and mudflaps (remember I said track use only) should be coming into tomorrow. Heck even my HDMI cables should be here. The only thing I'll be waiting on will be the bullit lug nuts and the final shock tower molds. Looks like tomorrow's going to be a very Mustang filled day. Unfortunatly I don't have my old camera or my new camera so I won't be able to get any pics untill I go over Kevins on Saturday.
1/11/07, 07:09 AM
#5390
Shelby GT350 Member
Thread Starter
Join Date: January 17, 2006
Location: Tornado Alley
Posts: 2,061
Likes: 0
Received 0 Likes
on
0 Posts
Looks like my new armrest, ebrake handle assy.,floormats,and mudflaps (remember I said track use only) should be coming into tomorrow. Heck even my HDMI cables should be here. The only thing I'll be waiting on will be the bullit lug nuts and the final shock tower molds. Looks like tomorrow's going to be a very Mustang filled day. Unfortunatly I don't have my old camera or my new camera so I won't be able to get any pics untill I go over Kevins on Saturday.

I have the CAI & SCT2 just sitting at the house waiting on installs.
 You might ask why I have not done it yet, and I will explain. Last weekend (the only time I thought I might get a chance) I spent most of it driving to pick-up my son from G-mas house.
Now we have an ice storm coming that looks like it will roll in tonight
 and the last thing I want to do is add POWER when the streets will be covered in snow/ice/sleet. I would hate to think they will sit until spring, but that may just happen.
  1/11/07, 07:51 AM
#5391
I'll check mine out on Saturday to see if there's any rub marks on top of the stops. If so, guess I'll slice off a layer.
Going to attempt to adapt the Shaker 'Cold Air' duct to the CAI heatshield? Or are you planning on removing the whole duct work aft of the Shaker scoop (Like what Leo was planning)?
1/11/07, 08:07 AM
#5392
Shelby GT350 Member
Thread Starter
Join Date: January 17, 2006
Location: Tornado Alley
Posts: 2,061
Likes: 0
Received 0 Likes
on
0 Posts
1/11/07, 08:22 AM
#5393
Adapting the duct to a C&L heatshield has been done before by a few guys here.
1/11/07, 08:32 AM
#5394
Shelby GT350 Member
Thread Starter
Join Date: January 17, 2006
Location: Tornado Alley
Posts: 2,061
Likes: 0
Received 0 Likes
on
0 Posts
Am I crazy in thinking this, but I really would like to get rid of the 90° bend from the duct to the heatshield. Something a little less constrictive to the airflow. Do you think that is possible? I haven't really taken the time to get under the hood and do some measurements etc.
1/11/07, 09:11 AM
#5395
Am I crazy in thinking this, but I really would like to get rid of the 90° bend from the duct to the heatshield. Something a little less constrictive to the airflow. Do you think that is possible? I haven't really taken the time to get under the hood and do some measurements etc.
I forgot who it was, but he got one of the accordian ducts (expandable/bendable) and attached it to the straight section to the heatshield.
1/11/07, 09:30 AM
#5396
Shelby GT350 Member
Thread Starter
Join Date: January 17, 2006
Location: Tornado Alley
Posts: 2,061
Likes: 0
Received 0 Likes
on
0 Posts
Really early, but here are a couple of events I plan on attending this year, and of course pics will be provided
Oklahoma Centennial Mustang National in Mustang, Oklahoma
(I have heard in excess of 700 Mustangs will be there )
)
&
Mid America Ford & Shelby Meet in Tulsa, Oklahoma
Hmm which should I do there
A few laps @ Hallett Motor Racing Circuit
or
A few passes @ The Tulsa Raceway Park
I will not be showing, just attending.
Oklahoma Centennial Mustang National in Mustang, Oklahoma
(I have heard in excess of 700 Mustangs will be there
)&
Mid America Ford & Shelby Meet in Tulsa, Oklahoma
Hmm which should I do there
A few laps @ Hallett Motor Racing Circuit
or
A few passes @ The Tulsa Raceway Park
I will not be showing, just attending.
1/11/07, 03:14 PM
#5397
Legacy TMS Member
Join Date: May 24, 2006
Location: San Diego
Posts: 7,409
Likes: 0
Received 0 Likes
on
0 Posts
I know it's going to sound like I wussed out but I'm going to go ahead and wait to do the rears at Kevin's. There's high winds and clouds moving in and I don't want to get caught mid install in a downpour. If things clear up tomorrow I'll reconsider installing the rears. The ebrake install is going to be done at Bill's so we can document it with pics since there doesn't appear to be a write-up for than anywhere on the site. I'm still waiting on UPS to deliver the ebrake, and console lid they're "en route for delivery". I'm waiting for the call from my local ford ont the Floor mats and mudflaps. So it's looking like nothing will get installed today.
1/11/07, 04:20 PM
#5398
GTR Member
Join Date: January 26, 2006
Location: Central Florida
Posts: 4,639
Likes: 0
Received 0 Likes
on
0 Posts
Mike's coupe had rub marks. Leo, check yours since it has more miles on it and much more variation in terrain. Cutting it off won't hurt a thing. It will still bottom out on the next layer before the shocks bottom out or before anything else hits.
1/11/07, 06:07 PM
#5399
Legacy TMS Member
Join Date: May 24, 2006
Location: San Diego
Posts: 7,409
Likes: 0
Received 0 Likes
on
0 Posts
BTW- As I was typing this the UPS guy dropped off my ebrake and armrest.
Sorry can't post any pics since I don't have a camera.
1/11/07, 06:38 PM
#5400
GTR Member
Join Date: January 26, 2006
Location: Central Florida
Posts: 4,639
Likes: 0
Received 0 Likes
on
0 Posts
I checked the bumpstop for rub marks and didn't see any so I left it as is. If I feel any bottoming out on the way to Bill's (100mile drive) I'll cut it then.
Now's when you'll get the marks with it lowered. I would drive it for a few weeks and then check for marks. I know they are used, but it still may take awhile for them to completely settle again. It also may take that long for marks to be made. And you may be bottoming out but not know it. All I knew is some of the of the bumps seemed rougher than they should have been. That went away when I cut the top section. You most definitely will bottom out if you have any passengers in the rear.
I didn't bother to measure if I'll need an adj. panhard yet. I'll figure that out at Bill's.
Tie two nuts to pieces of string and tape them to the rear fender dangling past the tire... and measure from the string to the rim lip on both sides. My rear axle is 1/4" off so it needs to be moved back to the passenger side 1/8". Without the string, you really can't tell it's off.