COMPLETE How To Install: M90 on 4.OL V6 SOHC - Mustang 05-10
 5/8/14, 10:05 AM
#1
Member
Thread Starter
Join Date: March 31, 2014
Posts: 6
Likes: 0
Received 0 Likes
on
0 Posts
COMPLETE How To Install: M90 on 4.OL V6 SOHC - Mustang 05-10
Thought I should post up a "Complete How-To Supercharge the 4.0L". If anyone is interested in supercharging an 05-10 4.0L V6... this blog is for you. This was a pretty simple build that I was able to achieve in only about a day's work (+ some data logging). I also needed to get some injectors and tune after and was good to go with around an extra 100 hp 
You can find the dyno sheet here: 05 Mustang 4.oL V6 w/ 94 T-bird M90 - Dyno Sheet
(Dyno was with: Moddbox Install Kit, 47lb Ford Racing Injectors, #6NGK plugs, 91 Octane & 94 Salvage T-Bird Supercharger)
Ok... here it goes:
COMPLETE How To Install: M90 on 4.OL V6 SOHC - Mustang 05-10
REFERENCE ABBREVIATIONS
EGR � Exhaust Gas Recirculation
HVAC � Heating Ventilation & Air Conditioning
IAC � Idle Air Control
MAF � Mass Air Flow
TPS � Throttle Position Sensor
Vac - Vacuum
TOOLS REQUIRED
Standard metric socket set
Hex key set
Various pliers
T-30 Torx bit
Fluid funnel
Oil pan
Flat head screw driver
Pneumatic or electric hammer drill
Crescent wrench
Utility knife
Shop vacuum
Rat tail file
Propane torch or similar heating device
Wire Strippers
Wire Crimper
STOCK REFERENCE DIAGRAMS
Stock Intake Pipe & Air Box Reference Diagram

Stock Exhaust Gas Re-circulation (EGR) Reference Diagram

Throttle & Stock Intake Manifold Reference Diagram

Ignition Coil Reference Diagram

Belt Diagram Reference Diagram (Dark Belt Showing the Supercharged Orientation)

MODDBOX SUPERCHARGER KIT PARTS
*several parts not shown. Refer to installation manual and parts list for more details.
ModdBox Supercharger Bypass Valve
ModdBox 255lph Fuel Pump
Moddbox 5.5 & 8.0 psi Pulleys
ModdBox Quick Change Pulley Adapter
ModdBox Plenum Bottom Plate
ModdBox Plenum Top Plate
ModdBox Intake Manifold
ModdBox Stainless EGR Extension
Black Silicone Liquid Gasket
Moddbox 6PK Serpentine Belt
INSTALLATION STEPS
Note: The installation has been broken up into two parts: (1) the fuel pump installation, and (2) the supercharger install.
PART 1 - FUEL PUMP INSTALLATION (1.5 hours)
WARNING: Gasoline vapors are explosive!
Caution: When replacing the fuel pump, perform all work in a well ventilated area away from sparks or open flame. Eye protection and rubber gloves are highly recommended. Avoid inhaling fuel fumes.
If fuel is ingested, seek medical attention immediately. To avoid a fire hazard, disconnect the negative battery cable when instructed. Failure to perform any service or repair in a safe manner may cause serious personal injury or death.
Relieve the fuel system pressure. This can be done by a variety of methods. It is recommended that you remove the fuel pump fuse and start your vehicle. The engine will run, shutter, then stall. Remove your key from the ignition and re-install your fuel pump fuse.
Remove the negative battery cable. Secure it to the side of the battery to prevent any accidental contact with the negative terminal.

Gain access to your vehicle's fuel pump assembly as required (fuel pump is located under the driver side back seat). Use a vacuum and/or a brush and clean off the top of the tank. Disconnect your fuel lines and remove the retaining ring. Caution: Do allow dirt or deleterious substances into your fuel tank.

Remove the fuel pump assembly.

Remove the Stock Fuel Pump Filter.

Un-bolt the ground wire and remove the pump retaining cap.

Remove the bottom pump cover.

Unplug the Stock Fuel Pump and disconnect the Fuel Line. It is recommended to use the stock fuel line. Be careful not to damage the fuel line during removal.

Remove the stock fuel pump and dispose of it appropriately.

Cut the bottom of the Rubber Retaining Gasket so that it can be used as a sleeve for your new 255lph Moddbox Fuel Pump.

File or cut the Stock Fuel Pump Assembly Retaining Cap to accomodate the new 255 lph ModdBox Fuel Pump.

Re-assembly the Fuel Pump Assembly and install the new pump. Reuse the stock fuel line and the provided stainless hose clamp Caution. Do not forget to re-connect the ground wire.

Press the provided In-tank Fuel Filter onto the new fuel pump.

Remove the Stock Fuel Pump Electrical Plug. Install the provided plug for the ModdBox pump by splicing in the wires as shown. lug in the new Pump and replace the Fuel Pump Assembly and secure the retaining ring. Re-connect your fuel lines. Caution: Be sure the plug has seated securely. Failure to do so may require you to re-access your pump assembly for inspection.

PART 2 - SUPERCHARGER INSTALLATION (5-6 hours)
Note: Prior to proceeding, you may want to test your fuel pump installation. If you choose to test the fuel pump installation, be sure to remember to disconnect your battery prior to proceeding. Disconnect TPS plug and Electronic Throttle Plug.

Disconnect MAF plug.
Disconnect Crank Case Vent hose from the Intake Hose.

Disconnect EGR plug and EGR vac line. Remove the EGR valve and set aside for future use.

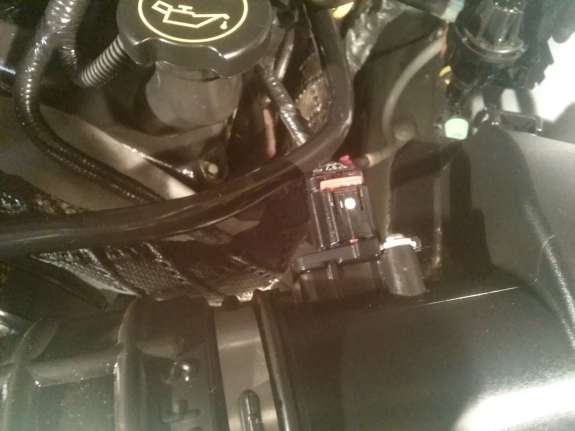
Disconnect Spark Plug Wires and remove the Plug Wire Retaining Clip from the top of the Stock Intake Manifold. Disconnect the Vac Line and Fuel Vapor Return Line as shown. Mark them with tape if necessary.

Disconnect Electrical Plug Mount from Stock Intake Manifold. Use the supplied short plastic straps to secure this to your wiring harness or fuel rail as required.

Disconnect the passenger side Crank Case Ventilation Tube.

Remove the two bolts shown. This will disconnect your Stock Intake Manifold from your Ignition Coil Mounting Bracket.

Disconnect the plug to your Ignition Coil.

Pry your Ignition Coil assembly toward the Driver Side (the assembly should be displaced by approximately 2-2.5" to allow for the future relocation of your EGR valve).

Remove the Stock Rubber Intake Tube and set it aside for future use.

Disconnect the Throttle body. You may want to loosen the Coolant Line Retaining Clips to allow the coolant lines to twist on their mount points. Place the Throttle Body aside for future use.

Use a T-30 Torx bit and remove the eight bolts that connect the Stock Intake Manifold to the Engine Block. The bolt locations are shown below:

Clean and vacuum the area if necessary. Be sure to clean the Engine Block�s mating faces. Caution: Do not drop anything into the Intake Ports. Before Proceeding, fill the Intake Ports with rags or paper towel.

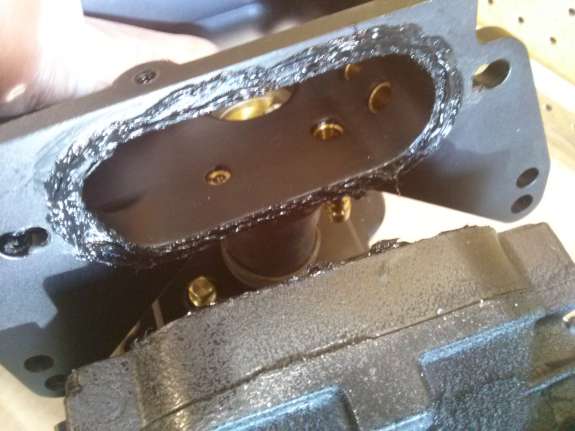
Place a bead of RTV Black Liquid Gasket around the engine's inlet ports as shown.

Obtain the Moddbox Lower Plenum and fit the Future Intercooler Inlet/Outlet ports with the provided NPT plugs. Place a bead of RTV Black Liquid Gasket around the ports openings as shown.
Optional: If you have purchased a ModdBox Intercooler Kit, replace the provided NPT plugs with the provided NPT hose fittings. Refer to the ModdBox Intercooler Kit Installation Manual for further
instructions.

Caution: The Plenum Base Plate is NOT reversible. Before placing the Plenum Base Plate on the Engine Block, note the orientation of the lower plenum. The front of the lower plenum has a bulge as shown in the picture below. Torque the provided M6x35 SHCSs to 13lbft. Start at the center bolts and work your way to the ends in a cross-pattern.

Remove the stock alternator shield.

Remove the Coolant Cap. Locate the plastic Radiator Drain Valve at the bottom passenger side of the Radiator. Turn this plug and release approximately a gallon of coolant fluid (~4L).

Remove the Stock Upper Radiator hose and set it aside for future use. Remove the Thermostat Coolant Elbow and replace it with the one provided as shown. Be sure to clean the mating flanges and replace the o-ring. Failure to do so may result in a coolant leak.

Replace the Stock Upper Radiator hose with the one supplied. The Throttle Body Coolant Hoses will need to be re-arranged as shown.

Obtain the Moddbox Intake Manifold and install the brass fittings as shown (2x 1/4" NPT Plugs and 2x 1/4"-3/8" Barbs). Use the hardware and RTV Black Liquid Gasket to securely bolt the supplied block plates as shown. Install the Supercharger Bypass Valve as shown. The NPT Plug shown below is for an optional Future Methanol Injection Port.
Optional: If you plan to install a methanol injection kit, it is advisable to install the methanol injection nozzle at this time.

Connect the 14" long 3/8" hose to the 3/8" Barb as illustrated below. Secure it with one of the provided stainless hose clamps. Leave the other end loose until a later step.

Obtain your Eaton M90 Supercharger (either an 89-93 oval or 94-95 rectangular style M90) and the provided ModdBox Stainless Steel Supercharger Pulley Adapter. Remove the supercharger's flange bolt and ensure the shaft key is inserted and aligned.

Use a propane torch to pre-heat the Stainless Steel Pulley Adapter (allowing it to thermally expand). Slip the supercharger Adapter onto your supercharger shaft until it binds. Note: The pulley is designed to have an interference fit which will cause the pulley to jam once it slips halfway onto the shaft. If you do not have a torch, simply placing the adapter in a cup of boiling water should expand the adapter enough to proceed.

If you did not use a torch, the threads of the supercharger shaft might not be exposed. Use a hammer and a socket and gently tap the Adapter further down the shaft until the first few threads on the supercharger shaft are exposed beyond the Stainless Adapter bore as shown below.

Utilize the stock Eaton M90 Supercharger Lock Nut and two box wrenches. Use one wrench to prevent the Adapter from rotating (utilizing the flats on the stainless steel part) and use the other wrench to apply torque on the Supercharger Lock Nut. Continue to torque down the nut until the back of the Adapter hits the stop on the Supercharger shaft. Caution: Be sure that no debris falls into your
Eaton M90 Supercharger. The tolerances on your supercharger is only ~0.003"-0.007" and can be damaged if material gets sucked into the supercharger housing. Rotating the rotors by hand can generate enough air flow to suck debris into the rotors. Use a vacuum to clear your rotors prior to installation.

Obtain the provided ModdBox 6PK Custom Pulley and slip it onto the Supercharger Pulley Adapter. Caution: The pulley is a machined precision slip-fit (only when both parts are room temperature). You must either heat the Pulley or wait for the Adapter to cool prior to slipping it on. No force should be required. The pulley will not bind if it is slipped on straight.

Rotate the pulley and align the M5 threads with the pulley holes (should rotate freely if slipped on correctly). Torque down the provided M5x16mm socket head cap screws.

Obtain the Moddbox Plenum Top Plate. Install the 1/8" NPT and 1/4" NPT Brass Plugs as shown. These plugs have been provided for the use of optional intake temperature and boost senors/controllers.
Apply a bead of the RTV Black Liquid Gasket to the Moddbox Plenum Top Plate flange as illustrated.
Optional: If you plan to install a boost gauge or intake temperature sensor, it is advisable to install them at this time.

Obtain the ModdBox Plenum Top Plate and bolt it to the base of the Eaton M90 Supercharger & Pulley Assembly. Use the provided M8x40mm socket head cap screws. Clean any excess gasket material.

Obtain the Stock Upper Radiator Hose that was previously set aside. Measure out and cut a length of hose as is required for your supercharger:
For the 94�-95� Eaton M90 Supercharger (rectangular inlet): 1-7/8�
For the 89�-93� Eaton M90 Supercharger (oval inlet): 2-5/8�
Use one of the 2� stainless hose clamps to secure the hose to the Plenum Top Plate. Loosely place the other 2� diameter stainless hose clamp on the hose.

Use the RTV Black Liquid Gasket and put a thin bead on both the Supercharger and the Moddbox Intake Manifold. Press the Moddbox Intake Manifold Assembly onto the hose prepared in a previous step.
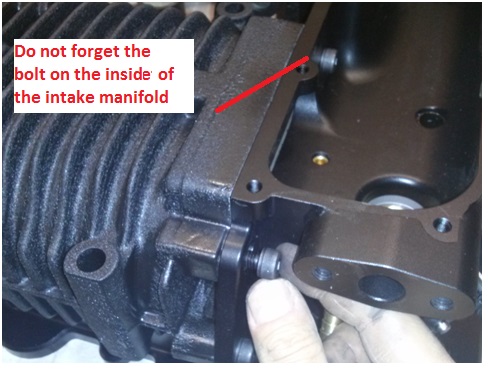
Bolt the Moddbox Intake Manifold to the back of the Supercharger using the provided four M8x25 SHCS bolts. Use the RTV Black Liquid Gasket to seal the Moddbox Custom Washer in place as shown (the bolt located inside the Intake Manifold). Tighten the 2" stainless hose clamp around the bypass valve.
Note: The Moddbox Custom Washer must be reversed for the 94-95 Superchargers (orientation shown is for the 89-93 superchargers).

Use the RTV Black Liquid Gasket and place a bead around the Intake Manifold Top Flange. Place and bolt-up the Intake Manifold Cover as shown. This whole Supercharger Assembly will be used in the next steps.

Remove the rags or paper towels in your Engine Inlet Ports. Apply a thin bead of Black Liquid Gasket along the Plenum Base Plate. Caution: Be sure to apply gasket material around all the bolt holes (as illustrated in the photo below). The gasket material must be extended to the inside edge of the mating face as shown on the bottom-left of the photo below. Failure to do so can result in a leak in your Intake Manifold Assembly.

(Note: Engine rags/paper towels removed from engine ports prior to installing Plenum Top Plate)
Place the whole Supercharger Assembly on the Moddbox Plenum Bottom Plate. Align the holes and bolt it down using the twelve M8x30 hex bolts. Do not forget the bolt under the Supercharger Snout. Torque the bolts in a cross-pattern.

Locate the disconnected Fuel Vapor Return Line. Cut off the press fit connection and reconnect it to the remaining 3/8� barb on the ModdBox Intake Manifold.

Connect the fuel Vapor Return Line to the un-used Barb as illustrated.

Use the provided 1/4" Tee and connect the Brake Boost and Vac Lines to the 14" long 3/8" diameter hose connected to the Supercharger Assembly (prepared in an earlier step). Secure the Vac lines with the provided hose clamps.

Connect the Moddbox Flexible EGR Extension to your EGR valve.

Install the EGR Valve using the Moddbox EGR Spacer and the provided M8x40 SHCS bolts. Note: The provided spacer is anodized black (raw aluminium shown).

Install the Throttle Body.

Bend the Stainless Steel EGR Extension to suit. Secure it with the provided C-clamps as shown. Connect the EGR Extension to the stock EGR re-circulation line. Caution: The Stainless Steel EGR Extension is not designed to be twisted. Do not twist the EGR Extension when tightening the threads or damage to the extension may occur.

Use a knife and carefully cut your Stock Rubber Intake Pipe along the center of the ribs as shown. Be sure to count the ribs and confirm the exact location for cutting.


Use your knife and carefully carve out the ribs to allow for a stainless hose clamp.

Install the Moddbox Intake Pipes using the Stock Rubber Intake pieces and the provided hose clamps.

Install the 5/8" diameter hose to the Crankcase vents as shown. Use the provided Tee and stainless steel hose clamps to securely fasten them together. You may opt to cut off the stock crankcase vent connection ends and reuse them if a stock-looking snap fitting is preferred.

Use the provided wire and butt crimps to extend your Electronic Throttle, TPS, and EGR plugs. Use the loom and remaining plastic strap to secure and clean-up the wiring once completed. Plug the wires back into the TPS and EGR.

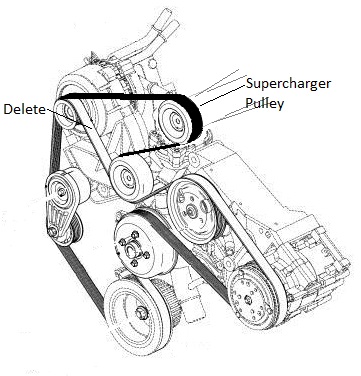
Slack your Belt Tensioner using a 3/8� Box Wrench or Belt Removal Tool. Remove the Stock belt and replace it with the ModdBox 6PK Belt as illustrated below.
Optional. Affix the "Supercharged" emblems where appropriate.
Plug in the MAF sensor, reconnect the disconnected Ignition wires, top up the coolant level, and reconnect the battery. You must allow the liquid gasket material to fully cure at room temperature or as per the manufacturer's recommendations. Failure to provide the necessary curing time may lead to vacuum leaks.
CONNECTION CHECK LIST
MAF sensor plug
Vac Line to EGR Valve
EGR Stainless Recirculation Line (if equipped)
Crank Case Vent Hose to Intake Tube (may be 2 depending on your model)
IAC Electrical Plug (may need to check polarity on the wiring extension)
TPS Electrical Plug (may need to check polarity on the wiring extension)
Ignition Coil Plug
Fuel Vapor Return Line
Fuel Injection Vacuum Line
Brake Booster Vacuum Line

... hope you enjoyed the blog. Happy Supercharging.
You can find the dyno sheet here: 05 Mustang 4.oL V6 w/ 94 T-bird M90 - Dyno Sheet
(Dyno was with: Moddbox Install Kit, 47lb Ford Racing Injectors, #6NGK plugs, 91 Octane & 94 Salvage T-Bird Supercharger)
Ok... here it goes:
COMPLETE How To Install: M90 on 4.OL V6 SOHC - Mustang 05-10
REFERENCE ABBREVIATIONS
EGR � Exhaust Gas Recirculation
HVAC � Heating Ventilation & Air Conditioning
IAC � Idle Air Control
MAF � Mass Air Flow
TPS � Throttle Position Sensor
Vac - Vacuum
TOOLS REQUIRED
Standard metric socket set
Hex key set
Various pliers
T-30 Torx bit
Fluid funnel
Oil pan
Flat head screw driver
Pneumatic or electric hammer drill
Crescent wrench
Utility knife
Shop vacuum
Rat tail file
Propane torch or similar heating device
Wire Strippers
Wire Crimper
STOCK REFERENCE DIAGRAMS
Stock Intake Pipe & Air Box Reference Diagram
Stock Exhaust Gas Re-circulation (EGR) Reference Diagram
Throttle & Stock Intake Manifold Reference Diagram
Ignition Coil Reference Diagram
Belt Diagram Reference Diagram (Dark Belt Showing the Supercharged Orientation)
MODDBOX SUPERCHARGER KIT PARTS
*several parts not shown. Refer to installation manual and parts list for more details.
ModdBox Supercharger Bypass Valve
ModdBox 255lph Fuel Pump
Moddbox 5.5 & 8.0 psi Pulleys
ModdBox Quick Change Pulley Adapter
ModdBox Plenum Bottom Plate
ModdBox Plenum Top Plate
ModdBox Intake Manifold
ModdBox Stainless EGR Extension
Black Silicone Liquid Gasket
Moddbox 6PK Serpentine Belt
INSTALLATION STEPS
Note: The installation has been broken up into two parts: (1) the fuel pump installation, and (2) the supercharger install.
PART 1 - FUEL PUMP INSTALLATION (1.5 hours)
WARNING: Gasoline vapors are explosive!
Caution: When replacing the fuel pump, perform all work in a well ventilated area away from sparks or open flame. Eye protection and rubber gloves are highly recommended. Avoid inhaling fuel fumes.
If fuel is ingested, seek medical attention immediately. To avoid a fire hazard, disconnect the negative battery cable when instructed. Failure to perform any service or repair in a safe manner may cause serious personal injury or death.
Relieve the fuel system pressure. This can be done by a variety of methods. It is recommended that you remove the fuel pump fuse and start your vehicle. The engine will run, shutter, then stall. Remove your key from the ignition and re-install your fuel pump fuse.
Remove the negative battery cable. Secure it to the side of the battery to prevent any accidental contact with the negative terminal.
Gain access to your vehicle's fuel pump assembly as required (fuel pump is located under the driver side back seat). Use a vacuum and/or a brush and clean off the top of the tank. Disconnect your fuel lines and remove the retaining ring. Caution: Do allow dirt or deleterious substances into your fuel tank.
Remove the fuel pump assembly.
Remove the Stock Fuel Pump Filter.
Un-bolt the ground wire and remove the pump retaining cap.
Remove the bottom pump cover.
Unplug the Stock Fuel Pump and disconnect the Fuel Line. It is recommended to use the stock fuel line. Be careful not to damage the fuel line during removal.
Remove the stock fuel pump and dispose of it appropriately.
Cut the bottom of the Rubber Retaining Gasket so that it can be used as a sleeve for your new 255lph Moddbox Fuel Pump.
File or cut the Stock Fuel Pump Assembly Retaining Cap to accomodate the new 255 lph ModdBox Fuel Pump.
Re-assembly the Fuel Pump Assembly and install the new pump. Reuse the stock fuel line and the provided stainless hose clamp Caution. Do not forget to re-connect the ground wire.
Press the provided In-tank Fuel Filter onto the new fuel pump.
Remove the Stock Fuel Pump Electrical Plug. Install the provided plug for the ModdBox pump by splicing in the wires as shown. lug in the new Pump and replace the Fuel Pump Assembly and secure the retaining ring. Re-connect your fuel lines. Caution: Be sure the plug has seated securely. Failure to do so may require you to re-access your pump assembly for inspection.
PART 2 - SUPERCHARGER INSTALLATION (5-6 hours)
Note: Prior to proceeding, you may want to test your fuel pump installation. If you choose to test the fuel pump installation, be sure to remember to disconnect your battery prior to proceeding. Disconnect TPS plug and Electronic Throttle Plug.
Disconnect MAF plug.
Disconnect Crank Case Vent hose from the Intake Hose.
Disconnect EGR plug and EGR vac line. Remove the EGR valve and set aside for future use.
Disconnect Spark Plug Wires and remove the Plug Wire Retaining Clip from the top of the Stock Intake Manifold. Disconnect the Vac Line and Fuel Vapor Return Line as shown. Mark them with tape if necessary.
Disconnect Electrical Plug Mount from Stock Intake Manifold. Use the supplied short plastic straps to secure this to your wiring harness or fuel rail as required.
Disconnect the passenger side Crank Case Ventilation Tube.
Remove the two bolts shown. This will disconnect your Stock Intake Manifold from your Ignition Coil Mounting Bracket.
Disconnect the plug to your Ignition Coil.
Pry your Ignition Coil assembly toward the Driver Side (the assembly should be displaced by approximately 2-2.5" to allow for the future relocation of your EGR valve).
Remove the Stock Rubber Intake Tube and set it aside for future use.
Disconnect the Throttle body. You may want to loosen the Coolant Line Retaining Clips to allow the coolant lines to twist on their mount points. Place the Throttle Body aside for future use.
Use a T-30 Torx bit and remove the eight bolts that connect the Stock Intake Manifold to the Engine Block. The bolt locations are shown below:
Clean and vacuum the area if necessary. Be sure to clean the Engine Block�s mating faces. Caution: Do not drop anything into the Intake Ports. Before Proceeding, fill the Intake Ports with rags or paper towel.
Place a bead of RTV Black Liquid Gasket around the engine's inlet ports as shown.
Obtain the Moddbox Lower Plenum and fit the Future Intercooler Inlet/Outlet ports with the provided NPT plugs. Place a bead of RTV Black Liquid Gasket around the ports openings as shown.
Optional: If you have purchased a ModdBox Intercooler Kit, replace the provided NPT plugs with the provided NPT hose fittings. Refer to the ModdBox Intercooler Kit Installation Manual for further
instructions.
Caution: The Plenum Base Plate is NOT reversible. Before placing the Plenum Base Plate on the Engine Block, note the orientation of the lower plenum. The front of the lower plenum has a bulge as shown in the picture below. Torque the provided M6x35 SHCSs to 13lbft. Start at the center bolts and work your way to the ends in a cross-pattern.
Remove the stock alternator shield.
Remove the Coolant Cap. Locate the plastic Radiator Drain Valve at the bottom passenger side of the Radiator. Turn this plug and release approximately a gallon of coolant fluid (~4L).
Remove the Stock Upper Radiator hose and set it aside for future use. Remove the Thermostat Coolant Elbow and replace it with the one provided as shown. Be sure to clean the mating flanges and replace the o-ring. Failure to do so may result in a coolant leak.
Replace the Stock Upper Radiator hose with the one supplied. The Throttle Body Coolant Hoses will need to be re-arranged as shown.
Obtain the Moddbox Intake Manifold and install the brass fittings as shown (2x 1/4" NPT Plugs and 2x 1/4"-3/8" Barbs). Use the hardware and RTV Black Liquid Gasket to securely bolt the supplied block plates as shown. Install the Supercharger Bypass Valve as shown. The NPT Plug shown below is for an optional Future Methanol Injection Port.
Optional: If you plan to install a methanol injection kit, it is advisable to install the methanol injection nozzle at this time.
Connect the 14" long 3/8" hose to the 3/8" Barb as illustrated below. Secure it with one of the provided stainless hose clamps. Leave the other end loose until a later step.
Obtain your Eaton M90 Supercharger (either an 89-93 oval or 94-95 rectangular style M90) and the provided ModdBox Stainless Steel Supercharger Pulley Adapter. Remove the supercharger's flange bolt and ensure the shaft key is inserted and aligned.
Use a propane torch to pre-heat the Stainless Steel Pulley Adapter (allowing it to thermally expand). Slip the supercharger Adapter onto your supercharger shaft until it binds. Note: The pulley is designed to have an interference fit which will cause the pulley to jam once it slips halfway onto the shaft. If you do not have a torch, simply placing the adapter in a cup of boiling water should expand the adapter enough to proceed.
If you did not use a torch, the threads of the supercharger shaft might not be exposed. Use a hammer and a socket and gently tap the Adapter further down the shaft until the first few threads on the supercharger shaft are exposed beyond the Stainless Adapter bore as shown below.
Utilize the stock Eaton M90 Supercharger Lock Nut and two box wrenches. Use one wrench to prevent the Adapter from rotating (utilizing the flats on the stainless steel part) and use the other wrench to apply torque on the Supercharger Lock Nut. Continue to torque down the nut until the back of the Adapter hits the stop on the Supercharger shaft. Caution: Be sure that no debris falls into your
Eaton M90 Supercharger. The tolerances on your supercharger is only ~0.003"-0.007" and can be damaged if material gets sucked into the supercharger housing. Rotating the rotors by hand can generate enough air flow to suck debris into the rotors. Use a vacuum to clear your rotors prior to installation.
Obtain the provided ModdBox 6PK Custom Pulley and slip it onto the Supercharger Pulley Adapter. Caution: The pulley is a machined precision slip-fit (only when both parts are room temperature). You must either heat the Pulley or wait for the Adapter to cool prior to slipping it on. No force should be required. The pulley will not bind if it is slipped on straight.
Rotate the pulley and align the M5 threads with the pulley holes (should rotate freely if slipped on correctly). Torque down the provided M5x16mm socket head cap screws.
Obtain the Moddbox Plenum Top Plate. Install the 1/8" NPT and 1/4" NPT Brass Plugs as shown. These plugs have been provided for the use of optional intake temperature and boost senors/controllers.
Apply a bead of the RTV Black Liquid Gasket to the Moddbox Plenum Top Plate flange as illustrated.
Optional: If you plan to install a boost gauge or intake temperature sensor, it is advisable to install them at this time.
Obtain the ModdBox Plenum Top Plate and bolt it to the base of the Eaton M90 Supercharger & Pulley Assembly. Use the provided M8x40mm socket head cap screws. Clean any excess gasket material.
Obtain the Stock Upper Radiator Hose that was previously set aside. Measure out and cut a length of hose as is required for your supercharger:
For the 94�-95� Eaton M90 Supercharger (rectangular inlet): 1-7/8�
For the 89�-93� Eaton M90 Supercharger (oval inlet): 2-5/8�
Use one of the 2� stainless hose clamps to secure the hose to the Plenum Top Plate. Loosely place the other 2� diameter stainless hose clamp on the hose.
Use the RTV Black Liquid Gasket and put a thin bead on both the Supercharger and the Moddbox Intake Manifold. Press the Moddbox Intake Manifold Assembly onto the hose prepared in a previous step.
Bolt the Moddbox Intake Manifold to the back of the Supercharger using the provided four M8x25 SHCS bolts. Use the RTV Black Liquid Gasket to seal the Moddbox Custom Washer in place as shown (the bolt located inside the Intake Manifold). Tighten the 2" stainless hose clamp around the bypass valve.
Note: The Moddbox Custom Washer must be reversed for the 94-95 Superchargers (orientation shown is for the 89-93 superchargers).
Use the RTV Black Liquid Gasket and place a bead around the Intake Manifold Top Flange. Place and bolt-up the Intake Manifold Cover as shown. This whole Supercharger Assembly will be used in the next steps.
Remove the rags or paper towels in your Engine Inlet Ports. Apply a thin bead of Black Liquid Gasket along the Plenum Base Plate. Caution: Be sure to apply gasket material around all the bolt holes (as illustrated in the photo below). The gasket material must be extended to the inside edge of the mating face as shown on the bottom-left of the photo below. Failure to do so can result in a leak in your Intake Manifold Assembly.
(Note: Engine rags/paper towels removed from engine ports prior to installing Plenum Top Plate)
Place the whole Supercharger Assembly on the Moddbox Plenum Bottom Plate. Align the holes and bolt it down using the twelve M8x30 hex bolts. Do not forget the bolt under the Supercharger Snout. Torque the bolts in a cross-pattern.
Locate the disconnected Fuel Vapor Return Line. Cut off the press fit connection and reconnect it to the remaining 3/8� barb on the ModdBox Intake Manifold.
Connect the fuel Vapor Return Line to the un-used Barb as illustrated.
Use the provided 1/4" Tee and connect the Brake Boost and Vac Lines to the 14" long 3/8" diameter hose connected to the Supercharger Assembly (prepared in an earlier step). Secure the Vac lines with the provided hose clamps.
Connect the Moddbox Flexible EGR Extension to your EGR valve.
Install the EGR Valve using the Moddbox EGR Spacer and the provided M8x40 SHCS bolts. Note: The provided spacer is anodized black (raw aluminium shown).
Install the Throttle Body.
Bend the Stainless Steel EGR Extension to suit. Secure it with the provided C-clamps as shown. Connect the EGR Extension to the stock EGR re-circulation line. Caution: The Stainless Steel EGR Extension is not designed to be twisted. Do not twist the EGR Extension when tightening the threads or damage to the extension may occur.
Use a knife and carefully cut your Stock Rubber Intake Pipe along the center of the ribs as shown. Be sure to count the ribs and confirm the exact location for cutting.
Use your knife and carefully carve out the ribs to allow for a stainless hose clamp.
Install the Moddbox Intake Pipes using the Stock Rubber Intake pieces and the provided hose clamps.
Install the 5/8" diameter hose to the Crankcase vents as shown. Use the provided Tee and stainless steel hose clamps to securely fasten them together. You may opt to cut off the stock crankcase vent connection ends and reuse them if a stock-looking snap fitting is preferred.
Use the provided wire and butt crimps to extend your Electronic Throttle, TPS, and EGR plugs. Use the loom and remaining plastic strap to secure and clean-up the wiring once completed. Plug the wires back into the TPS and EGR.
Slack your Belt Tensioner using a 3/8� Box Wrench or Belt Removal Tool. Remove the Stock belt and replace it with the ModdBox 6PK Belt as illustrated below.
Optional. Affix the "Supercharged" emblems where appropriate.
Plug in the MAF sensor, reconnect the disconnected Ignition wires, top up the coolant level, and reconnect the battery. You must allow the liquid gasket material to fully cure at room temperature or as per the manufacturer's recommendations. Failure to provide the necessary curing time may lead to vacuum leaks.
CONNECTION CHECK LIST
MAF sensor plug
Vac Line to EGR Valve
EGR Stainless Recirculation Line (if equipped)
Crank Case Vent Hose to Intake Tube (may be 2 depending on your model)
IAC Electrical Plug (may need to check polarity on the wiring extension)
TPS Electrical Plug (may need to check polarity on the wiring extension)
Ignition Coil Plug
Fuel Vapor Return Line
Fuel Injection Vacuum Line
Brake Booster Vacuum Line
... hope you enjoyed the blog. Happy Supercharging.
 5/9/14, 04:49 PM
#3
Member
Thread Starter
Join Date: March 31, 2014
Posts: 6
Likes: 0
Received 0 Likes
on
0 Posts
Thanks atrav83! Thanks for the comments.
We think our kit is a great alternative too. With more Moddbox power adder products under development, we think think everyone will soon agree!
We think our kit is a great alternative too. With more Moddbox power adder products under development, we think think everyone will soon agree!
7/12/14, 12:21 PM
#5
Member
Thread Starter
Join Date: March 31, 2014
Posts: 6
Likes: 0
Received 0 Likes
on
0 Posts
Just posted a universal tuning blog. This is applicable for all custom supercharger/turbo installs and even naturally aspirated.
Check it out here: Moddbox Tuning Blog
Check it out here: Moddbox Tuning Blog

Thread
Thread Starter
Forum
Replies
Last Post