When you click on links to various merchants on this site and make a purchase, this can result in this site earning a commission. Affiliate programs and affiliations include, but are not limited to, the eBay Partner Network.
Yesterday was house work. Hadda do Things(tm). So no progress on Awesome that day. Eh. Is what it is. Tomorrow is already spoken for. Maybe it goes faster, but I doubt it. If I do things relevant to this thread, I'll let ya know.
But today... slow start, but pretty good finish. I wasn't lookin' forward to it at all. Because today... was underside day. Ugh.
That's right, I went through the entire underside adventure regarding this project. Checked and torqued the cradle bolts. Well, the ones for the engine cradle itself were already good. The three for the rear frame connectors weren't, but are now. Dunno what I was thinkin', but all's good, no issues. 'Ceptin' that one that I gotta drill out, but that's the very dang last thing, and it'll be on a lift when I get back to it.
I then did the power steering rack. Which, due to a previous power steering leak due to less-than-stretchy o-rings, had made a very good mess of itself. I cleaned it all up. Mainly because I didn't want to have to handle that dirty dang thing. Cleaned up, and actually pretty shiny, I put that rack back in. Wasn't all that big a deal, although the drippiness wasn't makin' me happy. Nervoused a bit with the steering wheel coupler thingy, but either I got the wheel back in the right place or I'm gonna need a clockspring. We shall see... I think I did it right. I was kinda careful about not movin' it... much...
Then I attacked the oil adapter plate. And let me tell you... that's a weird thing. First, the scraping and scraping I did wound up getting things off, but some things were not coming off. The coolant part had a crust that was made of very tough stuff. My plastic razors did what they could, but at the end, nosir, that wasn't comin' off. Not without a harder, and therefore damaging, device than plastic razors. This was the case on both the block and the plate. You'll see that in the pics below. You'll also be pointed out to the pits... yes, actual pits... on each side. The block had a pit. The plate had a pit. And I don't think they were in the same place. The aluminum was eaten. Thankfully, all that was *inside* the gasketed area. As long as I got that clean... and I really really hope/think I did... then it'll seal and there's no issues gonna happen... Whatever, I'm sending it, because I did my very best without a machine shop. I think it'll be ok.
The plate was then mounted. Awkward wrenching situation. But done.
Then the power steering pump. THAT is a mess. Dripping everywhere, that one hose that's still attached... just... man. BUT... I did it. Trick is to put the upper two bolts in, hold them in the pump with one hand, with another, support the pump and maneuver it onto the block where the two bosses will catch and align it nice, then with a third hand run the bolts in on the top... but do that with only two hands. Yes, it's doable, no it's not any fun, but it's done. Then you can hit the lower third bolt.
Do not recommend. Well, do recommend if you gotta do the pump, but do not recommend because dang.
With that in, time to do the hoses. The long loopy one from the pump goes in one hole of the rack, the short lil' beastie goes in beside it, and it's a sorta dance to get them all together because the lil' beastie has a clip to support the long loopy one, and then the plate has to go under that thing, and THEN they don't wanna line up... cross toes... tongue just so in the corner of my mouth... Tada, it's all in there. Bolted down, that's done. Whee. Oh, and then loopy one has to have a bolt put in for support on the cradle. And also at the pump side, it's gotta lil' bracket that gets fastened to the lower pump stud with a nut. There we go, those are done.
And then we put the lower radiator hose guard on the top two pump studs to prevent the hose from hitting the pulley as it comes up and around and forward to the thermostat housing, Two nuts and it's on and done. Whee.
Then the pump to reservoir and the reservoir to rack hoses were done. The pump one is off a fitting on the pump and on up to the reservoir, the bigger hose. Then the little hose goes to the lil' beastie on the rack. And with those, the power steering is done and sealed up. For now. I'm concerned the reservoir to pump hose is routed under a pipe that on second and third and other thoughts might need go to over... but I like it there, it seems more protected that way from spinny thing. Seems to fit, I may leave it. I'll have to check the manual anyway, but still.
I put the lower radiator hose on the oil adapter plate. Which, when one thinks about it, isn't just an oil adapter plate, it's an oil and coolant adapter plate, but nobody wants to type the 'and coolant' part at Ford, I guess. Anyway, that in and of itself, the putting on of the hose (which, btw, was brand dang new because the old one was... poofy), wasn't a big deal. Nosir. Went on nice and easy, really. Nosir, the issue was the clamp. I had said before I'd not be using those factory constant compression clamps. But reading about them they seem to be THE thing to use over the worm ones... So fine, I talked myself into using the factory ones.
Well, it got stuck in a way I can't get off, and I can't get the hose back off. GREAT. FINE. WHATEVER. So I'll be going to Norseman Trawls tomorrow to pick up the hose pliers that'll (hopefully) solve this problem. If I gotta use those factory clamps, I gotta have the right tools. Until then... well, it's in the picture. I'm pretty sure it'll be ok there, but I just can't move it with the pliers I do have.
Spun the oil filter on. Stuffed a blue shop towel into the other end of the lower block radiator hose. And a few more here and there as I forgot to close off the cam/crank/pcv holes/tubes, idiot that I am. Not that it really matters at this point, but I think it might. I'm fairly certain any thing(tm) that gets into the oil system is gonna either get eaten by a chain, and/or put in the pan, get sucked up, chewed by the oil pump, then spit into the filter where it'll stay. 500 miles later, oil swap. Maybe sooner. Either way, that'll be that.
BUT, for sure this time, all openings to the coolant and oil are sealed off. Yay. And the underside, excepting this one clamp, and that one bolt, is done, I believe. I shouldn't have to crawl under that and do uncomfortably positioned work anymore. And that's truly a :yay: moment.
So. What's left? A bit. New water pump is going in soon(tm). Intake, fuel, wiring, accessories and pulleys and belt... New radiator (yep, that screwdriver drop has me worried and it's relatively cheap insurance). And a new thermostat of which I have two. Way to go, me. Hoses on...
I'm missing something. But at that point it'll be really close to trying the start. If it goes well, then suspension needs addressing, then she'll be on the ground.
I'm gettin' scared and excited and worried and confident and I'm just a mess people.
Thanks for watchin'. 'Till next time!
---
Pics section!
Rack back in, much better looking than oil/dirt/crud black... Notice the bolt holding it in.
The right side rack bolt. It's right there, center, trust me.
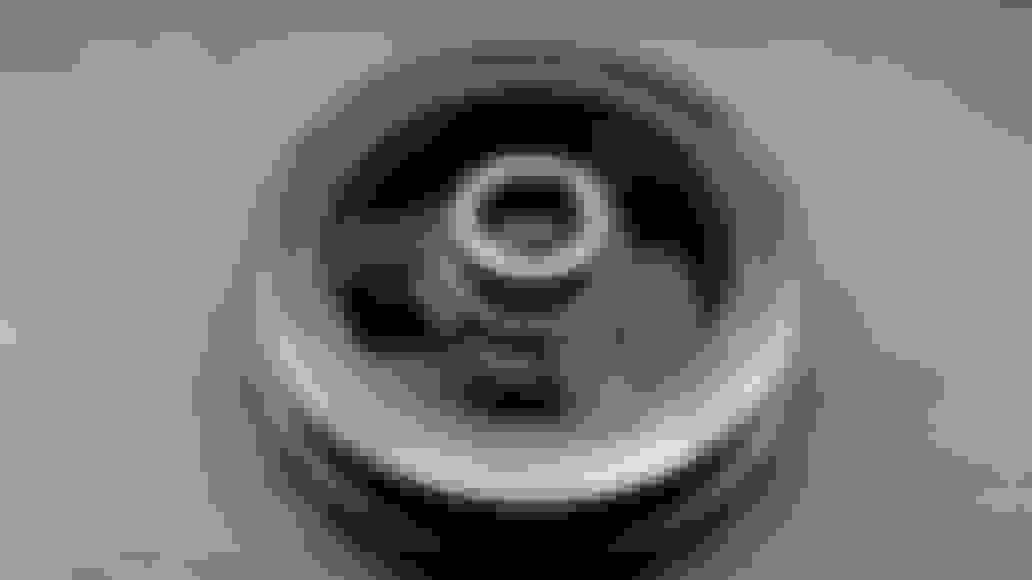
The block side of the oil adapter. Try as I might, that's the best it's getting. And notice the upper right 'corner'? That's a pit. BUT... the actual gasket is further out than that. And I assure you, that stuff is flat, it's stained. Not sure how else to deal with it without machining, which ain't happenin'.
The oil adapter plate itself. Just for full reference.
So in the 'upper right' on this, right across from the bolt hole (second hole from the left), see that little bit going outward that's not following the overall 'curve'? That's a pit. But like the block, the gasket surface is not there, and the gasket surface is clean, I think, just stained. Scraped both a lot. Felt with my finger on both. They should be good. *crosses fingers*
This is after the fact, but that is a properly mounted power steering pump and the lower block coolant hose guard. The hose comes up from the oil adapter plate (you'll see that later) and wraps around the back of the pump. Where the spinny bit would eat it without that guard.
The mounted pipes of the steering rack. What a mess. Both in spilled fluid and just the design overall. But it's done.
Power steering reservoir. Ready to mount. Yay or something.
As you see, the bigger hose may need to go 'over' the A/C line, but I rather like it there. We'll see if that needs to change or not, it seems to be ok.
Oil filter on. Hand tight, properly oiled gasket, all that.
You can sorta see how the hose is going to come up and over the pump, hence the guard. Also, plugged with these shop towels for now.
I hate these SOO.... flames. FLAMES... from the side of my face... breathing... heaving breaths... (bonus points if anyone knows that reference) Yeah. It's gonna stay there until tomorrow. Frackin' things. I know they're 'better', but dudes and dudettes, the less I have to deal with these clamps, the better. But I'll soon have the proper tool.
So today, a rare midweek working time happened. Not much, but yesterday, Monday, I managed to just sneak in to that Norbert Cools and pick me up a set of hose pliers, of which, this was the magic one:
The slotted end goes on the big, slotted side of the clamp,and the cup goes on the teeny side of the clamp. Squeeze. And these have ratchets! So they don't let go if you do. Pretty sweet, easy enough to use.
But it was just freakin' awkward. Hose, clamp, pliers, my hands, and some other stuff in the area all fighting for position... fun. Oh, and the clamp, I over squeezed it and it locked into 'open'. Which is handy because easier to move up and down the hose, but difficult because how in the HECK am I supposed to get it to unlock!? Also, it's scary, like compressed suspension springs on a '66 Thunderbird. Now, lemme tell ya, you compress THOSE? Don't breathe on them, they're likely to explody. So like that. Didn't like it.
So the answer was the pliers, of course, and then a screwdriver *just so*, and voila, I had control again. Love those ratchets, honest, so so so very good. Money well spent. I positioned, checked, positioned again, and by the fourth or fifth adjustment... Here it is:
Finagled. Using the 'proper' clamp and all, and hose is adjusted to the correct, non-tensioned/twisted/wrongly position. Just wanted to update on that, because I'm thinkin' maybe some of yas were worried about the clamp staying on in the wrong place and causing things(tm).
Think the heater pipes and intake are happening next. Probably the injectors/fuel rails go on too, as they're nothing after the intake... Also, none of that should be extraordinarily dirty, so I don't have to change clothes, and they're up top, so no crawling/crawler. Although that valley is really nasty, to be frank. I really should look into cleanin' the mess up from the leaky heater pipes...
SPOILER ALERT! Well, it's just gonna be there, so you've been warned. Jump past the first picture. Or not. Your call.
---
TL;DR: Today, stuff happened to this point:
You can punch 'eject' if that's all you wanted to know, thanks for stoppin' by!
---
Updateathon continues! People groaning everywhere! "Not again..."
---
Today I got some good stuff done.
First, I was gonna put on the crank pulley. But it's ugly. All rusty and nasty. Also needed cleaning up on the interface areas. So I did the cleaning up, the entire thing, and a lot of cleaning. Wax and grease removed. Then I taped up the rubber, the grooves, and the interfaces, I'm glad I had that fine line tape from Michaels. Tamyama, I think it is. Sticks good to even rubber.
Then I shot that pulley with some etching primer. Just a little bit. Enough to cover, just. Let that sit for 30 minutes. Then I shot that pulley again with some satin black. Just enough to cover. A little bit. Because rust is just messed up. And I didn't want gloss. I woulda used hot pink or electric green, but the theme just wouldn't have worked overall, so satin black it is. Plus I had all that just laying around so there's that.
I let that sit around in the sun for a long time. Meanwhile, I then attacked the water pump. Did I mention I got a water pump? Yep. While I'm here... 'But houtex,' I imagine you all saying with some bit of horror, 'the crank pulley's not on! You're gonna get coolant...'
Never fear, I had that covered. I stuffed that teensy gap on the timing cover with 'wet not', and then proceeded to dump coolant everywhere. Mostly in a pan, which was pretty neat of me to have forethought about and maneuver into place. I'm very VERY pleased to say that coolant was as gold as the new stuff... would be if it were diluted 50/50. Not bad for original stock. The old pump popped off, sopped up enough of the remnant in the block to keep it from drippin' down. While I had it out, I compared things. The old one, if spun with X amount of force, would spin a full 360 then stop on its own. The new one? 180. Bearings were definitely a bit worn, I'm thinkin', on that old one. Greased up the new pump's o-ring, got it centered as one should (DO NOT spin the water pump in the block, that'll tear the o-ring up!) pushed it in, tightened it down, done!
Next, the heater pipe. New o-rings were affixed to the nipple out the back of the water pump housing. I hope they're good. they were the overall right size, but they may have been a bigger OD, same ID. JUST slightly. The pipe DID go on (greased up things of course), if it did sorta not want to so much, but hey. It shouldn't EVER freakin' leak... maybe... I don't know. Two o-rings... We'll see. I know what I'm doin' now, it won't be that big a deal to get to them, even with the intake in place. I'm kind of thinking the old o-rings were squished.
Anyway, that thing on, the bracket secured on the back of the right head, the hoses connected, the block's water system is ready to be connected to the radiator... at some point... but still, woot!
I then attacked the coolant crossover. Fairly easy enough. I removed the old o-rings, scraped the surfaces, then put new o-rings in. I then went about cleaning up the intake surfaces to receive the crossover, first, then the intake (as the front two bolts of the intake go through the coolant crossover back bolts, securing them both.) I went ahead and put the crossover in place, put the front two bolts on just to 'center' it for now, not even tight.
Next, the intake. I don't have pictures of the entire chain of events, but the cleaning was... miserable. Charge Motion Control Plates were just *caked* with carbon. I cleaned them out, sprayed, drained, sprayed, drained, blew air, rubbed, even chipped just a little... I'm probably going to seafoam it or something, whatever the best intake cleaning I can do for it. But I did a reasonable enough good job. Maybe I should have thought about that and got the deletes, but eh... I am a stock guy, for better or worse... And new o-rings on the 8 intakes. Wiped the block/head side one more time on those ports, then put the intake on. Tada. Oh, yeah, had to put that vacuum line on the back side. Miserable with... THOSE clamps... but I did it. Center two 'inside' bolts went in, then the rest, then finger tight all those, then center bolts, then a criss cross, back front pattern was used as specified. Intake/crossover is done!
I decided to put the vapor recovery up... but first the oil dipstick had to be secured. One bolt for that, done. Vapor recovery mounted on the left strut tower, done.
Injectors, cleaned, greased o-rings, installed, bolted down. Fuel feed put on (after greasin' those o-rings as well!) Oh, THAT's where that vacuum tube goes, the fuel regulator! Riiight... that's on. Left and right PCV hoses on... the left one is a dance, have to get the intake side sorta on, then the valve cover, then sort of syncrhoniously click them in place. But done. Vapor recovery tube, on.
And I then put the crank pulley on the crank just a little bit. It'll have to come right back off as I gotta put RTV on the keyway and then tap it on before bolting it in. There's a trick to that, I'll tell ya tomorrow. I just wanted to see how it looked, y'know? Looks good, btw. Oh, it's got a lil' bobo on the front as I messed up with a too much spray on it, so I dabbed it and resprayed, but eh. Still looks WAY better than rust.
I'm sure I'm gonna get told 'You ruined it, you're just gonna have to go get another one!' because I've messed with the balance or the rubber is gonna disintegrate... I taped off the rubber, it's fine. And if it can't handle a little paint after *losing* material from the rust, well, yeah, I'm gonna get one that comes painted then. Because in this case, stock is ok, but dang, man does it have to look terrible? Yes? Well, forget that noise.
I'm sending it. It'll be fine, watch.
That's it. Pics incomin', 'till tomorrow!
---
Ugly rust. That's gonna change.
Scraping away the old RTV in the keyway. Plastic razors are good stuff.
Keyway is clean!
After I'd bronze wirebrushed the entire thing (I didn't go crazy, y'know), I cleaned it up several times with wax and grease remover. Until I really didn't get any rust comin' off from the cleaning. I then taped it up front and back.
Self etching primer. As light yet complete a coat as I could put. 30 minutes, then...
Satin black. Again, as light a coat that was complete. 3 hours before handlin'.
That housing for the water pump is really a work of art.
But this valley is a complete and utter mess. Ugh. Thank goodness it's covered. I did actually do some work on it after I put the pump in, but dudes and dudettes... I don't know. Yuck.
See, I did! But this is about the water pipe being all on and everything. New o-rings too. Hope they fit... they seemed to... we'll see... *crossing fingers*
Crossover tube and water pipes all in place.
Heater hoses installed! Those new hose pliers are really great, overall!
Stuff happened, and the intake is on! Rest of it is up top.
The outcome of the painting. That blotch up there is the 'whoops' I spoke of. Don't care, not that bad, better'n rust! Also see the rubber is clear of paint as is the bolt/washer interface.
Ditto the 'block' side, the crank/seal interface is clear of paint as is the rubber.
Really starting to come together now. Hey, if the harmonic balancer shakes itself apart from a light coat of paint, it just means it's time to upgrade to a underdrive pulley! And a 2010 alternator...
Today was a pretty productive day! I totally went to the store and bought groceries! But I gotta say, putting on the mask is a bit annoying, but worse, coming out of the store, packing the groceries in the back, then disinfecting myself before I sit in the car... You ever see a bee or ant or such clean itself? I feel like that every time I get back in the car.
Then I get home, and I have to sit there with the hatch open (Dad's Caliber, actually not a bad lil' car... and I jinxed it. ) and remove all the stuff from the bags, wipe down the bags with my dwindling supply of lysol wipes, inside and out, then wipe down the stuff and put it back in the bag. Repeat for several bags. Tote inside. Wipe the lysol wipe off and put things up. Ugh. But I literally cannot catch this bug, so every little thing I can do, I'mma do. I am very afeared that if I get this Budweisikenlob thing, I won't make it back in any decent shape. I'm workin' on ridding myself of the factors, which is semi-possible, and yes, some people have survived the thing what are like me, but the reports are scary, and the aftermath is months long, if you don't wind up being permanently scarred.
Paranoia. It sucks.
But anyway, I went, got stocked up... except for DANG LYSOL/CLOROX WIPES. I JUST WANT A THREE PACK!! JUST ONE! How are we supposed to keep clean and disinfected when we can't even get freakin' supplies!?
Stupid dirty nasty panicky hoarding humans. At the state and federal level too. All y'all need to back off the accelerator pedal on the wipes, thanks.
NO, I'm not gonna buy it from those jerks what wanna upsell. Unless they sell it at normal price and free shipping, no handling, then I'll do it. Maybe.
---
Oh, yeah, the thread isn't about that. It's about timing. Riiight... Well, ok, FINE. Here:
---
Reminder, pics at the end.
First, I got the fuel system and wiring done. I had to figure out where a couple of things were that had no apparent location on the harness. The Cylinder Head Temperature sensor one was cute. The alternator harness is special. And of course, the heater hoses had to be taken back off so the main harness sneakin' around the back side of the intake could be properly done. And the same for the vacuum lines on the left side, the harness was not happy about going on the top. Everything is 'just so', y'know. But wonder of wonders, and hours of hours, I got ALL the wiring put in place! And the fuel system is ready to go! But I then removed the fuse for the fuel pump for later. I didn't want any fuel to come up until I'm ready to start.
Oh... wait. Not all. Dangit. I gotta put the oil pressure switch plug on. Ugh. Back under the car... Ok, figured and done. Probably gonna wind up under the car a couple more times before I'm done, but it's just a little not my favorite thing. Still, I LOVE my crawler, it's nice to have, comfy to work on, mostly. Lil' awkward, but what isn't workin' on your back, eh?
I put the coil packs on, tightened them down... And two of the left bolts on that left valve cover, the messed up one? Yeah, they had to be replaced with new hardware. Oh, I found the missing coil pack bolt on the right side, but had already bought a full set of 8 replacement bolts and washers back when because of that issue. Lil guy was under a harness I'd tucked between the fender and the engine fuse box. Heh. "Oh, THERE you are! Yay!" But the two on the left, cylinder 6 and 8, I don't know. The bolts weren't good? I put the replacement bolts in, and they went tight. So now I have 6 7mm head bolts and 2 8mm head bolts. And the new ones look prettier, actually, so I may replace them all. We'll see. Just an oddity that, and figures it'd be the left side, right?
(Side note: By the way. Ford's use of the loom instead of just taping it up is very... messy. The plastic disintegrates in the heat. I had half a mind to take the entire harness out and tape it up like I did my '66 Mustang's engine bay (I'd.. well my dad because he really wanted to, and I agreed... painted the engine bay T-Code Red, block too, and that old, black harness looked not right in there, so I took all that black tape off and redid it in red. Came out fantastic if I do say so myself. ), but that'd take too much time and I am on a different mission. Restomod isn't the thing here, get the thing running is. Also, red tape wouldn't look right. And while I have new loom, still, time. It's time to get done. Ok, back to the long storytime.)
So with that... the intake, wiring, fuel and ignition are done, I think. I have to acquire a right side radio interference thingy as the previous one was destroyed getting the timing cover off. That'll be a junkyard run. Maybe I'll get a valve cover set... But anyway, I then put the Cam Position Sensors in, got those tight, and plugged up. I then went to put in the Crank Position Sensor (CKP as it's called, btw, as the CPS is the cams, so...), and... oh. That's not helpful.
(If any of you guessed it before I say it, good on you for knowing the engine like that. Wish I'd thought of it. Ah well. )
The crank sensor is way too long to fit in the timing cover where it should because the A/C compressor is rightthere. So.. under the car again, and I get the A/C compressor off (those bolts weren't all that happy about it, mind), moved it over a little bit. Stuck the crank sensor in, bolted it down. Put the compressor back in place and stuck a bolt in it for temps. I then got my nickel anti-seize out and put it on the other two bolts and ran them in enough to then dig out the first bolt, coat it, then run them all down and tight. I mean, I got a relatively huge dang tub of the stuff, might as well put it to use. Helped those bolts go in much better than they came out, lemme tell ya. Left the crank sensor disconnected to ensure she's not gonna start when the time comes to play with a starter.
I put the throttle body on. And the intake snorkel. Because MAF connector. Took the snorkel back off because just wanted test fitting for the moment.
Alternator went on, all connected and done. Battery tray in, battery in (it had been trickle charged yesterday, but it really was ready to go without it. Still, wanted a fresh charge for cranking purposes), and the positive terminal on. Then the negative touched, no sparks. Good. Negative on all the way.
Ok. I think.. Lemme see... I pulled the crank pulley back off and set it aside. I opened the door... and it was nice to hear the bing bing bing of the 'key is in the igntion'. She really doesn't do that much, as the sensor in the ignition switch is not all that good, but this time, she did. Nifty. I ensured neutral. I set the parking brake. I... Turned the key.
Things lit up, dash was on, radio was on... turned radio of as AM530 is just not a great station. Well, it's just static, there's no actual station. Anyway. Let her settle. I actually sat inside. It's been so very very long...
And then I pushed the clutch in.
And then I just... barely... touched start...
She lives! But only to turn the motor a little bit. Still, that was pretty great! I did that a couple of times, just to see how it sounded, just a *little bit* of a crank. She can't start, fuel pump and crank sensor aren't connected, remember?
So. That's pretty great! Oh right, I said that. Um... ok... What do I need to do to *really* crank this? I have to crank it in 10 second bursts until I get oil pressure. Fuel pump is off, crank sensor is not connected, wiring is complete, intake is ready in all the ways... I think we're ready to put oil in and hi...
...Oh, right, the crank pulley! Gotta seal up the oil for the last time. So I got the pulley and put RTV Ultra Black in the keyway, then slid the crank on. And then proceeded to use my dead blow hammer to beat the thing on enough to get the old crank bolt to go in the threads. I then used the 18mm 1/2" socket and ratchet to proceed to install the pulley. Once the pulley was seated, I then removed the old bolt, and broke out my brand new ARP crank bolt! No more replacing that thing if I need to do this again. Which I sincerely isn't any time soon of course. But dangit, it's a 12 point. Great. The one impact 1/2" 18mm 12 point socket is a deep well. Which won't fit with the impact in the space it has to to do this. More later.
Lubed up the bolt threads, crank side of the washer, and the underside of the head of the bolt. Not in that order. But all done. I then installed the bolt by hand with the ratchet and the deep well 18mm 12 point. And then got the impact gun... and as I said before the deep well and the gun aren't gonna be able to fit in there. Radiator is in the way. Yeah, I'm replacing it, no I'm not taking out just yet. So it just happens I have a short socket 18mm! In green chrome, not optimal. And further... a 3/8" drive. But when in Rome, you send it. one 1/2 to 3/8 adapter later it all fit in there, and I torqued the bolt down... enough. I still have to ensure 100 lb-ft, but that'll be later when I have the accessories and belt on. For now it's fine, it's about the seal of the oil cavities at the moment.
Ok, so the pulley on... I proceed to fill the crankcase with fresh Mobil 1 20w-50 High Mileage. Oh, I've been awaiting this moment. I have never been so glad and still nervous for pouring some oil. And I did a *real* good job, not a drop was spilled! Even had a little tray to put the funnel I was using in to keep that from dripping on something too! Planning. Sometimes I haz it. I put in the 5 quart bottle's worth, then put the cap on. I checked the dipstick... yep, it's showing, so that's good!
Alrighty. There's oil in that there oil pan. Full partial send time! Hit the starter, punk! (which requires I get in the car, push the clutch, all that.)
So I did.
10 seconds later, I stopped. No oil pressure during the crank. Which is expected. Waited a little bit. Cranked for 10 seconds. Repeated. Repeated. Repeated. Repeated.
Oh, c'mon. Where's the oil pressure? That's 50 seconds!
Got out, checked the oil on the dipstick. Ok, showing maybe it needs another half quart. So I added that in. That looks good. Guess the filter's full-ish now...
Repeated the crank 10 seconds thing. And again. And again. And again.
I'm starting to be really really nervous. Although except for the oil pressure not being there during crank, the engine sounds fine as it's turnin'... so I'm pretty hopeful... just need that oil pressure to happen...
Again. And again.
I'm starting to be a little concerned, as you might expect. But I persevere... And again. And.. OH WAIT....
She. Has. Oil pressure.
I'm *elated* that pressure showed up. I was getting a bit more worried than I wanted to, obviously, and just when I was about to be real upset and wonder if I have to go get a gauge... I have an oil pressure needle not on 0!
It happens to turn out that the oil pressure will NOT READ if you're actually in the process of starting. At all. The dash goes off, in effect, while starting, so the gauges aren't active until you stop.. um, starting. And that's when the needle moved to center! Switch, wire is working, there's pressure, I'm good!
I hope, anyway. I'm still thinkin' about maybe an oil pressure gauge, but I'm just not all that wanting to have a random gauge stuck in the engine bay, and I don't really want one in the cabin.... but maybe still, I dunno. The switch is happy, I probably should be ok with it.
I then cranked it a couple more times to ensure the pressure wasn't a fluke. It wasn't.
I'm
I took the negative terminal off for now, put the snorkle back on to seal that up (filter too!), cleaned up a little, and that was that for today because late, hungry, and need to sleep.
Tomorrow... Actually gonna attempt the start. No accessories or coolant, just enough to say "yep. It works!" Maybe about a minute's worth of run. She's pointed the wrong way to run it long anyway. I'll have to have fans going stupid back there to clear out the exhaust.
And if that works, the accessories and belt are going on, double checking the torque on the crank pulley, then the radiator and the hoses and thermostat/junction housing and stuff like that there. Then the suspension. Then brakes on, wheels on, and... off the jacks. Fill with coolant, start her up, drive out.
If nothing goes wrong, of course. Life is what happens when you are too busy making other plans, after all... Still, very hopeful.
I hope she doesn't make any weird noises. I'd be very unhappy. So happy thoughts!
Ok, that's it. Until tomorrow!
---
Pics as usual, not as many today, but here they are.
Wirin's done.
Right side too.
Snorkle test fit for wiring purposes. Came back off, but finally went back on for the night.
Time to put the crank sensor in...
...oh. The Dumb. I haz it. Wasn't that bad to fix though. Just... really? Yeah, really.
Almost there...
Battery tray and battery and harness and all connected! Didn't explode or anything!
Just for a moment, as she's not got any cooling on her, but she was put together enough to run, and RUN SHE DID. Started right up, oil pressure up, everything looks good. She ran smoooth! She sounded like the confident ol' girl she was before she had her little attack of broken.
All the things to get to this point, the time I had to wait for good days, or good me, or work not interfering, or other car, or whatever... I'm glad I was able to take my time and do it as right as possible, and thankful for the help behind the scenes I've gotten, especially Dad with the spare car.
But soon(tm). She'll be on the streets! More to do... Like the power steering o-ring seals decided to leak again and it's bad. I'm gonna have to replace them stat. Yay. Rack's fine, just that. Messy.
So, I'll be doin' that immediately as possible.
But anyway, wanted to update! I'm so thrilled! :whoohoo:
---
I'm glad I had this catch pad to get that leak. I'm sad I have to toss an otherwise wonderful fatigue mat. Oh well, another Hatcher Fret trip!
Actual update. May the Fourth be with you, always.
---
I'm really tired. I gotta admit. I was up too late last night. So later start today. And also, all the work that's kinda hurtin' me now, sore. Body being put in weird positions/places is brusin' me up. Went to get brunch on the way to the Hamper Fruit to get some things, and then Narwhal Tube because one of the things wasn't at Hamper Fruit. Then back to nearby the house A Ranch Otter Paws to get a belt tensioner, as I figured 'may as well'. I'd been wafflin', so finally I unwaffled. Mmn... waffles.
And then when I got home, disinfecting time. I'm gettin' REAL tired of that. All the things. Ugh. But that's done.
After a bit, I got switched out for clothing for to work on the car. I got her ready, which was tighten the snorkel down, then connect battery, inspect and ensure... Think we're good. And... well, you can read the previous post, she did run! I was very very happy. She sounded great! Like before this whole mess happened. Purrin' like she should. No weird noises. But only for a bit, as again, nothing to keep her running on. Especially cooling. But enough. Then I did a video, as you see.
And then that puddle was spotted. Great. But two new Nitrile (as apparently that's the kind, and apparently I happen to have them in the kit I bought) O-rings were put on the ends of the hoses in question, and that'll be that, thank you very much. The old ones were *square*, nearly. Squeezed down too. I no longer feel concerned about the water pipe ones. So that puddle is finally done, I hope. That did take a bit though.
Next, I attacked the thermostat. See the pictures, but the Motorcraft one I ordered was... definitely not right. Oh, it'd fit, but nosir, not good. See the pics. It was too short. I'm thinkin' it was for the old...? crossover tube mounted thermostat, not the junction one I have. But thankfully my scatterbrain didn't remember I'd bought that way way ago, and had bought a new thermostat with the water pump I got. And it's correct. Not Motorcraft, but a good brand, I did the checkin'. It's actually correct. So that, and the new O-ring, were put in after I cleaned up the junction housing. It's ready to go.
Then my mom and dad showed up! Cool! Hi guys! They brought me some things. My bro wanted me to have the shop manual for the motorcycle, so that's cool. And a Texas road map/atlas, which is nifty. And my Tabasco hat, I'm real happy to have that again, I forgot it somewhere, and they wound up having it. And my lil' scan tool, dad brought that back. And after unpackin' all that, I told them 'hang on, don't move', as they were in their car, staying in it, at my garage. So of course, I hopped in Awesome, and gave her a cold start. And a lil' vroom poppopdoppopdop... Cold starts are fun. They clapped. I was beamin', because I'm a kid even though I'm old and broken. Yeah. That's about right.
Lil' visitation time is over, mom had a sammitch to get to. Cool. Right. Now swap the radiator! Shouldn't be that hard...
"It indeed turned out to be that hard." - Morgan Freeman.
So... the way things are plumbed and routed and ears sticking out and all that... plus my ignorance on this adventure... turned an 'easy' swap (As even evidenced in the shop manual!) into a small... well, I won't say nightmare, but definitely an uncomfortable daydream.
There's a trick. Two of them. I'mma let you guys in on them. See the pics, but first what it is is the lower studs that the condenser and the power steering cooler (I actually didn't know I had that thing. I guess because Race Car!! but anyway) mount make it impossible to clear the radiator. It's all about the left side tank. It can't get cleared of the plumbing and the condenser at all. No matter what you do. I very nearly... and I'm not unconcerned about this... put a hole in the condenser. That would be tragic. But I think I managed to stop before Bad Things(tm).
So. What the entire heck. How do you do this?! WHO DESIGNS THIS...
I went to a youtube video. They were pullin' it out of an '06 V6. Same deal though. They got to where they were gonna yank it out... And then jump cut to 'it's out and it was some wiggling." DUDE. Why didn't you film that, it's kind of important!! I was not happy... but I kept watching, hoping to see the trick putting it back.. Oh, there it is. The clips for the screws had to be transferred to their new radiator. And what was that? The locations where my studs are have the clips...
I went outside... aha! The lower studs are not studs. They are studded bolts. You have to spin them out of the radiator. And the only socket I have that fits is a 5/32". But that's enough. I wrestled them out. Condenser and PS cooler were clear, the studs are outta the way. Let's go.
Dumping the remainder coolant out as I did this... The other trick is you have to disconnect two... possibly three, but the two did the trick... big harness connectors for the computer and front harness on the right side of the bay. They are in the way.
NOW... you lift up the radiator a little bit. Maybe an inch. Then lift up the right side of the radiator, then sneak the left side out of the plumbing. It's still tricky, but at least NOW it's doable.
My new radiator has all the clips, so just... oh, that reminds me. I got two screws in the old radiator I gotta recover. Gotta mount the shroud and/or the tanks... thanks for reminding me, folks! I'll get them in the AM, promise.
Ok, so just put the new one in, the studs go on the bottom, put the condenser and the PS cooler on them, nut them down. Bolts on the condenser brackets up top. Those are fun, ratchet wrenches for the win.
Bolt the radiator onto the support bracketry, and THAT'S IT, I'M DONE WITH THIS MESS FOR TODAY.
Didn't go as fast as I'd like, to be honest, didn't get as much done, dangit, but that power steering and those radiator bolts really messed me up. Oh well. That's why I call it a 'project', because if it were 'OMG gotta have it now!' I'd make mistakes. Like I've already done with that frame bolt.
But definitely EXCELLENT progress this weekend. I'm hoping work is slow enough I can take off and get her done before the weekend, actually, but we shall see.
I hope all y'all are doin' as well as can be in these weird times. Until next update, houtex signing off. Pictures incoming!
---
One on the right is the old one. Left side is the new one. Somethin' wrong here.
Backup thermostat to the rescue! Obviously a wrong part number correlation happened here. Middle one is just too short, and the stopper's not big enough. Old on the right, new otherbrand on the left. Someone reputable I assure you.
As you can see, the outlet seem to also be smaller. Old on the right.
The other end of things. Really obvious the part number was way wrong. Ah well.
All back together. I think that's the right orientation. New o-ring in there, thermostat's the right way 'round... Next item!
Ok, see that one stud on the left side? Near the drain? There's another one on the other side of the radiator. They are IN THE WAY when trying to get the radiator out. OR in.
Closer look. I just stuck it back in there for the picture, but you can see it's not a stud, but a stud bolt (or whatever you call it.)
One 5/32" socket to spin it out... carefully... and that is one of the keys to getting the radiator out safely. Nastly lil' bugger to deal with in some respects, but I did it.
Proof of the 5/32 socket.
The other trick. The top computer harness connector, and the front end harness connector have to be removed so the right side of the radiator can come on outta there at the angle needed to get the left side out.
This particular pipe is the real reason, but the stud bolt completes the irritation. Unless you know the SECRET, Doctors hate him!
The just before was scary, but the right after was just...
...well... Awesome.
I'm taking a break from that today, and tomorrow's booked. Thursday and Friday I'm hoping to get to stay home and finish her up, so that I can maybe, MAYBE get that stupid frame bolt figured. Small opportunity to get it on a lift at the work, which'll make the drilling out easier.. or someone will do it for me and be paid cash very gladly, whichever. I'll even supply the tools.
Still smiling about that startup. All three of them.
Thanks, Jim. It helps me unwind to write these things, but I'm glad I'm entertaining in some way. And yeah buddy, I can't hardly wait... except...
Update: No, I won't have Thursday off. Work got actual work I have to do. Maybe Friday. And I can do a couple or small somethings here and there if work keeps me both days. Ah well. Soon(tm) is still a thing! Just might be into middle next week is all..
Update. You probably know which number it is, so I won't bore ya with that. Pics at the bottom per usual.
---
No weekday workin' on Project Awesome, so it was today. And I got a goodly amount done!
I put up all my tools. So much for the 'gonna keep them put up' thing. Ah well. I am what I am. Reorganismed the tools so they were all actually accounted for.
With that done, I then attacked the idler pulleys. All new ones, including the tensioner. That went about as you'd expect, of course. Belt went on too. New belt, new tensioner... MAN. Gettin' that thing over the alternator pulley was cute. But it's on, and that's DONE!
Next, I put on the fan and shroud. Get 'er bolted in, connected. And then straight away put on the power steering reservoir, because it's just that kind of annoying with it's placement and flopping about.
Then, the hoses for the cooling system. It's... odd. Clamps in weird places from factory which makes it difficult to get them in place... and a couple here and there were spun around in some way because reasons(tm). But all hoses went on! I noticed they have little alignment printing on them that matches up with bosses on the fittings, so that's really nice. Very helpful for the crossover one from the tank to the thermostat housing. Didn't ever notice that before on other cars... but maybe I didn't care because it's kinda obvious how the mostly go. That one long one, though, it needs to be just so. It holds up the thermostat housing, via a bracket on the timing cover, same bolt as the left side radio interference capacitor. I still gotta get a new right side one, but later, it's not a big. Radio seemed to work just fine. Probably an AM thing. Who listens to AM anyway.
Oh, order of cooling system hoses is kinda this: Install lower hose from block to thermostat housing, going over the power steering pump, and you best have that little shield in there. Which was previously done and ready. Then the thermostat housing goes on that hose, on the side fitting of the thermostat housing, and also upon which you should already have installed the lower radiator hose, because you'll really not like it if you didn't. Forget to install the clamp on the radiator. Then install the upper thermostat hose to the left crossover on the engine. Then figure out the tank hose from the side of the thermostat opposite the lower block hose, and then remember "Oh, that's where that bracket went! Nifty!" and install that hose's bracket. The the overflow from the tank to the top left of the radiator. And.. that's it!
With that done, time to fill the radiator! I have a pitcher (I think I mentioned that earlier) and two gallons of concentrated Motorcraft Gold, and two gallons of distilled water. I mix up two quarts at a time, one quart each of coolant and water. Pour it in the tank, as that's apparently all you do, it's the top of the coolant system. Good jorb Ford, those silly old school burping points on the motor were... um, silly. So I get four quarts in, then realize.... Hayy... I missed something. Maybe you caught it earlier. Whether you did or not, I didn't, and then I did in time, thankfully. One upper radiator to right crossover fitting hose later, there's a leak. Small one, but still. Great. Where's that coming from... oh yeah, I forgot I forgot to put the lower radiator hose clamp on. So I put that on. Pain in the buttocks, but then I switch to using my hands and it was still a pain, but in the hands. But it's on, leak gone. Yay.
Onward. I continue to fill the system. It takes about a gallon and 1/4 of mixed coolant and that's all it wanted. I guess that's right. I dunno. Maybe it still had some in the block. Whatever I can't force anymore in. I mix the rest because might as well, so I have 1 gallon and 3/4 of 50/50 Motorcraft Gold left, ready to go.
So that done, I pour in some Mobil 1 ATF, which 'meets or exceeds Mercon V', into the power steering reservoir. Fill it up. I know it'll get sucked in. Put on the snorkle one 'last' time (because one day it'll come off for a cleaning, as one should does).
Think about things. Ponder other things. Examine further things. That sort of things. Things things things.
"I think I'm ready."
I put the battery terminals back on. I position the two fans I have in the shop to blow out any exhaust and also bring some fresh air in. I would not like to suffocate, thanks.
I start her up. So. Freaking. NICE. :yay: I'm just so happy.
This time, she's gonna stay running, because I need to cycle the power steering, and I need to cycle the coolant, which means she needs to get warmed up and the thermostat open up. So I turn the wheel lock to lock. And then I hit the horn. Fantastic, I didn't kill a clockspring! I cycle that a couple of times, and it seems that... that's all. It's ready. But then, it's not connected to the spindles because more work to do on the front suspension. Still, that there wasn't any complaints is kinda nifty.
So she runs and runs at idle. She is smelling. That would be the oil I dripped when putting in the followers. Not an issue. Oh, I also put on the A/C at some point and ran it like that to ensure two things: A/C works, and the high speed fan works. Yes and yes. Turned the A/C off. Hm. She's been running *quite* the while. Purrin' like a kitten, she is, but still, c'mon, thermostat open up already. I get impatient. I set the idle via my foot to about 2000 or so and keep it there for a little bit. Maybe a minute. All the gauges look happy, btw, the temp's up, but still, no flow yet. But after that minute, I get back out... There we go. Flow. It's working!
I let her idle for a little more, then shut her off. I go get some eats, rather satisfied at things. I come back out... *no leaks*. I am elated.
Guys and gals. I totally did it. I mean... I had my doubts, but there it is. She runs and she's *happy*. I hope she stays that way for a while, I'm tryin' to keep her that way... Oh, and niftiest of all: No chain slap! Ready to roll.
---
Well, almost. Time to attack the suspension, get that all resolved. It's just the lower ball joint bolt, the tie rod ends, and the camber bolt I wanna swap out. Then the brakes and the wheels and that's that. Not a big, right?
Yeah, well, so it's kinda large...
I am gonna do all the left side and then the right. It's getting late, but I figure I can whip this out, not a huge. The left side is a *mess* because of the power steering fluid leak from previous times, so I clean it up. Then I go re-learn about the camber bolt, and then pretty much no muss no fuss get the bolt installed on the left strut. I don't understand why they didn't know how to do that, but it's not hard or a problem. Whatever, it's on there, yay! Right side should be just that simple too.
Now the tie rod end. The left one I screwed up, even with my precautionary things to not, because stuck like Chuck. Or Louise. Or whomever you want stuck. It was. I 'won', but not really. So that one needs replacing, but I was going to swap out (previously mentioned?) for the bumpsteer kit I've been having for a bit, like those camber bolts. So I go to spin off the tie rod... And it ain't. I'm just gonna leave it like that, it ain't. Try as I might, clever with tools and leverage and this and that and the other, it ain't comin' off. What the heck.
And I stopped at that point. Time for dinner, time to relax, recover, rehydrate, and recount this tale, which I have. I'll go learn me how to get that thing off, I'm sure there's some trick or such. I am still aiming to have this car back on the ground and *out of the garage* tomorrow, if only for a little bit. Alignment and that one frame bolt will be the next things to get done after that, but I'll let y'all know how it goes tomorrow.
Stay safe out there! Pics incoming! Thanks for readin', sorry for the long as usual.
---
Pics:
New radiator in, can't remember if I put that in the last one.
All new idler pulleys and tensioner installed.
Belt installed. New belt + new tensioner = that was fun to get on.
Fan and shroud in.
This little guy like to move about and poke things. Annoying. Glad to have him back in place.
Sorry, she sneezed. Thermostat housing in place, all hoses on except the tank crossover one.
Tank on, that hose on, ready to fill! (Except not, but I'll fix it in a minute.)
Mixing station. Left is the concentrate, middle the mixing vessel (aka 2+qt pitcher), right distilled water.
Pour in one quart of concentrated coolant...
Then pour in one quart of water. Pour the water so it flows down the side and mixes the stuff up automagically. You can see it happen, it's kinda trippy. Makes two (2) quarts... ish, this was the remander 'quart' in each jug.
There we go. Big dummy. Didn't lose any coolant, as I started filling before I realized this hose wasn't on there, but still. Duh.
And then this happened. Gah. Small, SMALL leak, but a leak nonetheless... Can't have that.
Don't forget to clamp you lower radiator hose, and that leak doesn't happen.
Update: The Forgotten Bit, because it wasn't exciting.
I got the suspension and brakes all done yesterday. The left tie rod required the torch I bought yesterday (Saturnday), and then I went to watch the Houston Commemorative Air Force Flyover nearby with my parents, then decided maybe I need an extinguisher just in case, because fire and things that'll catch fire. So all that took a minute. I then tested the torch, it works. Nifty. I can adjust it too. I've never used one before, but I'd seen it done, so I actually did it like a pro and spun that seriously stuck tie rod end right the heck on off after torching it. Yay MAPP torch. Good choice, me. Way to read and understand enough. Oh, and a big vice grip was used to lock the inner tie rod.
I put on the Whiteline bumpsteer kit, set for the 1" lower setting (as that's what Awesome is set at, 1" lower) and tried my best to get the spins right. I know I didn't, but it's close enough, I think, to be safe enough to drive. That done, put the ball joint pinch bolt in, put the brakes back together, and... there we go. Tomorrow, she gets her feets.
No pictures, just suspension stuff, y'all seen that before. Until tomorrow!
---
And now, on to:
Aftermath: Part 1
The Aftermathinationing.
--
So. Right off the bat, end result so far:
She's still broke.
But not in the way you probably think, which is a good thing. It's more an annoyance. I'll get to that.
---
Today, we apparently went back to work, but nobody told me we're opening Monday, so I wasn't there. But there was work that needed doin'... except it didn't when I got there. And I found out no, we're not all back, as the office isn't, just the sales and service. I'm confused. I go home, as I'm 'office', being IT. Don't need to be there, really, at the moment, so I'm acting like office.
I had a dental appointment earlier before that work, and then I hadda go get drugs (Prescription), and then the work what wasn't. Then back home, lunch, more work from remote (I hate printers), then finally... time to clean this up, Clark. (Bonus for who gets that.) I pick up tools, buckets, catch pans, move stuff about, just generally squaring things away because I need to get things cleared out for later. Also, putting away tools, remember? Right, that.
So the cleanup done (as it can be, this garage is full with motorcycle and big things(tm) that I gotta re-sort later on..), I proceed to final check the engine bay, and underneath. All looks right.
I take a look at the situation on that frame bolt, and try to fit one of the several types and sizes of EZ-outs and removers and whatever, all that stuff to get the bolt out, and none of them quite fit. Hole is too big/small for all but one, and it's not biting because of that chip of drill stuck in there. So that'll go to my body shop to see if they can help me out. I'll be taking all my tools regarding that bolt with, in case it helps, sacrifices for the cause and such. I'll let ya know.
Fine. What's left? Nothing. I put the wheels on. I put the car on the ground. I torque the lug nuts. Oh, I had to shave one of the lug nuts because it was very very boogered up by previous actions by others. And/or me. Ill fitting tools, I'm guessing. I'll have to get an entire new set all 'round, and a proper size and type of lug nut tool this time. But they're on, they're torqued, I'm good to go.
So I start her up and she exits the garage! And she's dragging something. What... oh, the electrical cord is hung on the exhaust tip. No big, pull that off, get it put up. She moves, I hear something. Oh, the garage door was still working, there's nothing dragging. She moves some more. And more. And she's... fine! Sounds good. Runs good. Moves good. Power seems right. All's well!
I putter to my parents house around the corner to show them she's alive. We chat. Then I go to drive a little more to test. She seems ok!
I goto the very nearby Whataburger because great Coke Zero and I wanna celebrate. But while I'm in line... she starts going *wonky*. The dash shows alternator is *pegged high*, ABS light is on, battery's on, 'Check Charging System'... what the heck... She's still running fine, but... it goes away. Then it comes back. I hear the SJB clicking away at something. Finally it seems to settle down to 'Check Charging System' and the battery light on.
I'm... not terribly thrilled with this. I figure it's a connector. One of the ones I disconnected for the wiring harness moving and/or the radiator removal.
I'm right. The right harness connector below, beside the engine computer:
It has the little beige-ish tab looking thing inside. It *will not seat*. I thought I had it connected, but it apparently worked itself loose. It seems to be a problem with the little gasket in the other side what seals on that lip of the connector shown. Push and shove as I might, it's NOT going. And it's special, because on the other side, it has resistors on the corners that connect to the electricals in this connector.
It seems to me it's a can-bus connector and such for the ECU and other body boxes, such as ABS, to talk to each other SJB. While I've not yet done the research on this, it seems rather obvious.
I hooked up my scan tool to the car and it's got all kinds of codes. But the other thing is that it has good alternator and battery (It has a test for that), so why the system says 'check charging system' seems obvious. Battery was firmly connected, and the thing is making 14.8 volts. Battery's at 12-13. It's not got a charging system issue, it's got a communications issue.
I'm pretty sure I know what the problem is and what needs to happen to solve it, but man.. I'm tired. And I gotta go research this connector. So a little more time. She did run really good though. Very happy. No drips, no leaks so far either.
Close. So close... Le sigh... But it was a nice little drive anyway. Needs alignment really bad, and that bolt obviously. First things first.
Until next time!
---
Edit, a little later:
I should have figured FordTechMakuLoco would have yet another excellent tutorial on exactly what I needed to know. He's just so excellent a person, people, go watch all his stuff!
I may get all new coil and injector shells now. Stupid heat soaked plastic tabs... ugh. And the cam sensor ones too. Plastic is great, but it doesn't like heat.
/Maybe I just need to find a wrecked '06 and acquire another engine harness so I can tape it up nice and put all new shells on it... but that's probably overkill.
//Still. I wanna tape up the harness instead of that stupid disintegrating loom. It'll solve problems, I swear.
Today I got home from work and switched into 'get dirty' clothing and got back out under the hood. I took apart the connector as prescribed above, and it was easy. Very nice, actually!
I saw nothin'.
Everything sorta looked right to me. There wasn't any particular reason that I could see that there shouldn't be a good connection. I then proceeded to remove the weather seal, as that seemed to be the problem, so I took it out of the one side of the connection. I then put the connectors together...like buttah.
So... that seal is the problem. But why? I decided to put it back in, and lo and behold... it wouldn't go back where it was in the first place. This far, no further! After playing with it for a little bit, trying to get it to sink down, I said 'self... permayhaps it's supposed to be right where it is.
I reassembled things. It felt right, and clicked and all that. Took it back apart. Seal was in place. Hm. Put it all back together as it should be, clips and body mounts and all. Good to go, I guess.
So, I put the negative terminal back on the battery, started her up, and drove her around the neighborhood a little. All was well! No issues that I could see. The problems were go...
...aaand it's back. *click click click* goes the SJB. ABS light. On. Off. Battery comes on. Voltage meter goes to the moon, then back, then moon..... then back... Slightly different than it was. But yeah, problem's back. Then it stayed on 'Check Charging System' and the battery light was on, and that's where it stayed.
:hm:
So. I'm coming to the conclusion the alternator diodes or such are shot, or the clutch (I believe in a previous thread somewhere I mentioned these things have a clutch?) is shot and sticking 'on' instead of not engaging. So it's overvolting. Don't htink it's demivolting. And no way is it archivolting. But definitely it's real revolting.
Anyway. The odd part is the scan tool tests show all is well. But I can *hear* the alternator. So I think the scan tool is more lenient/not able to see the spikes or whatever.
I'll try again Friday. Tomorrow's ate up. Yet another distraction, but... that's life. Wouldn't be life if there wasn't 'no, wait' things happening. But when I get back to it, I'm probably gonna take the alternator off the brackets and see if I messed up those connectors. The one lead direct to the battery is stupid easy, so it should be right... unless I didn't put the nut on real secure. Which I suppose is possible, but wouldn't be like me, I'm pretty much a 'get that all done, then the next thing' guy, which probably explains my longess of getting Awesome back on the streets, but perhaps I got distracted by yet another person/situation that messed me up on the 'complete' thing. Meh.
Anyway, I get the alternator double checked on the connections, maybe clean them and reconnect, then I see where she's at. If she's still being silly about the charging, then I'm gonna take that alternator to Paddy O'Really's because *LYFETYME WARRANTEEE BABYYYY!* because I wasn't stupid when I bought it lo those many years ago. This will be the... um.. fourth? IDK. Just one of those things, I guess.
Until next time!
---
Picture of the offending thingy. It was trying to seal on the edge of the other connector, but it's supposed to slide in between them, not butt up against one. How it got messed up and too far down, I dunno. I'm thinking as I find things that this car has a history that AutoFox doesn't know about... y'know?
All I know is it was weird.
---
Bonus Pic, from Monday, because. Proof she was out! Dirty girl. But then, a 6 month stay in a garage will do that... and my grubby hands... I tried to not let that happen, but y'know... I'll fix it, don't worry!
BUT... I can't be more thankful that, despite the weird decisions Ford makes on things such as door subwoofers on Shaker systems in these cars, that there's one thing they did really fantastically on the Modular design: Make the alternator that dang easy to deal with. So I go out and do the things to get the alternator off the car. Snorkel off, throttle body off, belt off, alternator off, and that's that. Like 15 minutes and it's out. Love that design. So I do that and flip the alternator over to get to the wires and... yep the big cable's on there nice...disconnect that one because it impinges/keeps the other one (regulator connector) in place, and it's gotta come off anyway...
...oh. Well, that'd do it.
The regulator connector thing had not seated all the way and just slipped on off. Similar to the one in the above post. I guess I somehow missed that...?
So yeah. Idiot. Not exactly hard to make that connector happen y'know, and I'd done it lots of times (we all know why) so it's not like I didn't know how... but I didn't get it all the way in.
But still, it's a bit of a relief that this is probably what it is. So I set about that while I'm there, I retaped the wires because tape had failed, and also a bit sketchy on the big connector... 14 years y'know... and then cleaned the contacts for all that, just in case, then reapplied some dielectric grease on the regulator connector, and the big connector, got the alternator all wired back up proper, and reversed the uninstall. As you do.
I also cleaned the snorkel, that thing needed a bath.
And except the wiring loom, the engine compartment doesn't look too shabby for a 14 year old *driver*... I need to find those covers one day, though, because seriously... it's not all that pretty design wise, those covers will look sweet if I ever get them on... and painted black, of course. Taping that mustang on them is gonna be fun... no worries about the hood rub, I don't have that pad or hood, so there!
Oh, right. What happened.
Nothin'.
Which is how I wanted it to be. Ran like a top, no problem, did the 10+ mile normal check out ride I do. Half no A/C, half with, in some sort of traffic/stop lights with up to 50MPH drives and all in between. Purrin' along. No more weirdness.
I'm so happy.
So she's all done and pretty much ready to get back on the roads!
Well, except for the One True(ly broken) Bolt that I still have to get extracted and replaced. Then the alignment. Then a bath. I may spend quite the penny on someone to detail her stupid amounts.
THEN she'll be done... hopefully for a while.
That's it! This time anyway. Thanks for comin' along and puttin' up with me. Maybe I helped one of you guys/gals along the way. Probably in the "Heck no, I ain't doin that!" area of things, I imagine.
Wow, what an adventure @houtex !!!! I am glad to see you made it and the Awesome is back on the road again!! Definitely a nice "how to" for my own upcoming timing cover adventures and chain guide replacement. My friend tells me that it's possible to replace the plastic guides and the tensioner check valve assembly without the massive surgery that you did, but ONLY if it's done before it breaks. I'll be using you for inspiration for sure.
Yup. If I'd known, I'd have done this long ago and avoided the explody guide. Remember folks, if it's a-slappin', don't be a-nappin'. Swap those tensioners prontolike!
And remember viewers, if I can do it... you can do it. Thanks for watchin'! *slow guitar jam song ending with a little drum backing*
/Shout out to Eric O of SMA, go watch his stuff!
//Thanks for the 'grats!


 4/26/20, 08:53 PM

 I think I did it right. I was kinda careful about not movin' it... much...
 Whatever, I'm sending it, because I did my very best without a machine shop. I think it'll be ok.
 Seems to fit, I may leave it. I'll have to check the manual anyway, but still.


 How are we supposed to keep clean and disinfected when we can't even get freakin' supplies!?
 ), but that'd take too much time and I am on a different mission. Restomod isn't the thing here, get the thing running is. Also, red tape wouldn't look right. And while I have new loom, still, time. It's time to get done. Ok, back to the long storytime.)
 But anyway, I then put the Cam Position Sensors in, got those tight, and plugged up. I then went to put in the Crank Position Sensor (CKP as it's called, btw, as the CPS is the cams, so...), and... oh. That's not helpful.
 )
) Helped those bolts go in much better than they came out, lemme tell ya. Left the crank sensor disconnected to ensure she's not gonna start when the time comes to play with a starter.
 Well, it's just static, there's no actual station. Anyway. Let her settle. I actually sat inside. It's been so very very long...
 I did that a couple of times, just to see how it sounded, just a *little bit* of a crank. She can't start, fuel pump and crank sensor aren't connected, remember?
 I put in the 5 quart bottle's worth, then put the cap on. I checked the dipstick... yep, it's showing, so that's good!


 Yeah. That's about right.
  DUDE. Why didn't you film that, it's kind of important!! I was not happy... but I kept watching, hoping to see the trick putting it back.. Oh, there it is. The clips for the screws had to be transferred to their new radiator. And what was that? The locations where my studs are have the clips...


 Finally it seems to settle down to 'Check Charging System' and the battery light on.


 Well, that'd do it.

