All Base Trim Mustang Owners Look Here – Redline Goods Leather Ebrake Review /Install
#1
Bullitt Member

Thread Starter
Join Date: June 9, 2011
Posts: 222
Likes: 0
Received 0 Likes
on
0 Posts
All Base Trim Mustang Owners Look Here – Redline Goods Leather Ebrake Review /Install
Hi guys...before anything...Disclaimer: I do not work for Redline Goods...just a customer who is happy with their customer service and product.
Back in October of last year, I contacted Redline Goods and asked them if they could design/sale a leather ebrake cover for the 2010+ base trim owners. I hated how easily the rubber ebrake handle was susceptible to getting scratched and didn’t like the popular billet covers offered in our current market. No one was selling such a product online so I thought asking RedlineGoods was a good idea since they seem open to making/designing new products for anyone asking. They said they’d look into it, but I never really followed up.
Fast forward…I found myself on RedlineGoods.com the other day when lo and behold…there it was…a leather ebrake cover for sale on their website!!! I just want to say that RedlineGoods is an exceptional company because they listen and if at all possible…will make/design a product for the little guy.
On RedlineGood.com, they provide an installation guide to install the leather ebrake cover. Below, I took cues from their instructions and decided to offer another way of installing the leather cover since the rubber handle cannot be removed as it is molded to the entire ebrake unit.
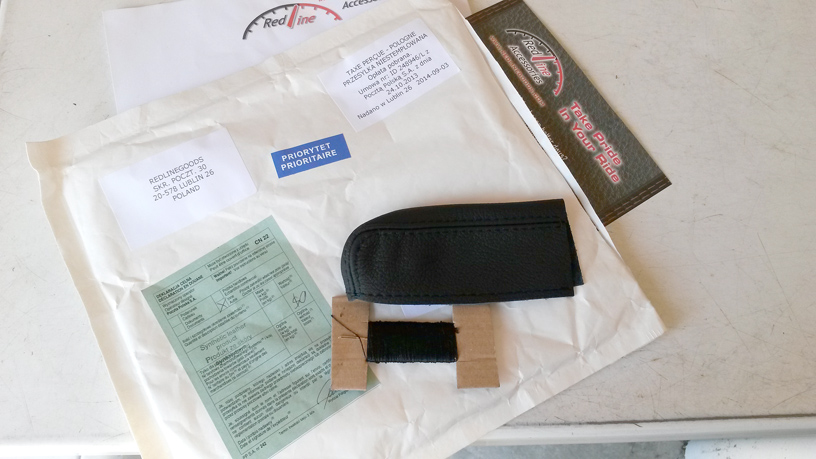
Note: Firstly, the communication was great…besides having a recent inquiry answered by Jack on another forum, Mike also followed up to make sure I was taken care of. A confirmation was emailed shortly after I made the online purchase and was notified about the description of the envelope that was being shipped.
Shipping was fast and upon inspection, the product was made with high quality leather and crafted exceptionally well. They also provided alot of thread, plus a needle.
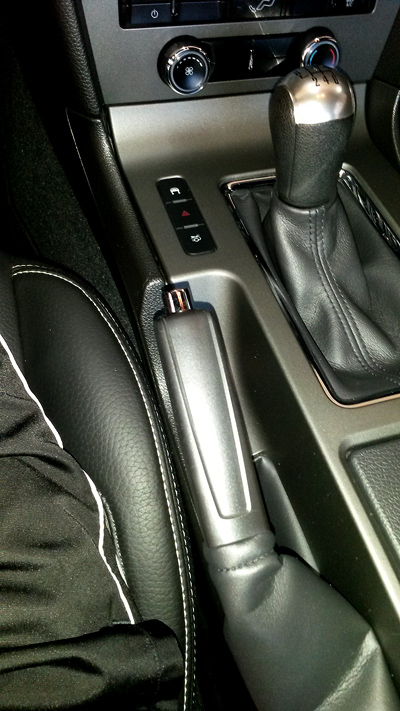
This is a before shot…rubber ebrake handle:
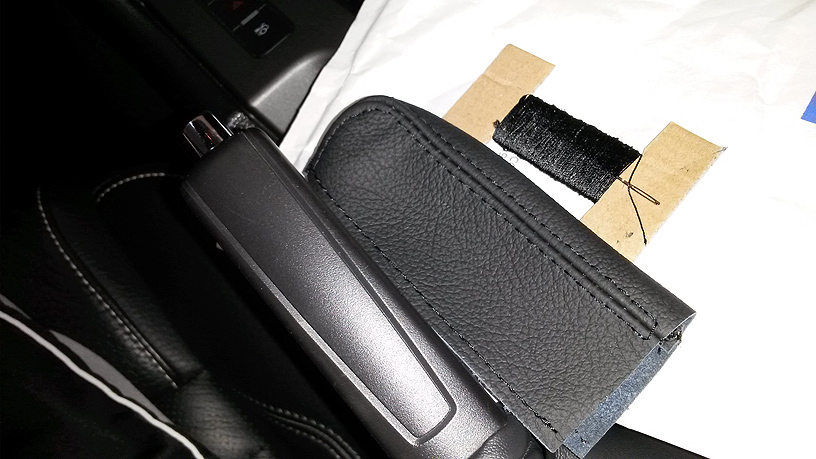
Another shot of the kit next to the rubber ebrake handle:
Note: My apologies…it was 94 degrees outside and a lot hotter in the garage…even with the garage door open and car windows rolled down…I was sweating like a pig so I wasn’t able to take pics of every play-by-play action…The installation took about 60-90 minutes because I kept on taking breaks and double/triple/quadruple checking everything I did.
Anyway, I test fitted the cover over the ebrake, and it was a perfect fit. The first challenge was figuring out how to measure and cut the hole for the ebrake release button. I used this puffy, .
I eyeballed and cut out a circle from the double sided tape (using scissors…Note: I actually used small scisscors found in a men’s grooming kit) and matched it to the size of the ebrake release button…kept on trimming it until it was about perfect. Then I centered and stuck the newly cut, circle shaped tape onto the flat, top surface of the ebrake’s metal release button and peeled off the backing to expose the other sticky side of the tape. Next, I slid the leather cover over the rubber handle until the tip of the cover made contact with the exposed sticky tape that is stuck onto the ebrake release button. Use some pressure to push the tip of the leather cover onto the taped, ebrake release button and carefully pull/peel off the leather cover (from the bottom to the top), making sure that the tape is still stuck onto the inside of the leather cover as the other side of the tape is released from the top of the ebrake’s release button. Carefully flip the leather cover inside out to see where the double sided tape has attached itself. Now you know where you’ll need to cut out the hole so the ebrake’s release button can slide through! Use a pen or thin marker to mark around the circumference of the circle shaped tape and peel off/discard the circle shaped tape.
Now in RedlineGood’s installation guide, they mention that using an Xacto knife works, but is difficult to control…They warn you because it’s TRUE!!! I tried using one to score/cut around the inside of the circumference I marked and almost messed up. If you cut holding the Xacto knife at too steep of an angle to the leather surface, it will cut past the area you intentionally want to cut. Make sure you cut a smaller circle inside of the original, traced marking so you don’t find yourself cutting outside of the circle. Once the smaller circle is cut out, discard the small leather cutout. Note: This would be a good time to test fit the position of the small circular cutout you just made to see how it will eventually fit over the ebrake’s release button. Next, I used the small scissors (mentioned earlier) to finish off /trim a perfect circle around the traced marking. Note: Again, use this time to test fit the leather cover over the ebrake handle. You may need to trim a little more to make sure the ebrake’s release button slides easily through the hole you just cut. Make sure you pull the bottom of the leather cover (by pulling on both ends) to make sure everything fits tight as that is how you want the cover to wrap around the ebrake handle.
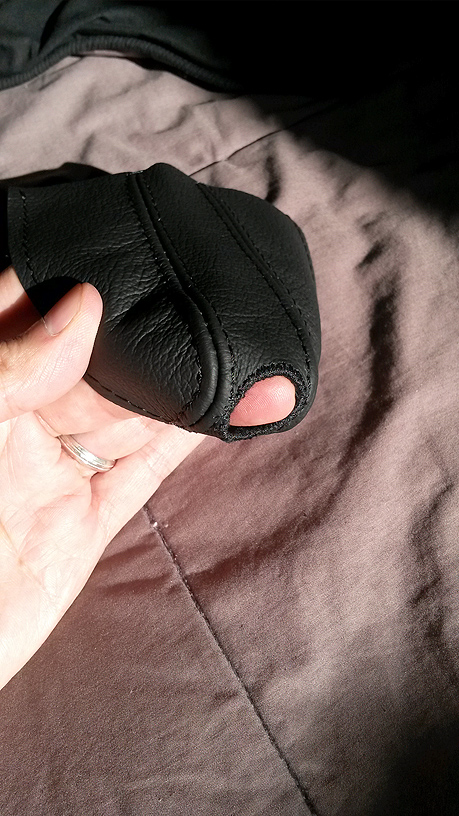
I didn’t have any leather glue to seal around the hole that was just cut out (Note: See Step 10 of RedlineGood’s installation guide), and wanted to take the look of the leather ebrake cover to the next level…so I used my own black thread and a smaller needle to sew around the hole until it looked like this:
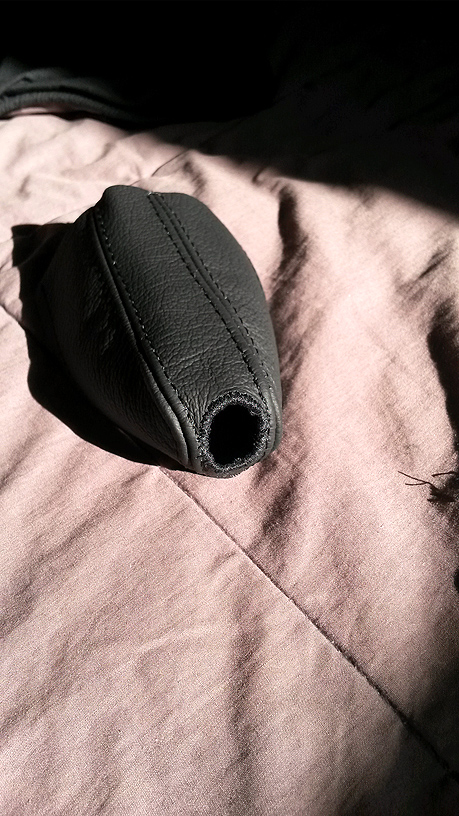
It took me a bit of time as I sewed around the hole 5 times by hand. Here’s another shot:
Because the ebrake’s rubber handle cannot be removed, the only way to install and stitch up the leather cover was by installing it inside the car with the ebrake pulled up. I found that the best and easiest way (for me) was to loosely lace up (Note: See Step 6 and 7 of RedlineGood’s installation guide) the leather ebrake cover and slide it over the rubber ebrake handle.
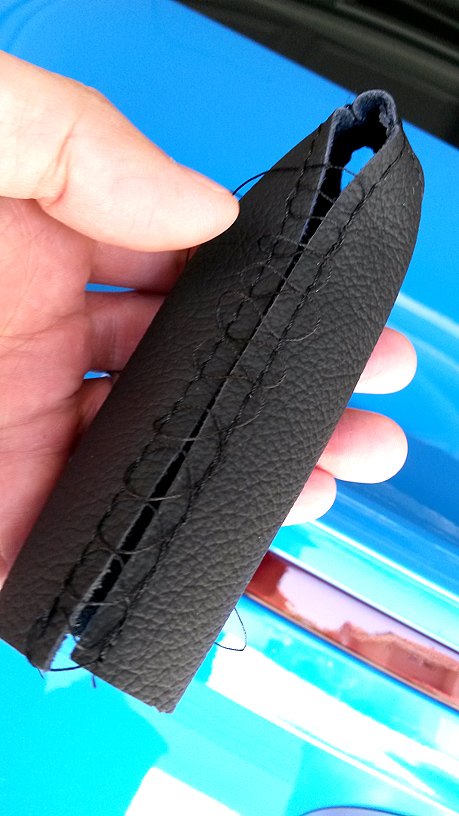
Pull and position/fit the leather ebrake cover over the rubber ebrake handle. (Note: At this point, you may pull the top of the ebrake boot off to allow the bottom of the leather ebrake cover to slide all the way down/over the rubber ebrake handle. The top of the boot is wrapped via an elastic band so don’t be afraid to pull it down/off…it will come off).
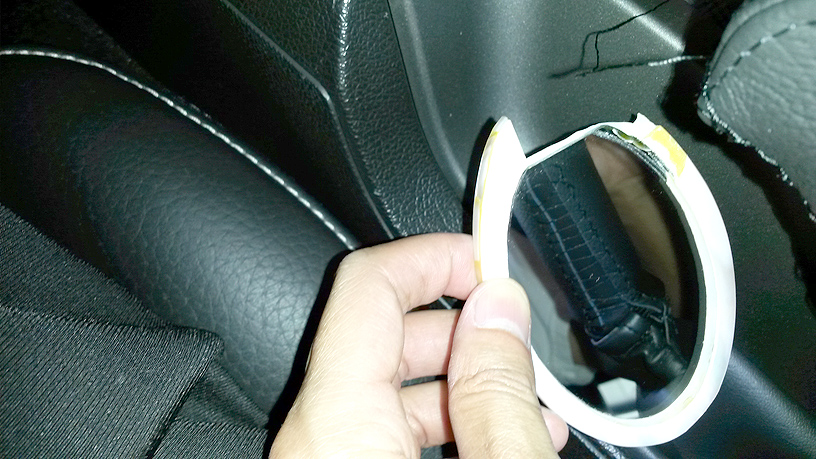
You will think that by looking at the pic below, it is gonna be a difficult job to lace up the leather ebrake cover, but it wasn’t that bad at all. I used a small mirror and a needle (as a tool) to carefully pull (from the bottom working my way to the top) each “loop” until everything was laced up tightly. (Note: Think of it as lacing up a shoe). Once you are able to pull on each loop, use your fingers to pull on it to tighten up the previous loops, and move on to the next.
Finally, once you stitch your way to the top of the leather ebrake handle, sew through and loop through a few of the stitches and make/tie a knot (Note: See Step 7 of RedlineGood’s installation guide)…make/tie a few knots on top of your knot and use the scissors to cut the rest of the thread.
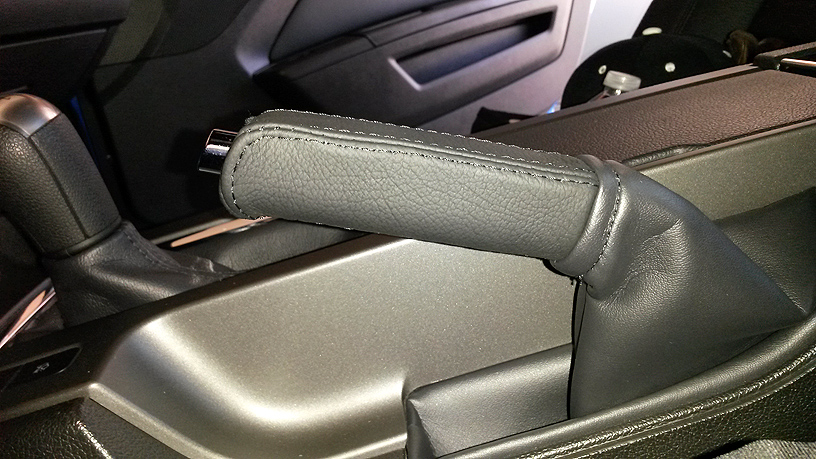
Here is the fruit of my (and possibly your) labor:
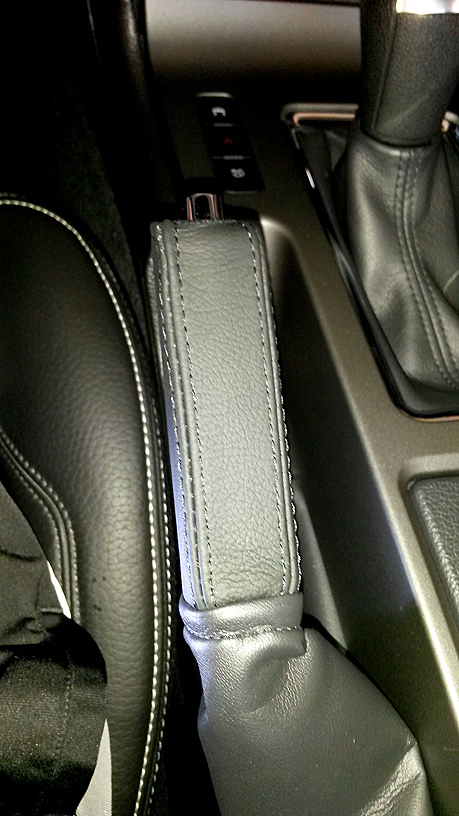
I think it looks freakin’ awesome!!! Make sure you pull the top of the ebrake boot over and around the bottom of the leather ebrake handle.Thanks for reading and Enjoy!!!
Back in October of last year, I contacted Redline Goods and asked them if they could design/sale a leather ebrake cover for the 2010+ base trim owners. I hated how easily the rubber ebrake handle was susceptible to getting scratched and didn’t like the popular billet covers offered in our current market. No one was selling such a product online so I thought asking RedlineGoods was a good idea since they seem open to making/designing new products for anyone asking. They said they’d look into it, but I never really followed up.
Fast forward…I found myself on RedlineGoods.com the other day when lo and behold…there it was…a leather ebrake cover for sale on their website!!! I just want to say that RedlineGoods is an exceptional company because they listen and if at all possible…will make/design a product for the little guy.
On RedlineGood.com, they provide an installation guide to install the leather ebrake cover. Below, I took cues from their instructions and decided to offer another way of installing the leather cover since the rubber handle cannot be removed as it is molded to the entire ebrake unit.
Note: Firstly, the communication was great…besides having a recent inquiry answered by Jack on another forum, Mike also followed up to make sure I was taken care of. A confirmation was emailed shortly after I made the online purchase and was notified about the description of the envelope that was being shipped.
Shipping was fast and upon inspection, the product was made with high quality leather and crafted exceptionally well. They also provided alot of thread, plus a needle.

This is a before shot…rubber ebrake handle:

Another shot of the kit next to the rubber ebrake handle:

Note: My apologies…it was 94 degrees outside and a lot hotter in the garage…even with the garage door open and car windows rolled down…I was sweating like a pig so I wasn’t able to take pics of every play-by-play action…The installation took about 60-90 minutes because I kept on taking breaks and double/triple/quadruple checking everything I did.
Anyway, I test fitted the cover over the ebrake, and it was a perfect fit. The first challenge was figuring out how to measure and cut the hole for the ebrake release button. I used this puffy, .
I eyeballed and cut out a circle from the double sided tape (using scissors…Note: I actually used small scisscors found in a men’s grooming kit) and matched it to the size of the ebrake release button…kept on trimming it until it was about perfect. Then I centered and stuck the newly cut, circle shaped tape onto the flat, top surface of the ebrake’s metal release button and peeled off the backing to expose the other sticky side of the tape. Next, I slid the leather cover over the rubber handle until the tip of the cover made contact with the exposed sticky tape that is stuck onto the ebrake release button. Use some pressure to push the tip of the leather cover onto the taped, ebrake release button and carefully pull/peel off the leather cover (from the bottom to the top), making sure that the tape is still stuck onto the inside of the leather cover as the other side of the tape is released from the top of the ebrake’s release button. Carefully flip the leather cover inside out to see where the double sided tape has attached itself. Now you know where you’ll need to cut out the hole so the ebrake’s release button can slide through! Use a pen or thin marker to mark around the circumference of the circle shaped tape and peel off/discard the circle shaped tape.
Now in RedlineGood’s installation guide, they mention that using an Xacto knife works, but is difficult to control…They warn you because it’s TRUE!!! I tried using one to score/cut around the inside of the circumference I marked and almost messed up. If you cut holding the Xacto knife at too steep of an angle to the leather surface, it will cut past the area you intentionally want to cut. Make sure you cut a smaller circle inside of the original, traced marking so you don’t find yourself cutting outside of the circle. Once the smaller circle is cut out, discard the small leather cutout. Note: This would be a good time to test fit the position of the small circular cutout you just made to see how it will eventually fit over the ebrake’s release button. Next, I used the small scissors (mentioned earlier) to finish off /trim a perfect circle around the traced marking. Note: Again, use this time to test fit the leather cover over the ebrake handle. You may need to trim a little more to make sure the ebrake’s release button slides easily through the hole you just cut. Make sure you pull the bottom of the leather cover (by pulling on both ends) to make sure everything fits tight as that is how you want the cover to wrap around the ebrake handle.
I didn’t have any leather glue to seal around the hole that was just cut out (Note: See Step 10 of RedlineGood’s installation guide), and wanted to take the look of the leather ebrake cover to the next level…so I used my own black thread and a smaller needle to sew around the hole until it looked like this:

It took me a bit of time as I sewed around the hole 5 times by hand. Here’s another shot:

Because the ebrake’s rubber handle cannot be removed, the only way to install and stitch up the leather cover was by installing it inside the car with the ebrake pulled up. I found that the best and easiest way (for me) was to loosely lace up (Note: See Step 6 and 7 of RedlineGood’s installation guide) the leather ebrake cover and slide it over the rubber ebrake handle.

Pull and position/fit the leather ebrake cover over the rubber ebrake handle. (Note: At this point, you may pull the top of the ebrake boot off to allow the bottom of the leather ebrake cover to slide all the way down/over the rubber ebrake handle. The top of the boot is wrapped via an elastic band so don’t be afraid to pull it down/off…it will come off).
You will think that by looking at the pic below, it is gonna be a difficult job to lace up the leather ebrake cover, but it wasn’t that bad at all. I used a small mirror and a needle (as a tool) to carefully pull (from the bottom working my way to the top) each “loop” until everything was laced up tightly. (Note: Think of it as lacing up a shoe). Once you are able to pull on each loop, use your fingers to pull on it to tighten up the previous loops, and move on to the next.

Finally, once you stitch your way to the top of the leather ebrake handle, sew through and loop through a few of the stitches and make/tie a knot (Note: See Step 7 of RedlineGood’s installation guide)…make/tie a few knots on top of your knot and use the scissors to cut the rest of the thread.
Here is the fruit of my (and possibly your) labor:

I think it looks freakin’ awesome!!! Make sure you pull the top of the ebrake boot over and around the bottom of the leather ebrake handle.Thanks for reading and Enjoy!!!

Last edited by magnido45; 9/17/14 at 08:42 AM. Reason: mistype
#3
Mach 1 Member


Join Date: July 27, 2010
Location: Jacksonville, FL
Posts: 670
Likes: 0
Received 10 Likes
on
9 Posts
My experience with Redline was completely different. The armrest cover they sent was medium gray rather than charcoal so it didn't match anything else in the car. The piece seems unfinished and came from Poland. I have had no response to my repeated emails so I guess I'll just have to write it off to experience.
I have chosen to order a replacement cover from amustangrocksleather.com which is an American company and appears to take great pride in ensuring pieces will match. I expect it within the next week or so and I will update at that time.
I have chosen to order a replacement cover from amustangrocksleather.com which is an American company and appears to take great pride in ensuring pieces will match. I expect it within the next week or so and I will update at that time.
#4
Bullitt Member

Thread Starter
Join Date: June 9, 2011
Posts: 222
Likes: 0
Received 0 Likes
on
0 Posts
My experience with Redline was completely different. The armrest cover they sent was medium gray rather than charcoal so it didn't match anything else in the car. The piece seems unfinished and came from Poland. I have had no response to my repeated emails so I guess I'll just have to write it off to experience.
I have chosen to order a replacement cover from amustangrocksleather.com which is an American company and appears to take great pride in ensuring pieces will match. I expect it within the next week or so and I will update at that time.
I have chosen to order a replacement cover from amustangrocksleather.com which is an American company and appears to take great pride in ensuring pieces will match. I expect it within the next week or so and I will update at that time.
Last edited by magnido45; 9/17/14 at 02:51 PM. Reason: mistype
#5
GT Member

That looks great.....now it's time to do the shift/e-brake boot to match!! 
I have the redline boots and the amustangrocks arm rest cover. The quality is top notch on both products IMO
amustangrocks customer service was above and beyond as well.

I have the redline boots and the amustangrocks arm rest cover. The quality is top notch on both products IMO
amustangrocks customer service was above and beyond as well.
#6
Bullitt Member

Thread Starter
Join Date: June 9, 2011
Posts: 222
Likes: 0
Received 0 Likes
on
0 Posts

Thread
Thread Starter
Forum
Replies
Last Post
ssjbuu
Repair and Service Help
6
8/28/15 08:55 AM
Michael Follett
2005-2009 Mustang
4
7/24/15 06:58 AM


