
Ford Racing Gauge Pod Installed
 9/27/14, 07:39 PM
#1
Mach 1 Member
Thread Starter
Join Date: April 17, 2013
Location: Hickory Creek, TX
Posts: 678
Likes: 0
Received 5 Likes
on
5 Posts
Ford Racing Gauge Pod Installed
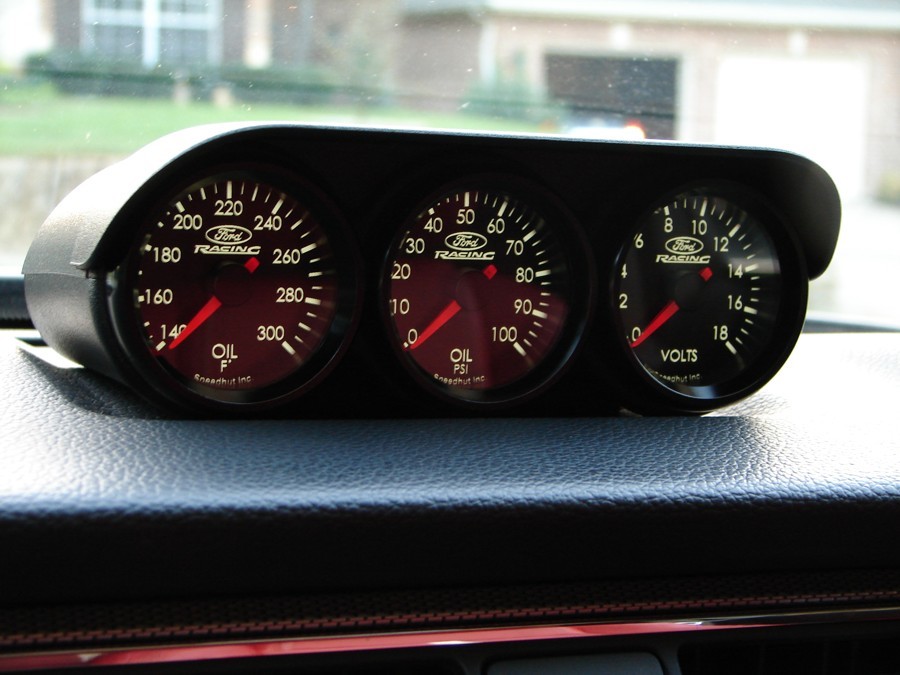
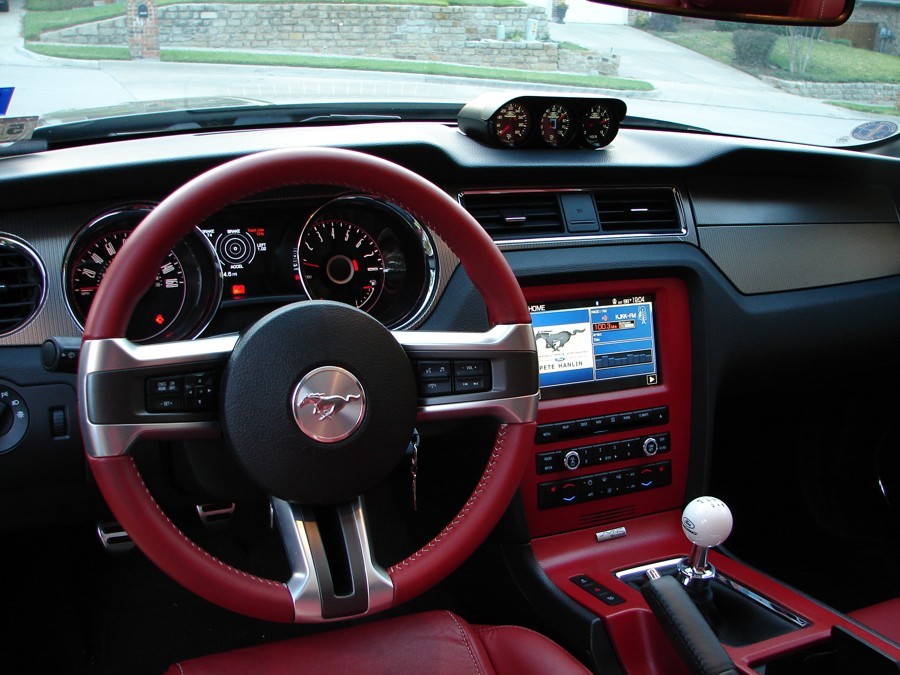
Managed to get the LS gauge pod installed on the dash- got everything mounted and illuminated last night, and connected the senders this morning. Not that bad of a project- most of the time was spent undoing steps I didn't need to do!
With the SpeedHut gauges, Ford Racing pod housing, and ProSport adapter, the total came to $370- and I'm 97% happy with the results... so not too bad.
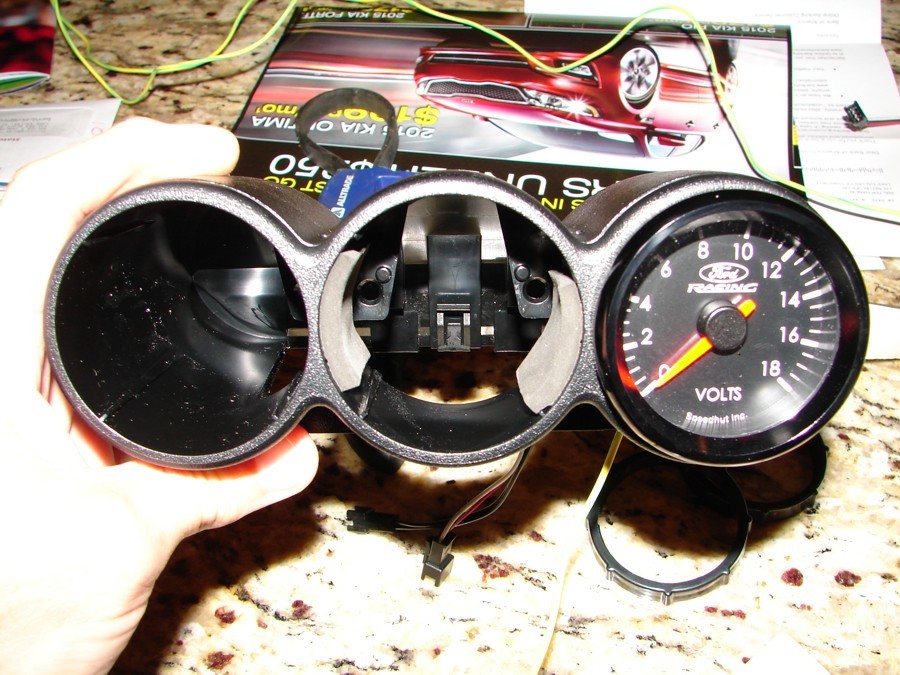
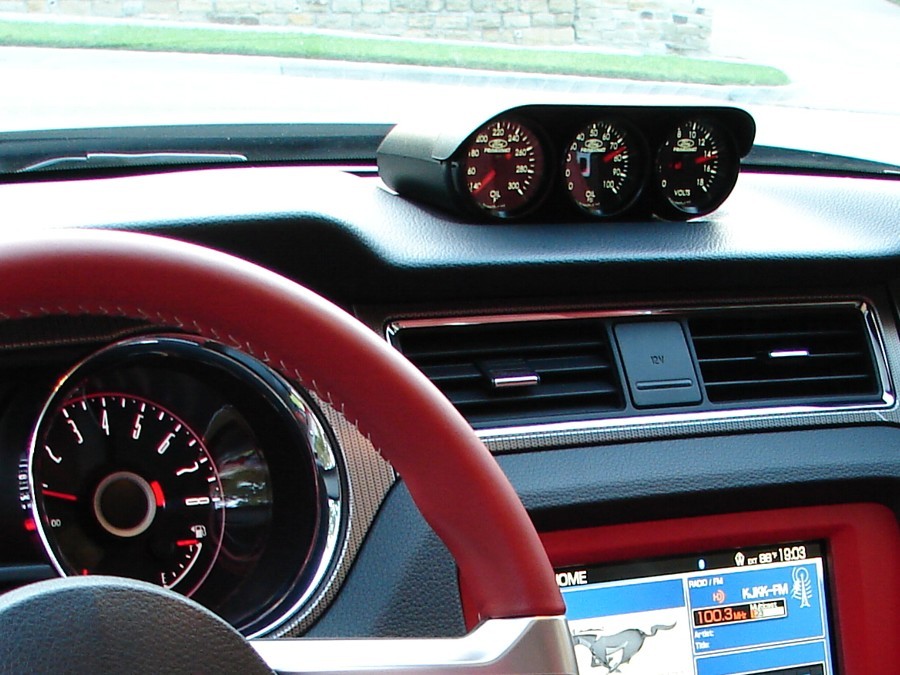
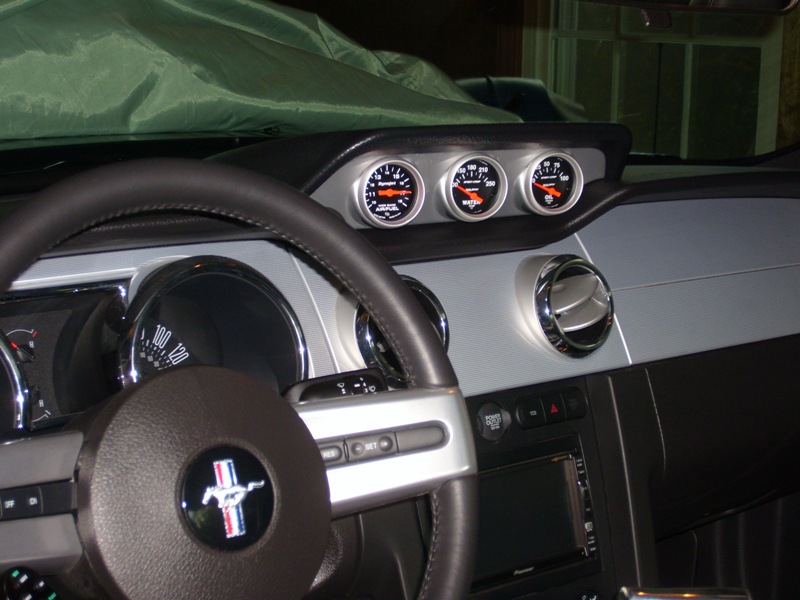
Mounting the SpeedHut gauges (which are designed to screw into rings) into the Ford Racing housing (which is designed for post mount gauges) was actually pretty easy. I used two 1" sections of weatherstripping (rubber foam with sticky backing) for each gauge, and screwed them in. They are definitely snug- so snug you'll want to remove the "lid" on the housing while twisting them in (see pic). The wiring on the SpeedHut gauges is super convenient using the supplied daisy chained connectors.

If you are not installing the $1400 complete-with-gauges Ford Racing pod, there are very few things you need to remove on your dash for install. Do NOT try to remove the vents right below the mounting location! I tried, and spent an hour just trying to get the partially removed piece back in place. You also do NOT need to remove your gauge cluster- I did, and put a small scratch on the steering wheel housing (which took awhile to buff out). ALL you have to remove is the center console, the plate covering the radio, and the radio itself. Drilling the dash wasn't too difficult using a 90 degree attachment and a step bit. You DO need to pilot drill all four screws- the plastic under the dash foam is thin but very tough. You can route the sender wires through the (hopefully removed) sound tube location.
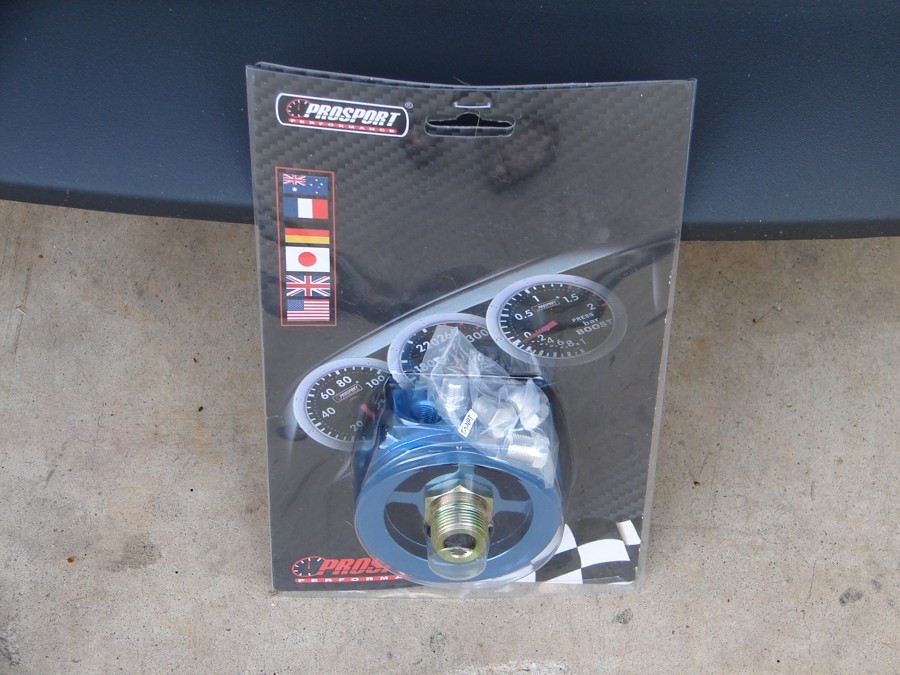
To mount the senders, I purchased an oil adapter ring from ProSport (around $45). It has four locations to mount senders- nifty piece!
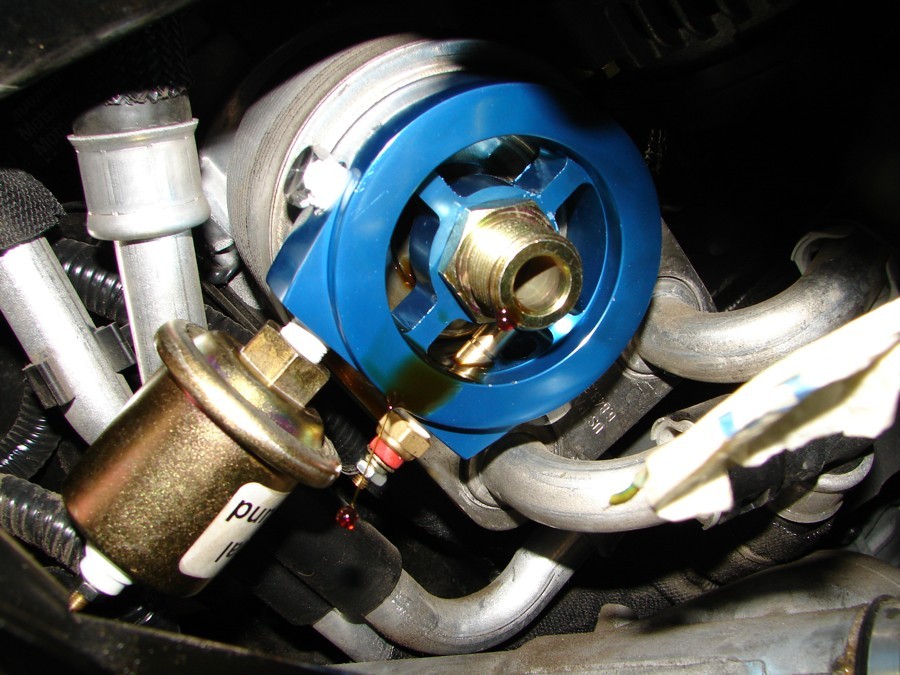
I mounted the voltage sender wire to the alternator (so all three senders connect within 6" or so of each other- keeps things clean). All the gauges fired right up, but the oil pressure gauge shot right up to 95-100psi (100 is the max on the gauge). Once warmed up, at idle the pressure reads 45psi- but the second the motor exerts any effort it shoots right back up to 95psi. I reopened the oil filter panel to ensure I had grounded the sender properly, and scratched my head for quite a while. Then I did some reading and realized the '14 Coyote 5.0L actually is SUPPOSED to have 95psi pressure when cold... WTH!?! I wish I had a gauge that went up to 140psi or so so the gauge doesn't look like its pegged most of the time- but watching it bounce from 45-90psi is entertaining, I suppose.
All-in-all, I'm happy with the gauges I chose and the way everything went together. I grabbed illumination power from the switches in the console (trunk release, traction control, hazards). As a result, they illuminate and dim only when the lights are on- they do not illuminate bright like the dash gauges do during the daytime (which doesn't seem to be necessary), but they DO illuminate when the door is opened when you leave or enter (which is kinda cool). For ignition power, I tied into the seatbelt restraint circuit.
The gauges are easy to read when driving. The location/style of the pod isn't exactly they way I would have designed it if I had completely free reign- but it is the factory location and looks pretty good (although the wife says they should have gone on the pillar ).
).
With the SpeedHut gauges, Ford Racing pod housing, and ProSport adapter, the total came to $370- and I'm 97% happy with the results... so not too bad.
Mounting the SpeedHut gauges (which are designed to screw into rings) into the Ford Racing housing (which is designed for post mount gauges) was actually pretty easy. I used two 1" sections of weatherstripping (rubber foam with sticky backing) for each gauge, and screwed them in. They are definitely snug- so snug you'll want to remove the "lid" on the housing while twisting them in (see pic). The wiring on the SpeedHut gauges is super convenient using the supplied daisy chained connectors.
If you are not installing the $1400 complete-with-gauges Ford Racing pod, there are very few things you need to remove on your dash for install. Do NOT try to remove the vents right below the mounting location! I tried, and spent an hour just trying to get the partially removed piece back in place. You also do NOT need to remove your gauge cluster- I did, and put a small scratch on the steering wheel housing (which took awhile to buff out). ALL you have to remove is the center console, the plate covering the radio, and the radio itself. Drilling the dash wasn't too difficult using a 90 degree attachment and a step bit. You DO need to pilot drill all four screws- the plastic under the dash foam is thin but very tough. You can route the sender wires through the (hopefully removed) sound tube location.
To mount the senders, I purchased an oil adapter ring from ProSport (around $45). It has four locations to mount senders- nifty piece!
I mounted the voltage sender wire to the alternator (so all three senders connect within 6" or so of each other- keeps things clean). All the gauges fired right up, but the oil pressure gauge shot right up to 95-100psi (100 is the max on the gauge). Once warmed up, at idle the pressure reads 45psi- but the second the motor exerts any effort it shoots right back up to 95psi. I reopened the oil filter panel to ensure I had grounded the sender properly, and scratched my head for quite a while. Then I did some reading and realized the '14 Coyote 5.0L actually is SUPPOSED to have 95psi pressure when cold... WTH!?! I wish I had a gauge that went up to 140psi or so so the gauge doesn't look like its pegged most of the time- but watching it bounce from 45-90psi is entertaining, I suppose.
All-in-all, I'm happy with the gauges I chose and the way everything went together. I grabbed illumination power from the switches in the console (trunk release, traction control, hazards). As a result, they illuminate and dim only when the lights are on- they do not illuminate bright like the dash gauges do during the daytime (which doesn't seem to be necessary), but they DO illuminate when the door is opened when you leave or enter (which is kinda cool). For ignition power, I tied into the seatbelt restraint circuit.
The gauges are easy to read when driving. The location/style of the pod isn't exactly they way I would have designed it if I had completely free reign- but it is the factory location and looks pretty good (although the wife says they should have gone on the pillar
).
 9/27/14, 09:54 PM
#3
Bullitt Member
Join Date: October 22, 2012
Location: West Bend, Wisconsin
Posts: 343
Likes: 0
Received 4 Likes
on
3 Posts
I agree with your wife and think a pillar would have been better. I also have speedhut gauges, but mine are going into an autometer pillar. So thank you for posting the photo with the weather stripping.
9/29/14, 01:19 PM
#4
Mach 1 Member
Thread Starter
Join Date: April 17, 2013
Location: Hickory Creek, TX
Posts: 678
Likes: 0
Received 5 Likes
on
5 Posts
Okay- just a quick addendum. The Ford Racing installation directions (to install the pod with the ridiculously expensive Ford Racing gauges) tell you to draw illumination from the yellow/red wire @ position #1 on the back of the dashboard gauge harness.
When I installed on Friday night, I used my voltmeter to confirm voltage from the yellow/red wire, but didn't end up using it because the gauge did not read any power when the lights were turned on. I now realize the dash gauge illumination does not turn on with the lights- but only when the car is running.
I think I'm going to go back into the dash to tie into the yellow/red wire- because during the daytime the gauges do not illuminate (even with the lights on) because the buttons from which I drew power do not illuminate unless the sensor on the dash senses it is dark out.
Just thought I'd add the note. I have gotten used to the oil pressure gauge topping out at 95psi. Once the engine warms up, the pressure falls off when you're not on the gas... in fact, I've never seen an oil pressure needle bounce around so much. Does the Coyote have an electronic oil pump- or is it tied into the the crank? Seems it must be electronically controlled because the oil pressure changes dramatically under conditions that wouldn't be triggered from a mechanical only pump.
9/29/14, 03:42 PM
#6
GT Member

Join Date: March 14, 2014
Posts: 167
Likes: 0
Received 0 Likes
on
0 Posts
Just thought I'd add the note. I have gotten used to the oil pressure gauge topping out at 95psi. Once the engine warms up, the pressure falls off when you're not on the gas... in fact, I've never seen an oil pressure needle bounce around so much. Does the Coyote have an electronic oil pump- or is it tied into the the crank? Seems it must be electronically controlled because the oil pressure changes dramatically under conditions that wouldn't be triggered from a mechanical only pump.
Thanks for the writeup. I'd like to add the cluster to mine eventually, so it's nice seeing the work others have done.
10/1/14, 12:21 AM
#7
Shelby GT500 Member
I have been thinking about doing this also just to make sure because we all know just how accurate the dash guages are at telling you actual information. On a side note...I really like your stereo config and controls. Which set-up is that?
10/1/14, 04:15 AM
#8
Cobra Member

But I would have much preferred a center-dash pod like the 2005-09 can use:
I'm not a fan of the Boss LS pod at all.
10/1/14, 03:10 PM
#9
Mach 1 Member
Thread Starter
Join Date: April 17, 2013
Location: Hickory Creek, TX
Posts: 678
Likes: 0
Received 5 Likes
on
5 Posts
jsimmons- I got the idea to do the custom SpeedHut gauges from the write-up you did on your install... thanks! I didn't like the LS gauge pod at first, but its quickly grown on me. I have the needles illuminated with ignition power- so the gauges are easy to read in the daytime, and at night the white lettering matches the setting I have for the rest of my gauges- so they tie in really well.
Stevedotmil- Not sure if you meant my radio... its just the regular nav screen. If you hit the arrow in the bottom left you can split the screen. I have mine set with the radio and climate controls shown on the right and a custom image I made set up and loaded on the left. Here's the custom image I made when I ordered the car...

Here's the screen on the radio (with the equalizer graphic shown where I normally have the climate displayed):
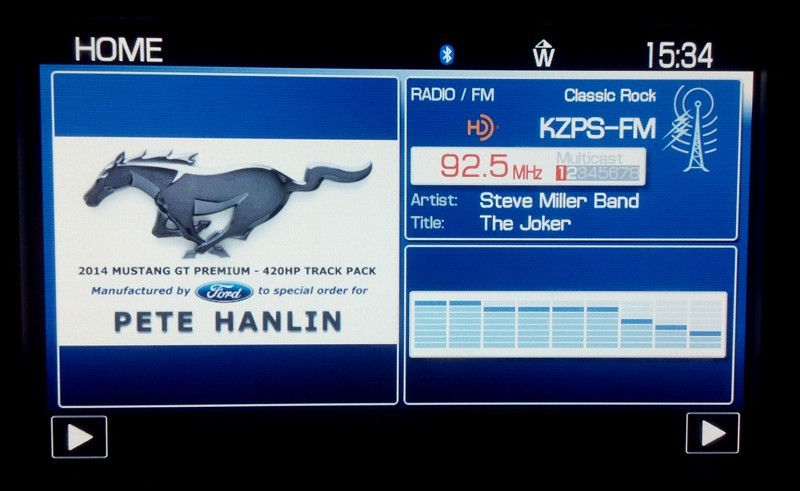
Stevedotmil- Not sure if you meant my radio... its just the regular nav screen. If you hit the arrow in the bottom left you can split the screen. I have mine set with the radio and climate controls shown on the right and a custom image I made set up and loaded on the left. Here's the custom image I made when I ordered the car...
Here's the screen on the radio (with the equalizer graphic shown where I normally have the climate displayed):
10/1/14, 03:49 PM
#11
jsimmons- I got the idea to do the custom SpeedHut gauges from the write-up you did on your install... thanks! I didn't like the LS gauge pod at first, but its quickly grown on me. I have the needles illuminated with ignition power- so the gauges are easy to read in the daytime, and at night the white lettering matches the setting I have for the rest of my gauges- so they tie in really well.
Stevedotmil- Not sure if you meant my radio... its just the regular nav screen. If you hit the arrow in the bottom left you can split the screen. I have mine set with the radio and climate controls shown on the right and a custom image I made set up and loaded on the left. Here's the custom image I made when I ordered the car...
Here's the screen on the radio (with the equalizer graphic shown where I normally have the climate displayed):
Do you have a write up on the screen?
10/1/14, 04:14 PM
#12
Mach 1 Member
Thread Starter
Join Date: April 17, 2013
Location: Hickory Creek, TX
Posts: 678
Likes: 0
Received 5 Likes
on
5 Posts
Looks Fantastic. Do you have a write up on the screen?
Thanks! Its just an 850x522 pixel .jpg file created on CorelPhotoPaint. Just create any image you like in that size and load it into the radio (IIRC, you have to put it on a CDRom to load it- can't use a USB... but my memory could be faulty on that one).
I just searched for the running pony and Ford logos on Google, then added some verbiage. I believe I still have the file in its raw PhotoPaint format- which I can send to anyone interested (if you have Corel, all you would have to do is substitute any words you wanted and save the file as a jpeg).


Thread
Thread Starter
Forum
Replies
Last Post